
Sixfab × Ultralytics Acceleration Path
Export Ultralytics YOLO models to DEEPX format for the DEEPX DX-M1 NPU, covering native export, Ultralytics Platform, and local DX-COM. Then deploy the .dxnn on Sixfab AI HAT+, Edge AI Expansion Board, or ALPON X5 AI.
Sixfab × Ultralytics Acceleration Path
Ultralytics exports directly to DEEPX format with
model.export(format="deepx"), with no manual ONNX export or standalone
DX-COM install required. This guide takes a trained YOLO model to a running
.dxnn file on a DEEPX DX-M1 NPU, covering the native export, two
alternative export paths, and the parts of the process the
official Ultralytics DEEPX doc
doesn't spell out: the export arguments that don't exist for this format, what the
output tensor actually looks like, and how to confirm a DX-M1 module is genuinely
healthy rather than just installed.
Three paths take an Ultralytics YOLO model to a DEEPX .dxnn binary for the
DEEPX DX-M1 NPU: the native format="deepx" export, training and exporting on
Ultralytics Platform in the cloud, and a local DX-COM run for full control. For most people
training with Ultralytics locally, the native export is the right starting point.
Which path should you use?
All three paths produce the same .dxnn binary for the DEEPX DX-M1 NPU. They
differ in where compilation runs, what you have to set up, and how much control you get over
quantization.
Native format="deepx" export |
Ultralytics Platform | Local DX-COM | |
|---|---|---|---|
| Where compilation happens | Your machine, inside the ultralytics package |
Ultralytics' cloud infrastructure | Your machine |
| Setup | pip install ultralytics — dx_com installs itself on first export |
Ultralytics Platform account, no local compiler needed | Separate DX-COM install, manual ONNX export |
| Host requirement | x86-64 Linux (export step only) | Any OS with bash/curl |
x86-64 Linux, glibc ≥ 2.31, Python 3.12 |
| Calibration dataset | Auto-selected (coco8.yaml by default, or your own data= argument) |
Handled automatically | You provide it |
| config.json | Generated for you | Generated for you | You write it |
| Control over quantization | Standard INT8 + calibration dataset choice | Limited — accepts platform defaults | Full — calibration count, PPU, DXQ, custom preprocessing |
| Training included | No — bring your own .pt |
Yes — annotate, train on cloud GPUs, export in one place | No |
| Best for | Most YOLO users — the default choice | Teams that want dataset, training, and export in one workflow, or anyone without an x86-64 Linux box | Custom architectures, PPU offload, accuracy tuning beyond the standard pipeline |
For most people training with Ultralytics locally, the native export below is the right starting point. If your dataset and training runs already live in the cloud, skip to Path B (Ultralytics Platform).
Supported tasks and model families
DEEPX export supports all seven Ultralytics tasks. Semantic segmentation and depth estimation are available only with YOLO26, the only family that ships those heads.
| Task | YOLOv8 | YOLO11 | YOLO26 |
|---|---|---|---|
| Detect | ✅ | ✅ | ✅ |
| Segment | ✅ | ✅ | ✅ |
| Semantic | ❌ | ❌ | ✅ |
| Depth | ❌ | ❌ | ✅ |
| Classify | ✅ | ✅ | ✅ |
| Pose | ✅ | ✅ | ✅ |
| OBB | ✅ | ✅ | ✅ |
Source: the Ultralytics DEEPX integration doc. This is the officially published support matrix, not a claim we've independently verified across every cell. The row we've actually run and benchmarked ourselves is YOLO26n detect/seg/pose/OBB/classify on Raspberry Pi 5 + DX-M1, in the benchmark table below. YOLOv8, YOLO11, and the YOLO26 semantic/depth heads follow Ultralytics' published claim but haven't been run through our own pipeline yet.
Any model trained with Ultralytics Train Mode and exported with format="deepx"
can be deployed on DEEPX NPU hardware, provided it uses supported layer operations.
Path A: Native export with ultralytics (recommended)
Prerequisites
- x86-64 Linux for this export step. ARM64 — including Raspberry Pi 5 — is not supported for compiling, only for running the resulting
.dxnnfile. - Python environment with
pip install ultralytics.
The dx_com compiler package installs itself automatically from the DEEPX SDK on
your first DEEPX export — no separate install step.
Export
from ultralytics import YOLO

# Load a YOLO model — YOLO26, YOLO11, and YOLOv8 families are all supported

model = YOLO("yolo26n.pt")

# Export to DEEPX format (INT8 quantization is enforced automatically)

model.export(format="deepx")  # creates 'yolo26n_deepx_model/'
Export arguments
DEEPX's supported export arguments are imgsz, quantize,
data, device, and optimize.
| Argument | Default | Notes |
|---|---|---|
imgsz |
640 |
Must be square — pass an integer or a matching height/width tuple |
quantize |
8 (auto) |
INT8 is required for DEEPX and enforced regardless of what you pass |
data |
coco8.yaml |
Calibration dataset for INT8 quantization — point this at images from your deployment domain for better accuracy |
device |
None |
0 for GPU, cpu for CPU |
optimize |
False |
Higher compiler optimization; lowers inference latency, raises compile time |
A few arguments that exist on other export formats (ONNX, TensorRT) are not available for DEEPX, and it's worth knowing this up front rather than hunting for them:
batch— not supported. DEEPX export is fixed at batch size 1. Run single-image inference per NPU core rather than batched inference.dynamic— not supported.imgszmust be a fixed square integer at export time. If you need multiple input resolutions, export a separate.dxnnper resolution.fraction— not supported. Other INT8 formats usefractionto subsample a large calibration dataset; DEEPX doesn't need it because it uses every image in whateverdata=dataset you point it at, via EMA calibration. To calibrate on a small, curated set, pointdata=at a small YAML directly instead of subsampling a large one:
# calib.yaml — a small, representative calibration set
# path: /data/calib
# train: images/
# val: images/
# names: {0: person, 1: ...}

model.export(format="deepx", data="calib.yaml")
A few hundred images from your deployment domain is typically enough for good quantization
accuracy. Compile time scales with calibration set size, so pointing data= at
your entire training set instead of a curated subset mainly adds compile time.
Output
yolo26n_deepx_model/
├── yolo26n.dxnn     # compiled NPU binary
├── config.json      # calibration and preprocessing settings
└── metadata.yaml    # class names, image size, task type
Run inference or validate directly from Python
from ultralytics import YOLO

model = YOLO("yolo26n_deepx_model")
results = model("https://ultralytics.com/images/bus.jpg")   # predict
metrics = model.val(data="coco8.yaml")                       # validate
This works once the DEEPX runtime (driver + libdxrt + dx_engine) is
installed on the target device — see
Deploying the compiled model below.
Accuracy and speed on Raspberry Pi 5 + DX-M1
Published Ultralytics benchmark, YOLO26n across all five tasks, Raspberry Pi 5 + DX-M1 M.2 module:
| Model | Format | mAP50-95 | Inference (ms/image) |
|---|---|---|---|
| YOLO26n | PyTorch | 0.476 | 315.2 |
| YOLO26n | DEEPX (INT8) | 0.466 | 34.6 |
| YOLO26n-seg | PyTorch | 0.408 | 485.4 |
| YOLO26n-seg | DEEPX (INT8) | 0.392 | 53.8 |
| YOLO26n-pose | PyTorch | 0.423 | 506.3 |
| YOLO26n-pose | DEEPX (INT8) | 0.459 | 37.6 |
| YOLO26n-obb | PyTorch | 0.817 | 1094.4 |
| YOLO26n-obb | DEEPX (INT8) | 0.783 | 56.4 |
| YOLO26n-cls (top-1) | PyTorch | 0.431 | 23.8 |
| YOLO26n-cls (top-1) | DEEPX (INT8) | 0.333 | 2.7 |
Inference time excludes pre/post-processing. If your compiled model's accuracy comes in
noticeably below the PyTorch baseline, point data= at calibration images from
your actual deployment domain rather than a generic dataset — this is the main lever
available in the native and Platform export paths.
Output shape and NMS
The output format depends on the model family you exported.
YOLOv8 / YOLO11: raw head output, shape (batch, 4+nc, 8400),
boxes in xywh (center x, center y, width, height). Run NMS and convert
xywh → xyxy yourself.
YOLO26: end-to-end (NMS-free) detection head by default. Output shape is
(batch, max_detections, 6) — commonly (batch, 300, 6) at the
default max_det=300 — with each row
[x1, y1, x2, y2, confidence, class_id]. This is already xyxy and
already NMS'd; running NMS again on it will drop valid detections, since confidence and
class_id are packed into columns 4 and 5 rather than one-hot class scores.
Always check output.shape[-1] before writing decode logic — 6 means
end-to-end xyxy, 4+nc means raw xywh that still needs NMS.
import numpy as np

def decode_deepx_output(output, conf_thres=0.25):
    """output: raw array from dx_engine inference."""
    output = np.asarray(output)

    if output.shape[-1] == 6:
        # end-to-end head: (batch, max_det, 6) = [x1, y1, x2, y2, conf, cls]
        dets = output[0]
        dets = dets[dets[:, 4] >= conf_thres]
        return dets[:, :4], dets[:, 4], dets[:, 5].astype(int)  # xyxy, conf, cls

    # raw one-to-many head: (batch, 4+nc, 8400), xywh, class scores not confidence
    preds = output[0].T  # (8400, 4+nc)
    boxes_xywh, scores = preds[:, :4], preds[:, 4:]
    cls = scores.argmax(1)
    conf = scores.max(1)
    keep = conf >= conf_thres
    boxes_xywh, conf, cls = boxes_xywh[keep], conf[keep], cls[keep]

    xy, wh = boxes_xywh[:, :2], boxes_xywh[:, 2:]
    boxes_xyxy = np.concatenate([xy - wh / 2, xy + wh / 2], axis=1)

    # standard NMS required here — cv2.dnn.NMSBoxes or torchvision.ops.nms
    return boxes_xyxy, conf, cls
Path B: Train and export on Ultralytics Platform
Ultralytics Platform
covers the whole chain in the browser: upload a dataset, train on cloud GPUs, test the
trained weights, and export straight to DEEPX, without a local compiler or an x86-64 Linux
machine. The walkthrough below follows one full run, from an empty account to a
.dxnn file on disk.
Prerequisites
- An Ultralytics Platform account
- Account balance for cloud training (GPU time is billed per hour; the estimate is shown before you start)
- Your Ultralytics API key (Settings → API Keys) for the download script at the end
bashandcurl(any Linux, macOS, or WSL shell; no DX-COM environment requirements on this path)
Create a dataset
From Home → Datasets → New Dataset, either drop images in from your machine or point Platform at a URL. The URL path is faster for public datasets: paste the archive link, name the dataset, pick the task type, and Platform pulls it in for you.
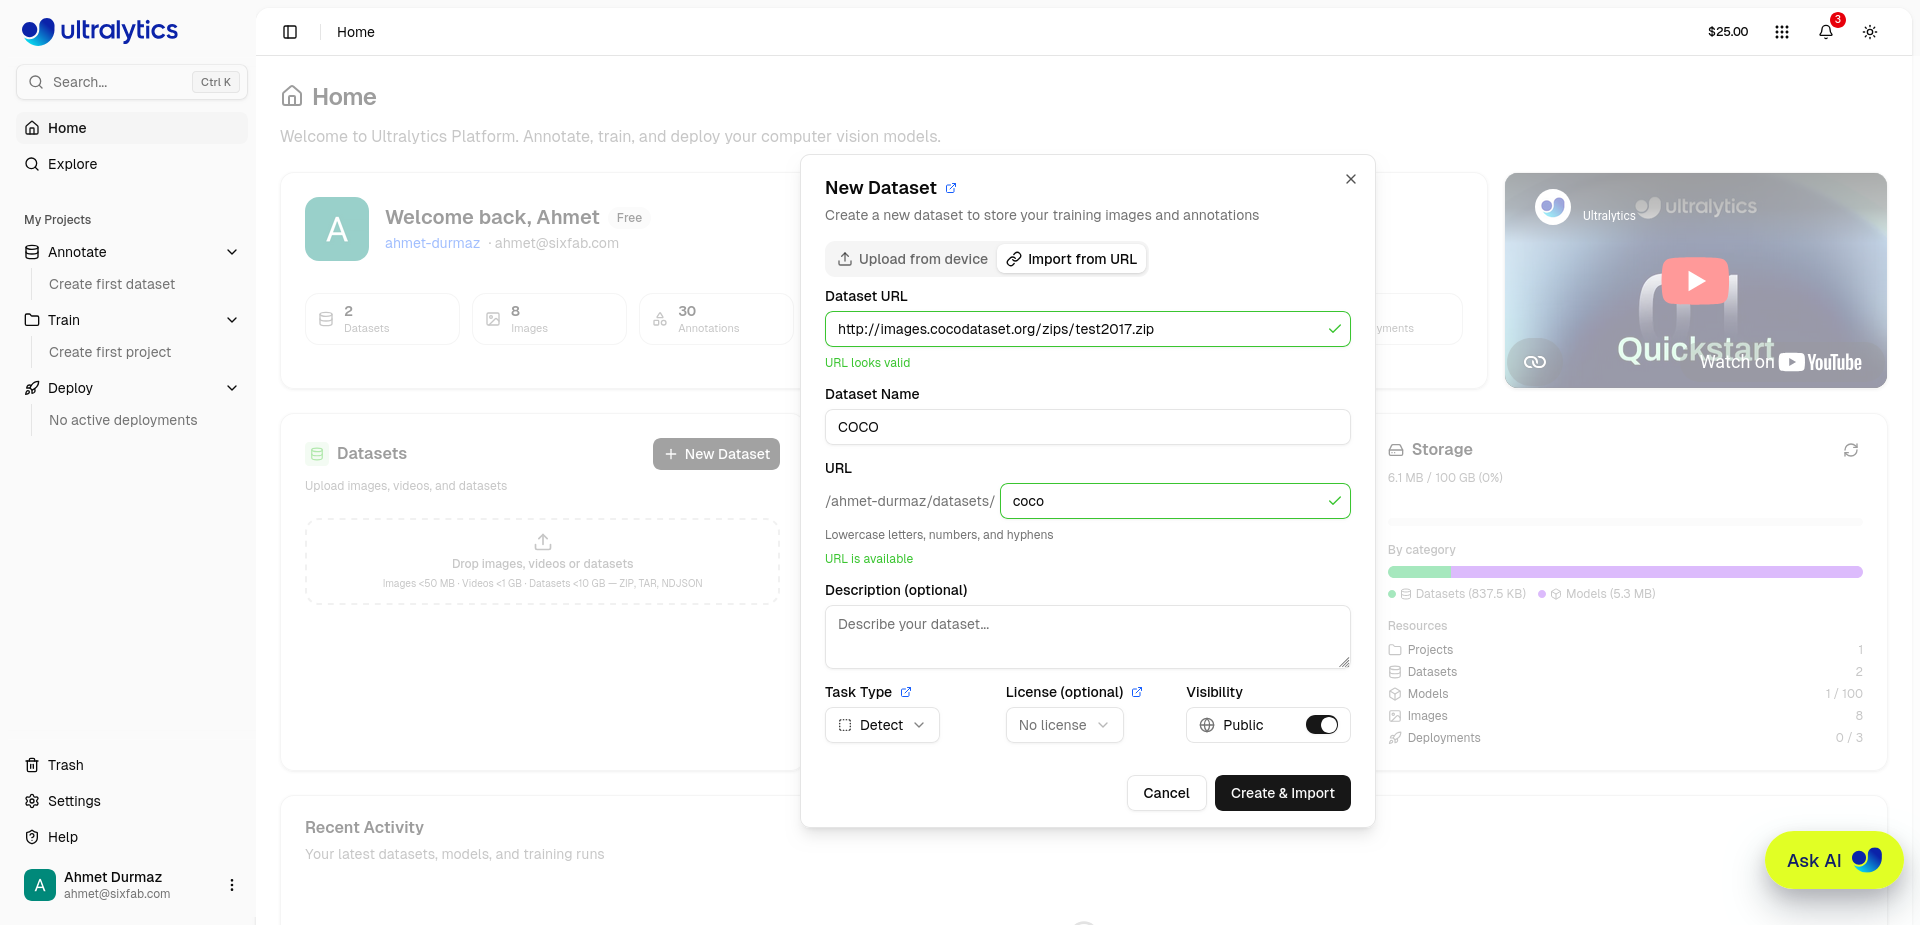
Fields that matter here:
| Field | What to enter |
|---|---|
| Dataset URL | A ZIP, TAR, or NDJSON archive (up to 50 GB, varies by plan). The green check confirms the URL is reachable. |
| Dataset Name | Display name — COCO in this run |
| URL slug | Lowercase letters, numbers, and hyphens; becomes ul://<user>/datasets/<slug> in your training command |
| Task Type | Detect, Segment, Pose, Classify, or OBB — must match the annotations in the archive |
| Visibility | Public or private |
Accepted formats: images (AVIF, BMP, DNG, HEIC, JP2, JPG, MPO, PNG, TIFF, WEBP up to 50 MB each), videos (MP4, WEBM, MOV, AVI, MKV, M4V up to 1 GB), dataset archives (ZIP, TAR, NDJSON), and annotations in YOLO, COCO JSON, or Ultralytics NDJSON.
Wait for processing
Platform transfers the archive to cloud storage, then indexes and validates it. Both stages report progress; large datasets take a while at the processing stage, so leave the tab open or come back later.
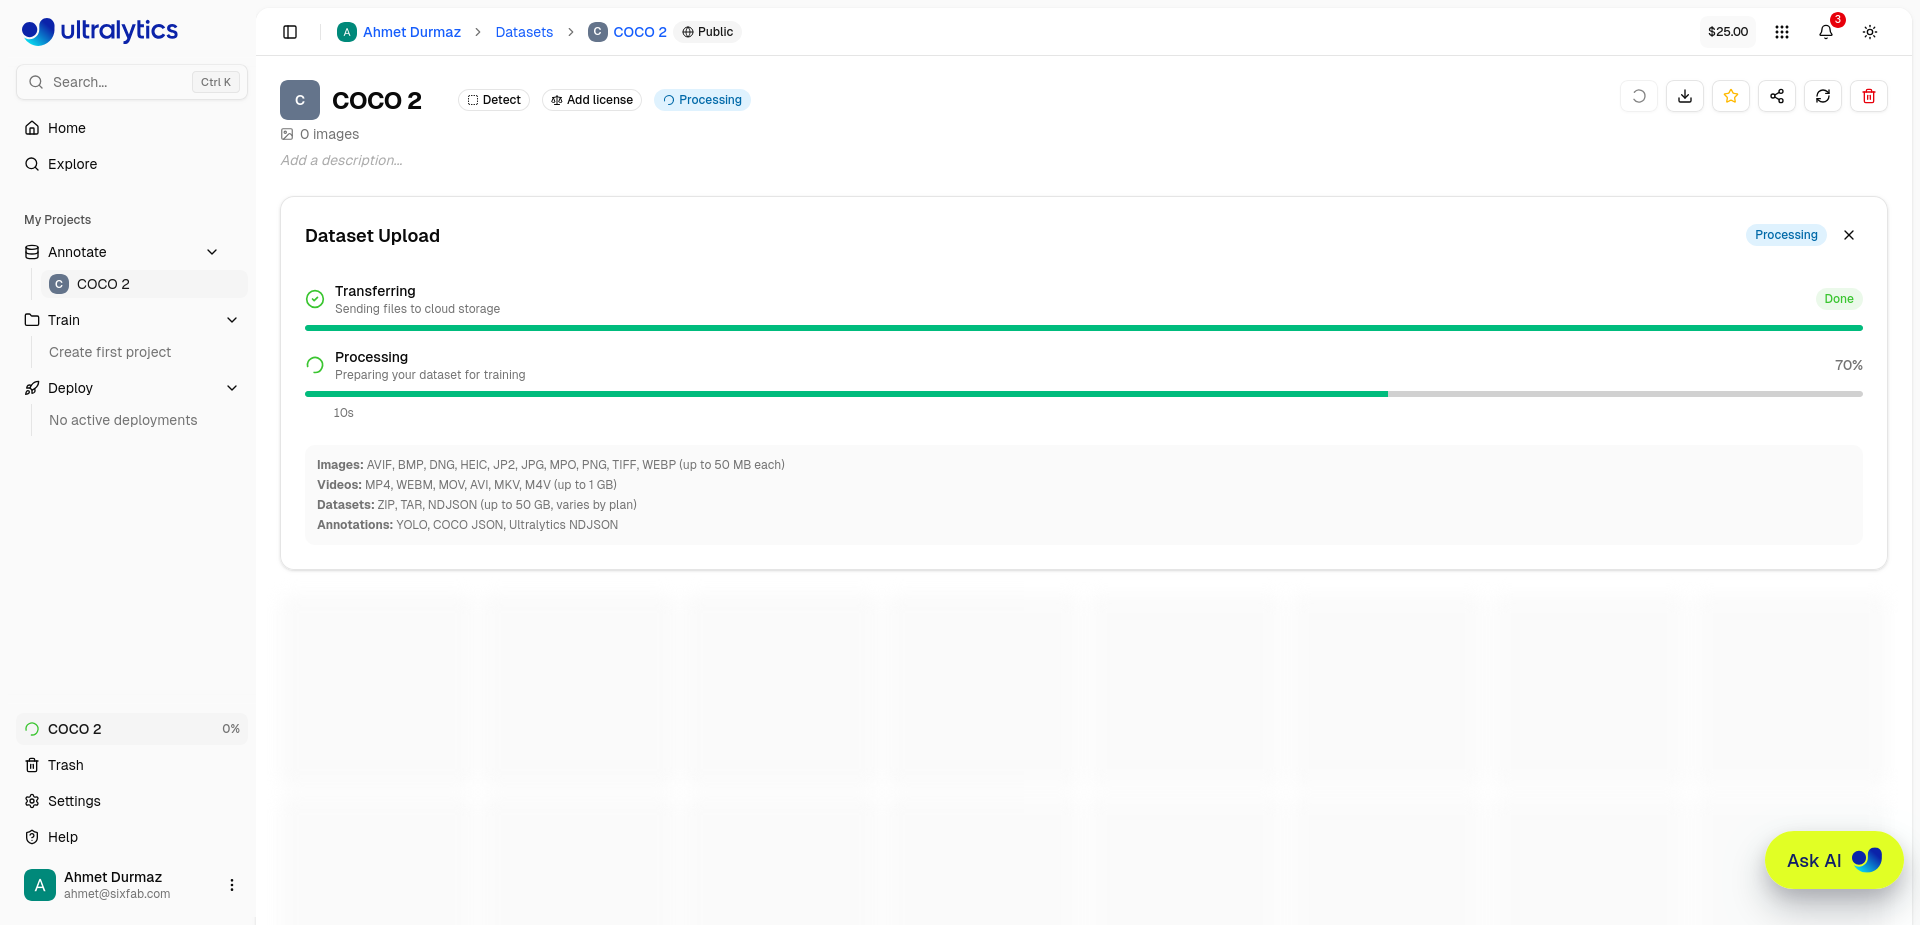
Confirm the dataset is ready
When the status badge flips to Ready, you get the full picture: image count, labeled count, annotation count, storage size, and the train/val/test split. The COCO import in this run landed at 354,346 images, 349,626 labeled, 4,970,819 annotations, 30.2 GB, split 344,194 train / 10,152 val.
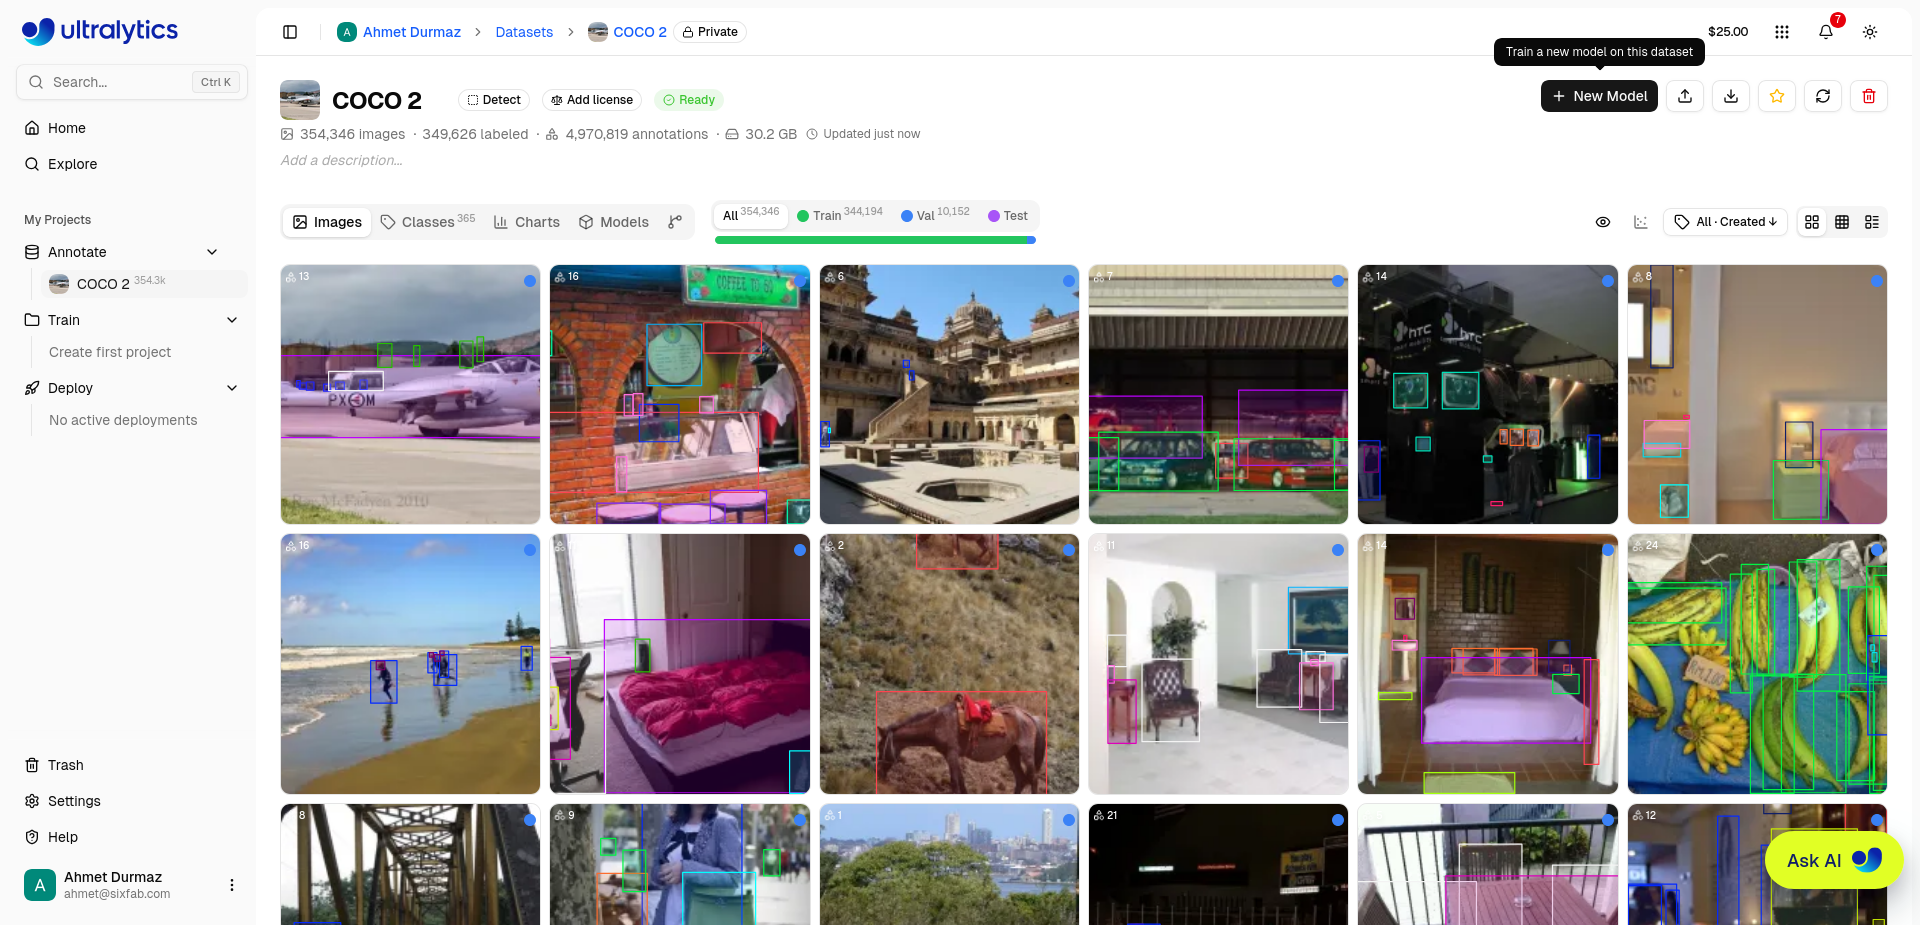
A class-count mismatch between your annotations and your intent is easier to catch now than after a multi-hour training run. When the data looks right, select New Model.
Configure the training run
The Train New Model dialog is where the run is defined.
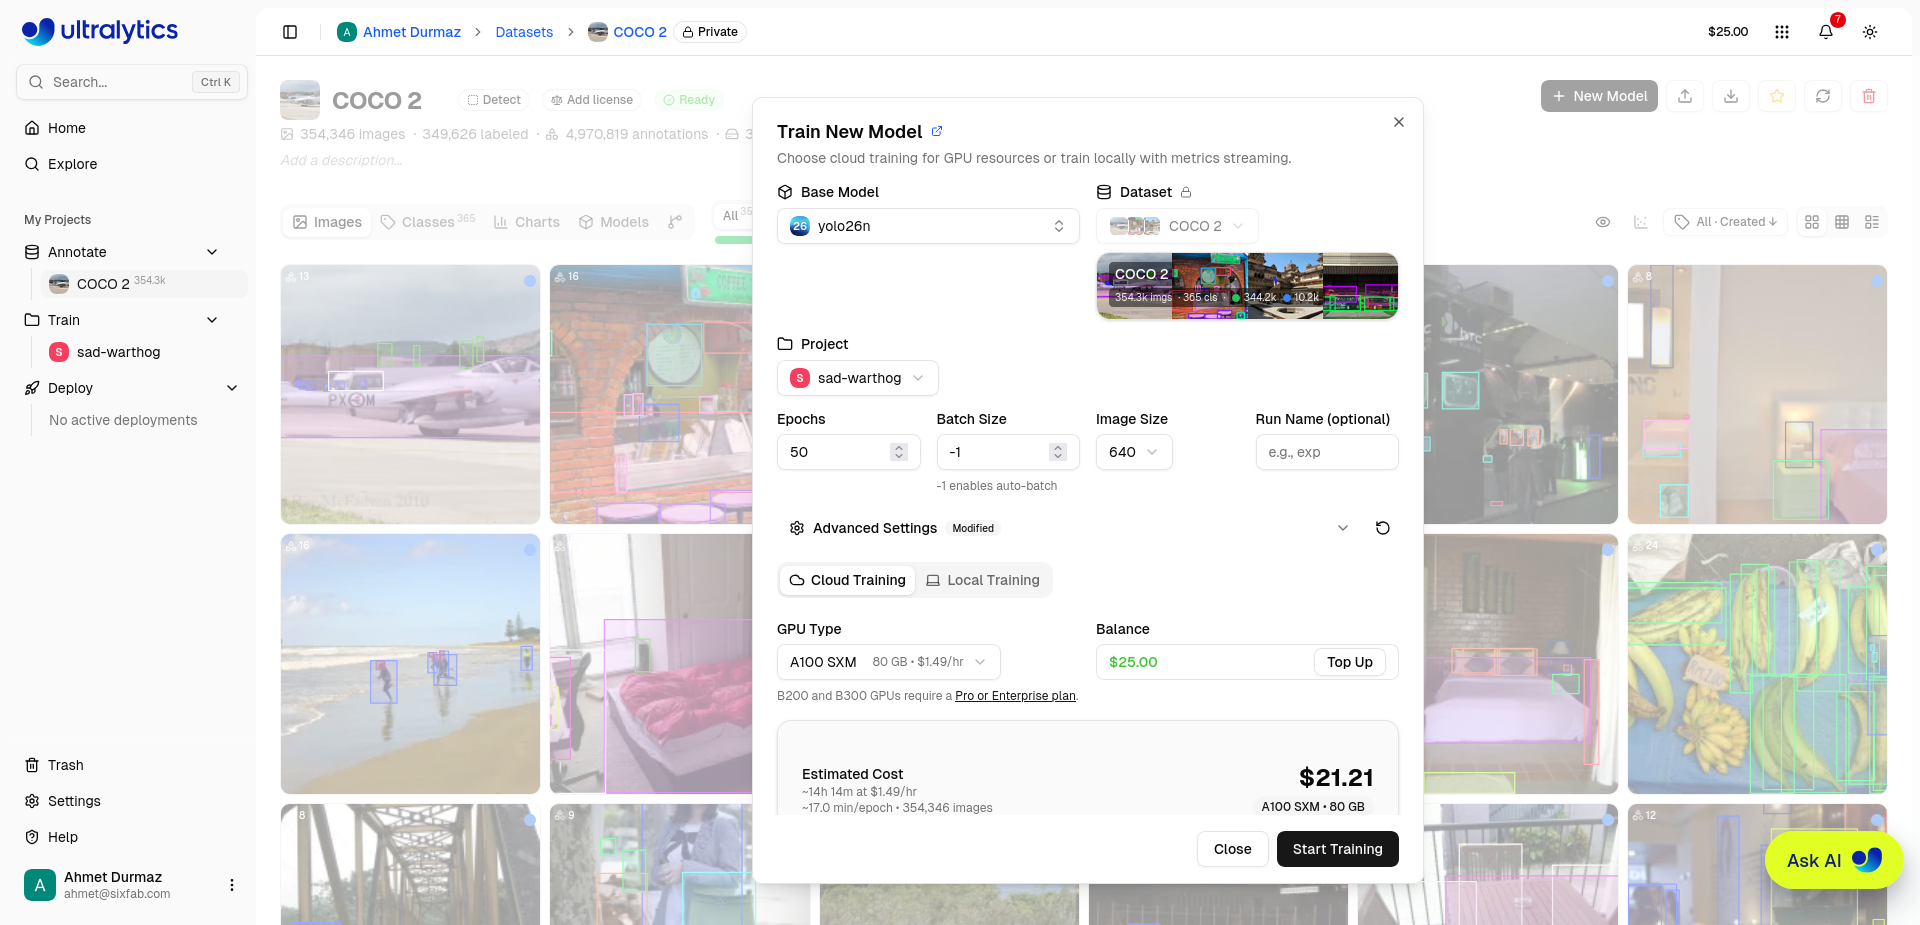
| Setting | Value in this run | Notes |
|---|---|---|
| Base Model | yolo26n |
YOLO26, YOLO11, and YOLOv8 families are all valid DEEPX export sources |
| Dataset | COCO 2 |
The dataset from Step 3 |
| Project | sad-warthog |
Auto-generated name; rename it if you plan to keep several runs |
| Epochs | 50 |
|
| Batch Size | -1 |
-1 enables auto-batch — the trainer picks the largest batch the GPU memory allows. This is training batch size, unrelated to the fixed batch-1 limit on the DEEPX export itself. |
| Image Size | 640 |
Keep this square. DEEPX compilation requires a square input, and matching train and export imgsz avoids a resize mismatch later. |
| Run Name | exp |
Optional, but a named run is easier to find in the export step |
| GPU Type | A100 SXM (80 GB, $1.49/hr) |
B200 and B300 require a Pro or Enterprise plan |
Platform prices the run before you commit: ~14h 14m at $1.49/hr, about 17.0 min/epoch over 354,346 images, for an estimated $21.21. The actual run in this walkthrough took 1d 2h of wall-clock time. Budget accordingly, and prefer Local Training if you already have a GPU box and only want Platform for metric streaming and the export pipeline.
Watch the run
Once training starts, the run page streams progress: epoch counter, elapsed time, live compute cost, and the full environment record — Ultralytics version, OS, Python version, CPU, GPU, container, parent model, and Git commit.
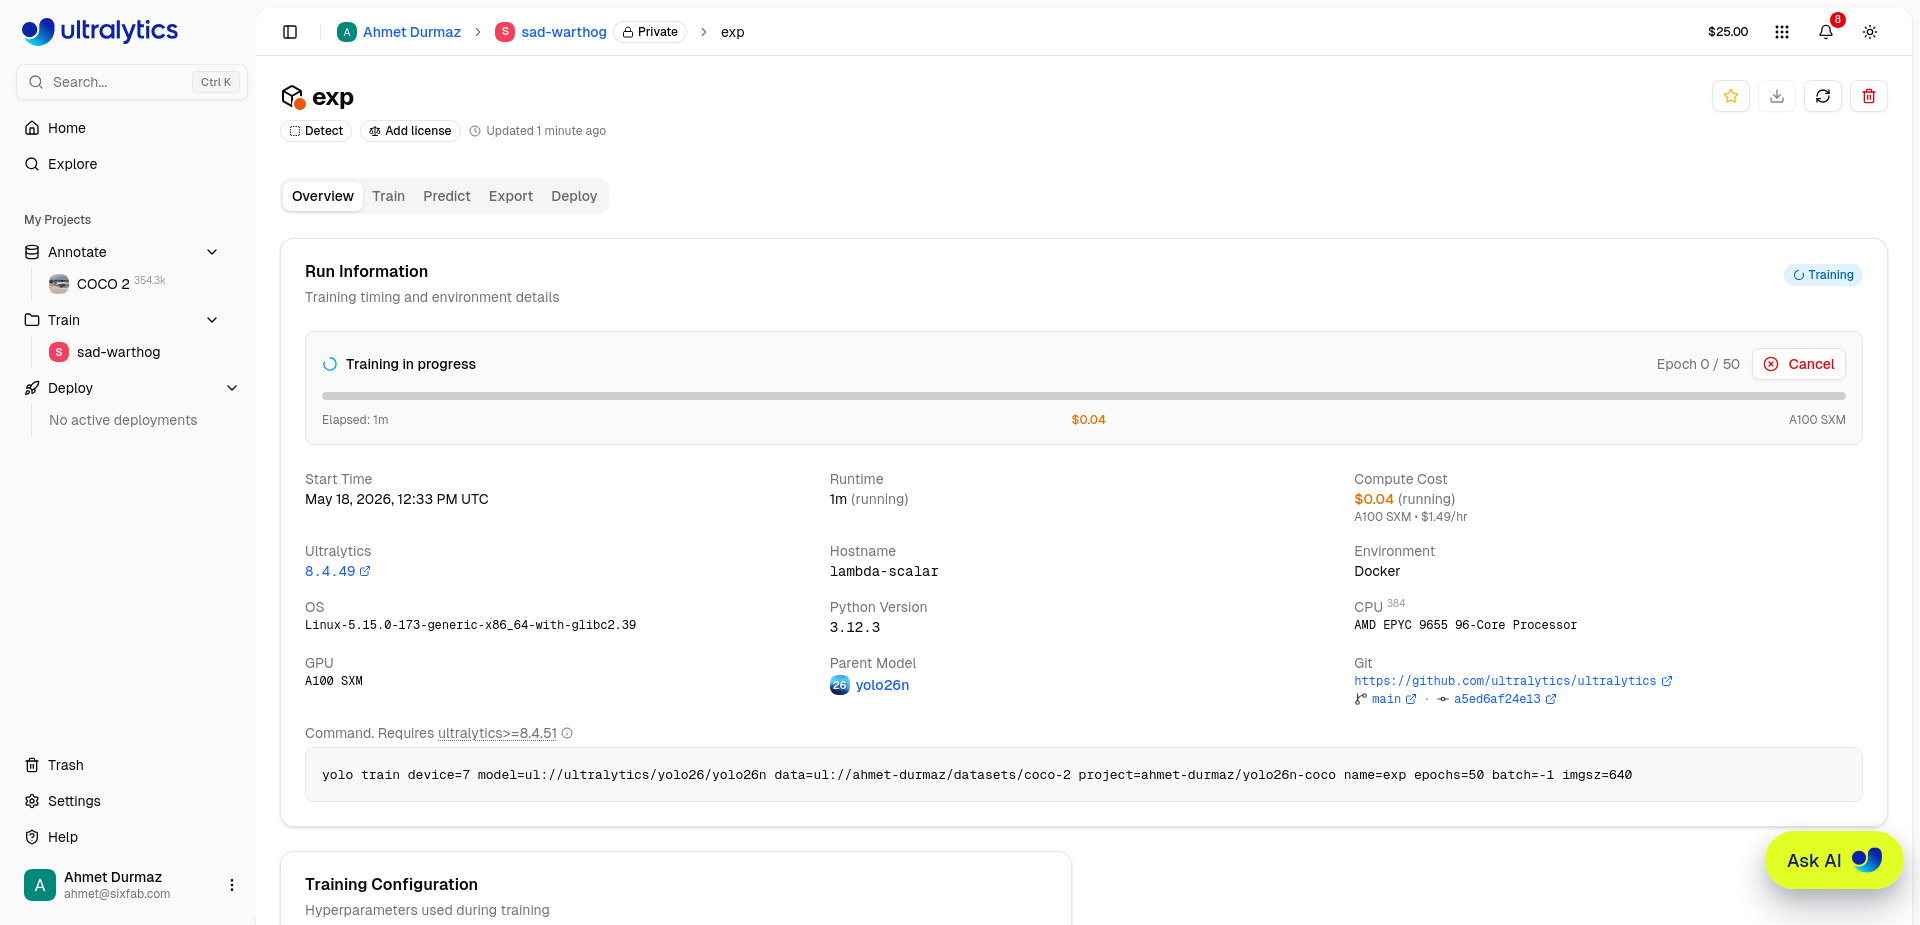
The page also prints the equivalent CLI command, useful for reproducing the run outside the browser:
yolo train device=7 model=ul://ultralytics/yolo26/yolo26n data=ul://ahmet-durmaz/datasets/coco-2 \
  project=ahmet-durmaz/yolo26n-coco name=exp epochs=50 batch=-1 imgsz=640
This command form needs ultralytics>=8.4.51. Cancel
stops the run and the billing with it.
Read the results
A completed run puts the headline metrics at the top of the model page: mAP50, mAP50-95, precision, and recall, each with its training curve. This run finished at 55.7% mAP50, 40.1% mAP50-95, 64.9% precision, and 50.7% recall after 1d 2h.
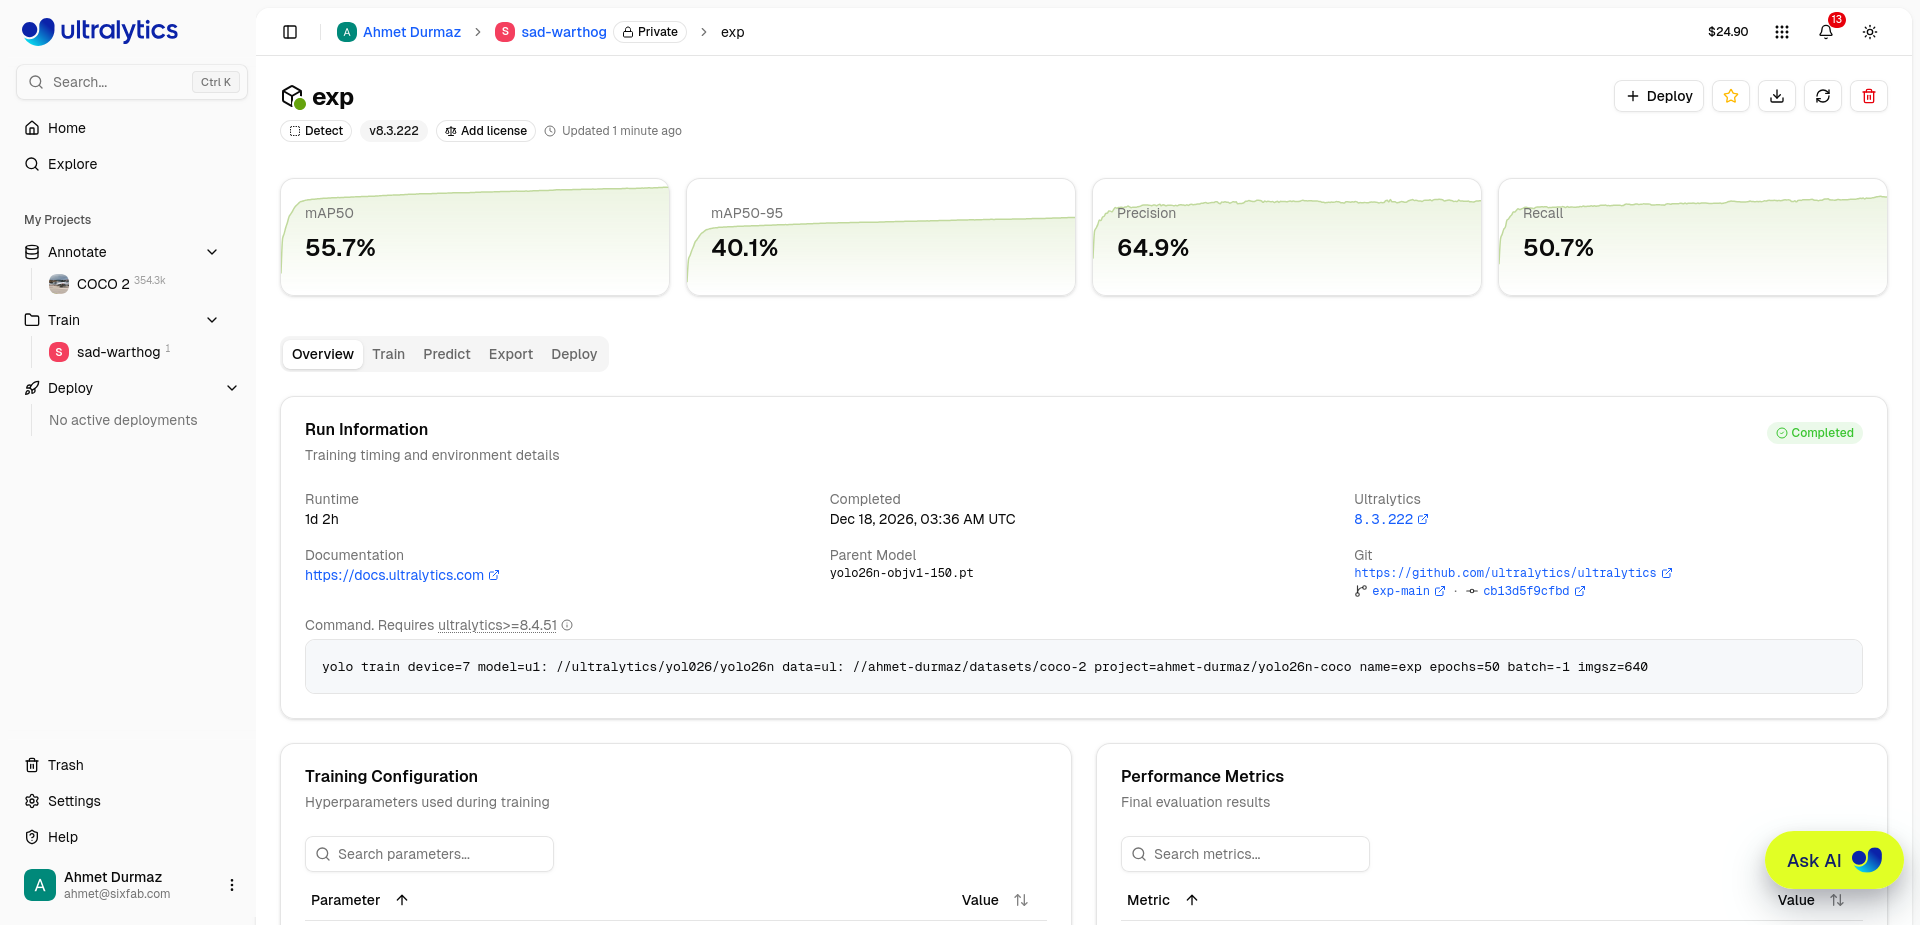
Write down the mAP50-95 figure — it's the number you compare against after INT8 quantization to see what the DEEPX export cost in accuracy.
Sanity-check the weights in Predict
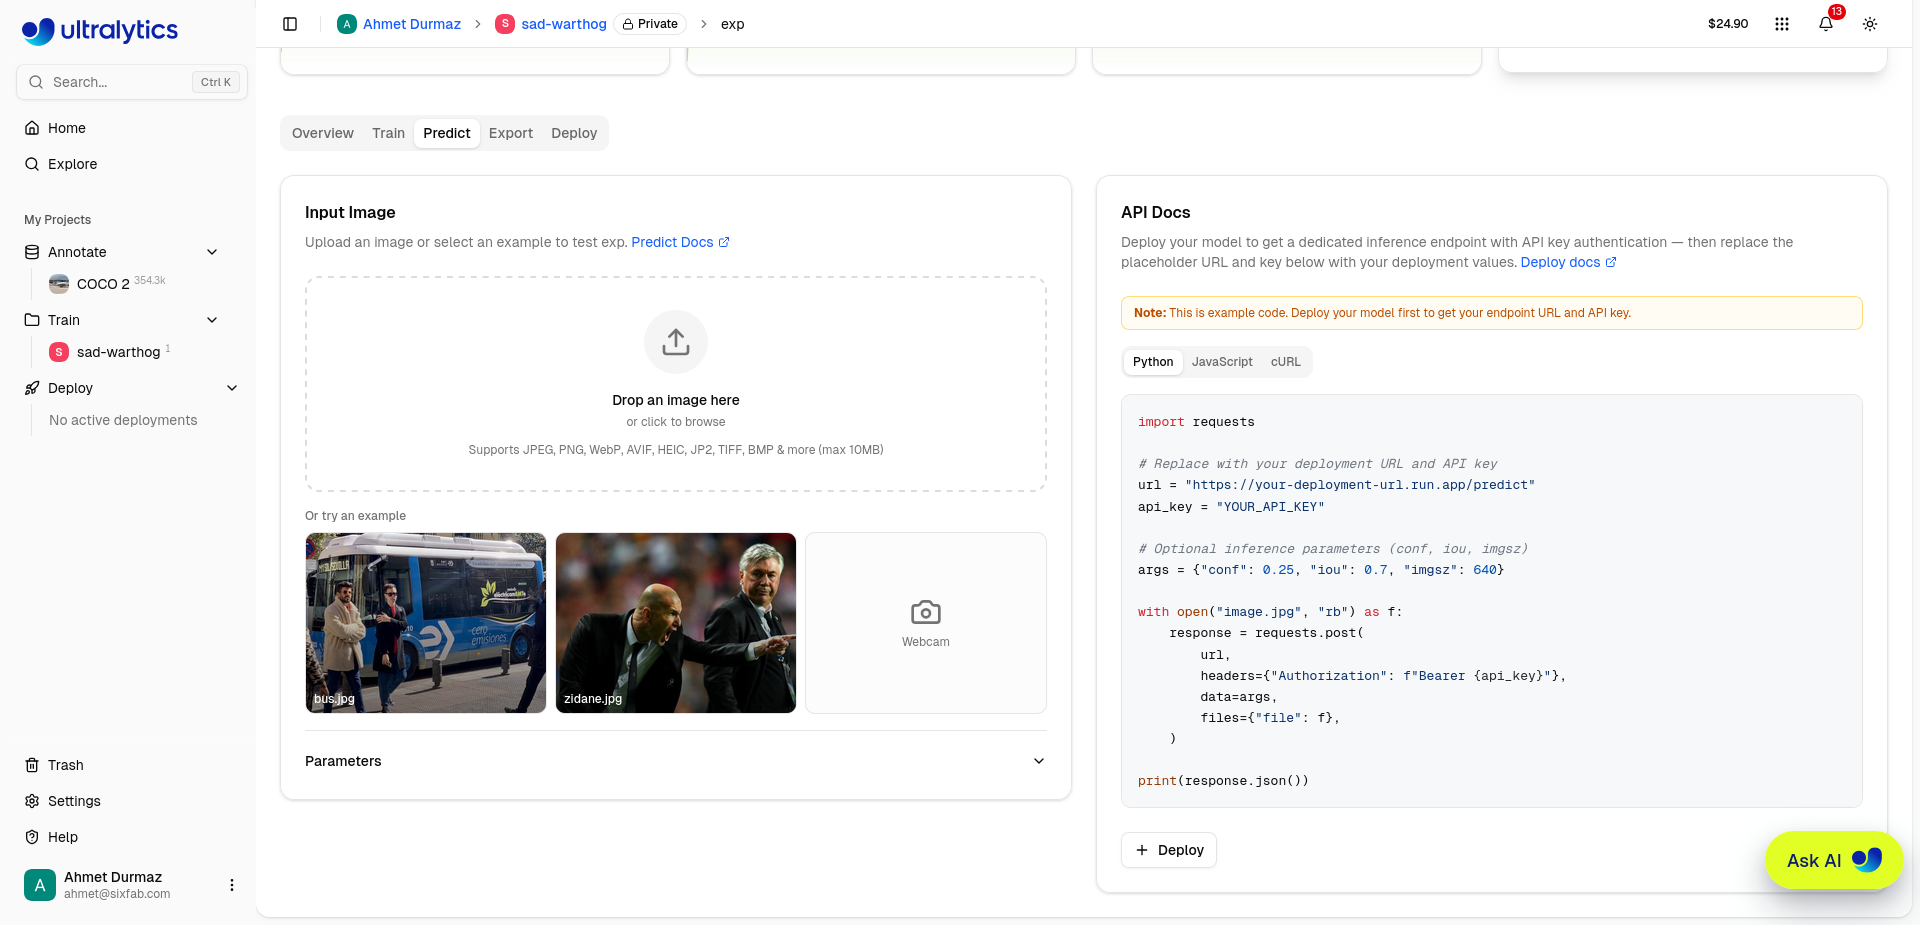
Before spending compile time, confirm the model actually detects what it was trained on. The Predict tab takes an uploaded image, a webcam frame, or one of the two built-in examples.
Results come back with per-stage timing and per-detection confidence, plus the raw JSON
the API would return. On the zidane.jpg example, this model returned 3
detections — two person boxes at 92.7% and 83.1%, and a
tie at 40.5% — at 90.4 ms inference on CPU (PyTorch 2.12.0+cpu).
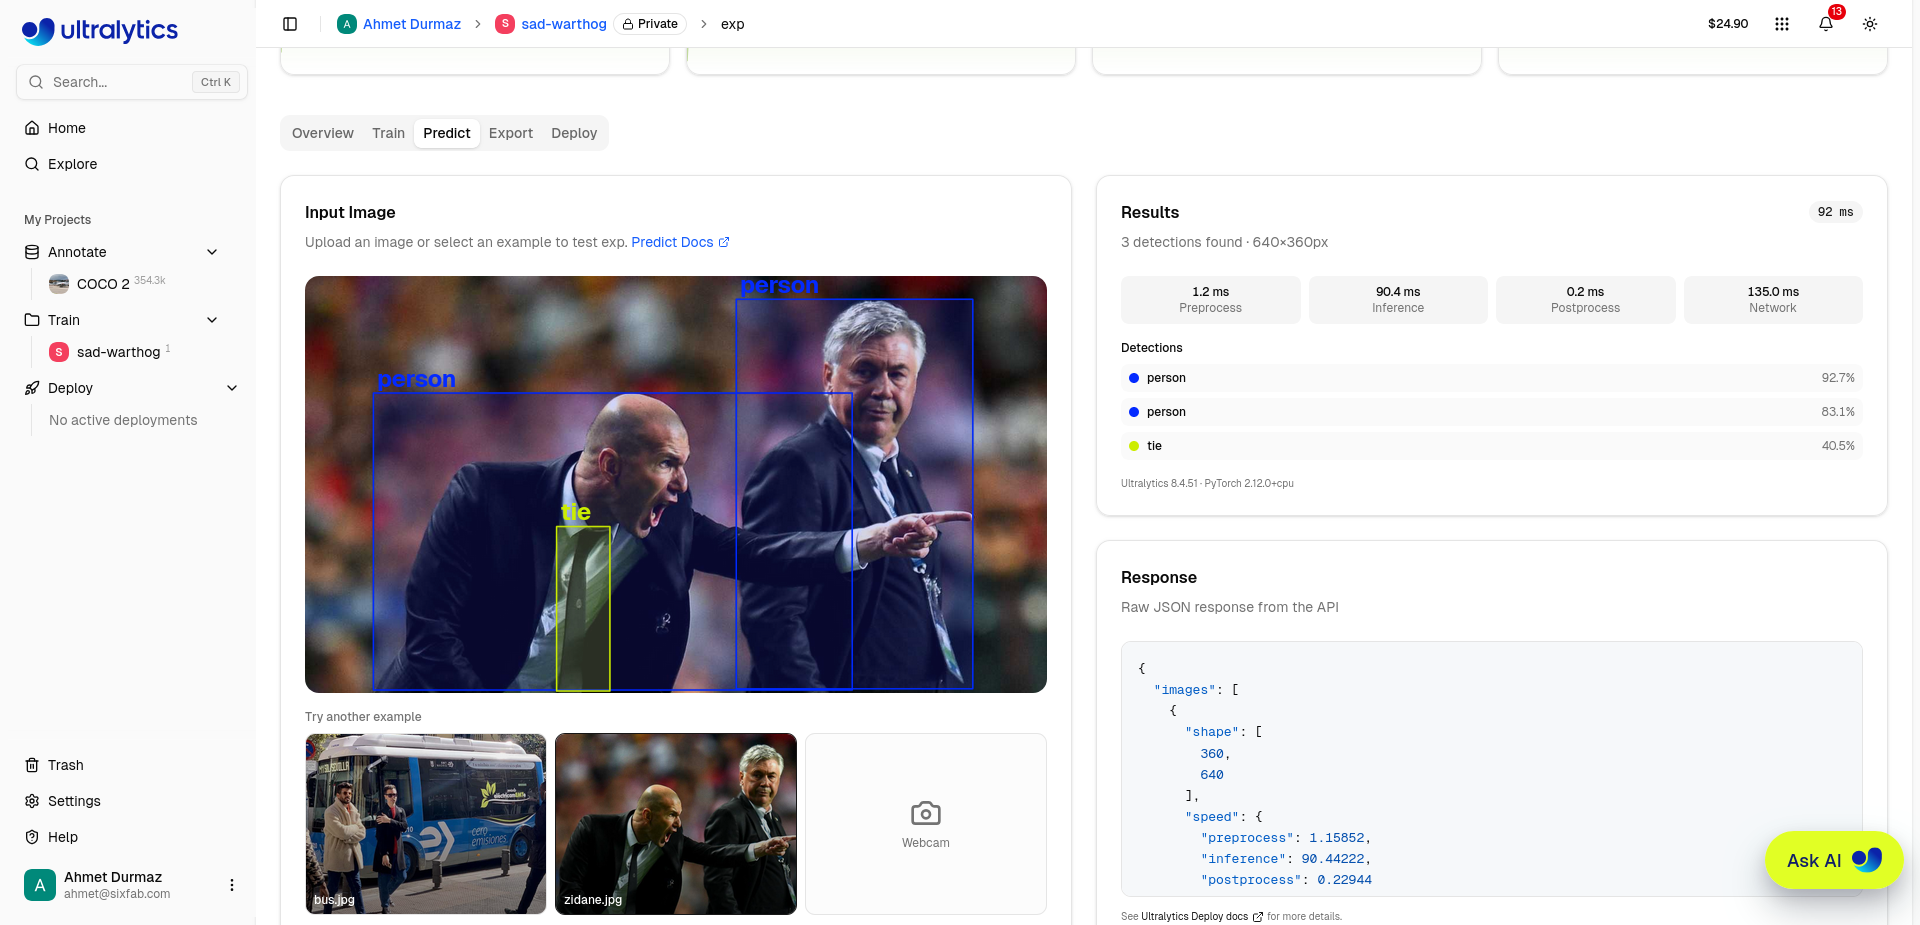
That 90.4 ms CPU figure is a useful baseline: it's the same PyTorch model about to be compiled for the DX-M1 NPU.
Open the Export tab
Export lists every target format Platform can compile to — ONNX, TorchScript, OpenVINO, TensorRT, CoreML, TF Lite, PaddlePaddle, NCNN, MNN, RKNN, IMX500, Axelera, ExecuTorch, DEEPX, and Qualcomm. Each format can be exported multiple times with different settings, so a 640 build and a 320 build can coexist.
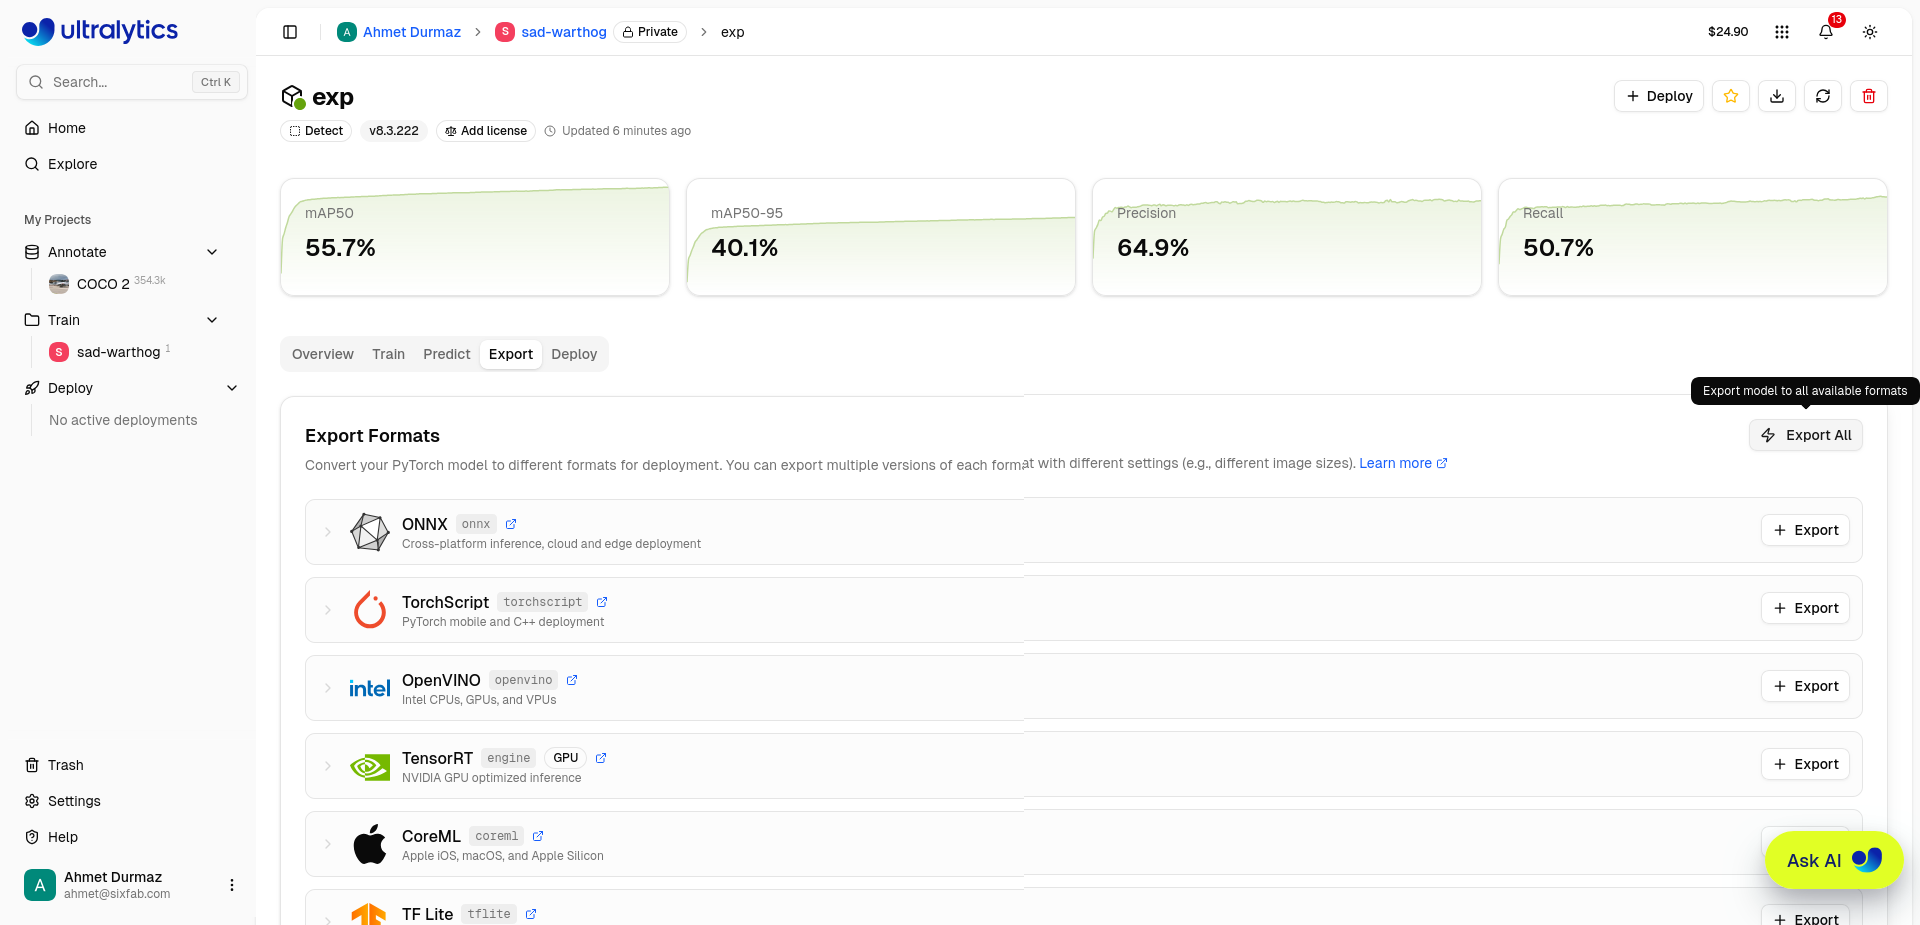
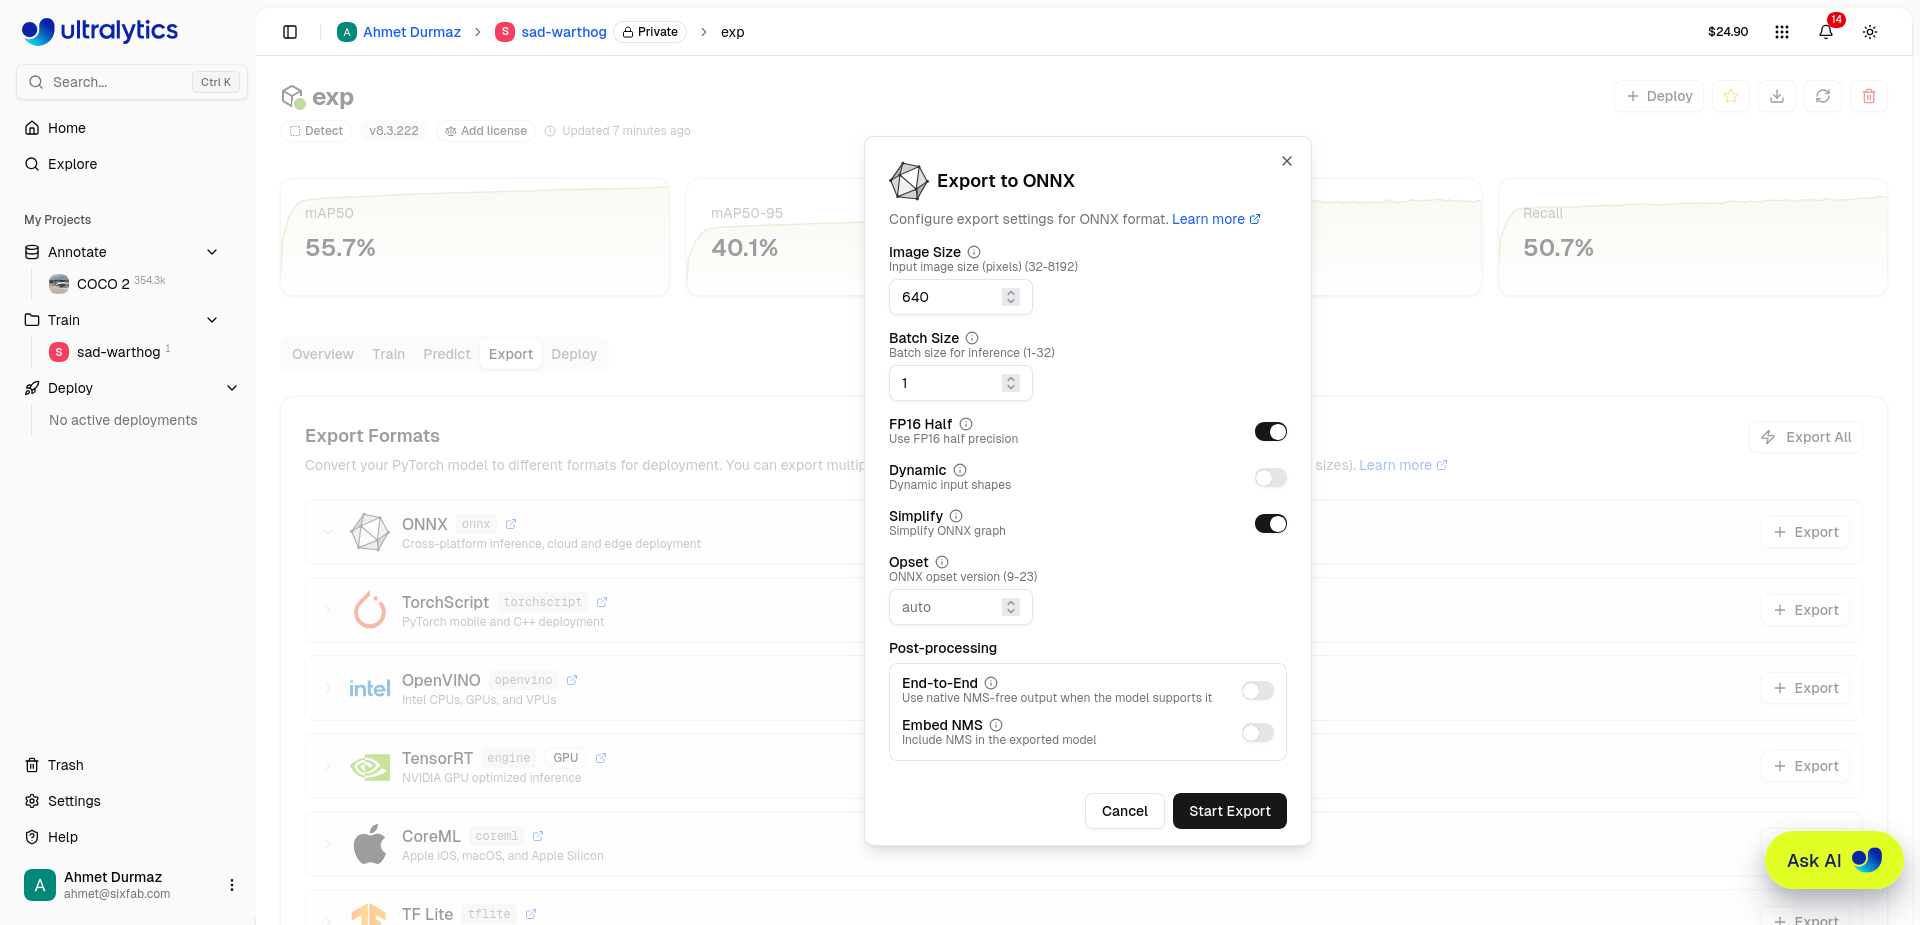
Expanding a format shows its settings before you commit. ONNX, for example, exposes image size, batch size, FP16, dynamic shapes, simplification, opset, and post-processing options:
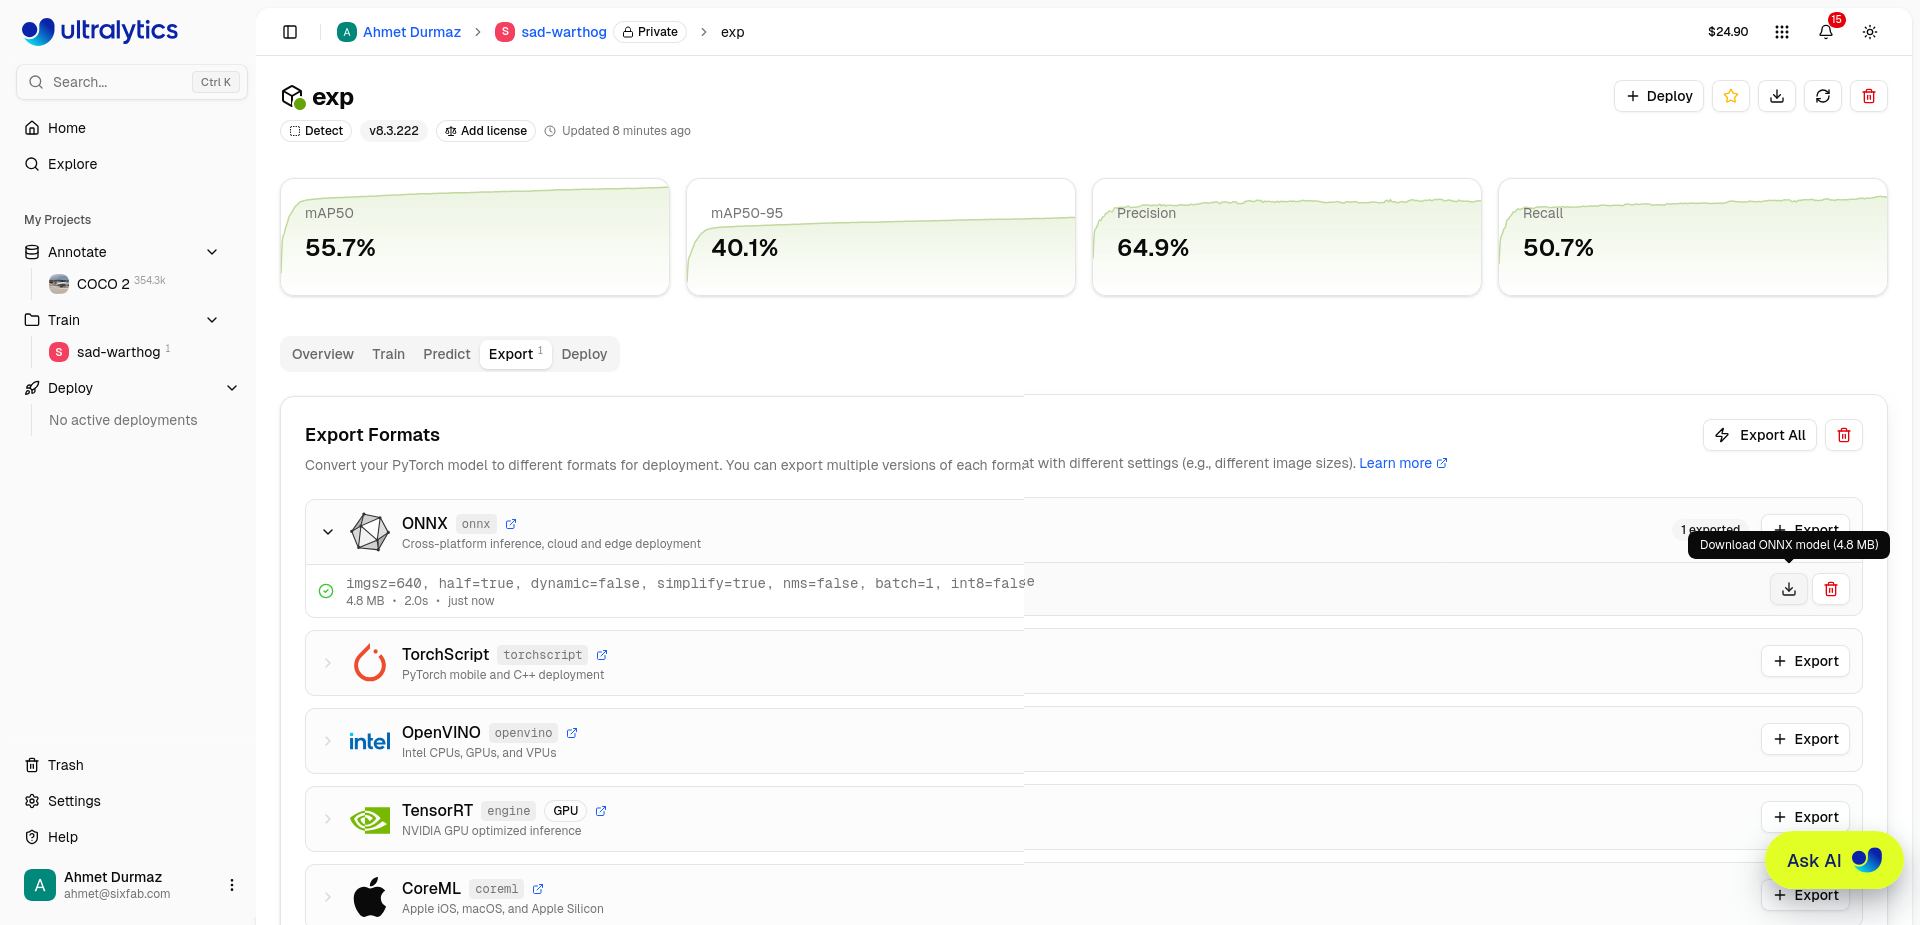
After the job completes, the row records the exact arguments used, the artifact size,
and the compile time — here imgsz=640, half=true, dynamic=false,
simplify=true, nms=false, batch=1, int8=false, 4.8 MB, 2.0s — with a
download button next to it.
You don't need the ONNX file for the DEEPX path. It's here because it shows the pattern every format follows, and because an ONNX export is a quick way to sanity-check the graph before spending minutes on NPU compilation.
Export to DEEPX
Scroll to the DEEPX row — "DEEPX NPU accelerators for power-efficient edge inference" — and select Export. Platform runs the ONNX-to-DXNN compilation server-side.
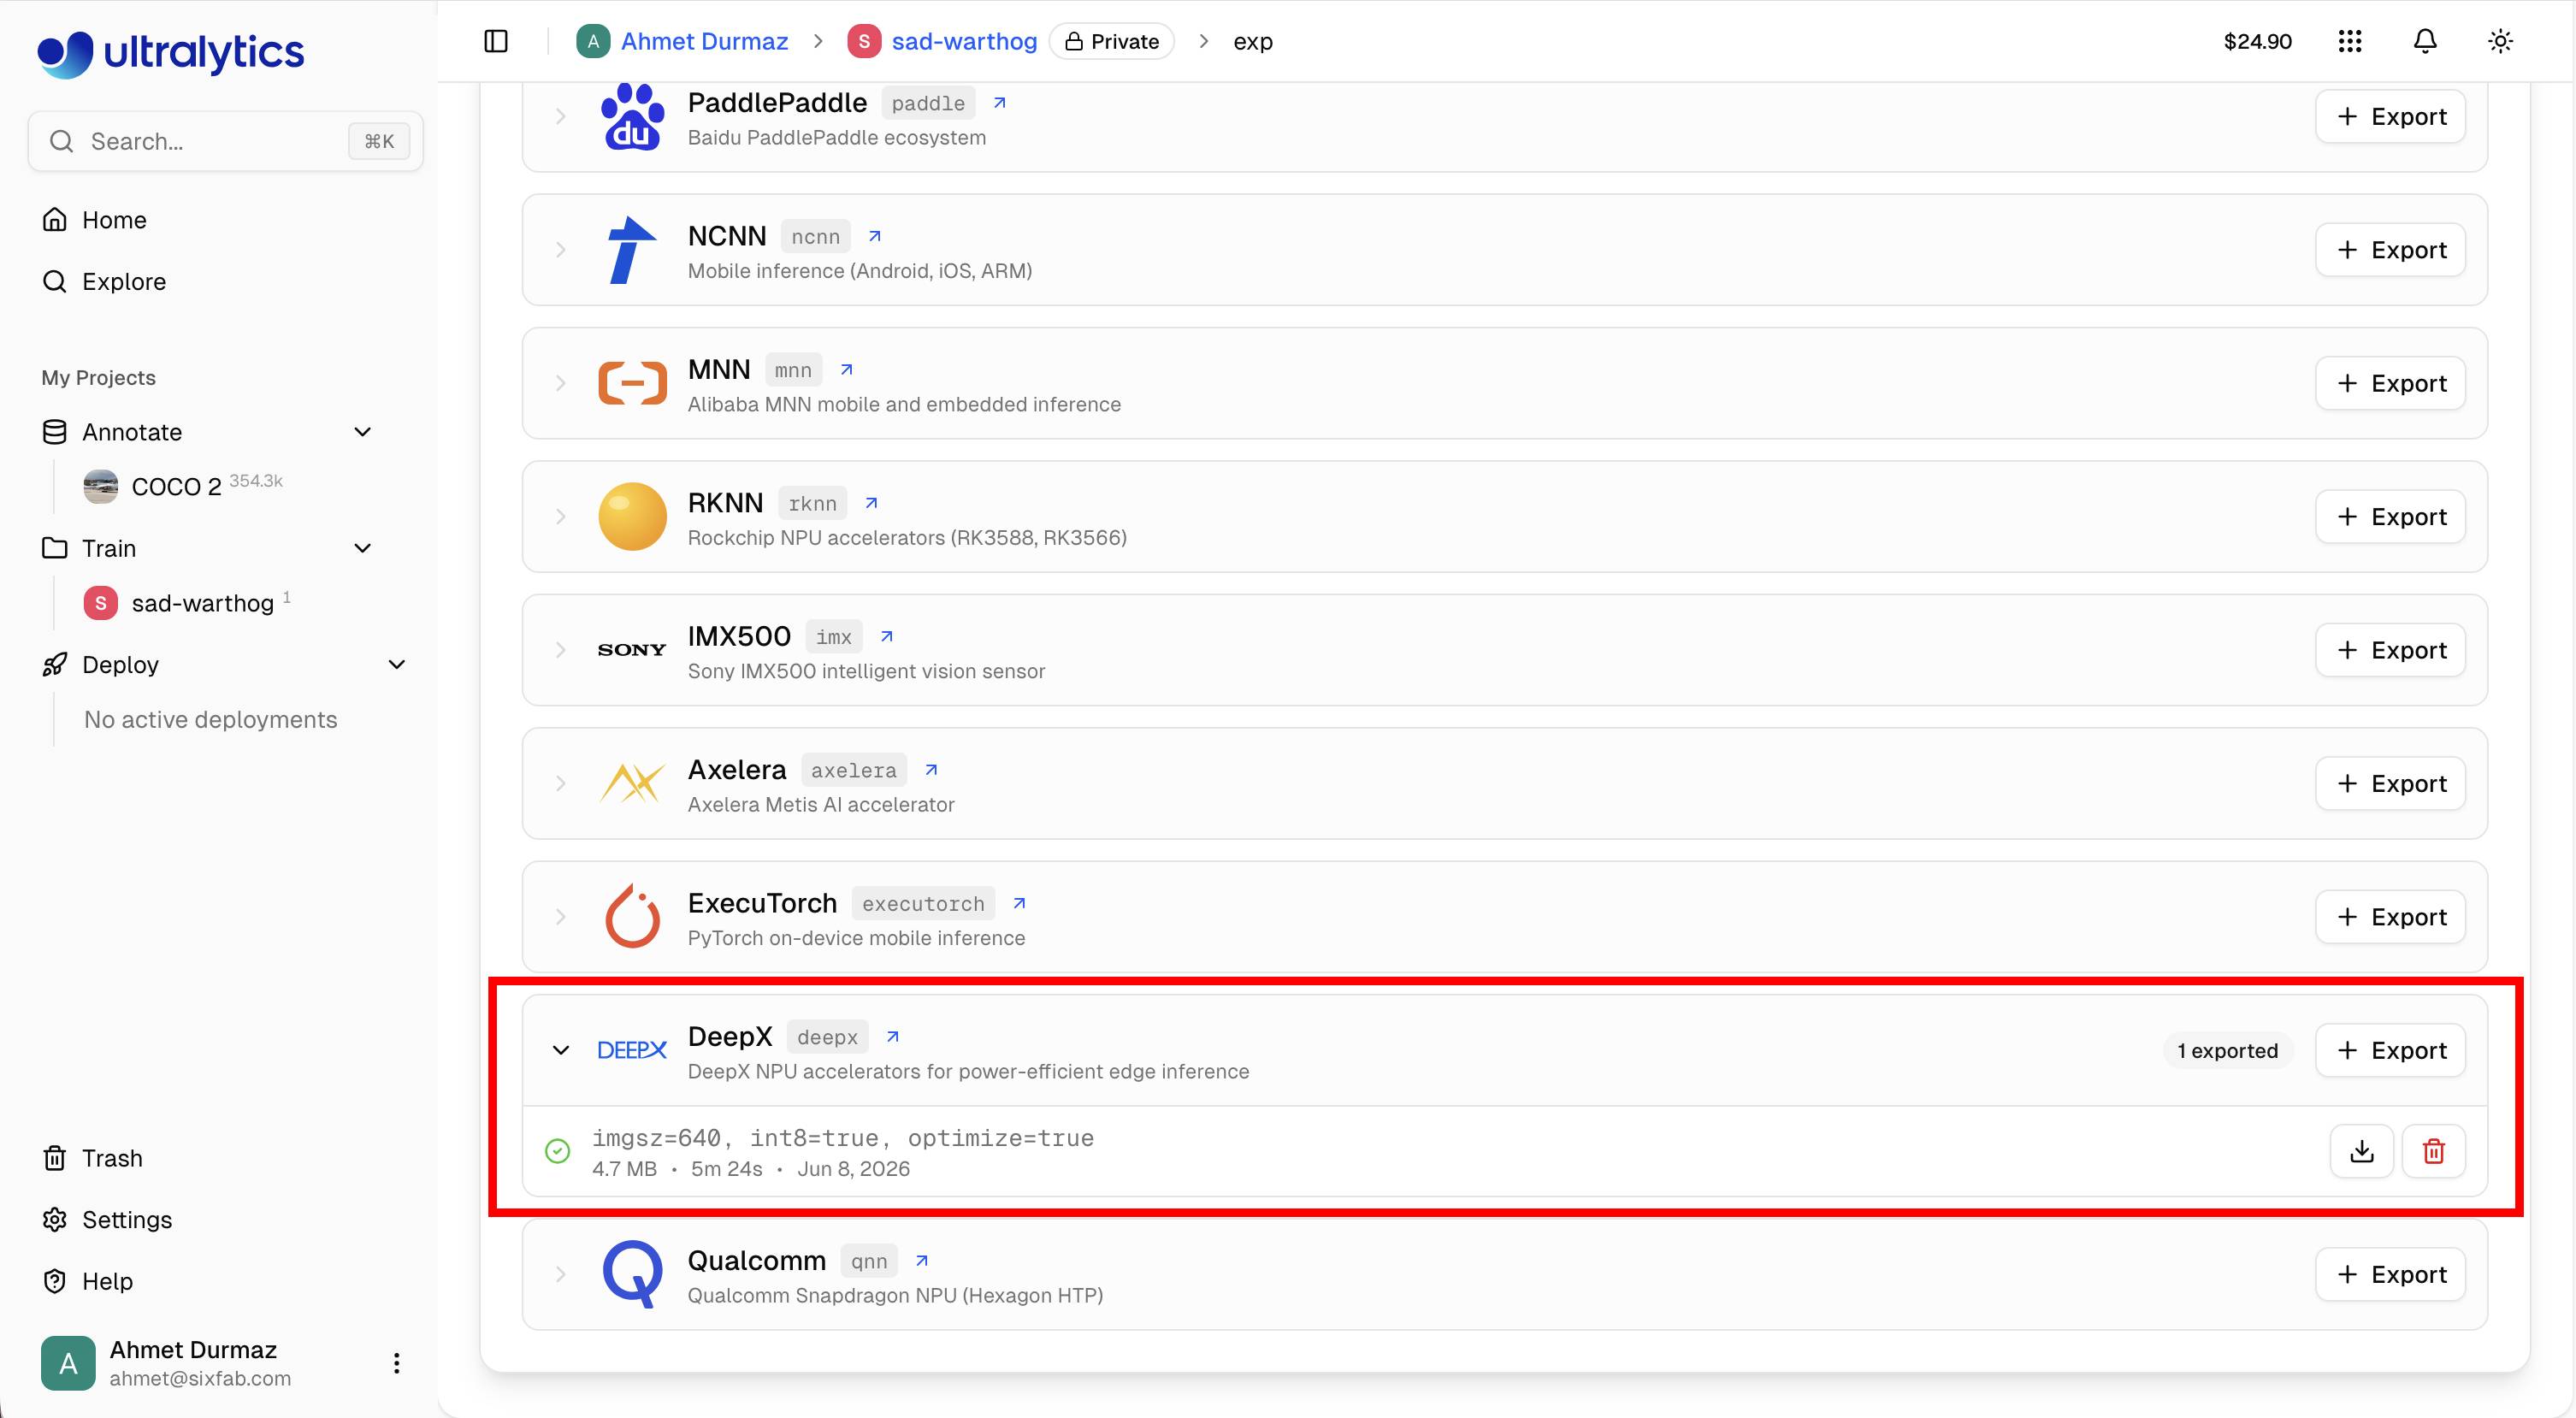
imgsz=640, int8=true, optimize=true, a 4.7 MB artifact in 5m 24s.
The finished export records its arguments the same way:
imgsz=640, int8=true, optimize=true, producing a 4.7 MB
artifact in 5m 24s. Two of those flags are not optional:
int8=true— the DX-M1 NPU runs INT8. Quantization is enforced regardless of what you pass.imgsz=640— square, and matching the training image size.optimize=true— higher compiler optimization. It lowers inference latency at the cost of compile time, part of why this export took 5m 24s rather than the 2.0s an ONNX export needs.
Compilation is measured in minutes, not seconds. The 1 exported badge on the row and the green check on the artifact line are the signals that it's done.
Download the export
The download icon on the DEEPX artifact row gives you the archive directly. If you'd rather not click through the UI — or want this in a build script — the one-liner in the next section does the same job from a terminal.
Downloading a Platform export from the terminal
This script authenticates with your Ultralytics API key, lists your projects, models, and exports, then downloads and unzips the archive. It can also kick off a new DEEPX export if none exists yet.
ULTRALYTICS_API_KEY=<YOUR_ULTRALYTICS_API_KEY> bash <(curl -sL https://scripts.sixfab.com/ultralytics-platform.sh)
Replace <YOUR_ULTRALYTICS_API_KEY> with your own key from
Settings → API Keys. Treat it like a password — don't commit it
to a repository or paste it into shared logs. To keep it out of your shell history, export
it from a file instead:
export ULTRALYTICS_API_KEY="$(cat ~/.ultralytics_key)"
bash <(curl -sL https://scripts.sixfab.com/ultralytics-platform.sh)
What the prompts look like
== Ultralytics Platform Model Downloader ==
Fetching projects...
Projects:
1) <project-name>  (<project-id>)
Select a project (number): 1
Selected project: <project-name>
Fetching models...
Models:
1) <model-name>  [detect | mAP50: 0.xxxxx]
Select a model (number): 1
Selected model: <model-name>
Fetching exports...
Available exports:
1) DEEPX  [completed]  <export-id>
2) onnx  [completed]  <export-id>
3) Create new export (format: DEEPX)
Your choice (1-3, q to quit): 1
Downloading -> ./models/<model-name>/<model>.DEEPX.zip
Done.

Extracting ./models/<model-name>/<model>.DEEPX.zip...
Archive:  ./models/<model-name>/<model>.DEEPX.zip
  inflating: ./models/<model-name>/<model>_DEEPX_model/<model>.dxnn
  inflating: ./models/<model-name>/<model>_DEEPX_model/config.json
  inflating: ./models/<model-name>/<model>_DEEPX_model/metadata.yaml
Extracted to: ./models/<model-name>
Select a project
Every project tied to your API key.
Select a model
Each trained model in that project, with task type and headline metric.
Select an export
Pick an existing DEEPX export to download it directly, or choose
Create new export (format: DEEPX) if none exists yet; Platform runs the
compilation server-side and makes the archive available once it completes.
The extracted folder has the same three files as the native export —
.dxnn, config.json, metadata.yaml — so
everything downstream is identical no matter which path produced it. Copy that folder to
your Raspberry Pi 5 and it's ready for the DEEPX runtime.
Path C: Manual export and compile with local DX-COM
Use this only when more control is needed than either export path above gives — custom calibration counts, PPU offload configuration, or DXQ enhanced quantization.
Export your model to ONNX yourself
model.export(format="onnx") (batch size 1, the DX-COM requirement, is
Ultralytics' default).
Find the input tensor name
Open the model in Netron;
the input is typically images for YOLO exports.
Prepare calibration images and write config.json
Prepare a calibration image set from your deployment domain and write a config.json by hand.
Compile with the dxcom CLI
Run the standalone dxcom CLI to compile.
Full steps — environment prerequisites (glibc ≥ 2.31, Python 3.12),
config.json parameters, PPU configuration, DXQ, and reading NPU-integrated
preprocessing from the compile log — are in the
DX-COM Installation & Usage Guide
and the
DX-COM Configuration Reference.
Checking dx_com / dxrt compatibility
A .dxnn file compiled by dx_com needs a dxrt runtime
on the target device that supports the same file format version. Check compatibility
directly on the device:
dxrt-cli -v

DXRT v3.3.2
Minimum Driver Versions

Device Driver: v2.4.0
PCIe Driver: v2.2.0
Firmware: v2.5.2
Minimum Compiler Versions

Compiler: v1.18.1
.dxnn File Format: v6
If a .dxnn file was compiled with a newer dx_com/ultralytics
pair than the target device's dxrt supports, the
.dxnn File Format line is what to check first — it's the actual
compatibility contract, not the headline DXRT vX.Y.Z version string.
DX-AllSuite
keeps compiler, driver, and firmware versions aligned automatically if you'd rather install
the whole stack as one bundle instead of tracking components individually.
Deploying the compiled model
Whichever path produced your .dxnn, the target device still needs the DEEPX
runtime installed to run it: the NPU driver, the libdxrt runtime, and the
dx_engine Python package.
On Sixfab hardware (recommended path)
sudo apt update
sudo apt install apt-repo-sixfab
sudo apt update && sudo apt install sixfab-dx
See the AI HAT+ Raspberry Pi 5 Quickstart for the full setup.
Manual runtime install (any DEEPX-supported Linux host)
If you're not on Sixfab's APT repository — a bring-your-own carrier board, or a CI box that only needs the runtime for validation — the components install directly from DEEPX-AI's GitHub releases:
# Install the NPU driver and libdxrt runtime
sudo apt update
wget https://github.com/DEEPX-AI/dx_rt_npu_linux_driver/raw/main/release/2.4.1/dxrt-driver-dkms_2.4.1-2_all.deb
sudo apt install ./dxrt-driver-dkms_2.4.1-2_all.deb
wget https://github.com/DEEPX-AI/dx_rt/raw/main/release/3.3.2/libdxrt_3.3.2_all.deb
sudo apt install ./libdxrt_3.3.2_all.deb

# Build the dx_engine wheel and install it
cd /usr/share/libdxrt/python_package && sudo ./make_whl.sh
pip install dx_engine-*.whl
Once installed, run inference and validation exactly as shown in
Run inference or validate directly from Python — the
exported _deepx_model directory loads directly with YOLO(...).
Once the runtime is installed either way, the
sixfab-dx-examples
repository has deployment code for Sixfab AI HAT+ and Edge AI Expansion Board — model
loading, pre/post-processing, and inference loops for common vision tasks. Clone it and
point it at your .dxnn file to get inference running. If integrating the DEEPX
runtime into your own application instead of using the repository as-is, it's still a useful
reference codebase — the same model-loading and pre/post-processing patterns apply
either way.
Set up the DEEPX runtime on Sixfab hardware
Driver, runtime, and device health check, end to end for Raspberry Pi 5.
Deployment code and examples
Model loading, pre/post-processing, and inference loops for AI HAT+ and Edge AI Expansion Board.
Device validation
dxrt-cli --version confirms the runtime package installed correctly.
Use the full five-command sequence to confirm the NPU is actually enumerated, the kernel
module loaded, and the PCIe link is healthy:
dxrt-cli -s                          # 1. full NPU status: runtime/FW versions, per-core voltage & temp
lspci                                # 2. is the device visible on the PCIe bus at all?
lsmod | grep -i dx                   # 3. is the kernel module actually loaded?
dmesg | grep -i dx                   # 4. driver / PCIe errors in the kernel ring buffer
journalctl -xeu dxrt.service         # 5. the runtime service's own log
Check PCIe link speed, not just enumeration
A device can enumerate over PCIe Gen1/Gen2 and appear to work — lspci
lists it, inference runs — while running at a fraction of its designed throughput.
Confirm the negotiated link speed:
sudo lspci -vvv | grep -iA 33 accelerators | grep -E "LnkCap|LnkSta"
LnkSta should read 8GT/s for Gen3. On Raspberry Pi 5, Gen3 is not
the default — enable it explicitly:
sudo nano /boot/firmware/config.txt
# add:

dtparam=pciex1
dtparam=pciex1_gen=3
# save (Ctrl+X, Y, Enter), then:
sudo reboot
Without this, the NPU still enumerates and inference still runs — just at a PCIe-bottlenecked fraction of the 34.6 ms/image figure in the benchmark table above, since that figure assumes Gen3.
After a kernel update
The NPU driver installs via DKMS, which rebuilds the kernel module automatically when the
kernel updates. If inference stops working after a Raspberry Pi OS update, re-run the
five-command check above — lsmod | grep -i dx will show whether the
module rebuilt for the new kernel. The
dx_rt_npu_linux_driver
repository includes a sanity-check script that verifies driver install state and PCIe
communication in one pass if you need to go deeper than lsmod.
FAQ
Do I need to export to ONNX first and run DX-COM separately?
No, not anymore. model.export(format="deepx") in the ultralytics
package runs the full ONNX-to-DXNN compilation for you, installing dx_com
automatically on first use. Manual ONNX export plus a standalone DX-COM run is only needed
for the advanced control described in Path C.
Can I run the export on a Raspberry Pi or other ARM64 device?
Not the export/compile step — that requires x86-64 Linux. The resulting
.dxnn file runs on both x86-64 and ARM64 (including Raspberry Pi 5), so
compile on an x86-64 machine, then copy the exported folder to your Pi for inference.
If you don't have an x86-64 Linux machine available,
Path B (Ultralytics Platform) compiles in the cloud instead.
Do I have to train on Ultralytics Platform to use its DEEPX export?
No. Platform can export any model in your account, including weights you upload rather than train there. Training in the cloud is one option in the Train New Model dialog — Local Training streams metrics from your own GPU and still leaves the model exportable from the Export tab.
How long does a DEEPX export take on Ultralytics Platform?
Minutes, not seconds. The run in this guide compiled a YOLO26n detection model at
imgsz=640, int8=true, optimize=true in 5m 24s, producing a 4.7 MB
artifact. Compile time rises with model size and with optimize=true.
What's the difference between the DEEPX and onnx exports on Ultralytics Platform?
onnx is the uncompiled model. DEEPX is the same model already
compiled into a .dxnn binary, ready for the DEEPX DX-M1 NPU.
Why does the DEEPX export force INT8?
The DX-M1 NPU executes INT8 arithmetic. FP16 and FP32 graphs have to be quantized before
they can run on it, so the export pipeline enforces int8=true rather than
letting a non-runnable artifact through.
What shape is the DEEPX model's output, and do I need to run NMS myself?
It depends on the model family — see
Output shape and NMS. YOLOv8 and YOLO11 export a raw
(batch, 4+nc, 8400) head in xywh that needs NMS applied by
your code. YOLO26's end-to-end head produces (batch, 300, 6) in
xyxy, already NMS'd. Check output.shape[-1] — 6 means
end-to-end, 4+nc means it needs NMS.
How do I use a smaller calibration set — where's the fraction argument?
DEEPX export doesn't have one; other INT8 formats (ONNX, OpenVINO, TensorRT) do.
DEEPX's calibration reads every image in whatever data= YAML you point it
at, using EMA calibration, so build a small calibration-only YAML rather than trying to
subsample a large dataset at export time. See
Export arguments.
Can I export with a batch size greater than 1, or with dynamic input shapes?
No, for DEEPX specifically. The export is fixed at batch size 1 and a fixed square
imgsz. Export separate .dxnn files per resolution if multiple
input sizes are needed.
My compiled model's accuracy is lower than expected.
Some accuracy loss from INT8 quantization is normal — the published Raspberry
Pi 5 benchmark shows YOLO26n dropping from 0.476 to 0.466 mAP50-95. For the native or
Platform export, pass a data= calibration set that matches your real
deployment images rather than the default coco8.yaml. For the local
DX-COM path, increase calibration_num and consider DXQ enhanced
quantization — see the
DX-COM Configuration Reference.
dxrt-cli --version prints cleanly but inference is much slower than the published benchmark. What's wrong?
Check the PCIe link speed, not just enumeration — see
Check PCIe link speed, not just enumeration. On Raspberry
Pi 5, Gen3 needs to be enabled explicitly in /boot/firmware/config.txt;
without it the board negotiates down and the published 34.6 ms/image figure won't be
reached.
How do I know if a .dxnn file will load on a given device's runtime?
Run dxrt-cli -v on the target device and check the reported
.dxnn File Format version against the compiler that produced your file.
See Checking dx_com / dxrt compatibility.
How do I install the DEEPX runtime to actually run the .dxnn file?
On a Sixfab AI HAT+ or Edge AI Expansion Board, install it through Sixfab's APT repository:
# 1. Refresh the package index
sudo apt update

# 2. Install the Sixfab APT repository

sudo apt install apt-repo-sixfab

# 3. Refresh again, then install the DEEPX runtime

sudo apt update && sudo apt install sixfab-dx
This installs the driver and runtime needed to run the .dxnn file on the
NPU. Full steps are in the
AI HAT+ Raspberry Pi 5 Quickstart.
For hardware without Sixfab's APT repo, see
Manual runtime install. For deployment code on top of
the runtime, the
sixfab-dx-examples
repository wraps model loading and pre/post-processing into ready-to-run examples.
Updated 5 days ago