
Deploying Node-RED with Modbus Support
Deploy Node-RED on ALPON X5 AI and ALPON X4 with Sixfab Connect, then add Modbus support to read data from PLCs and industrial devices over TCP.
Deploy Node-RED with Modbus on ALPON
Run Node-RED as a container on your ALPON X5 AI or
ALPON X4 and wire it to industrial equipment. This guide deploys the container through
Sixfab Connect, installs the node-red-contrib-modbus palette, and builds a
working flow that polls a Modbus device over TCP.
Push the nodered/node-red image to your Sixfab Registry (or deploy it
straight from Docker Hub), then use the Application → Deploy panel on
Sixfab Connect to launch the container on your ALPON X5 AI or
ALPON X4 with Host Network enabled. Open the editor at
http://<DEVICE_IP>:1880, install node-red-contrib-modbus from
Manage Palette, and add Modbus-Read / Modbus-Server nodes to poll your
industrial device.
Overview
Node-RED is an open-source, flow-based tool for wiring together hardware devices, APIs, and online services. Running it as a container on an ALPON X5 AI or ALPON X4 edge computer turns the device into a local automation gateway: it can poll PLCs and sensors on the factory floor, transform the data, and forward it to the cloud, all without a separate industrial PC.
With the Modbus palette added, Node-RED speaks Modbus TCP to any compatible device, energy meter, or PLC on the same network as the ALPON. The steps below are identical on ALPON X4 and ALPON X5 AI.
You need an ALPON X5 AI or ALPON X4 registered on Sixfab Connect, and Docker installed on your build machine to pull and push the image. New to container deployment? Start with Containerize Apps for ALPON.
-
1
Add the Node-RED container
Make sure the
nodered/node-redimage is available to your device. The recommended path is to push it to your Sixfab Registry so deployments are fast and work offline. From your build machine, pull thearm64image:bash · pull the imagedocker pull --platform linux/arm64 nodered/node-red:latest
Then log in to Sixfab Registry, click + Add Container, and follow the prompts to push the image.
Pushing images to the Sixfab RegistryFor the full walkthrough of tagging and pushing an image, see Update Containers from the Sixfab Registry.
Alternative: deploy straight from Docker Hub
If you prefer not to use the Sixfab Registry, choose “I would like to use my own container path” during deployment and enter
nodered/node-red:latest. The container is then pulled directly from Docker Hub (the device needs internet access at deploy time). -
2
Deploy the container on ALPON
Open your device in Sixfab Connect, go to the Application section, and click + Deploy. In the Deploy Container window, use these settings:
Container Namenode-redImageThe Node-RED image and tag you pushed to the Sixfab Registry — or, using the alternative option,nodered/node-red:latest.Enable Host NetworkTurn this on so Node-RED can reach other devices — including your Modbus equipment — on the local network.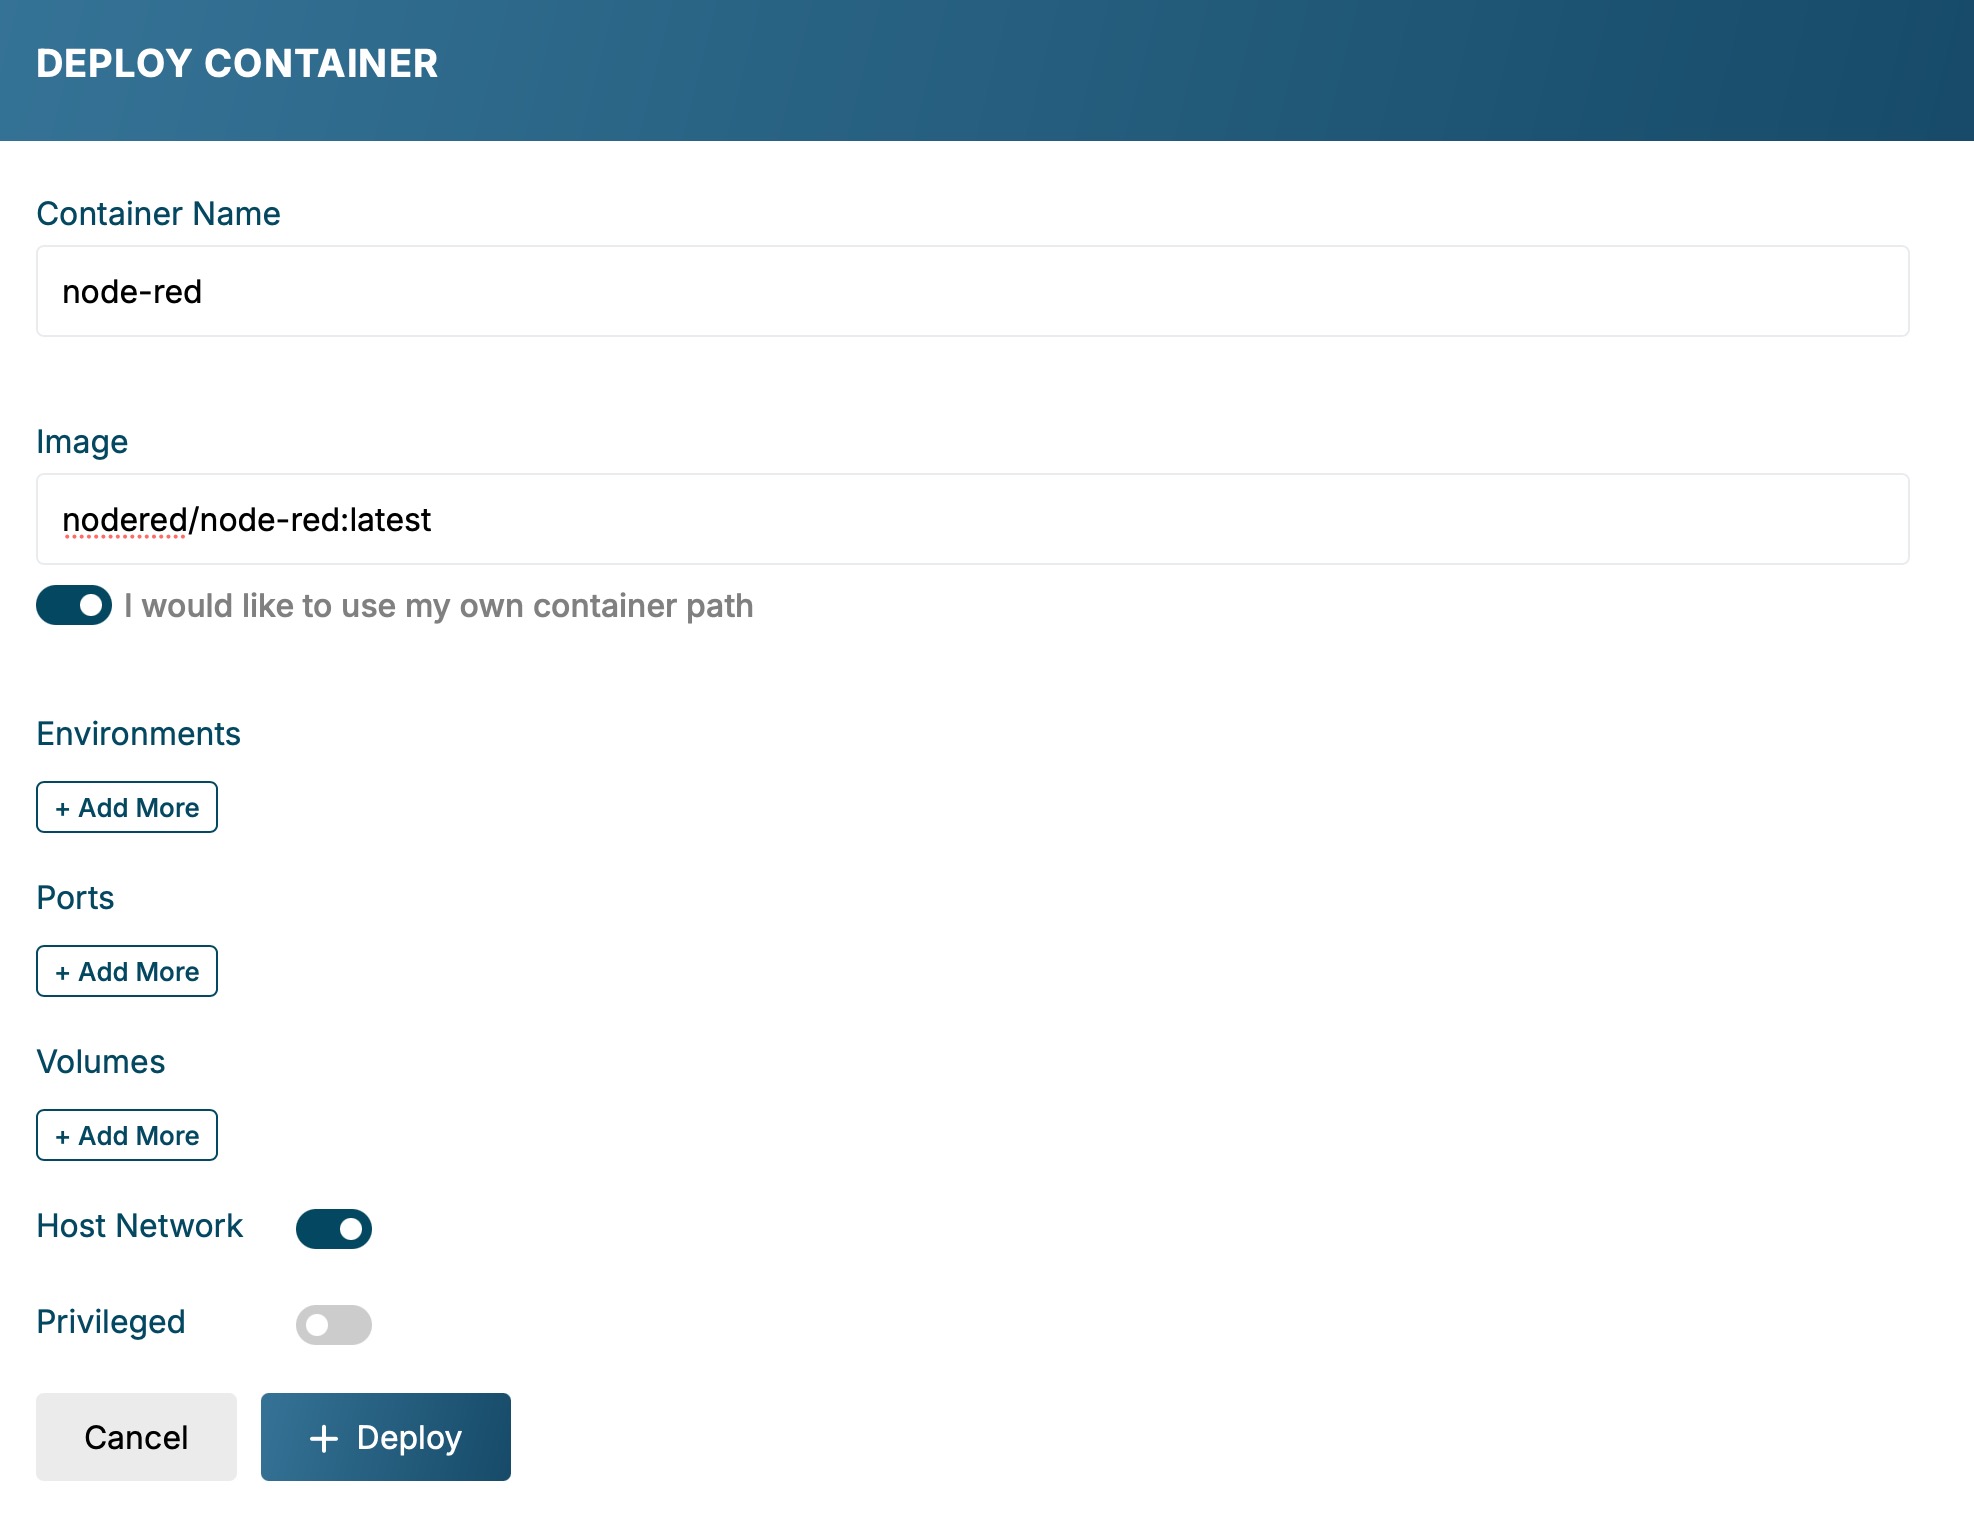
The Deploy Container window on Sixfab Connect, with Host Network enabled. Click + Deploy to launch Node-RED on the device.
-
3
Open the Node-RED editor
Once the deployment finishes, find the device's local IP address under Asset Details → Network tab → Interface Monitoring → Details, then open the editor in a browser:
browser · Node-RED editorhttp://<DEVICE_IP>:1880The Node-RED flow editor should now load. If it doesn't, confirm the container is running in the Application section and that Host Network was enabled in step 2.
-
4
Install Modbus support
In the Node-RED editor, open the menu in the top-right corner and choose Manage Palette.
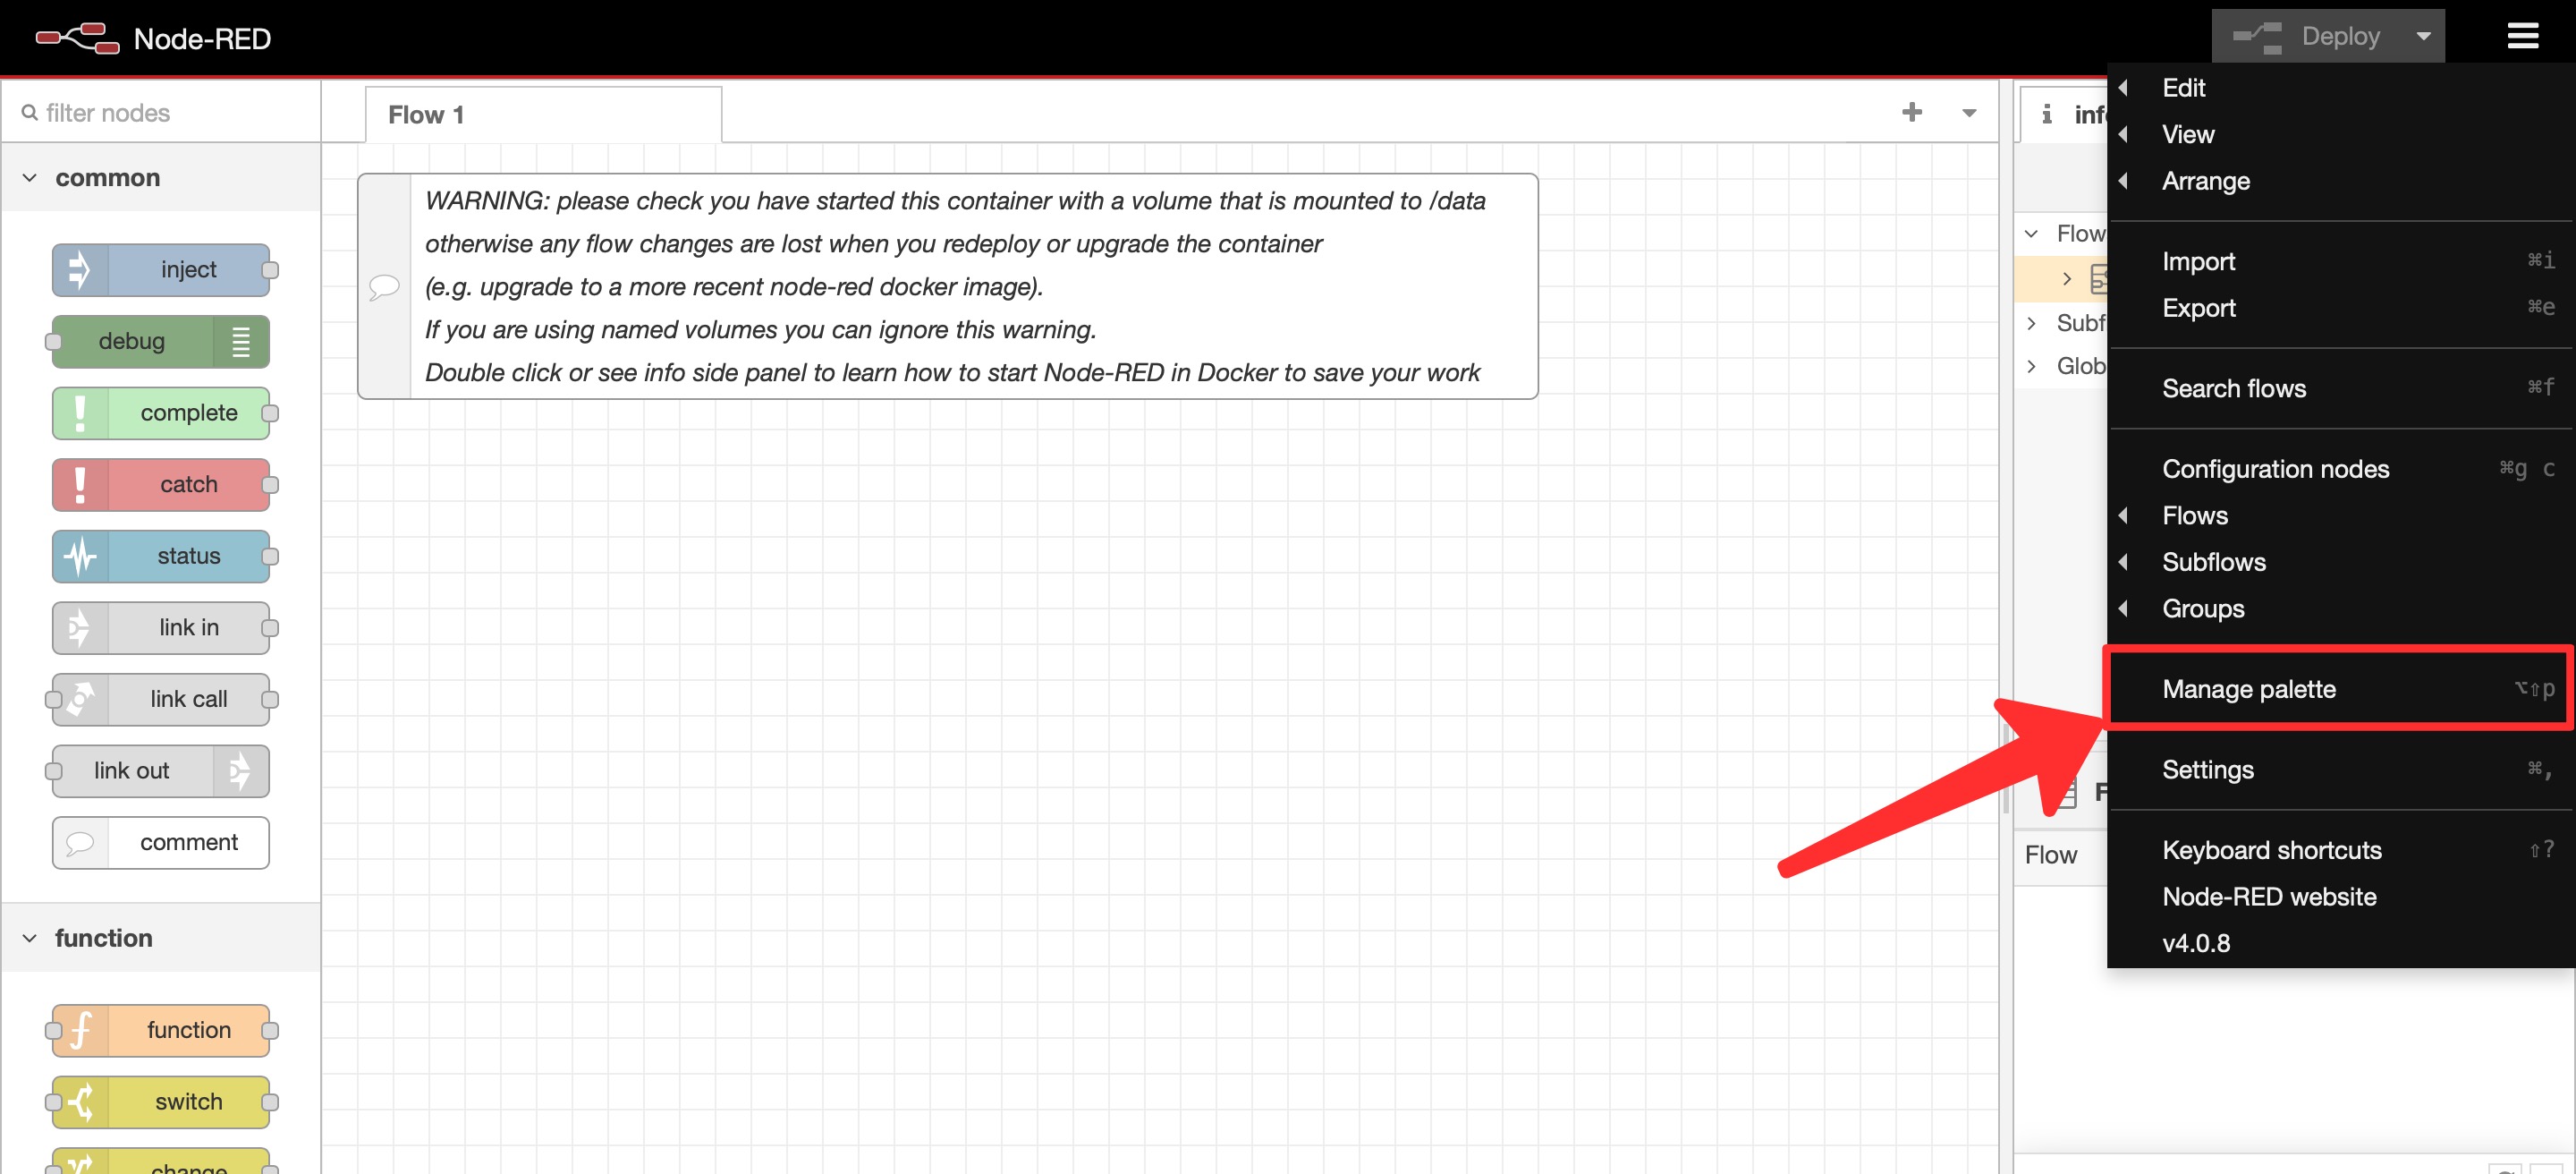
Open Manage Palette from the Node-RED menu. Switch to the Install tab and search for
node-red-contrib-modbus, then click Install.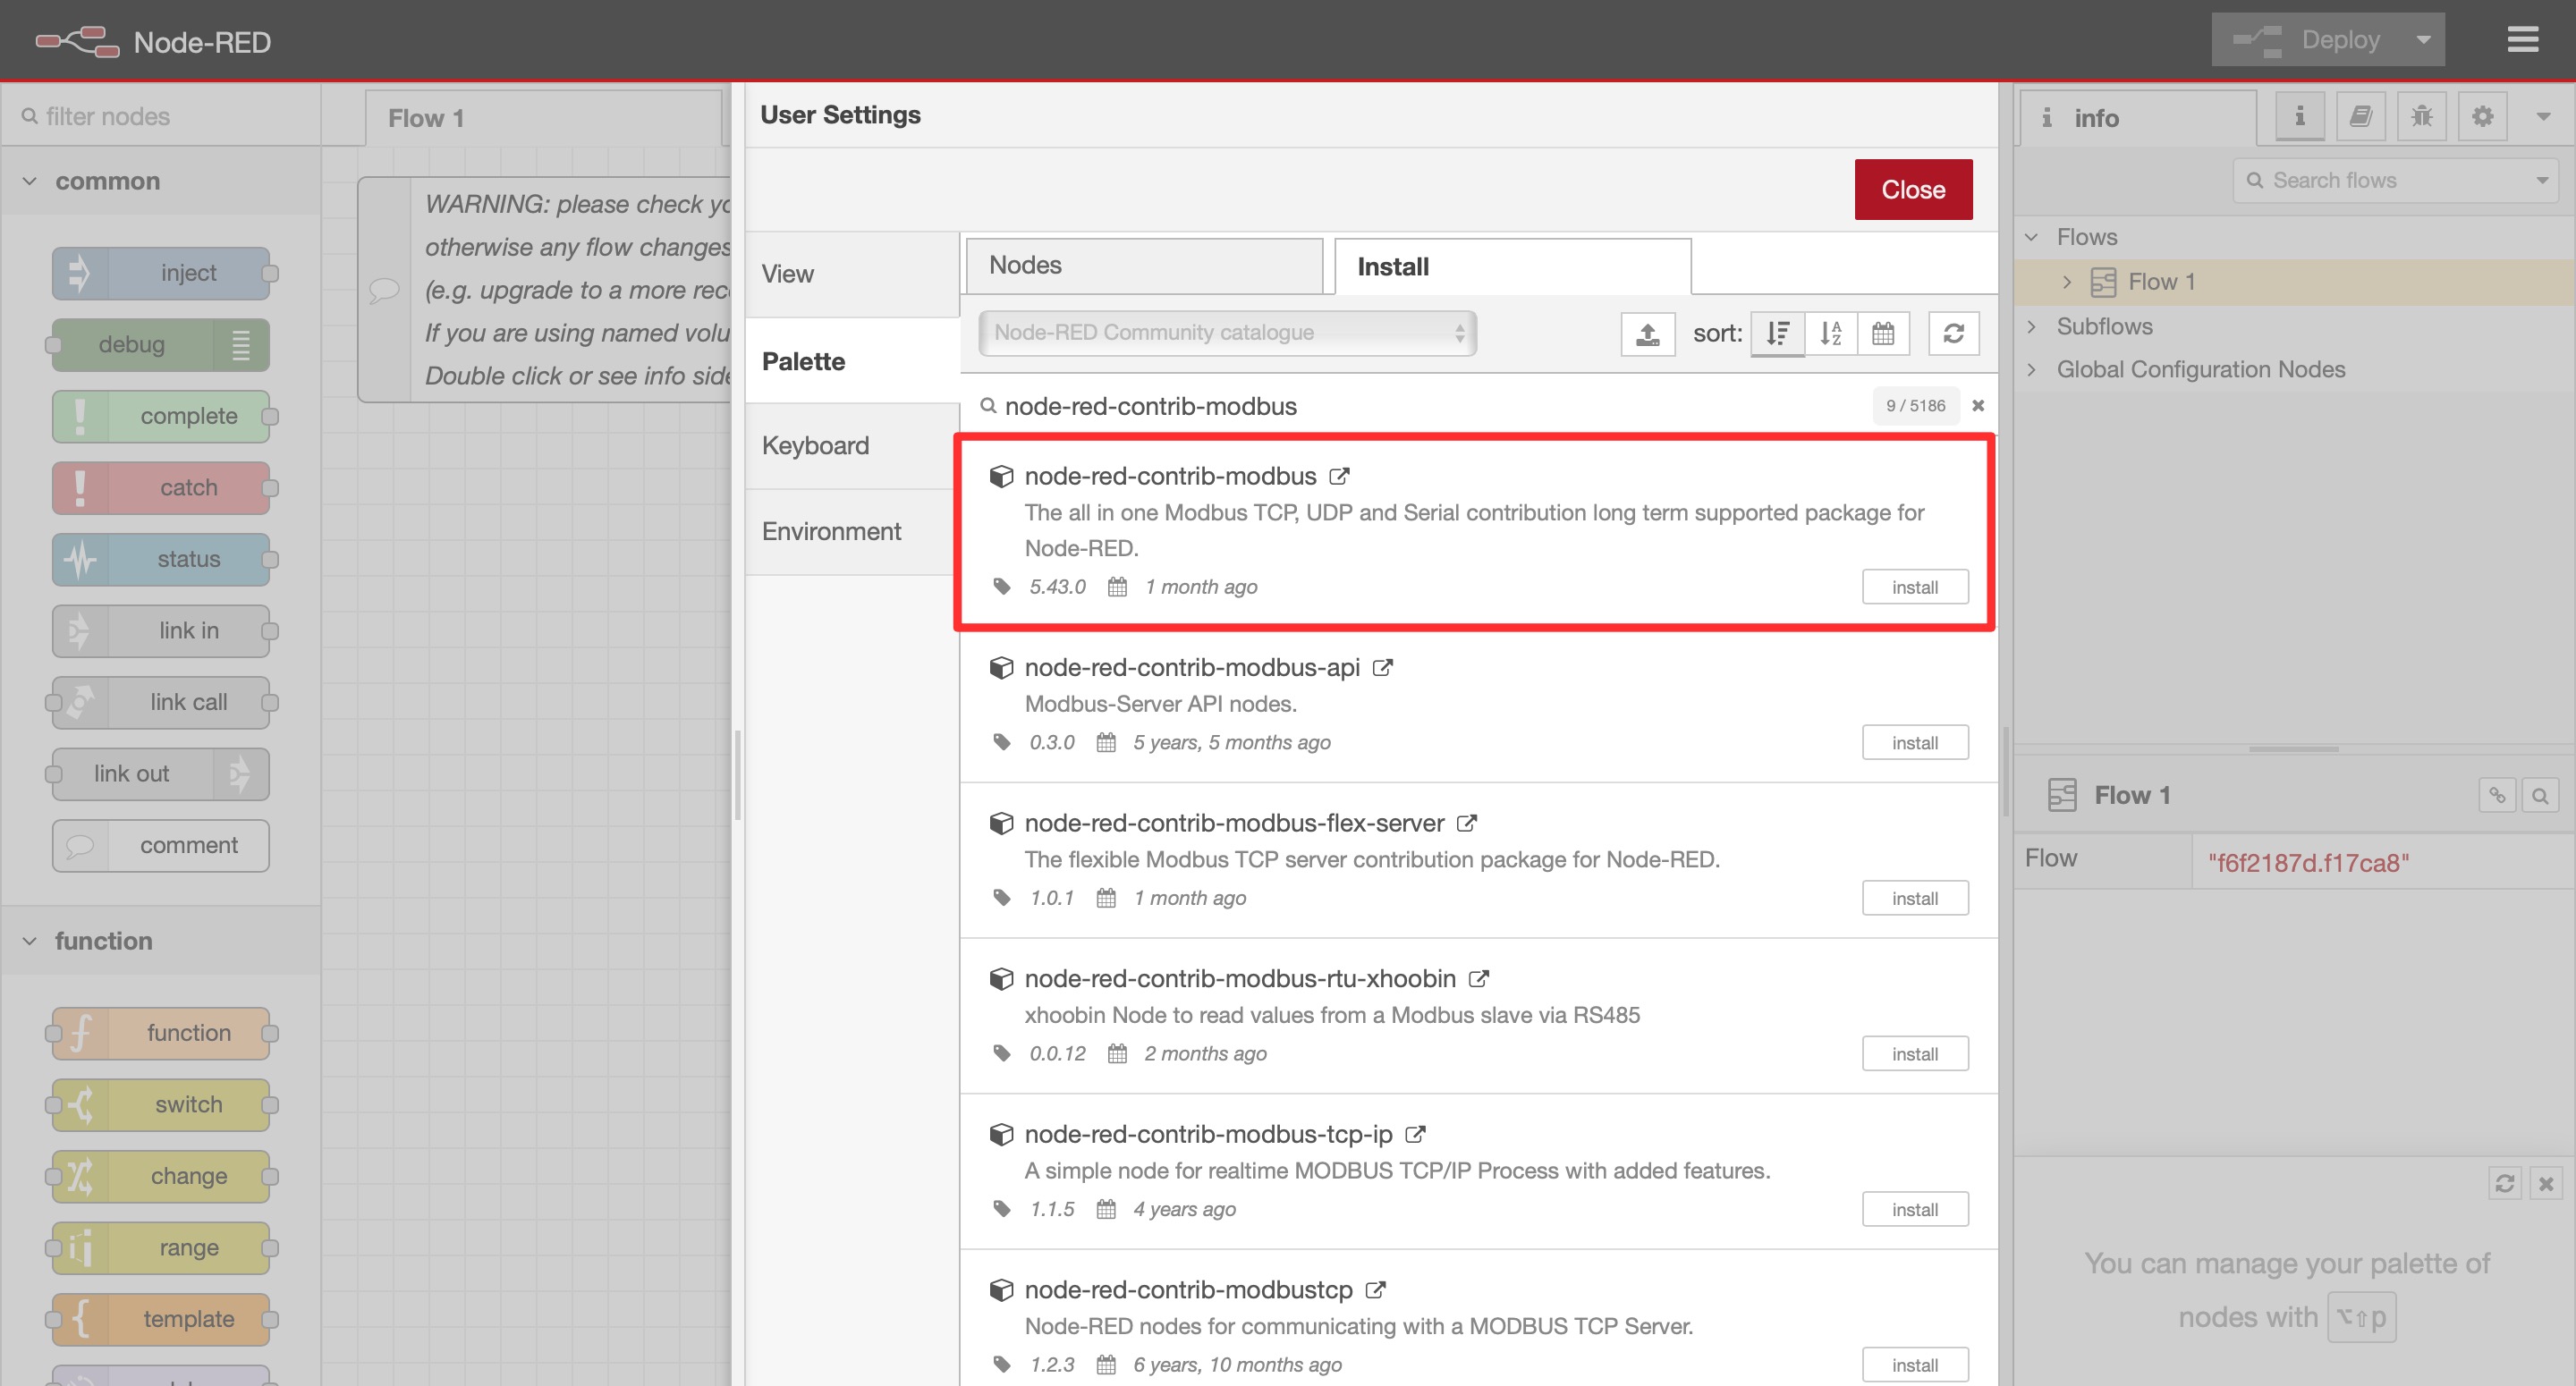
Search for node-red-contrib-modbusand install it.After the install completes, the Modbus nodes appear in the palette on the left.
-
5
Build a Modbus read flow
Drag nodes from the palette to assemble a flow like the one below — a trigger feeding a Modbus-Read node, wired to a debug node so you can watch the values.
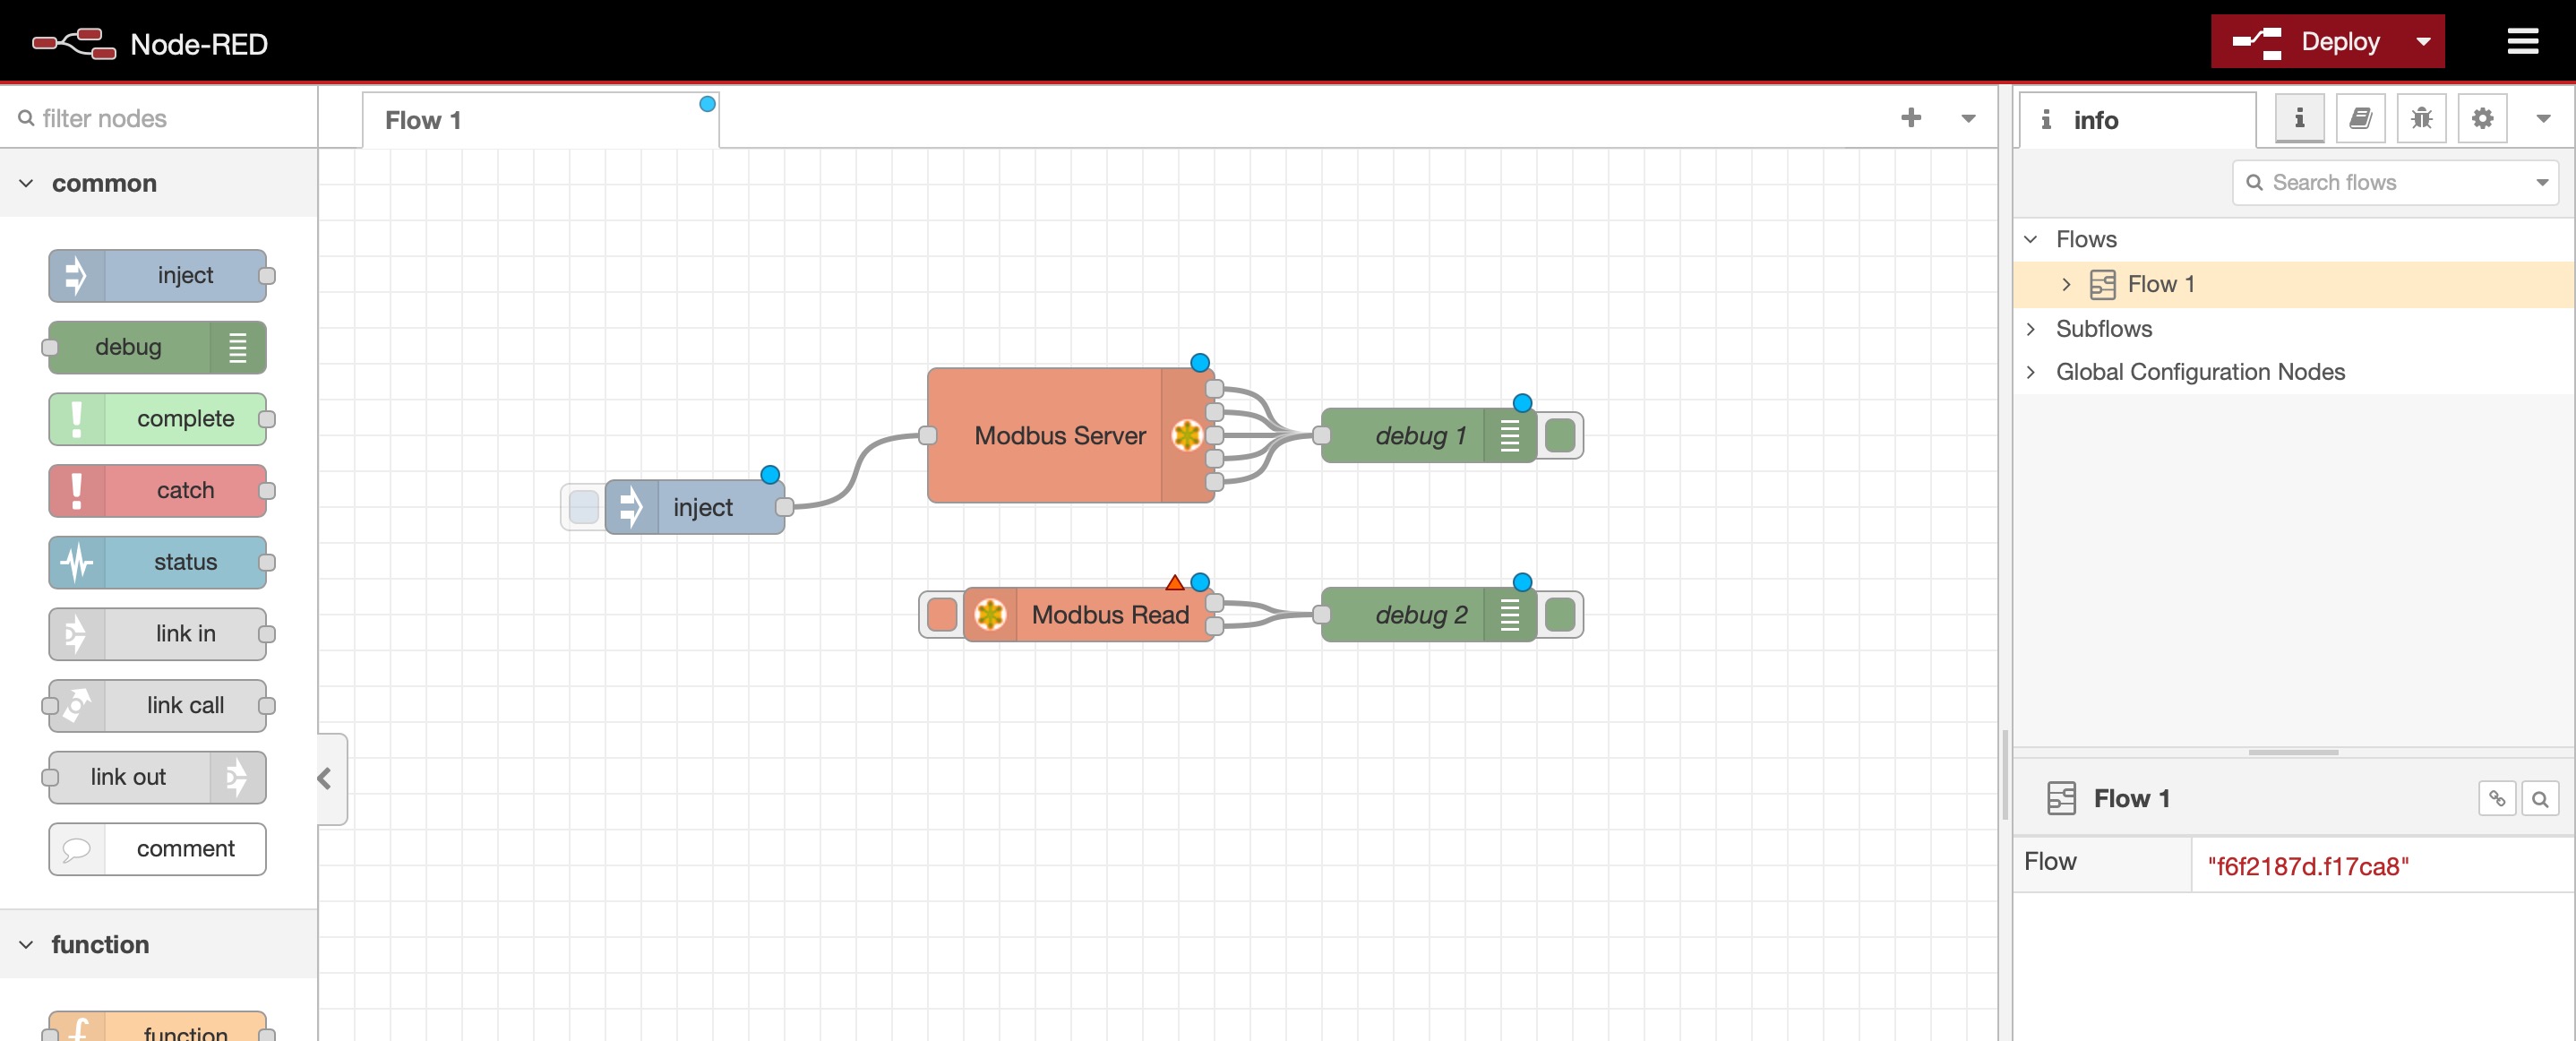
An example Modbus read flow. Double-click the Modbus-Server node, configure it as shown, and click Done. This example uses port
10502— use another port if your setup requires it.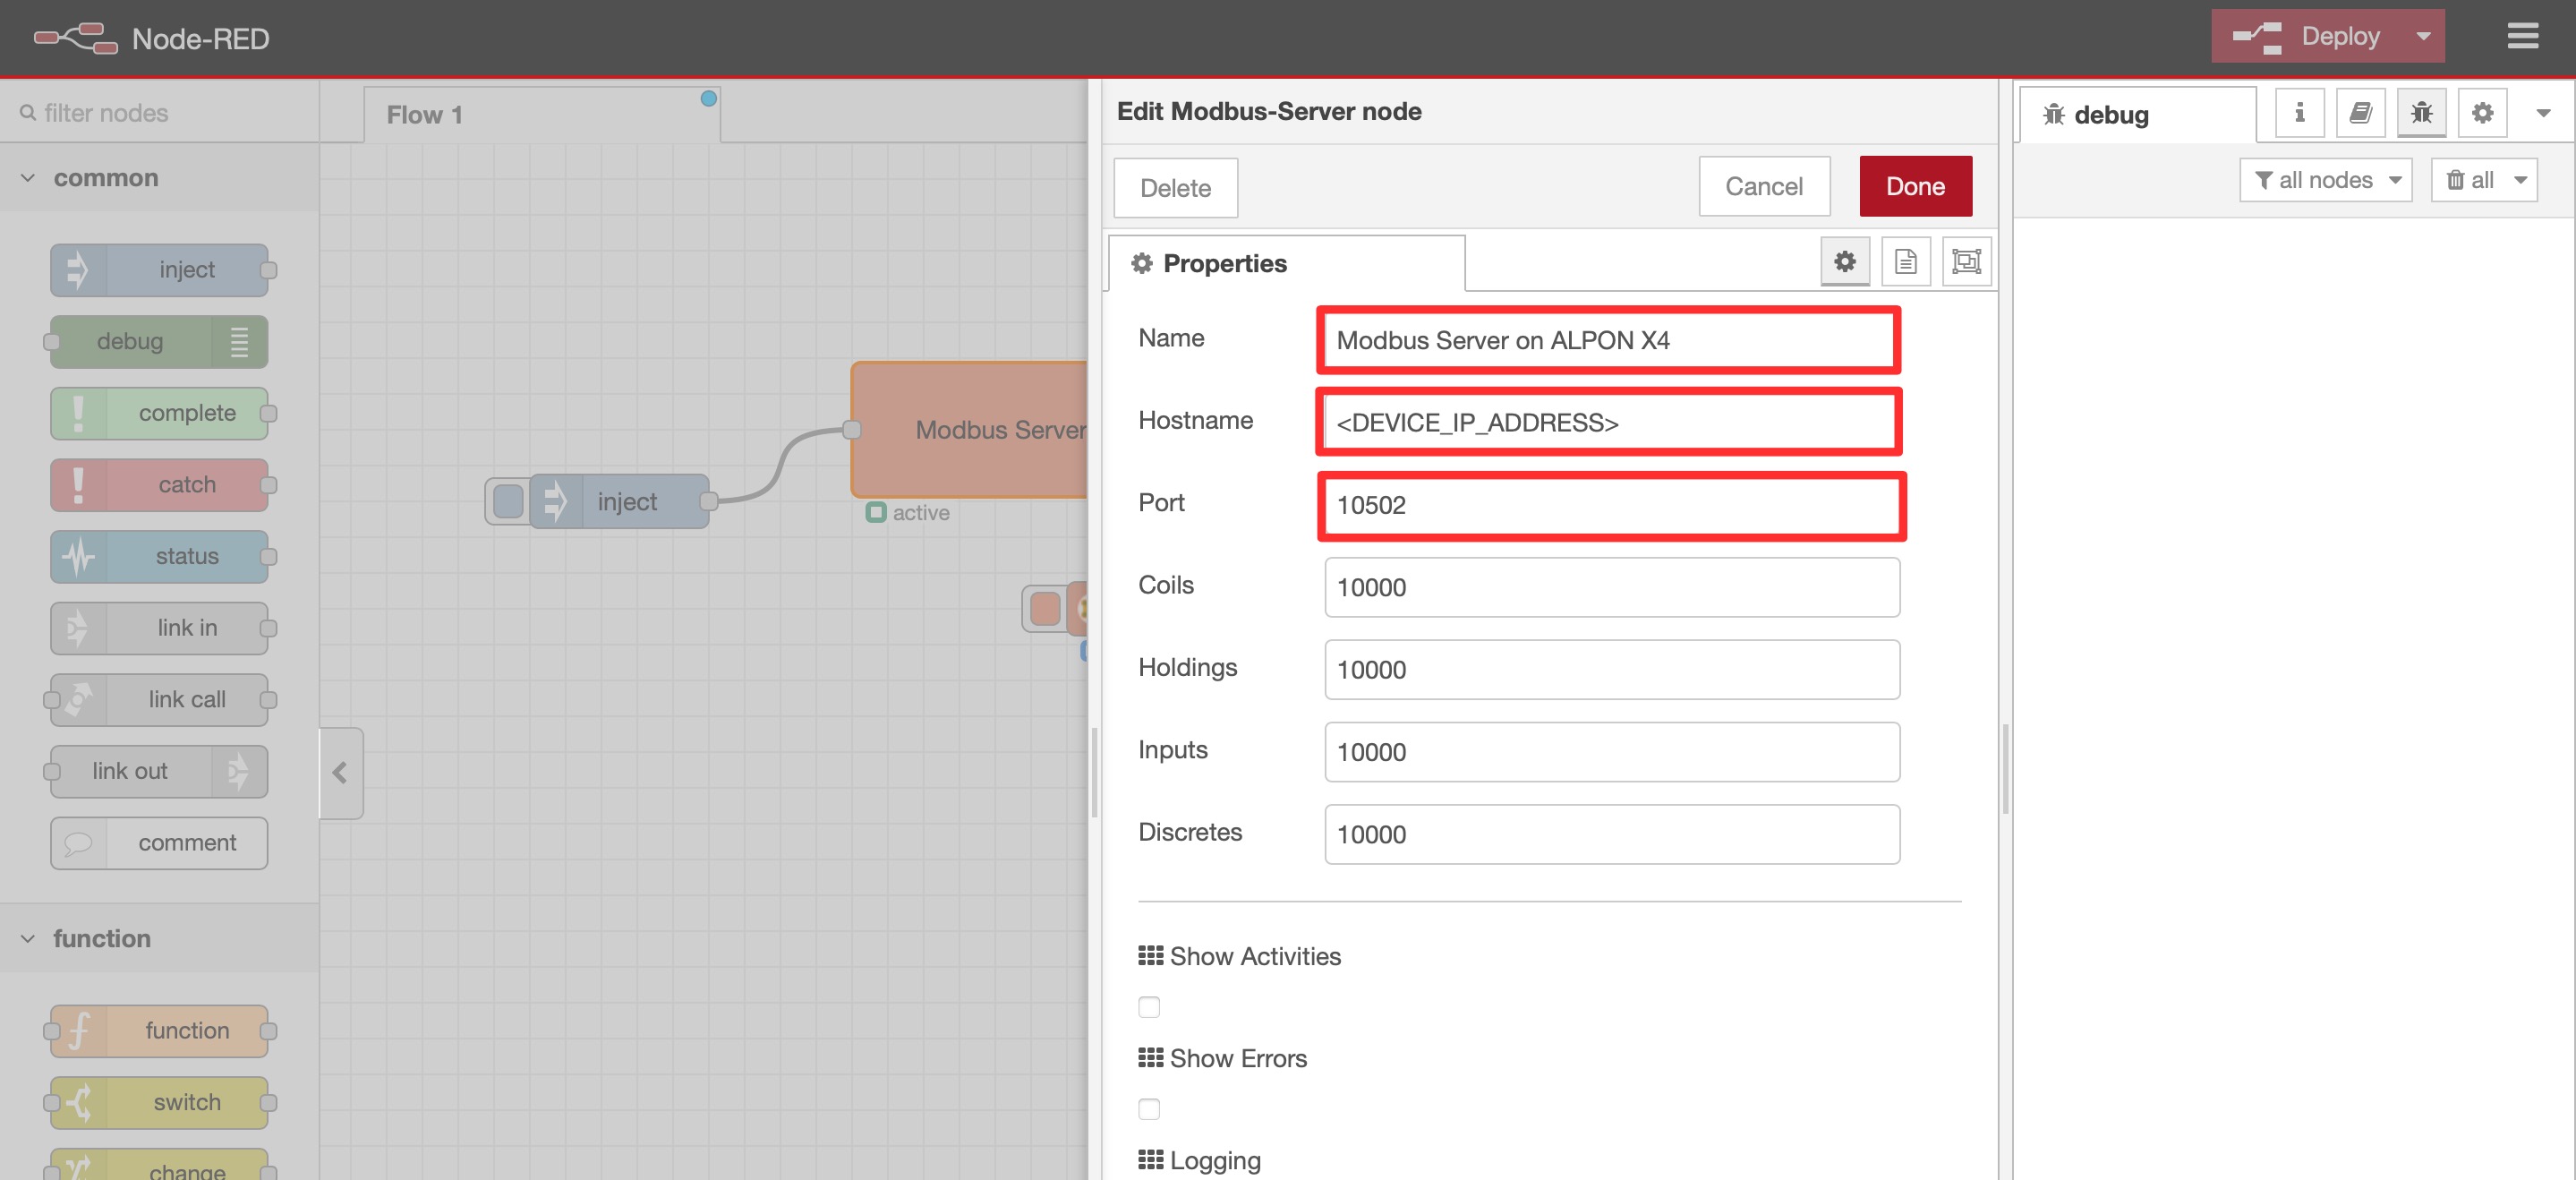
Configuring the Modbus-Server node on port 10502.Next, double-click the Modbus-Read node to configure it. This example uses FC 3: Read Holding Registers, but you can pick a different function code to match your device.
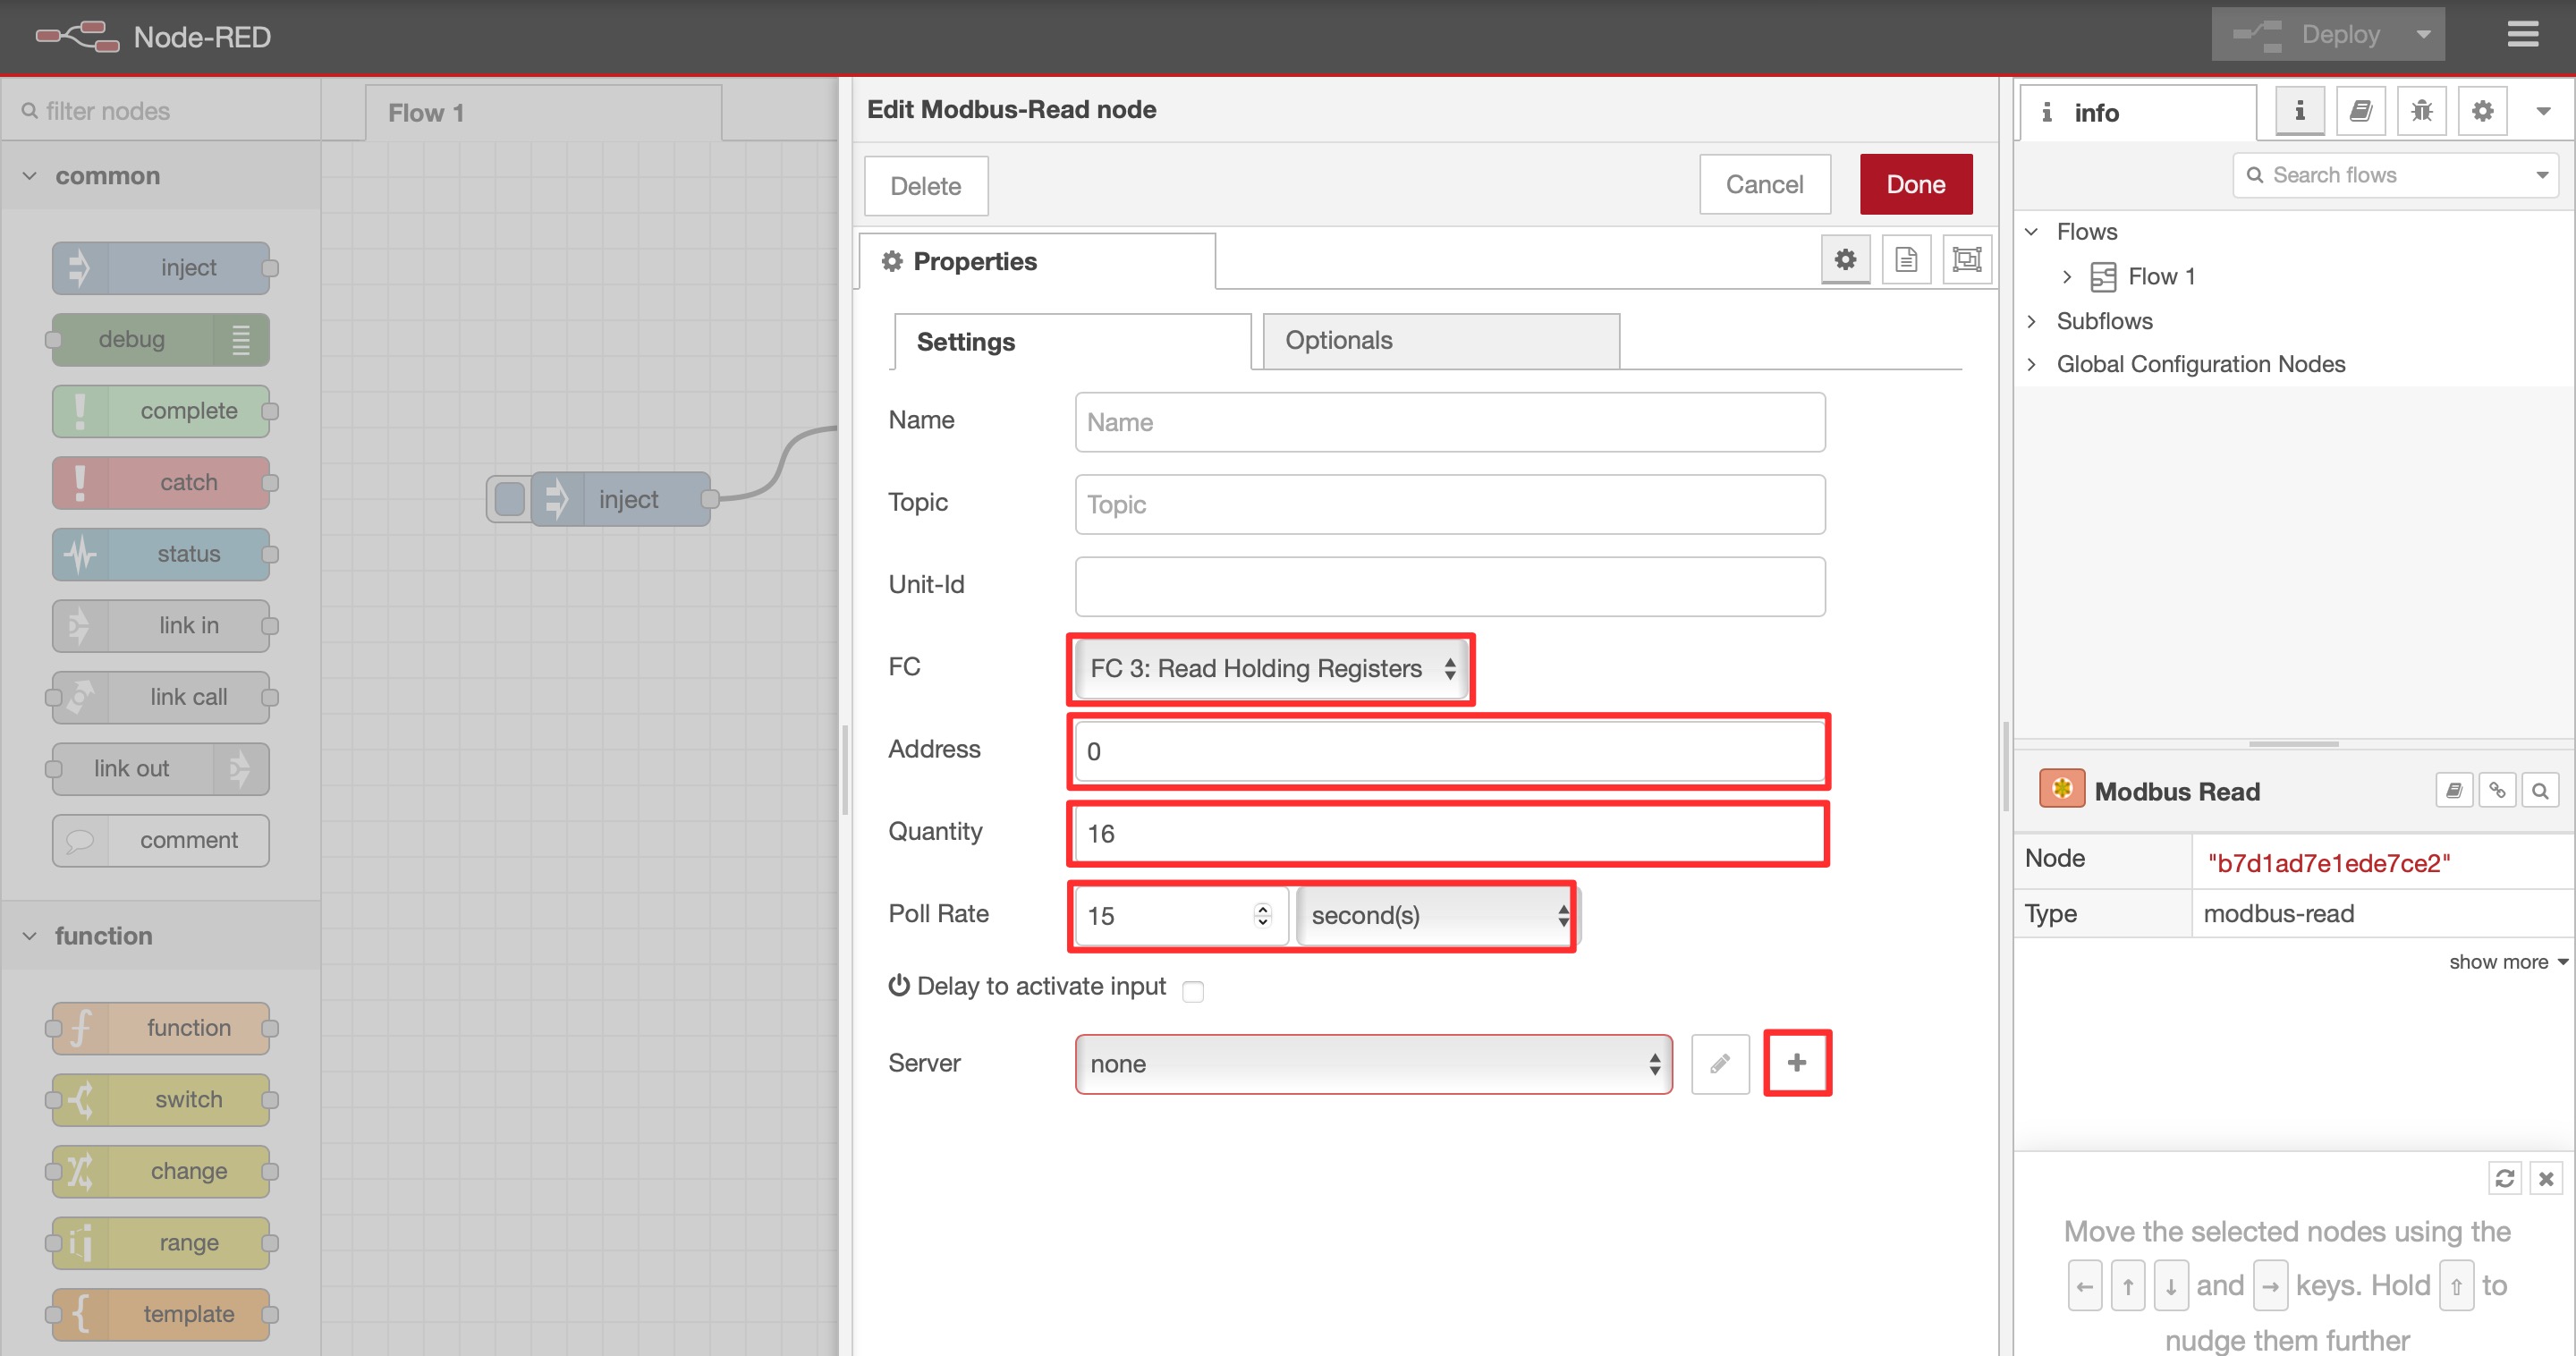
The Modbus-Read node set to FC 3: Read Holding Registers. Click the + button next to the server field to define the Modbus server to read from. Fill in the required fields, click Add, then Done.
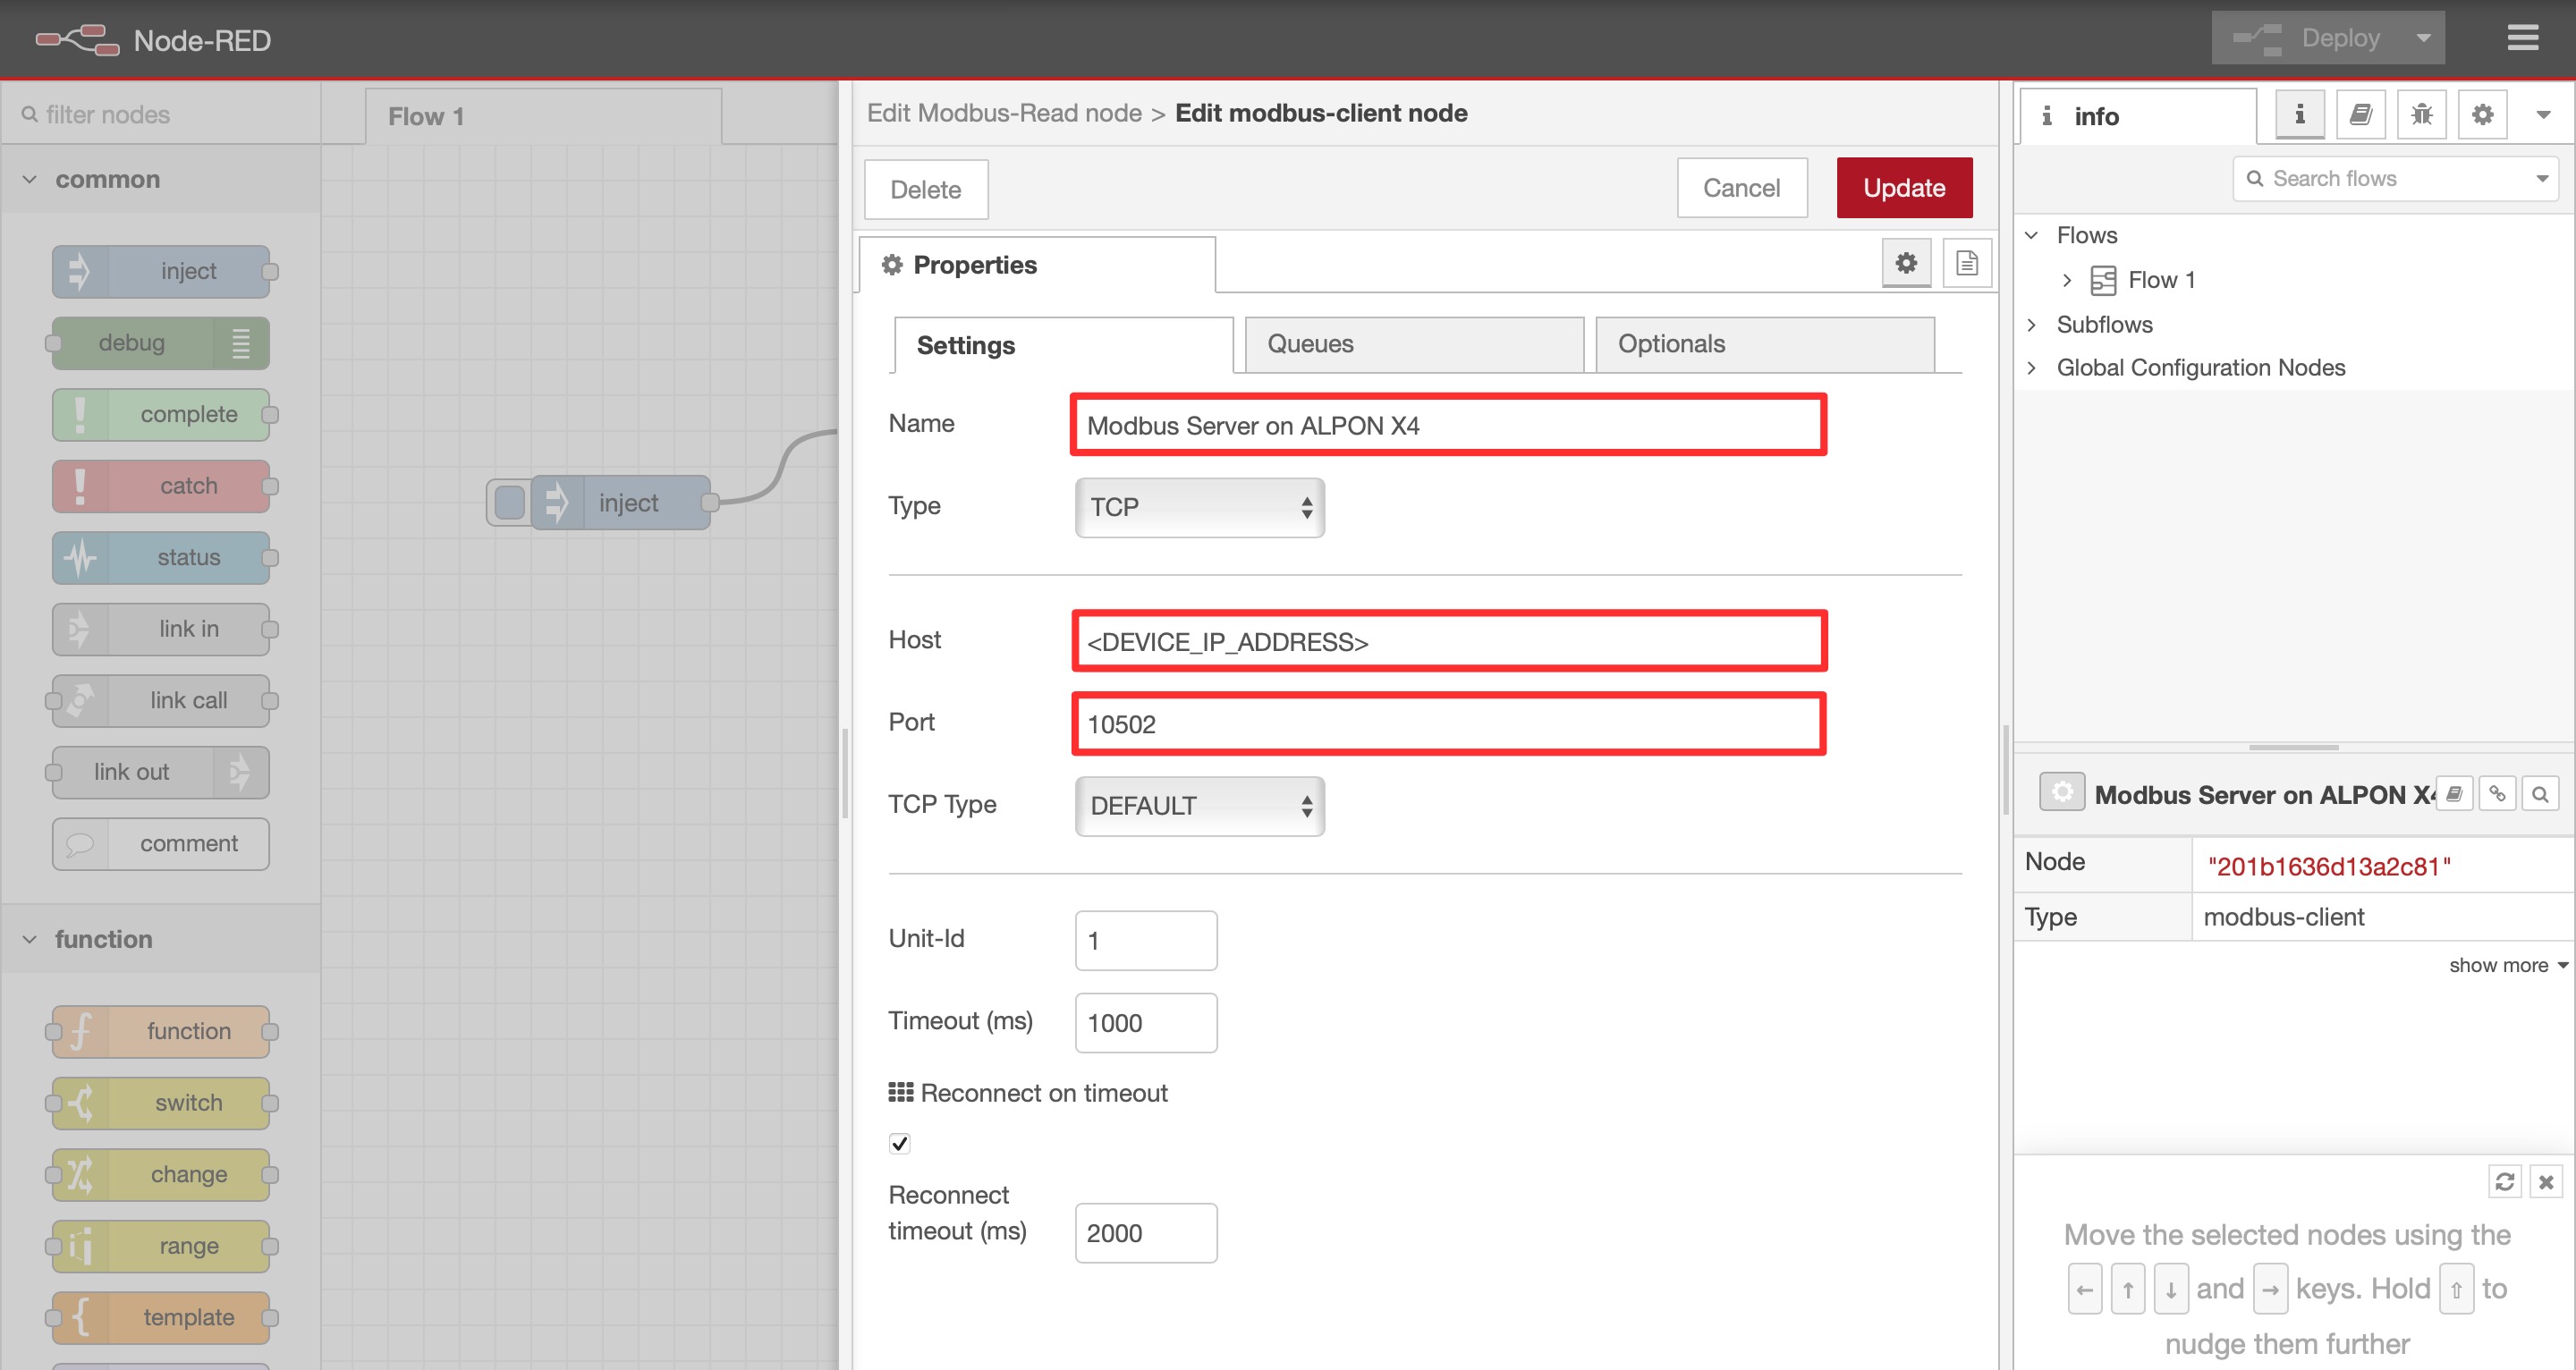
Defining the Modbus server for the read node. Finally, click Deploy in the top-right corner and open the debug panel. If everything is configured correctly, you'll see register values arriving on the polling interval.
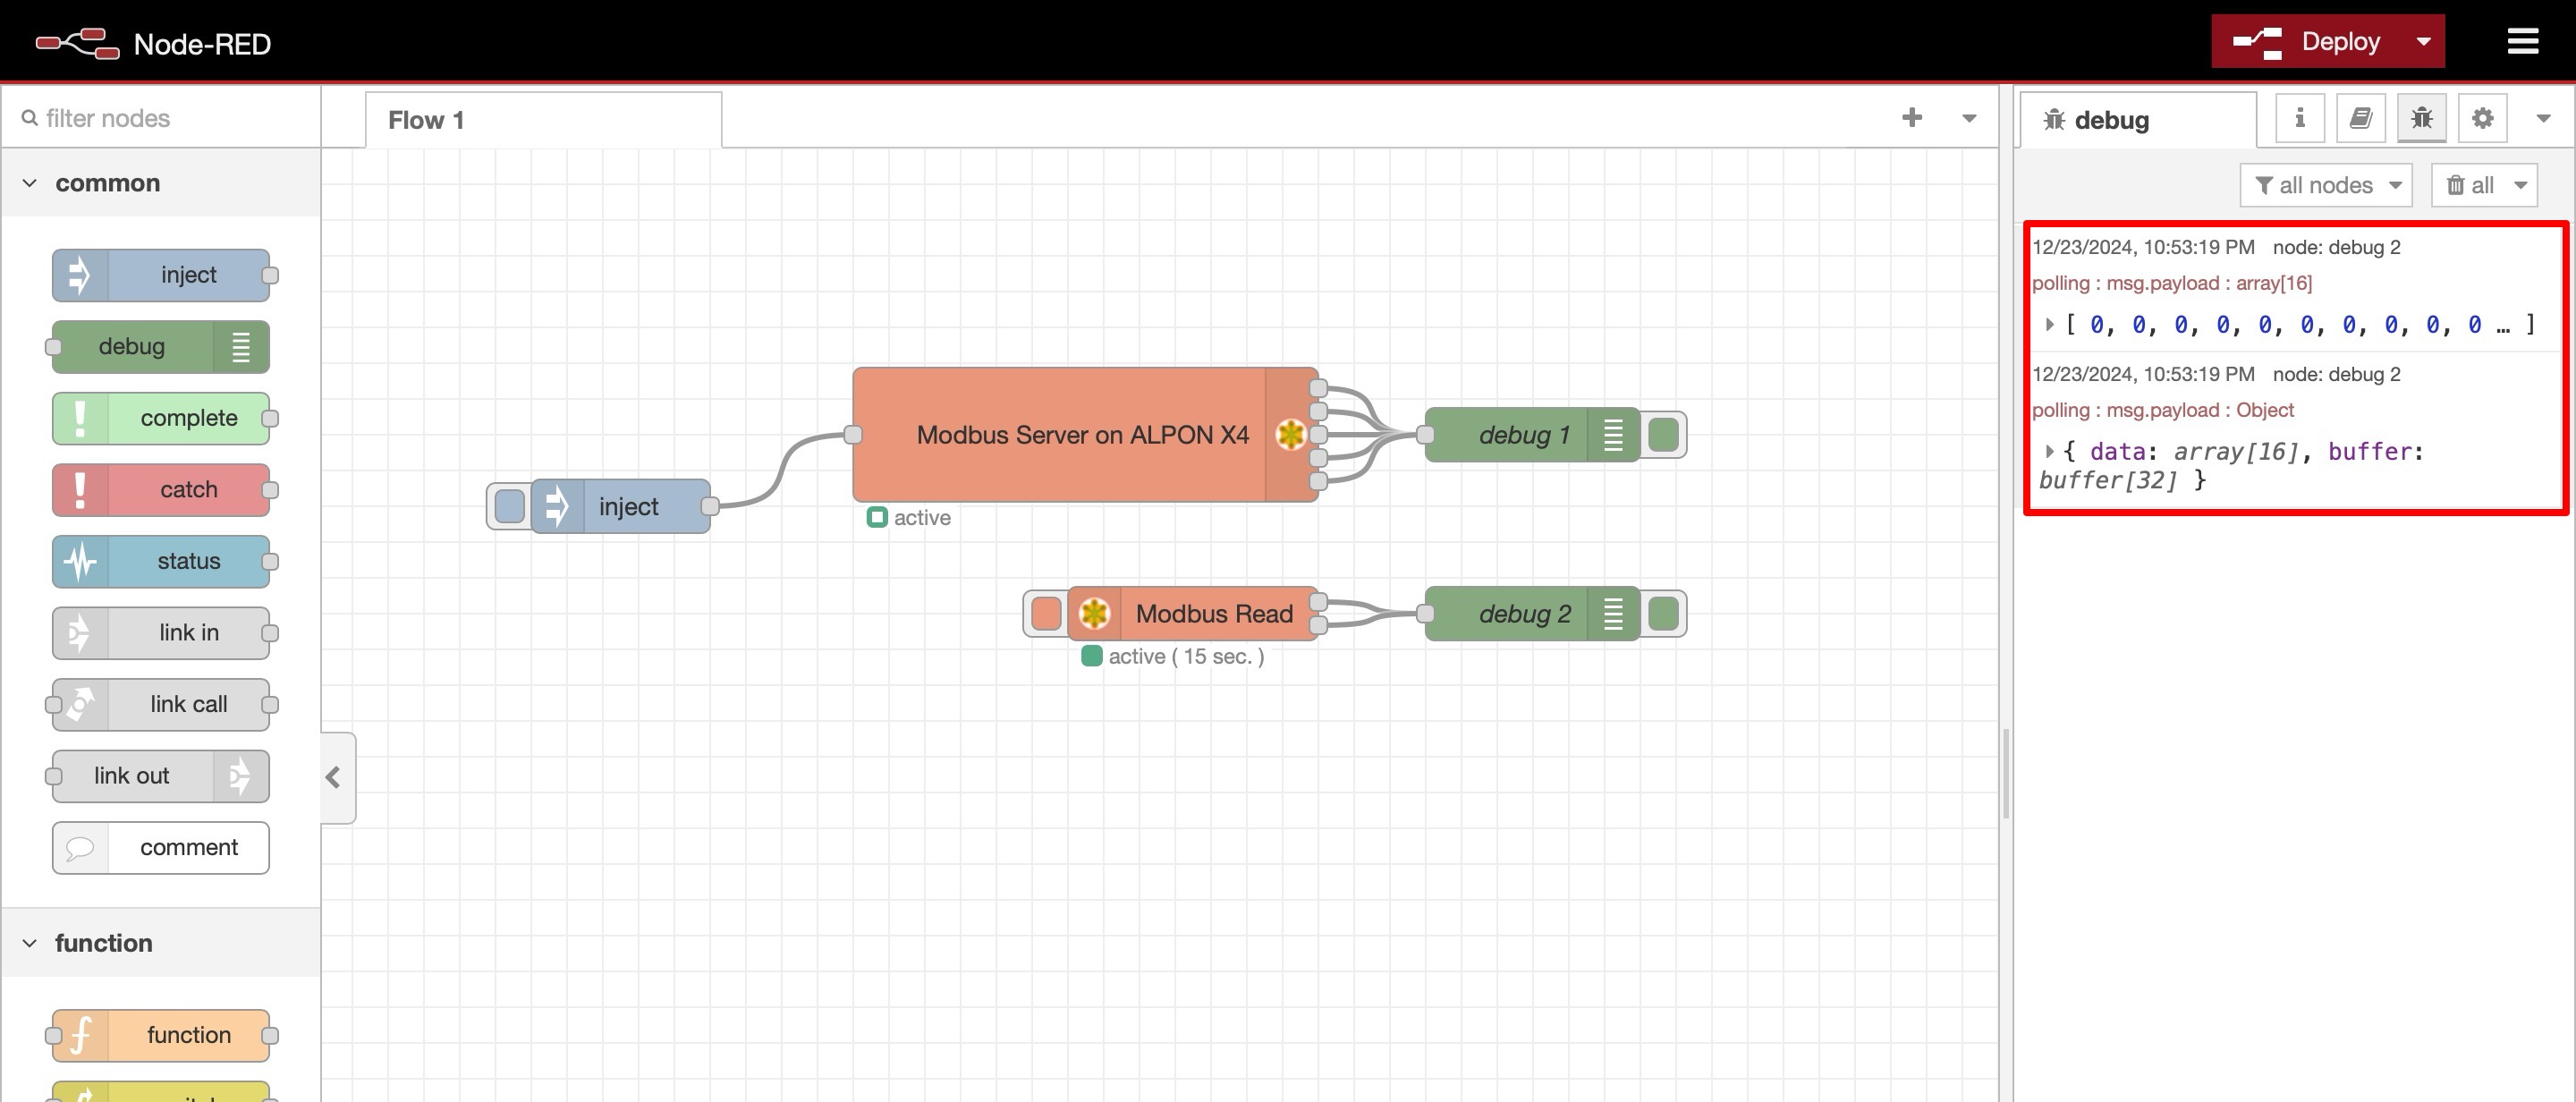
Modbus data arriving in the Node-RED debug panel.
- The
node-redcontainer shows as running in the Application section. - The editor loads at
http://<DEVICE_IP>:1880. - The Modbus nodes appear in the palette after installing
node-red-contrib-modbus. - Register values appear in the debug panel after you click Deploy.
Node-RED is now polling your Modbus device from the ALPON. Extend the flow to transform the data or forward it to the cloud using any of Node-RED's built-in nodes.
Updated 24 days ago