
Google Sheets API Usage
Get ready to explore the powerful combination of the Pico LTE and the Google Sheets API in this quick tutorial. Our focus will be on leveraging the capabilities of the Pico LTE to interact with Google Sheets through the Google Sheets API. By the end of this tutorial, you'll have a clear understanding of how to add, delete, retrieve data, and even dynamically add rows to your Google Sheets spreadsheet using the Pico LTE.
Before starting this Pico LTE tutorial, the Pico LTE SDK installation and configuration steps must be completed. Below are the system requirements for this tutorial. If you haven't followed the SDK installation steps, please refer to the page below before proceeding with the tutorial. The details of these steps will not be covered in this tutorial.
System Requirements
| Hardware Requirements | Software Requirements |
|---|---|
| • Sixfab Pico LTE • Micro USB cable |
• Thonny IDE |
If you have completed all the requirements, you are ready to use Google Sheets API with the Pico LTE device.
Let's get started!
Preparing Coding Environment
- Download the Pico LTE SDK repository to your local machine. If you have already downloaded it, skip this step.
- Open script "examples → google_sheets → create_sheet.py / add_data.py / add_row.py / delete_data.py / get_data.py"from the repository via Thonny IDE.
- If you haven't, create a config.json file in the root directory of Pico LTE device.
Google Sheets API
1. Login to Google Cloud Console
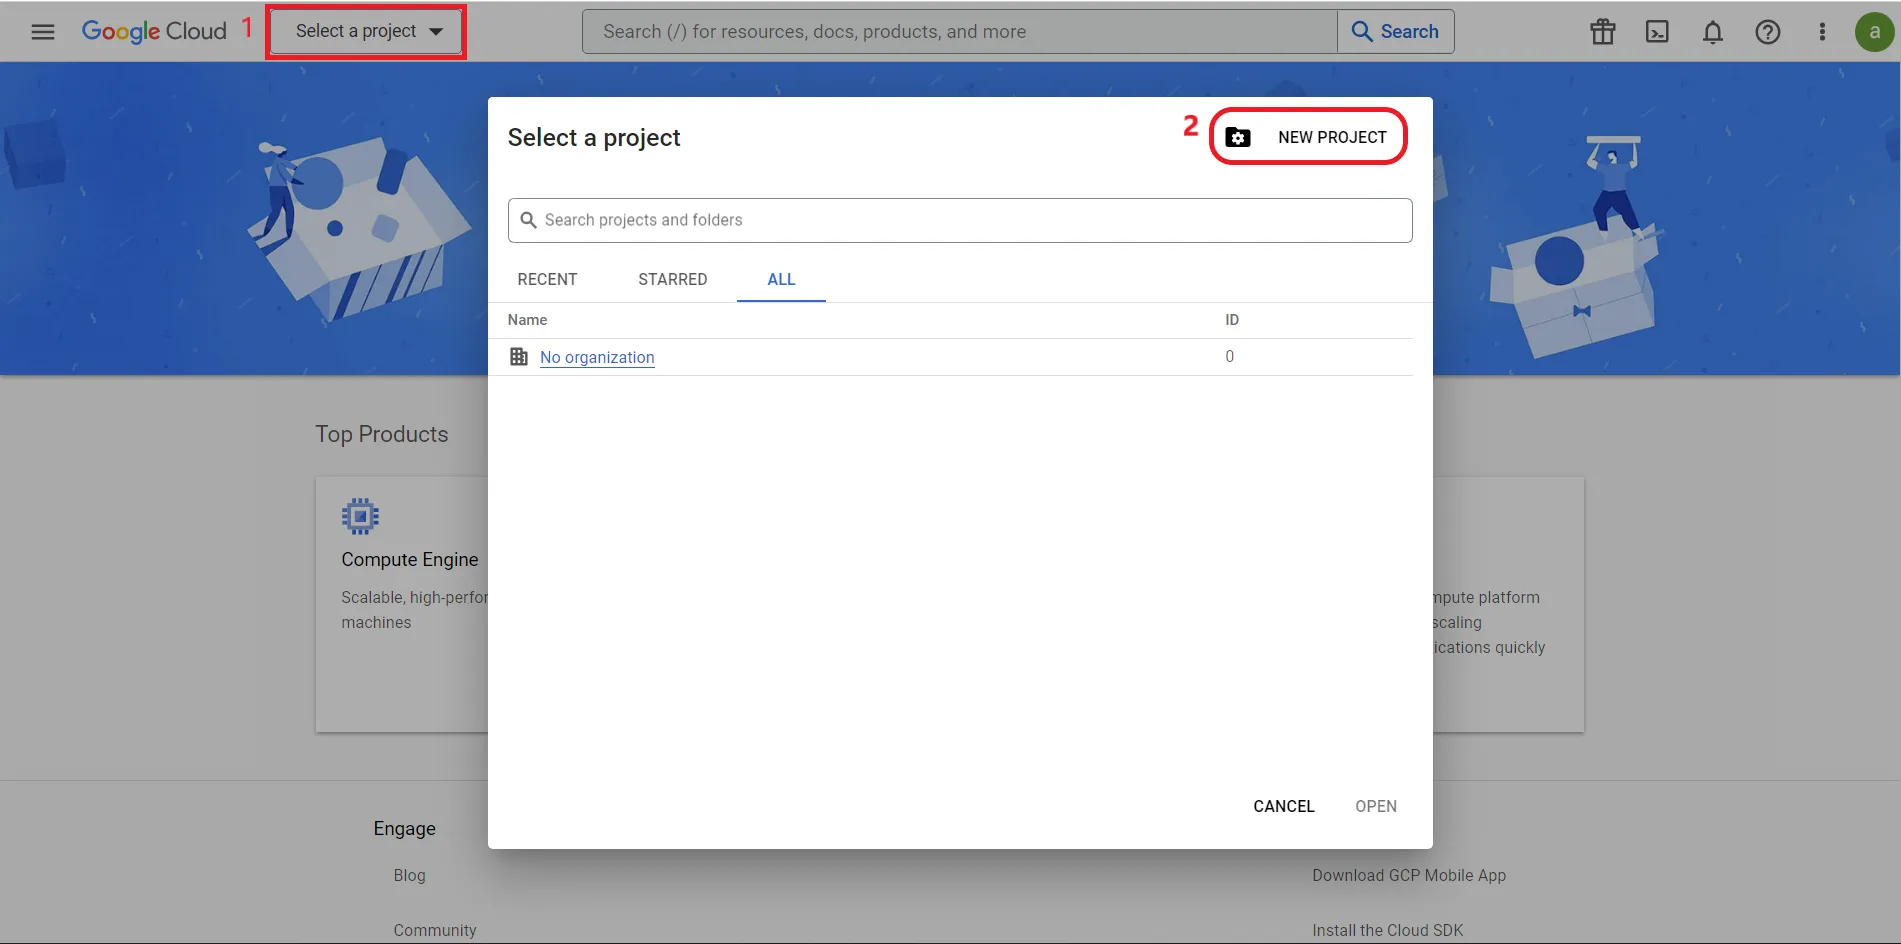
Login to Google Cloud Console with your Google account from the login page.
2. Create a New Project
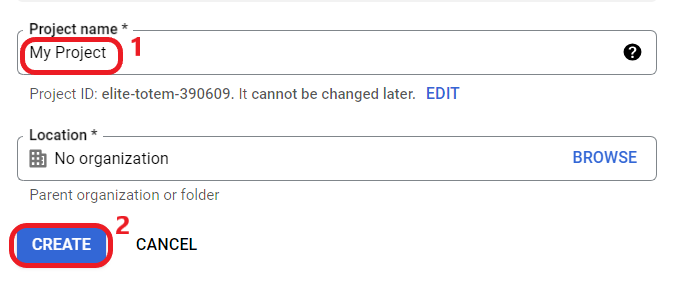
Create a project and give a name to it.
3. Enable Google Sheets API and Create Credentials
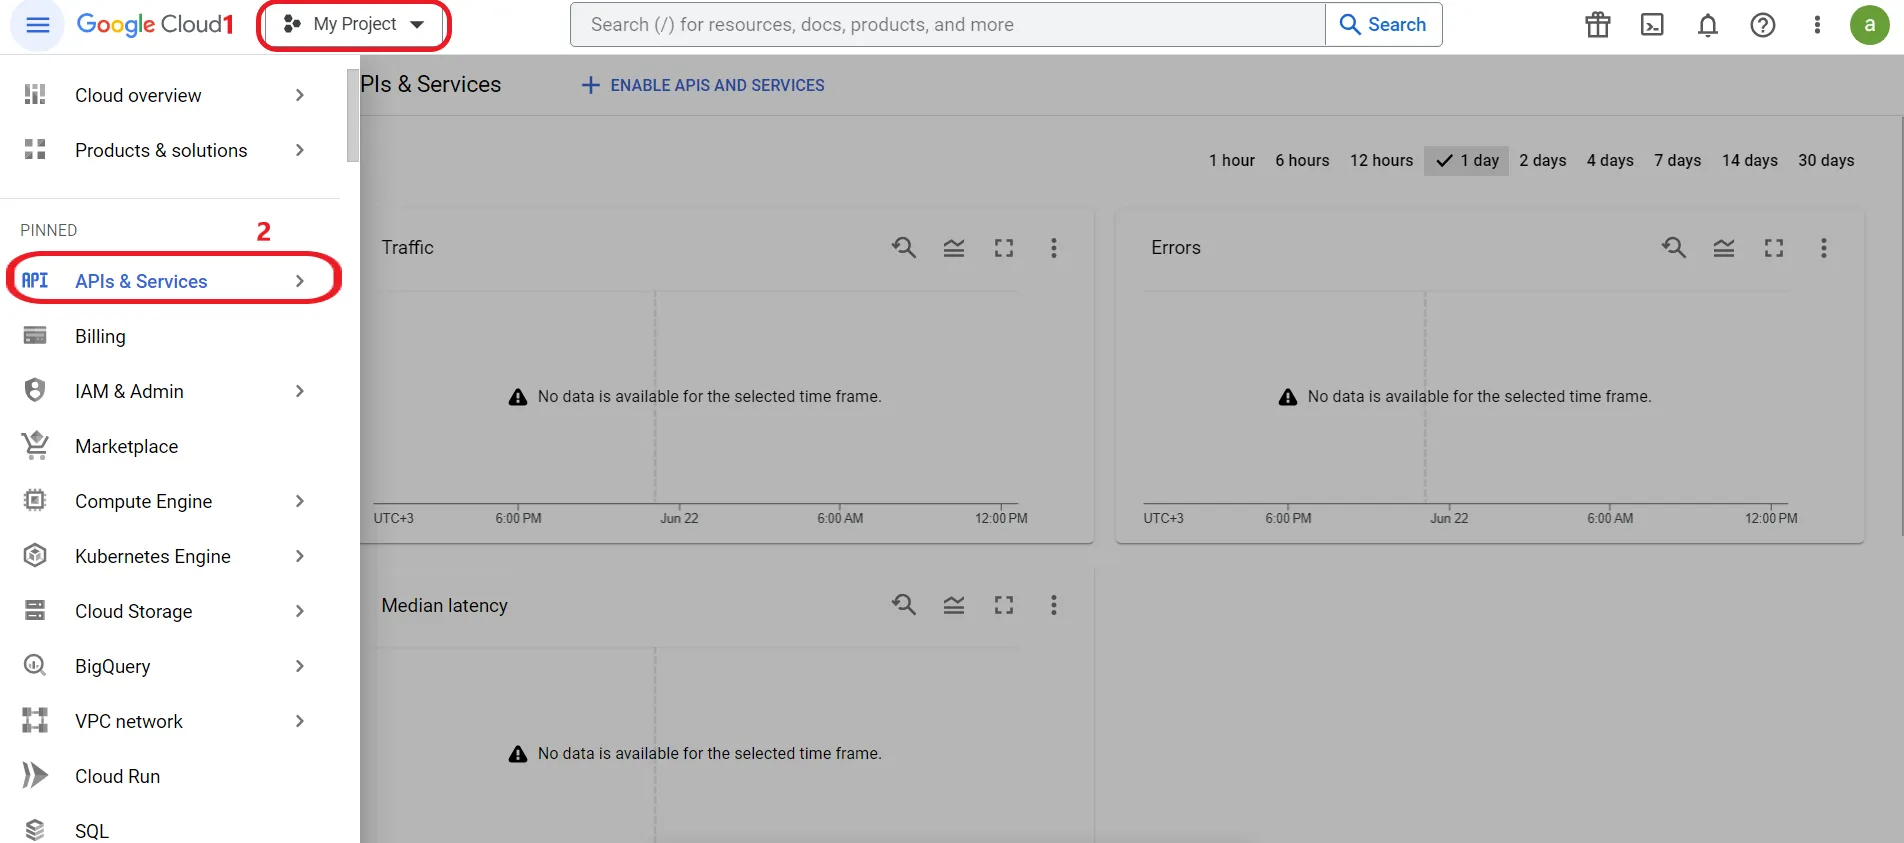
Select your project at first. Then, select "APIs & Services" section.
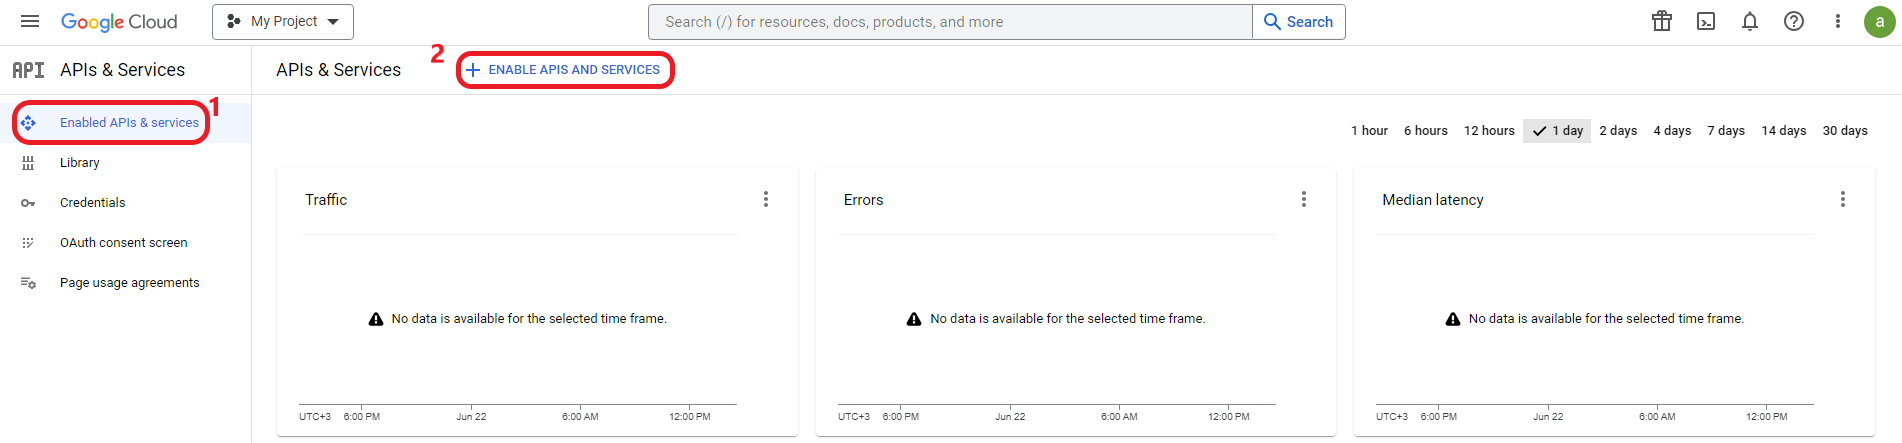
In the "Enabled APIs & services" section, press "ENABLE APIS AND SERVICES". Then, type and click "Google Sheets API" in the appeared menu.
Then, enable the Google Sheets API.

Press Create Credentials box.

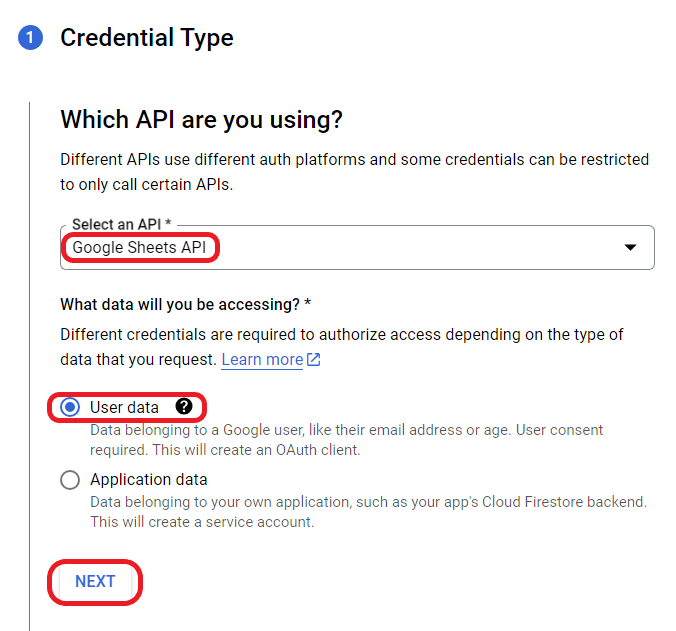
Select API as "Google Sheets API" and User data section. After that, press "Save & Continue" in scopes part with no extra operation.
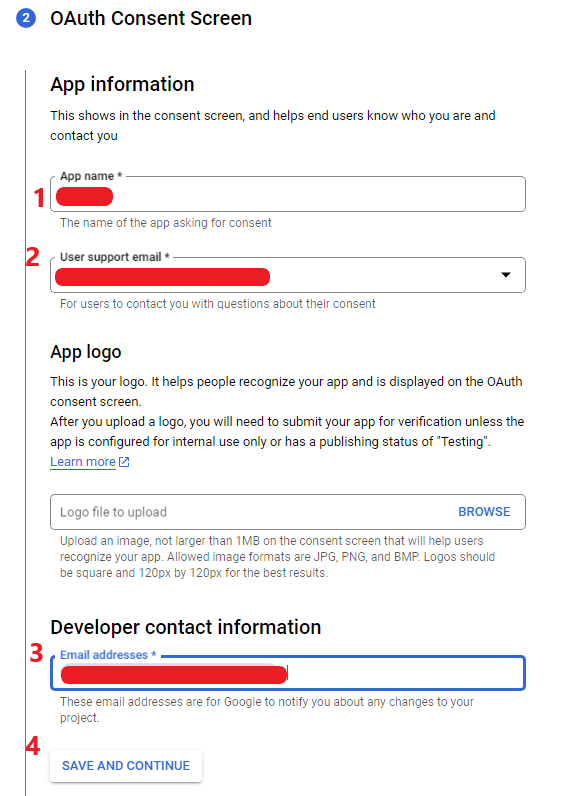
Fill the boxes numbered 1,2 and 3 and press "SAVE AND CONTINUE". You have to fill 2 and 3 numbered boxes with your existing Gmail address. Press create.
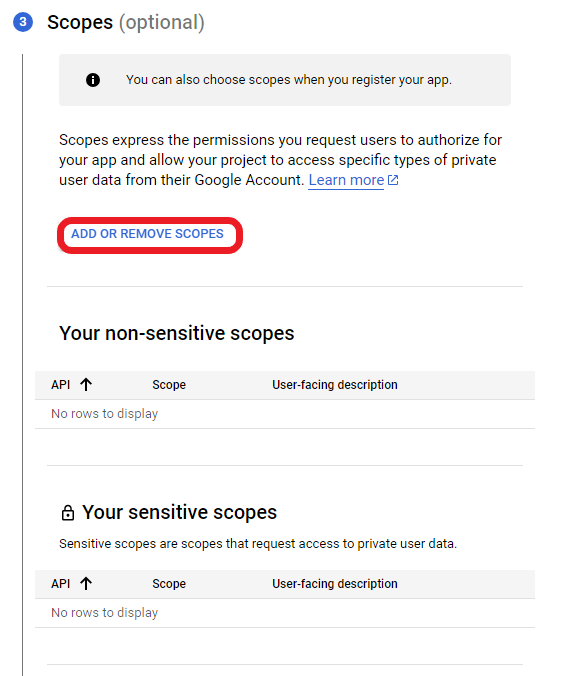
Press "ADD OR REMOVE SCOPES"
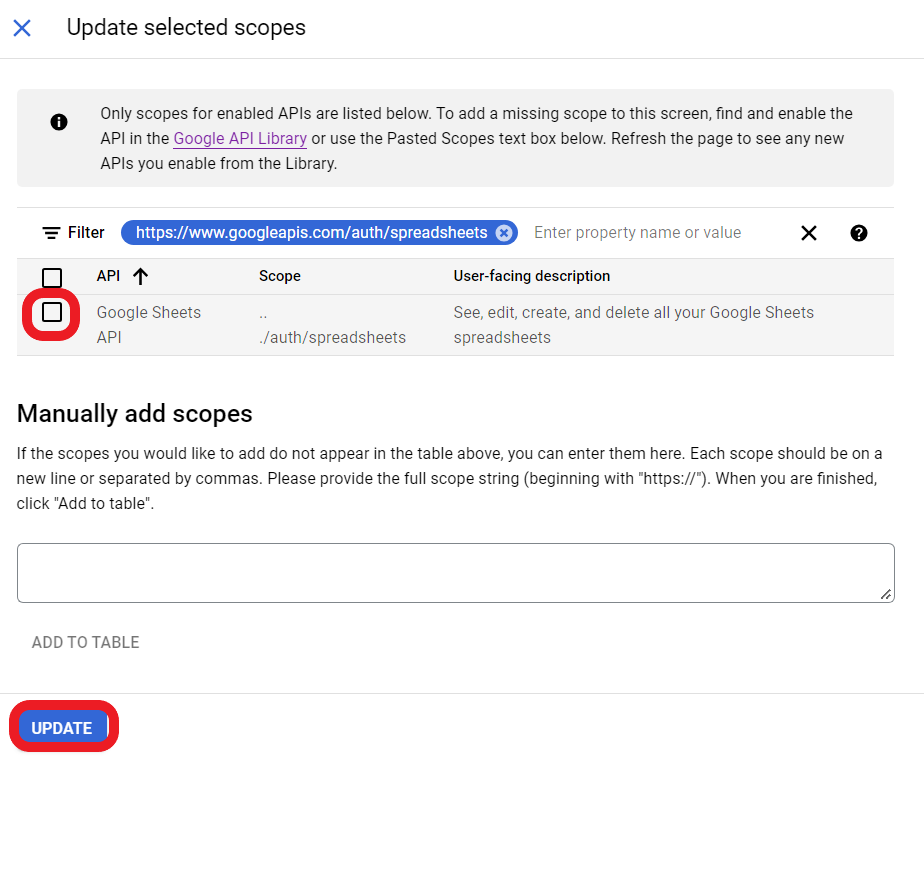
Type "spreadsheets" and select the box as below.
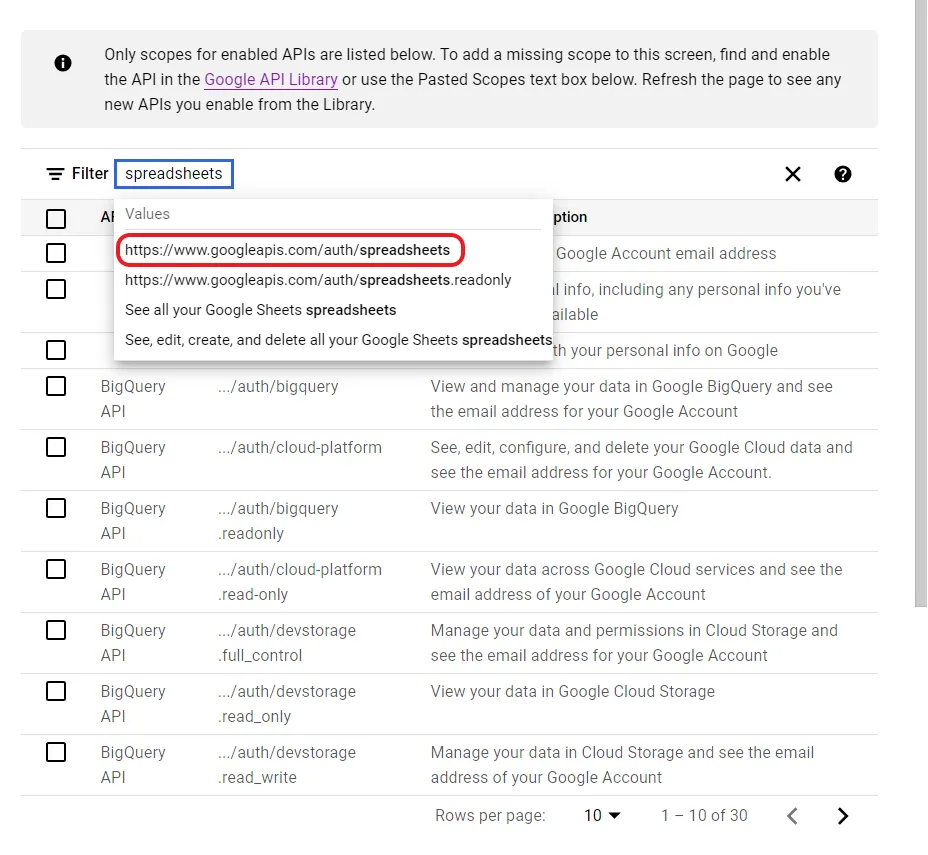
Press the box as below and click "UPDATE".
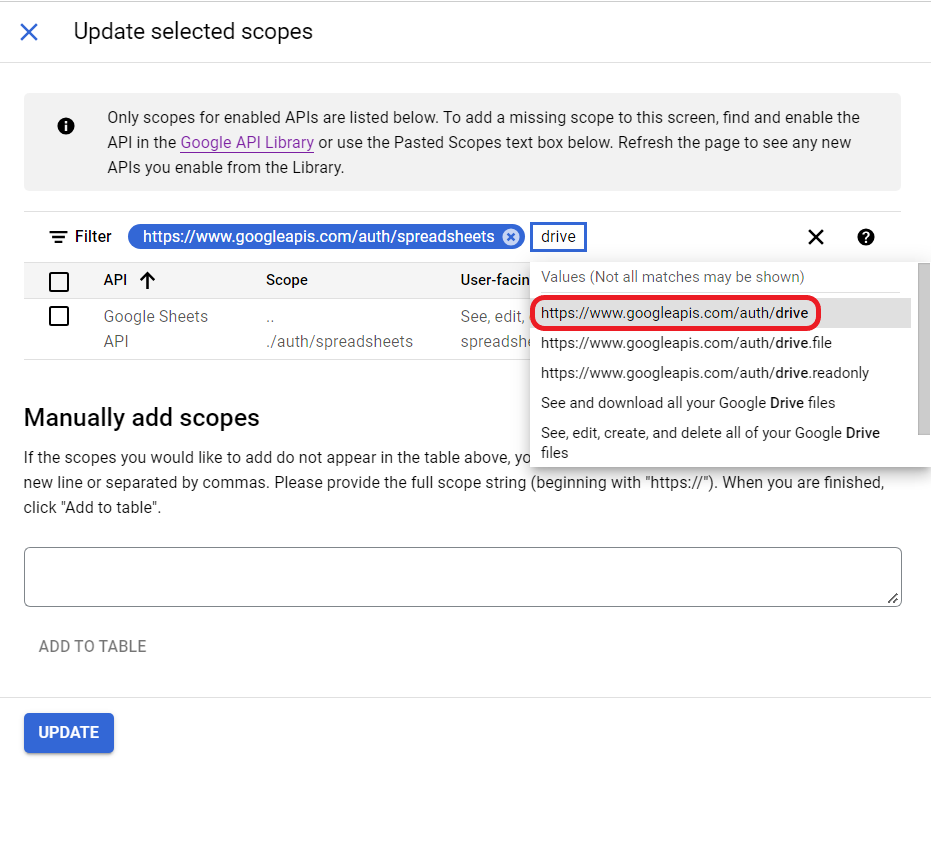
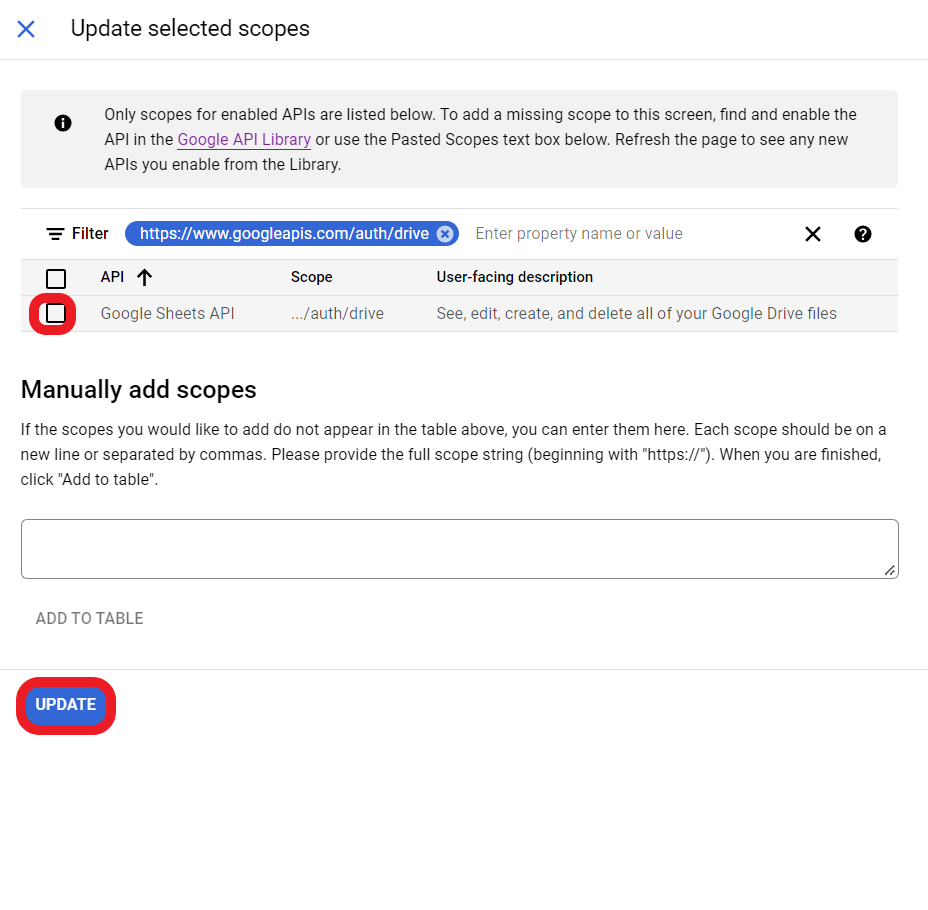
Press "ADD OR REMOVE SCOPES" again and type "drive" and select the box as below.
Press "UPDATE" and then, press "SAVE AND CONTINUE".
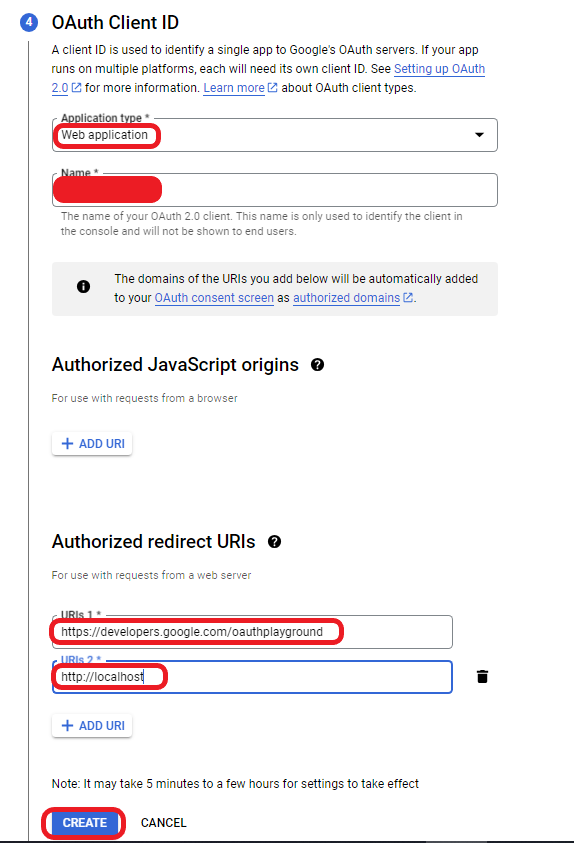
Select application type as "Web application". Fill the name box with your desired client name. Add "http://localhost" and https://developers.google.com/oauthplayground URL to "Authorized redirect URLs" section and create it.
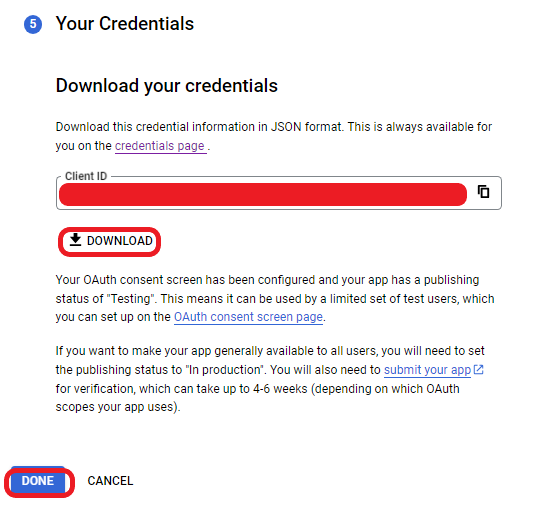
You can download client informations using download button. In downloaded file, client id and client secret keys can be found. They will be used in next operations.
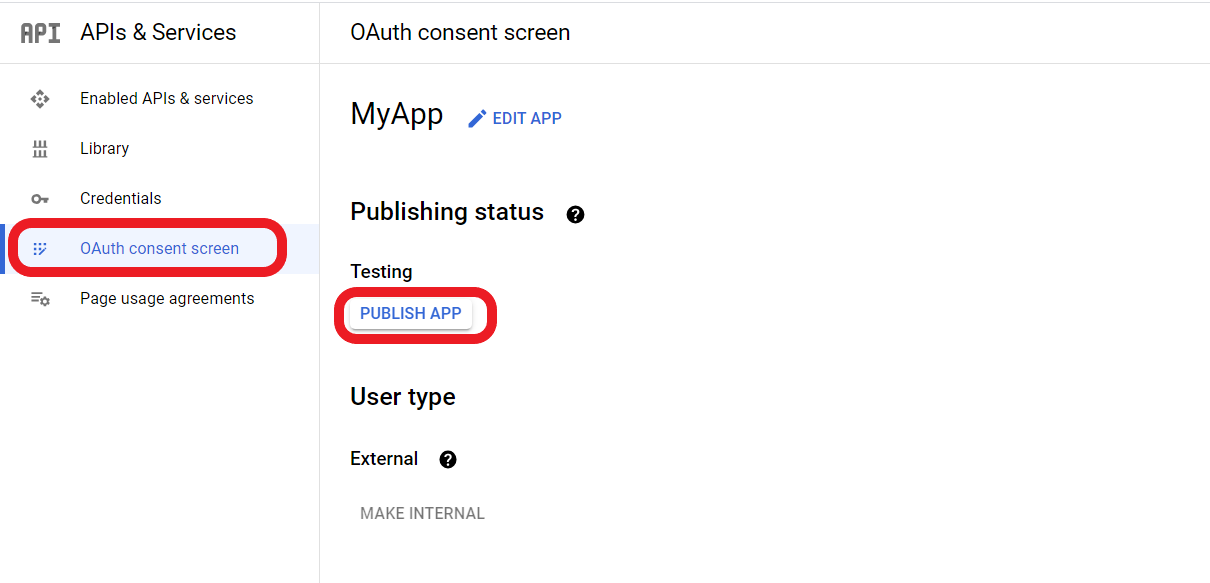
In the "Enabled APIs & services" section, press "PUBLISH APP". Then, press "CONFIRM".
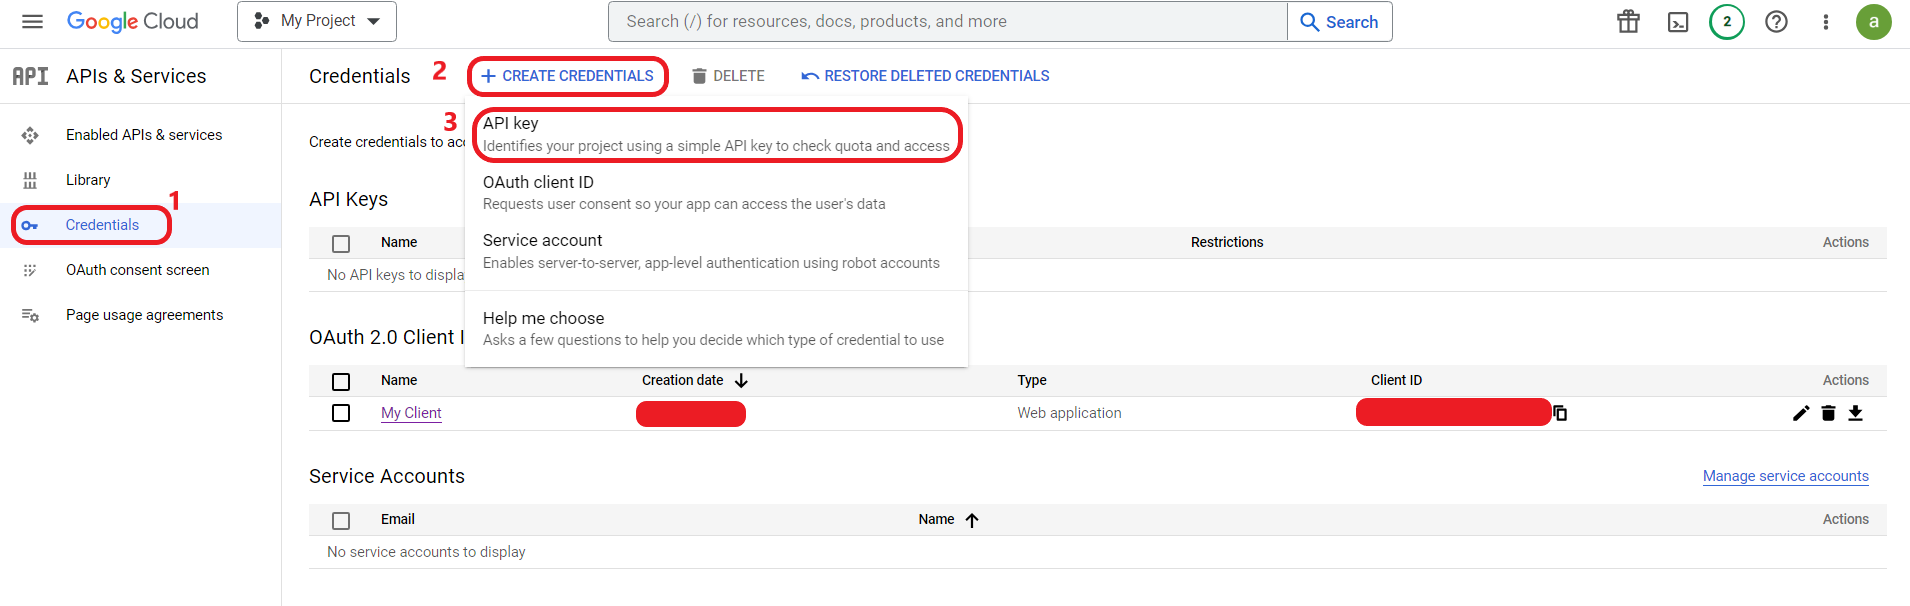
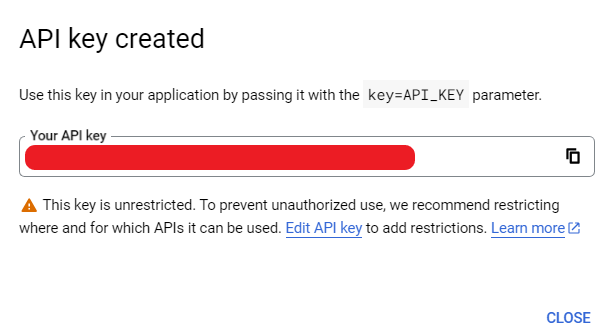
Press 1, 2 and 3 numbered buttons respectively and create an API key. API key will be used in next operations.
4. Create Authorization Token
Go to https://developers.google.com/oauthplayground. Follow numbered sections below and type your "Client ID" and "Client secret" keys generated before. For the client secret, click on the client name in Credentials -> OAuth 2.0 Client IDs. It is located in the Client secrets section under the Additional information tab.

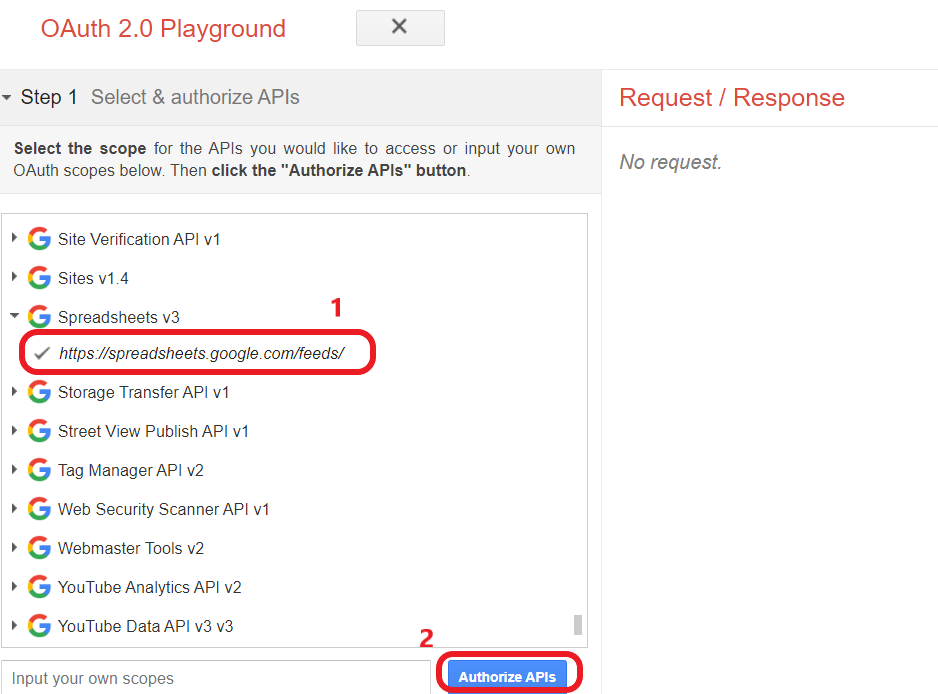
Select https://spreadsheets.google.com/feeds/ from the list on the left and click "Authorize APIs" button.
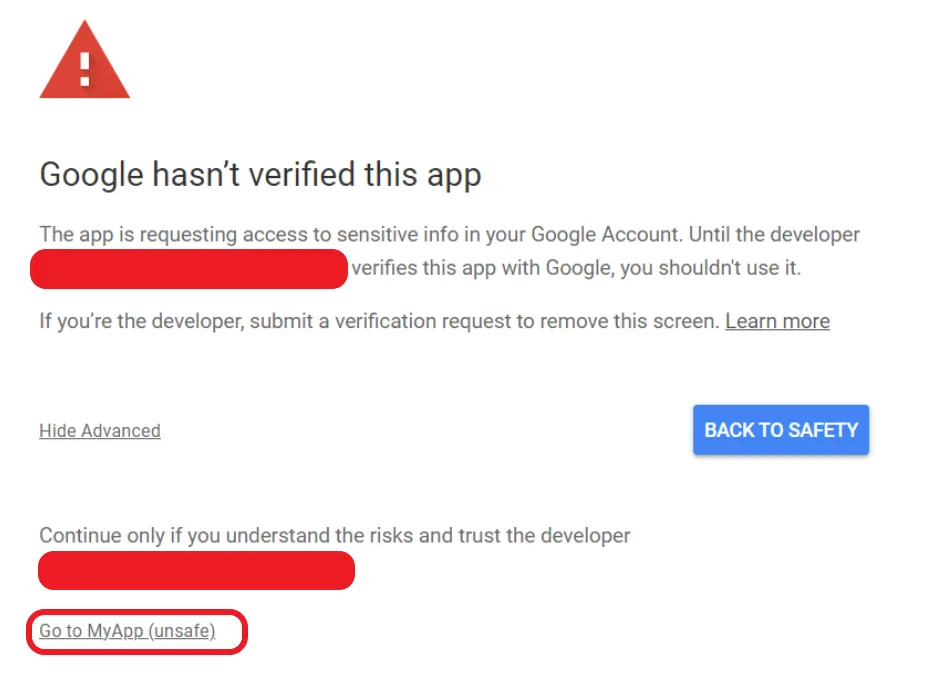
Choose your account that is used for this operations on the appeared menu. After that, press "Advanced" and "Go to MyApp (unsafe)".
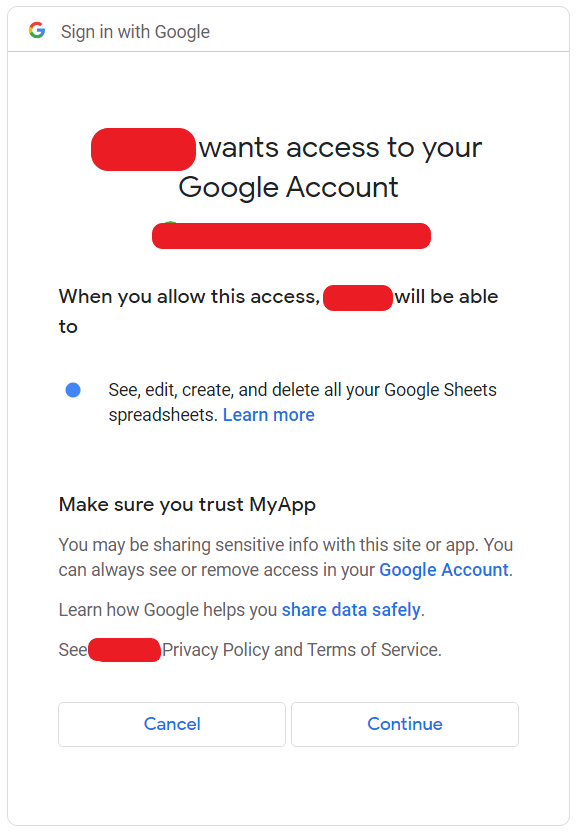
Press "Continue".
Press "Exchange authorization code for tokens" button.
Even if you don't press the "Exchange authorization code for tokens" button, a Refresh Token will still appear. However, it is definitely recommended to press the button to generate a new Refresh Token.
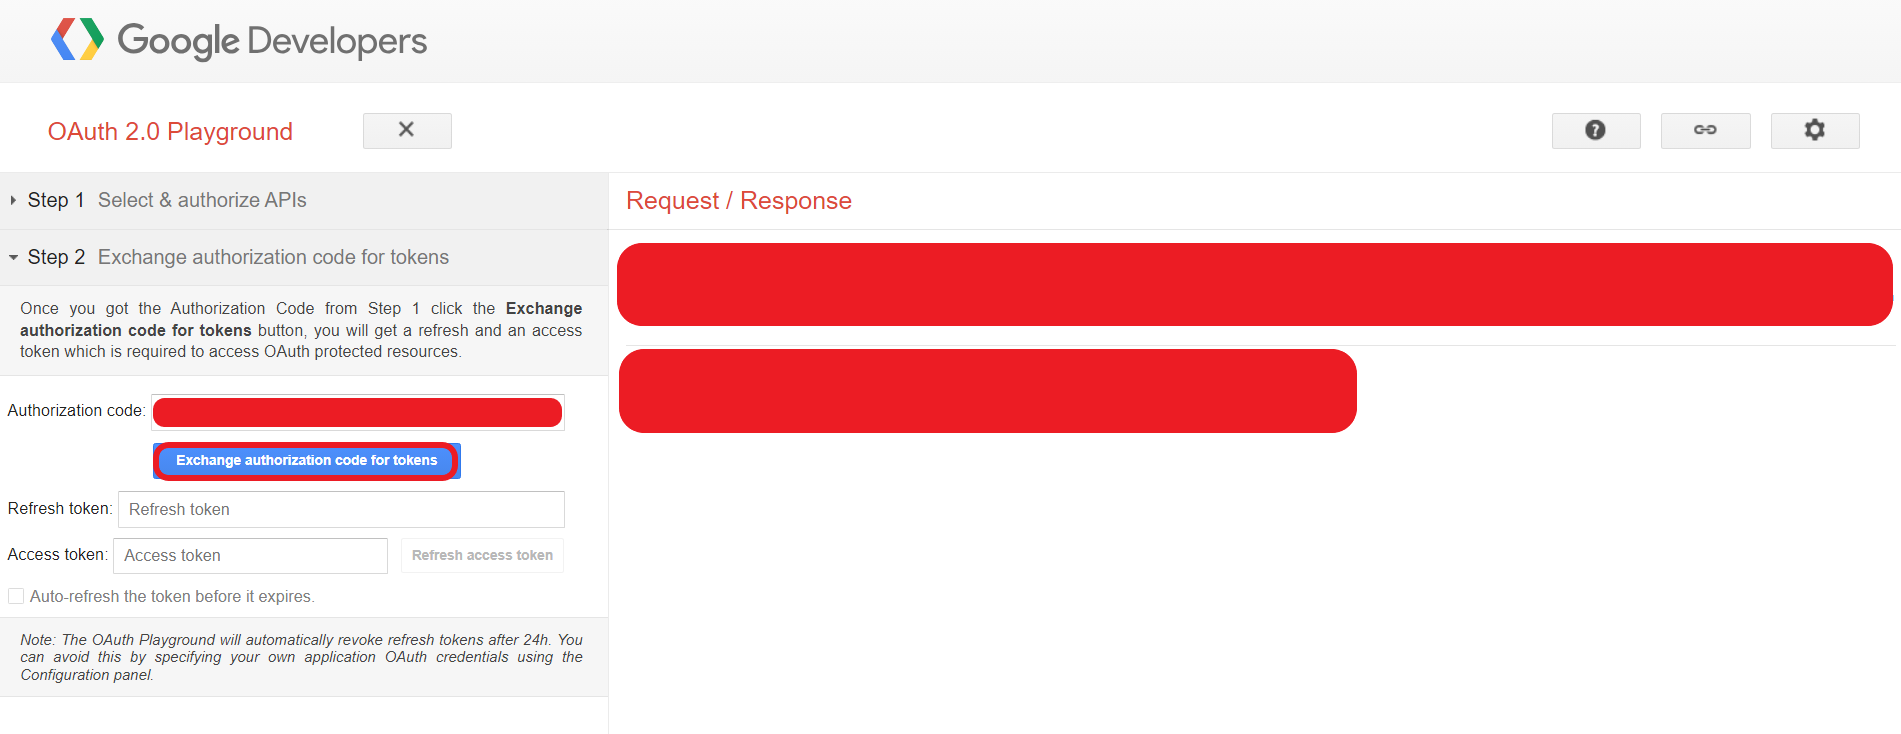
In the "Exchange authorization code for tokens" section, Refresh Token can be found.

Finally, you attain the Refresh Token. It will be used in the next operations.
Test the Code Example
1. Open Thonny and create the config.json file as shown below. Use the informations you saved before.
{
   "google_sheets": {
      "api_key": "[API_KEY]",
      "client_id": "[CLIENT_ID]",
      "client_secret": "[CLIENT_SECRET]",
      "refresh_token": "[REFRESH_TOKEN]"
   }
}
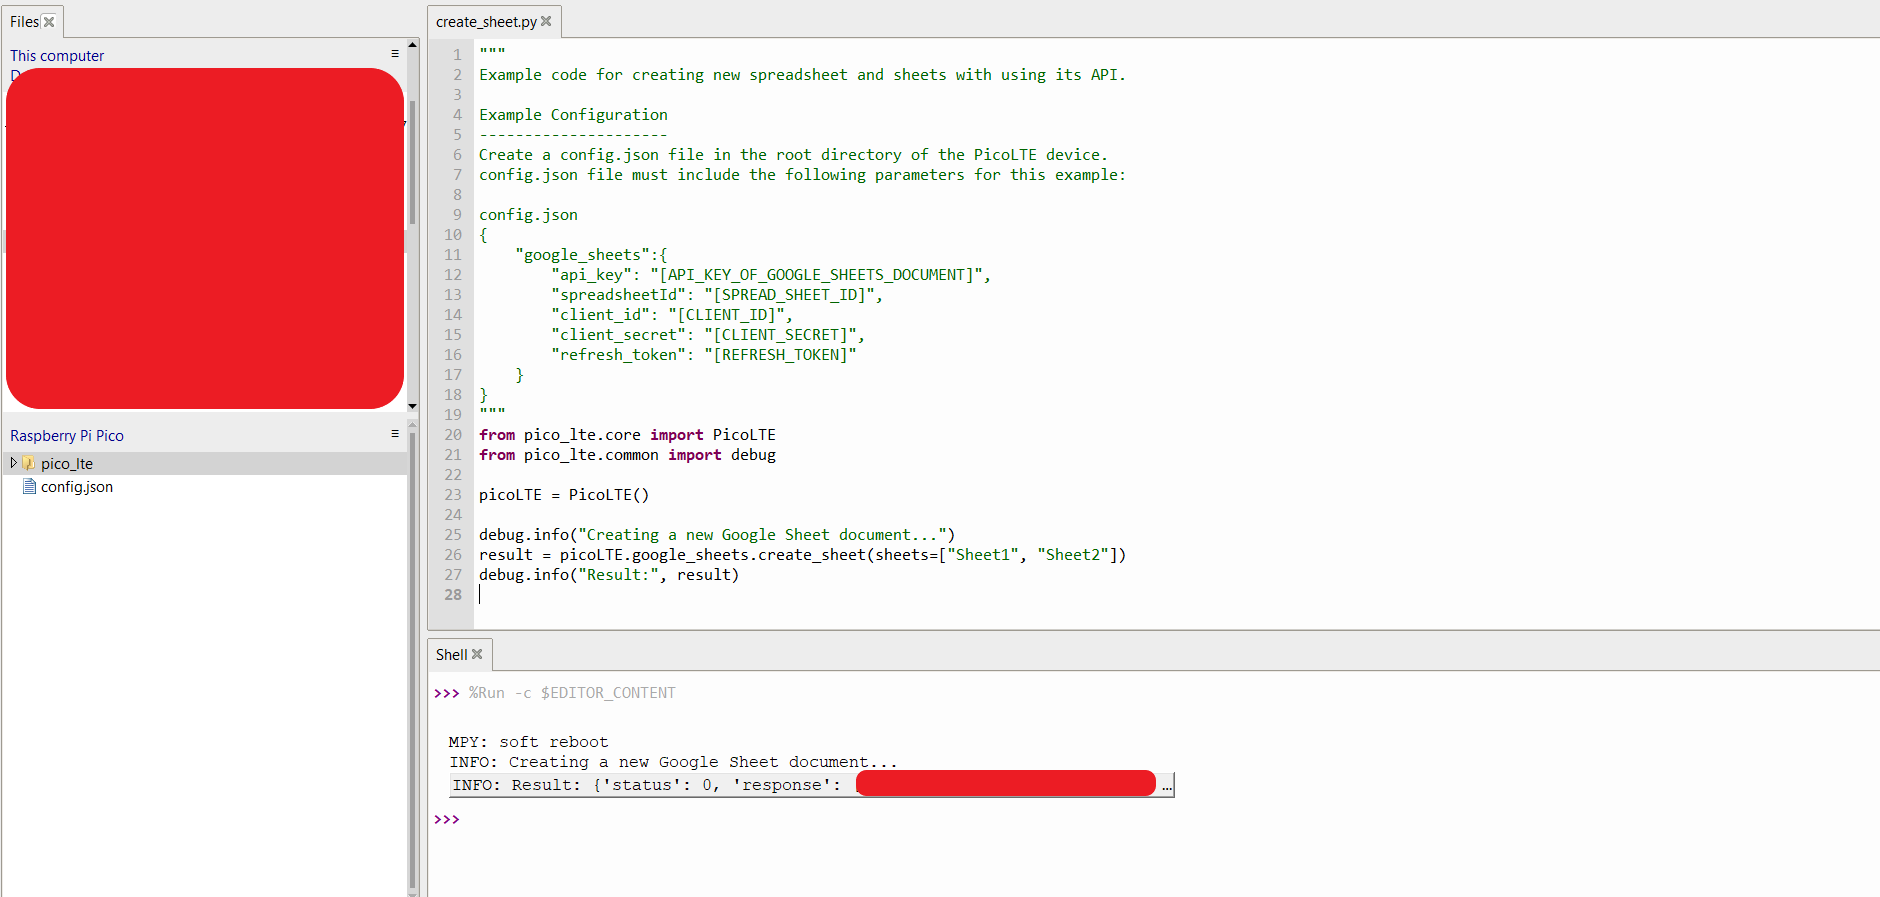
2. Open script "examples → google_sheets → create_sheet.py" from the repository via Thonny IDE. You will see "create_sheet()" function.
Parameters of create_sheet():
sheets: list, default: None
Name list of sheets in the new spreadsheet to be created.
More than 5 values are not recommended in this list.
3. Arrange the parameters of the create_sheet() function and run the script.
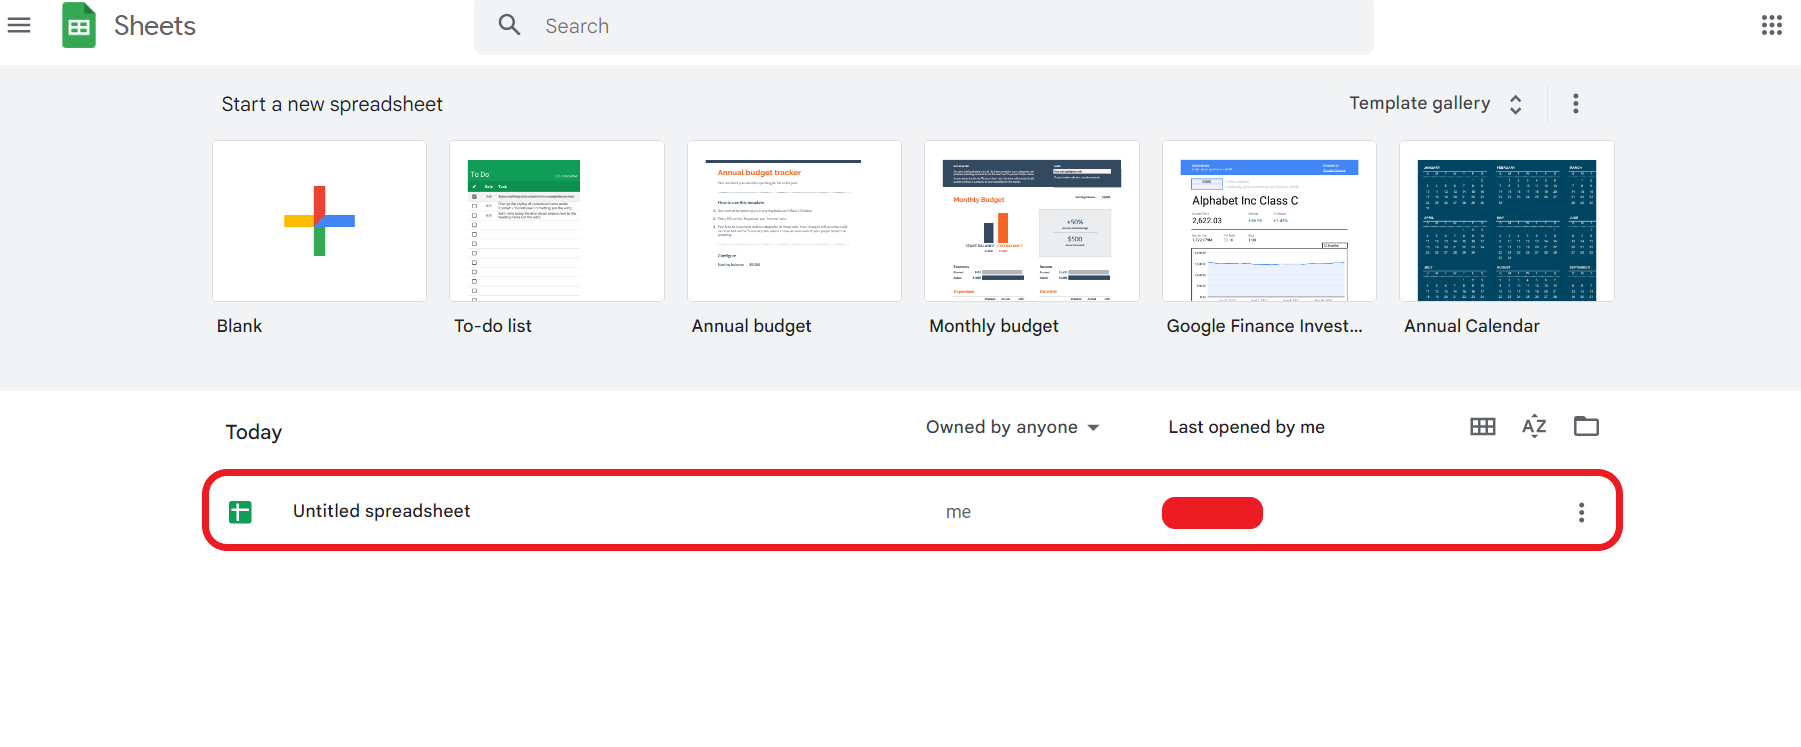
4. Now, in this link new spreadsheet can be found.
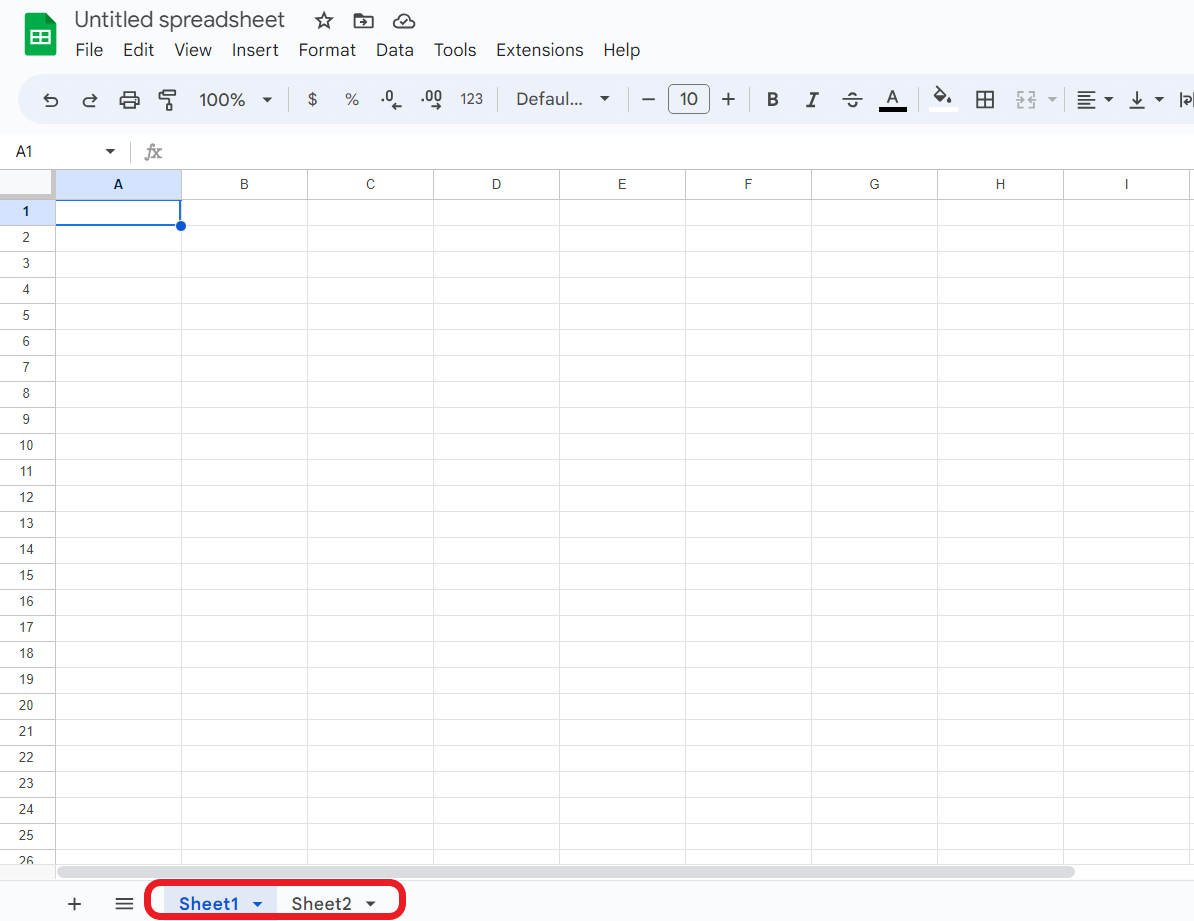
5. New sheets can be seen in the new spreadsheet.
After executing create_sheet() function, the new "spreadsheet_id" is attained and config.json is updated automatically with the new spreadsheet_id value. Therefore, you do not need to change config.js file manually.
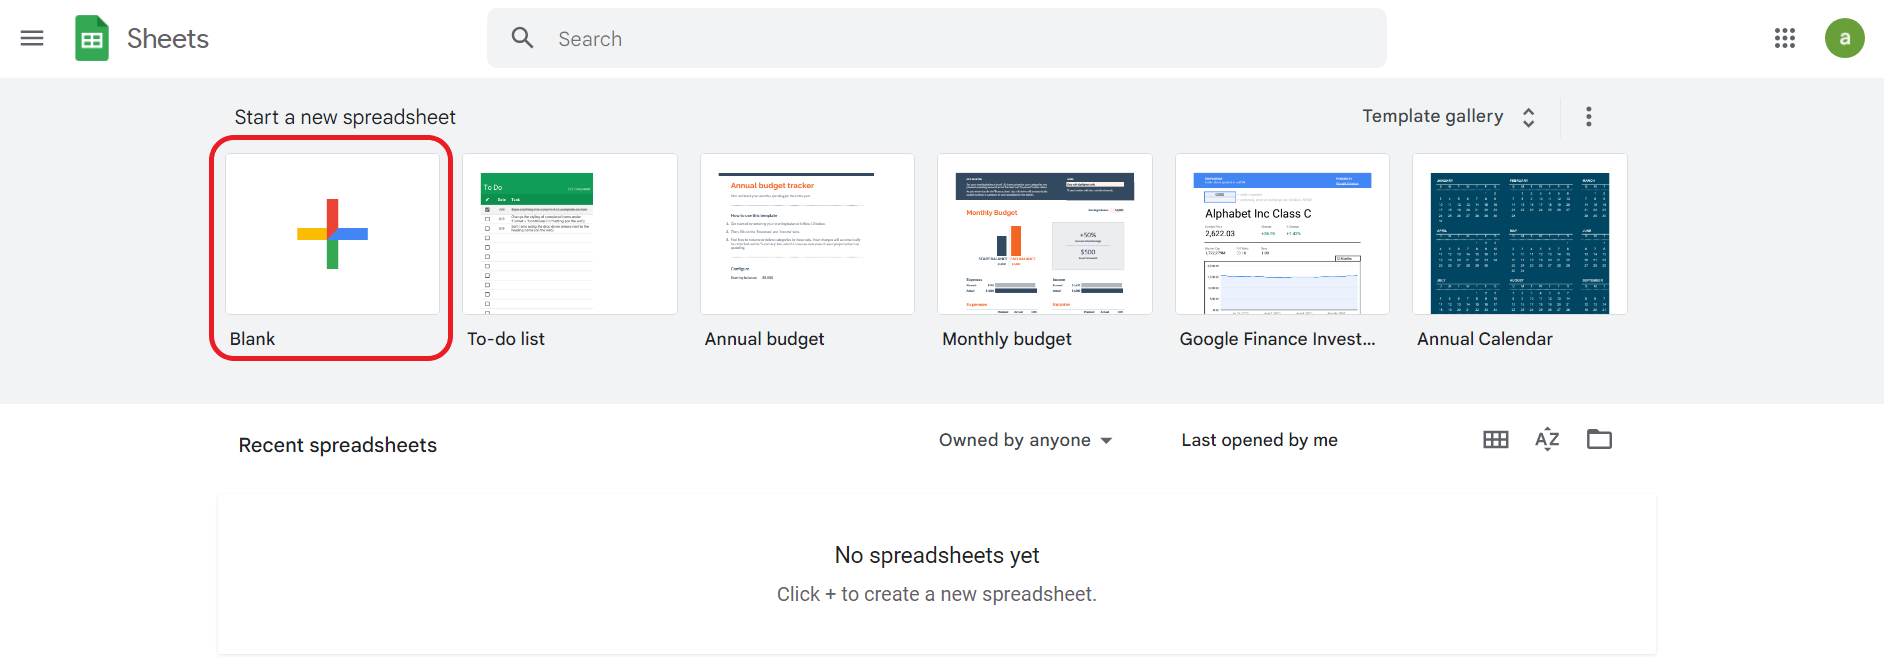
Create a Google Sheets spreadsheet
Login to Google Sheets page from this link and create a Google Sheets spreadsheet.
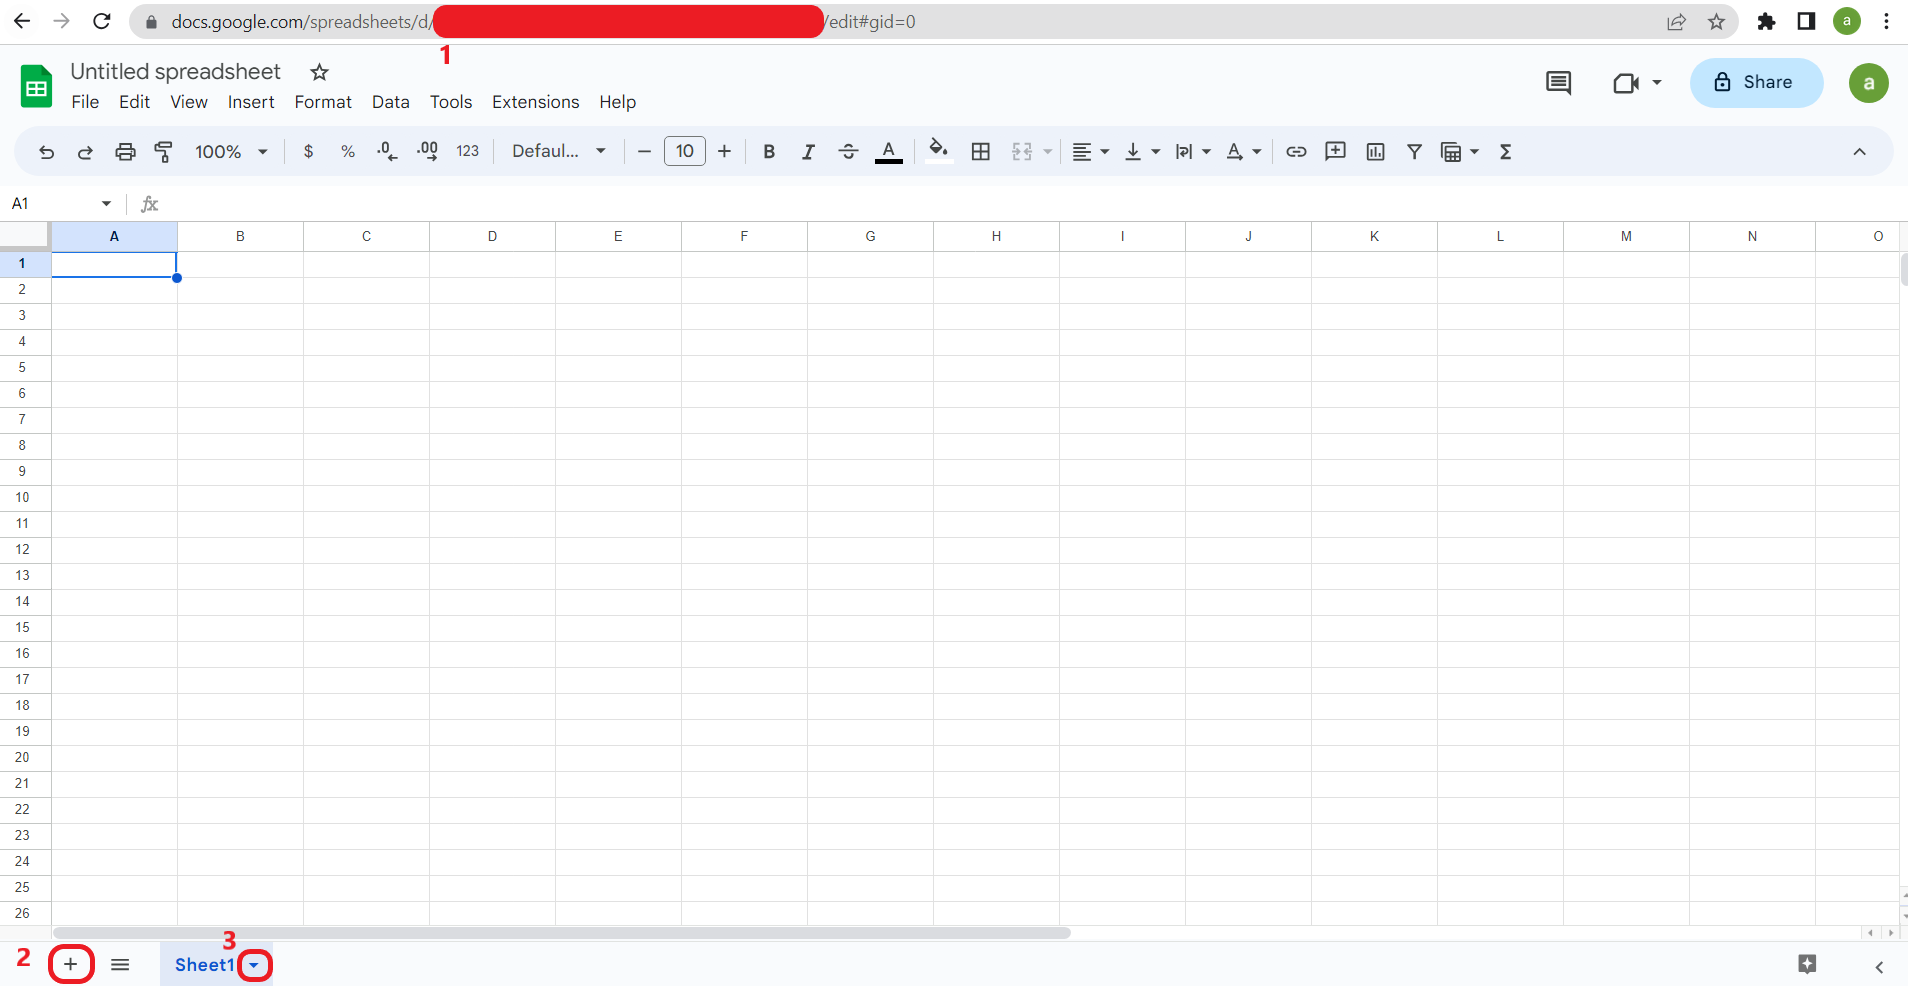
In the image below, you can get the spreadsheet id from 1 numbered part of the url. The URL format: "https://docs.google.com/spreadsheets/d/[SPREADSHEET_ID]". Spreadsheet id will be used in next operations
Also you can add a new sheet to spreadsheet using 2 numbered button and change the name of the sheet using 3 numbered button. Sheet name will be used in the next operations.
You can also create a new spreadsheet with using create_sheet() function. The spreadsheet_id will be automatically added to config.json file. For details, see the 'Create Sheet' documentation.
Test the Code Example
Open Thonny and create the config.json file as shown below. Use the informations you saved before.
{
   "google_sheets": {
      "api_key": "[API_KEY]",
      "spreadsheetId": "[SPREADSHEET_ID]",
      "client_id": "[CLIENT_ID]",
      "client_secret": "[CLIENT_SECRET]",
      "refresh_token": "[REFRESH_TOKEN]"
   }
}
Open script "examples → google_sheets → add_data.py" from the repository via Thonny IDE. You will see "add_data()" function.
Parameters of add_data():
sheets: str, default: None
Name of your target sheet in the spreadsheet.data: list, default: None
Data array to update cells. Array have to be 2 dimensional.data_range: str, default: None
Target cell range of the sheet. A1 Notation have to be used. For detailed information about the notation: https://developers.google.com/sheets/api/guides/concepts#cell
Arrange the parameters of the add_data() function and run the script.
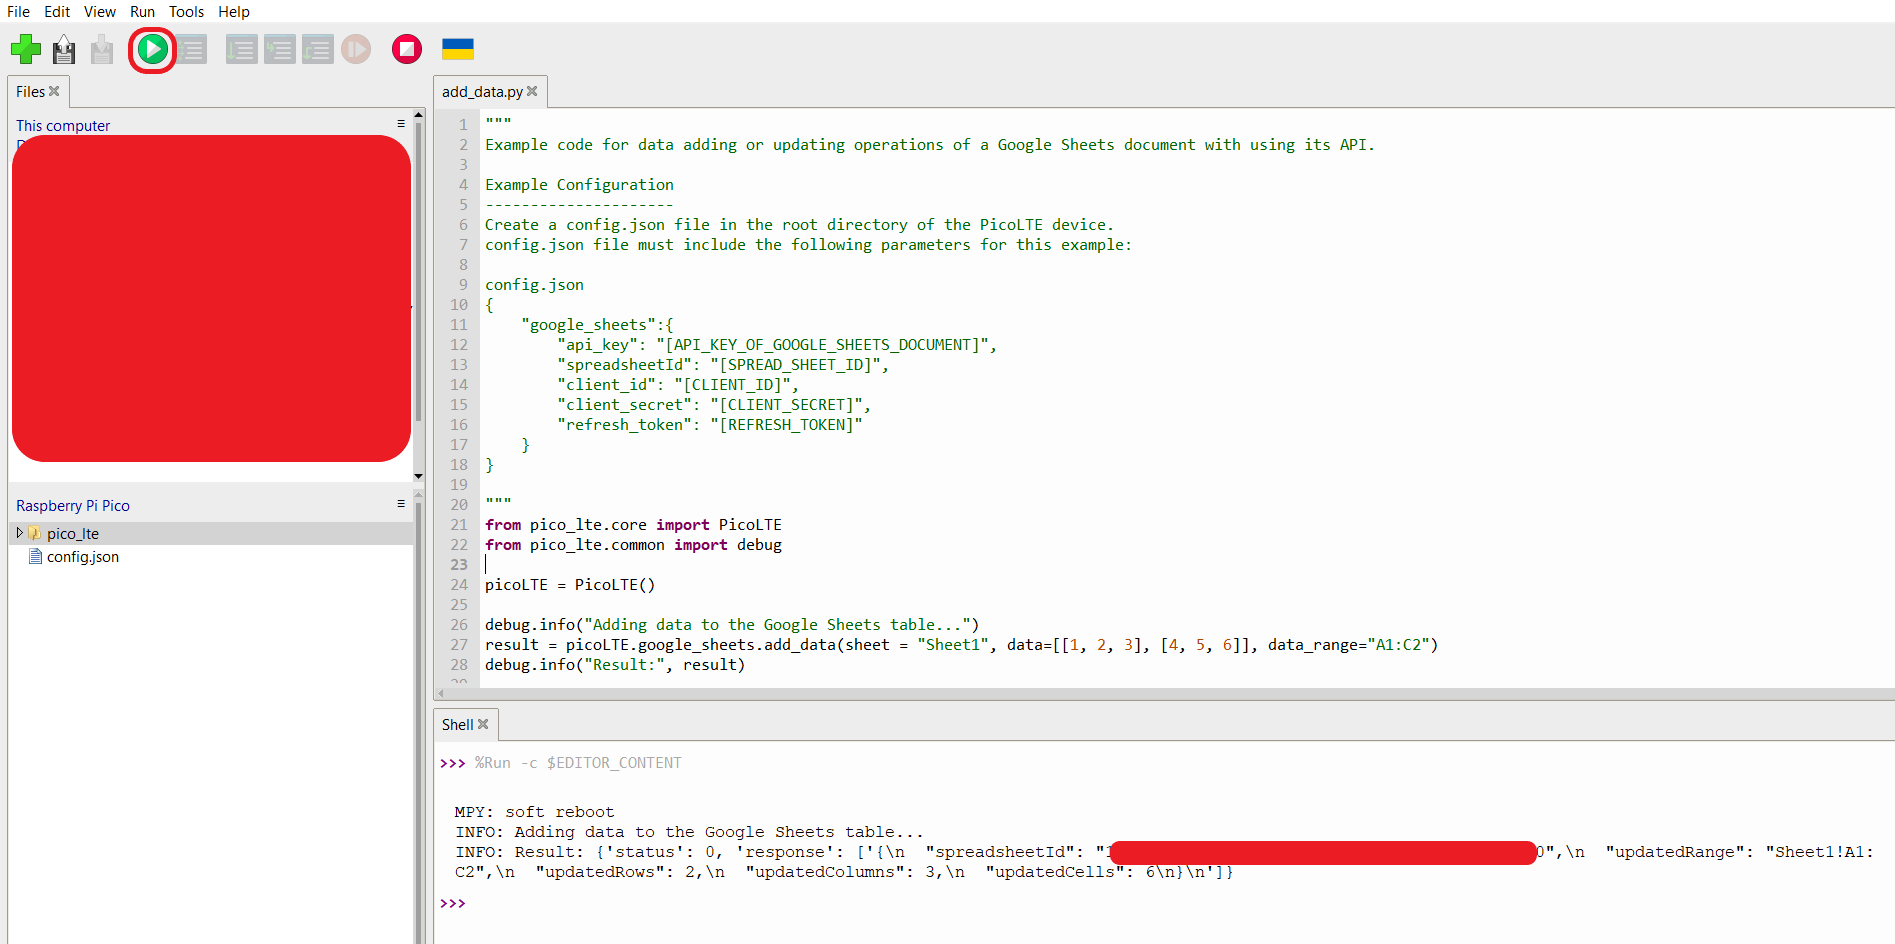
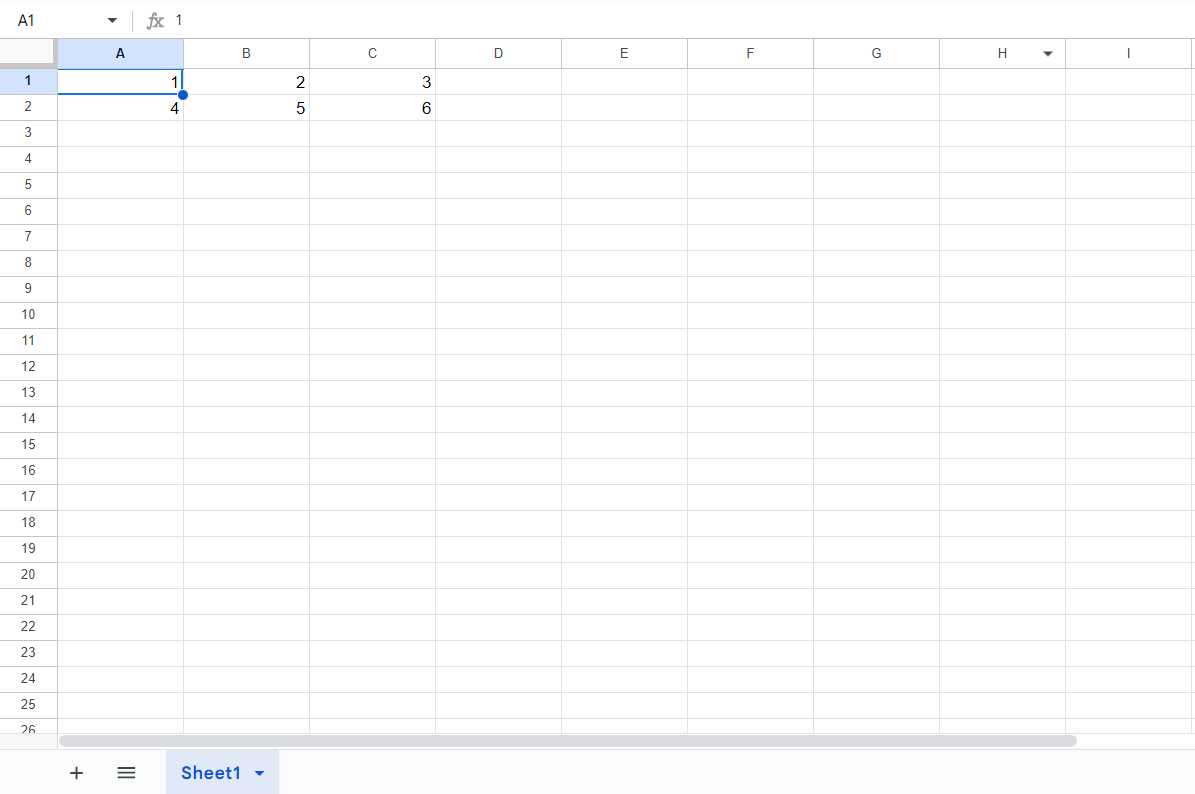
Now, your sheet is updated with given values.
Create a Google Sheets spreadsheet
Login to Google Sheets page from this link and create a Google Sheets spreadsheet.
In the image below, you can get the spreadsheet id from 1 numbered part of the url. The URL format: "https://docs.google.com/spreadsheets/d/[SPREADSHEET_ID]". Spreadsheet id will be used in next operations
Also you can add a new sheet to spreadsheet using 2 numbered button and change the name of the sheet using 3 numbered button. Sheet name will be used in the next operations.
You can also create a new spreadsheet with using create_sheet() function. The spreadsheet_id will be automatically added to config.json file. For details, see the 'Create Sheet' documentation.
Test the Code Example
Open Thonny and create the config.json file as shown below. Use the informations you saved before.
{
   "google_sheets": {
      "api_key": "[API_KEY]",
      "spreadsheetId": "[SPREADSHEET_ID]",
      "client_id": "[CLIENT_ID]",
      "client_secret": "[CLIENT_SECRET]",
      "refresh_token": "[REFRESH_TOKEN]"
   }
}
Open script "examples → google_sheets → add_row.py" from the repository via Thonny IDE. You will see "add_row()" function.
Parameters of add_row():
sheets: str, default: None
Name of your target sheet in the spreadsheet.data: list, default: None
Data array to update cells. Array have to be 2 dimensional.data_range: str, default: None
Arrange the parameters of the add_row() function and run the script.
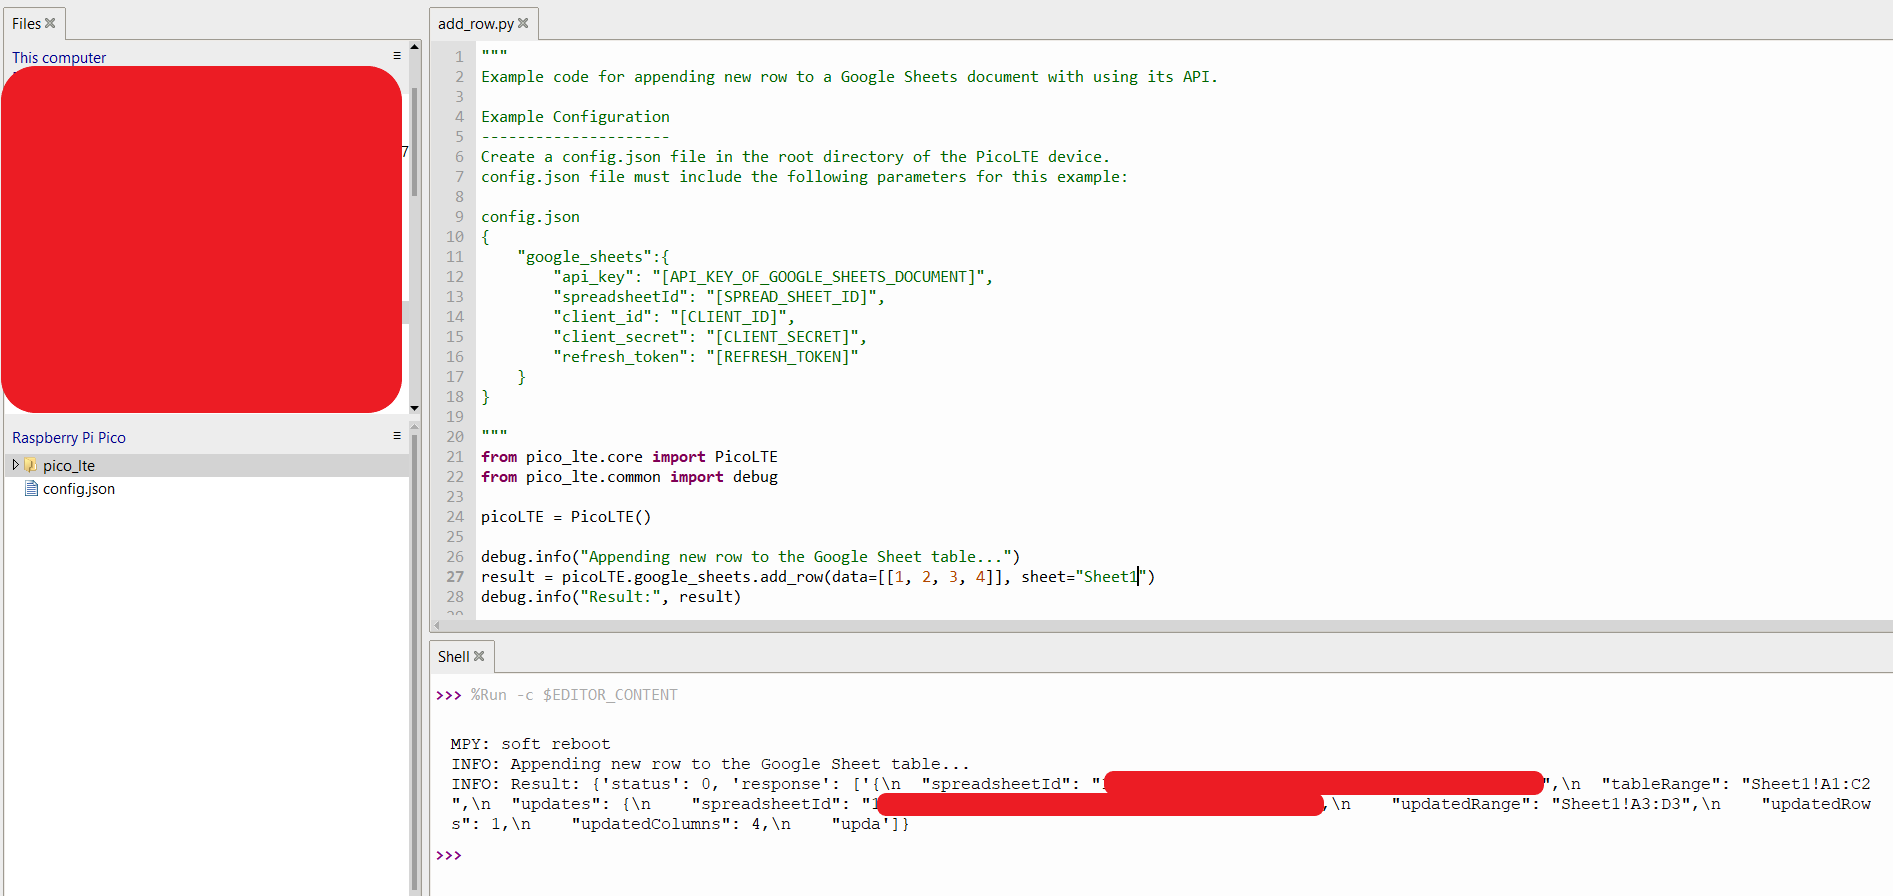
Now, your sheet is updated with given row values.
Create a Google Sheets spreadsheet
Login to Google Sheets page from this link and create a Google Sheets spreadsheet.
In the image below, you can get the spreadsheet id from 1 numbered part of the url. The URL format: "https://docs.google.com/spreadsheets/d/[SPREADSHEET_ID]". Spreadsheet id will be used in next operations
Also you can add a new sheet to spreadsheet using 2 numbered button and change the name of the sheet using 3 numbered button. Sheet name will be used in the next operations.
You can also create a new spreadsheet with using create_sheet() function. The spreadsheet_id will be automatically added to config.json file. For details, see the 'Create Sheet' documentation.
Test the Code Example
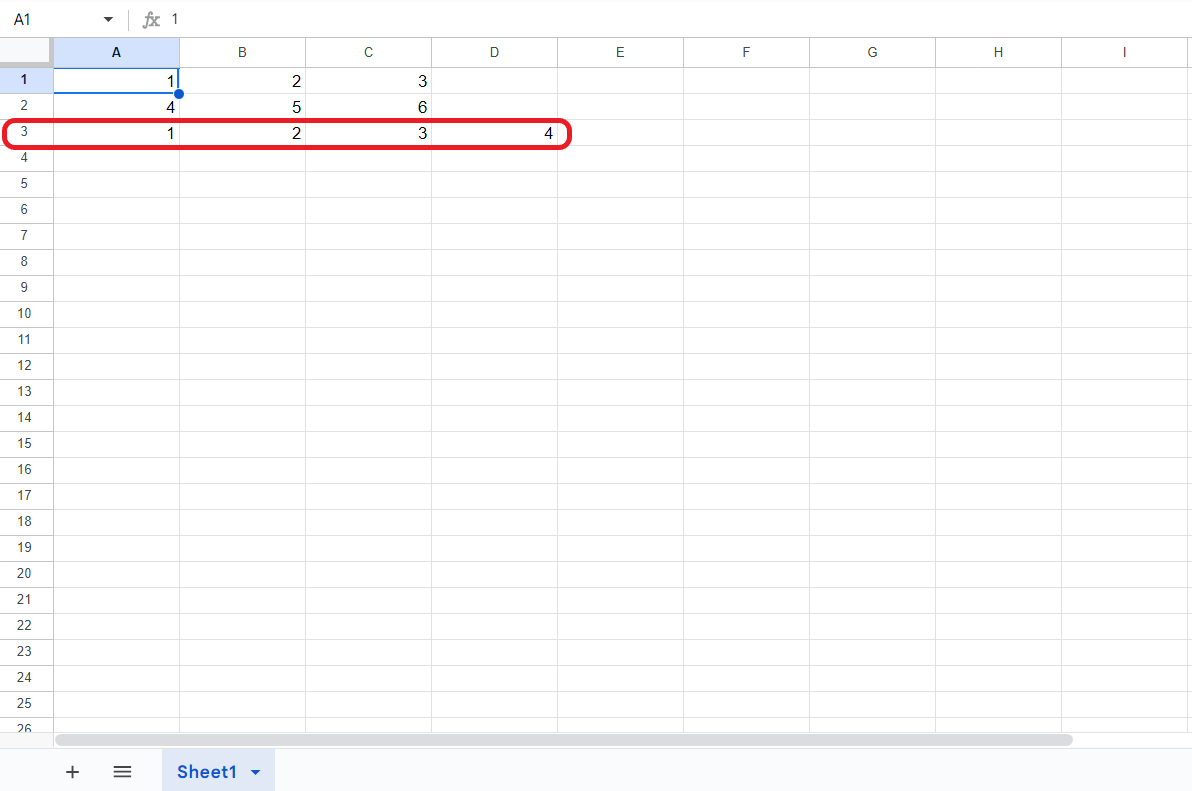
Open your new Google Sheet spreadsheet and input some datas.

Open Thonny and create the config.json file as shown below. Use the informations you saved before.
{
   "google_sheets": {
      "api_key": "[API_KEY]",
      "spreadsheetId": "[SPREADSHEET_ID]",
      "client_id": "[CLIENT_ID]",
      "client_secret": "[CLIENT_SECRET]",
      "refresh_token": "[REFRESH_TOKEN]"
   }
}
Open script "examples → google_sheets → delete_data.py" from the repository via Thonny IDE. You will see "delete_data()" function.
Parameters of delete_data():
sheets: str, default: None
Name of your target sheet in the spreadsheet.data: list, default: None
Data array to update cells. Array have to be 2 dimensional.data_range: str, default: None
Target cell range of the sheet. A1 Notation have to be used. For detailed information about the notation: https://developers.google.com/sheets/api/guides/concepts#cell
Arrange the parameters of the delete_data() function and run the script.
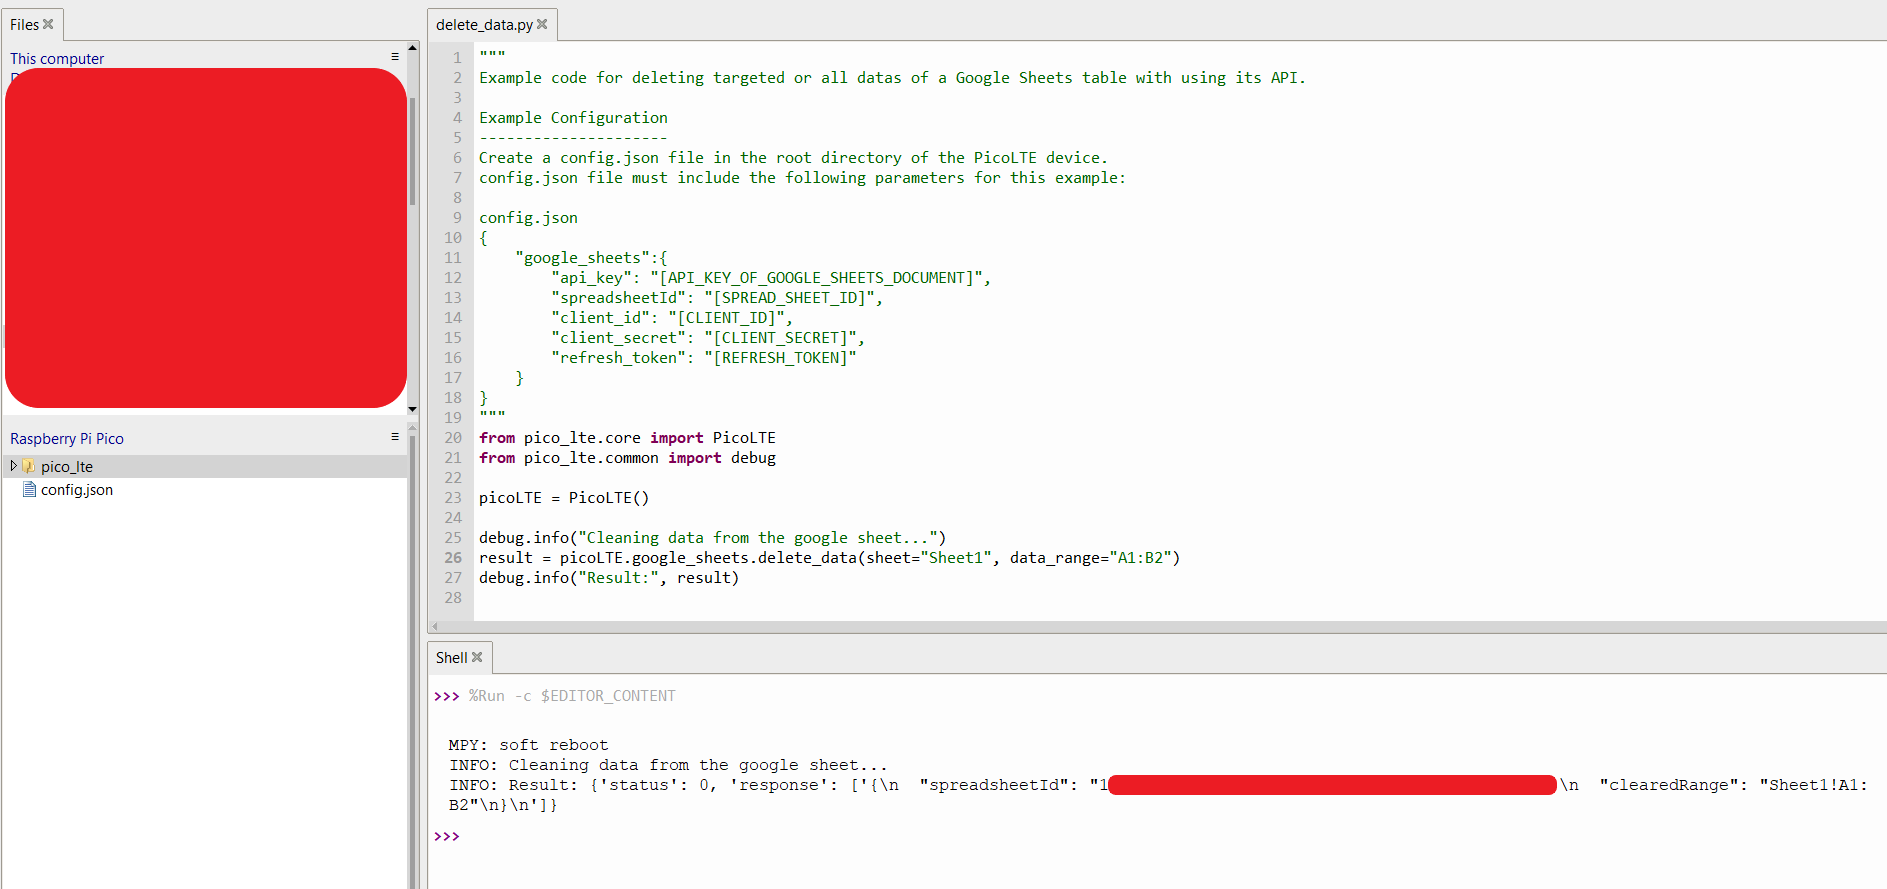
Now, your sheet is updated with deleted cells.
Create a Google Sheets spreadsheet
Login to Google Sheets page from this link and create a Google Sheets spreadsheet.
In the image below, you can get the spreadsheet id from 1 numbered part of the url. The URL format: "https://docs.google.com/spreadsheets/d/[SPREADSHEET_ID]". Spreadsheet id will be used in next operations
Also you can add a new sheet to spreadsheet using 2 numbered button and change the name of the sheet using 3 numbered button. Sheet name will be used in the next operations.
You can also create a new spreadsheet with using create_sheet() function. The spreadsheet_id will be automatically added to config.json file. For details, see the 'Create Sheet' documentation.
Test the Code Example
Open your new Google Sheet spreadsheet and input some datas.

Open Thonny and create the config.json file as shown below. Use the informations you saved before.
{
   "google_sheets": {
      "api_key": "[API_KEY]",
      "spreadsheetId": "[SPREADSHEET_ID]",
      "client_id": "[CLIENT_ID]",
      "client_secret": "[CLIENT_SECRET]",
      "refresh_token": "[REFRESH_TOKEN]"
   }
}
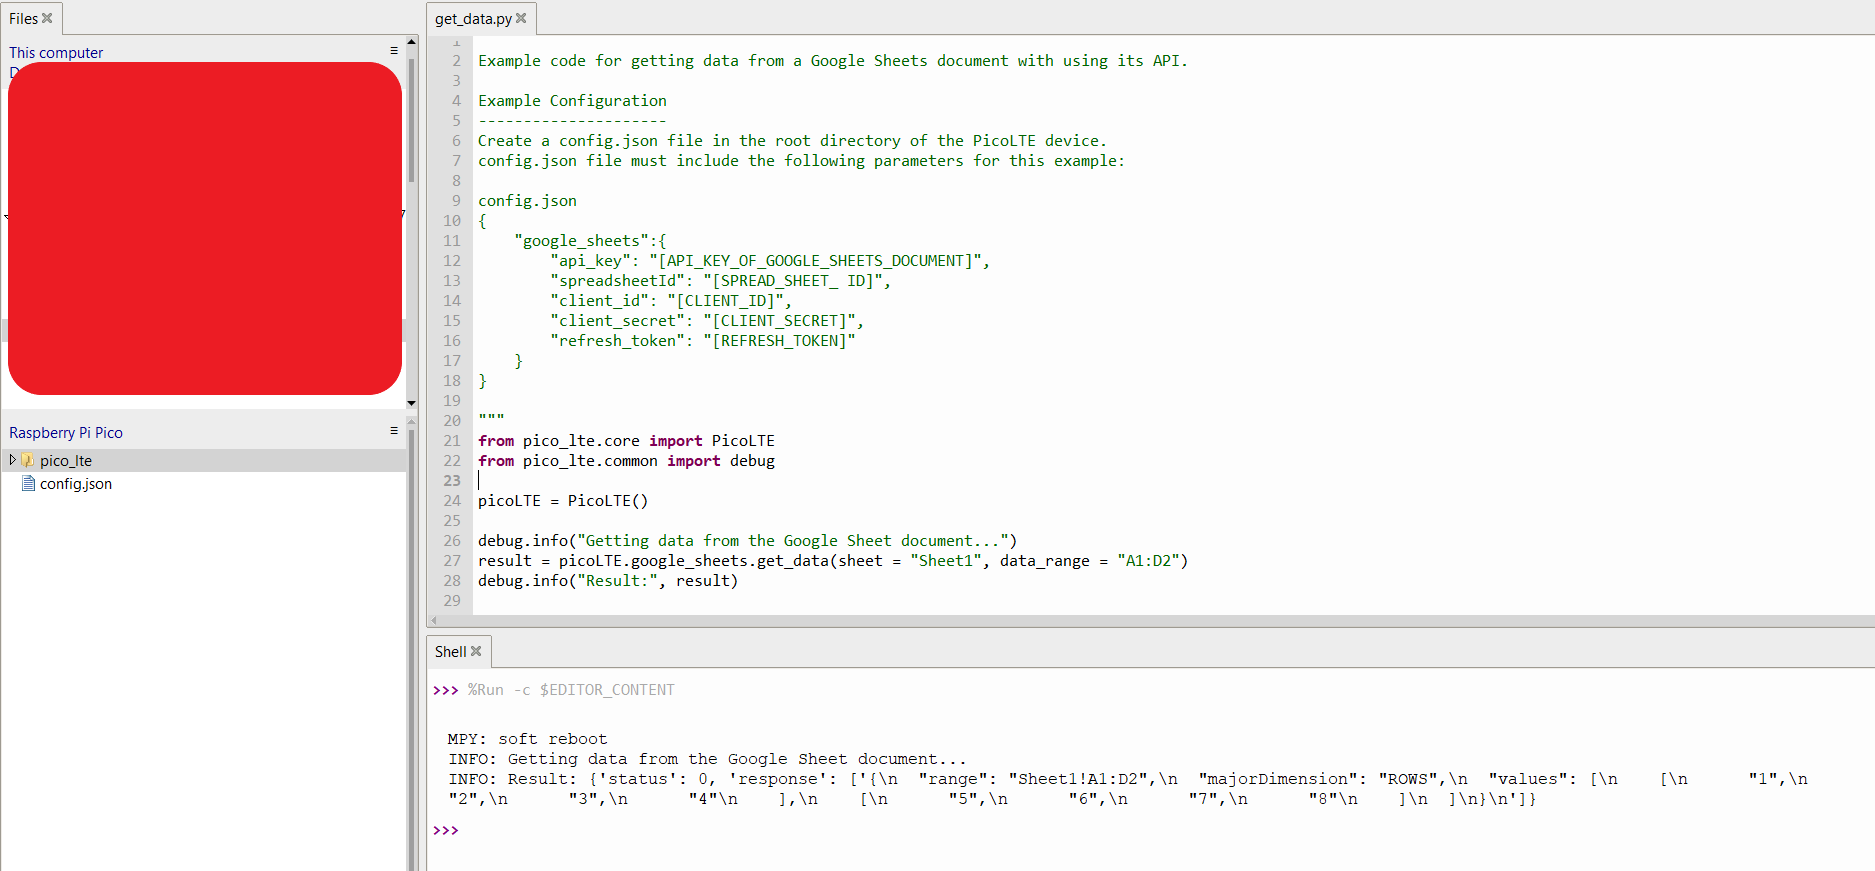
Open script "examples → google_sheets → get_data.py" from the repository via Thonny IDE. You will see "get_data()" function.
Parameters of get_data():
sheets: str, default: None
Name of your target sheet in the spreadsheet.data: list, default: None
Data array to update cells. Array have to be 2 dimensional.data_range: str, default: None
Target cell range of the sheet. A1 Notation have to be used. For detailed information about the notation: https://developers.google.com/sheets/api/guides/concepts#cell
If this parameter passed empty by user (not inputted), then function returns all of the data from the sheet.
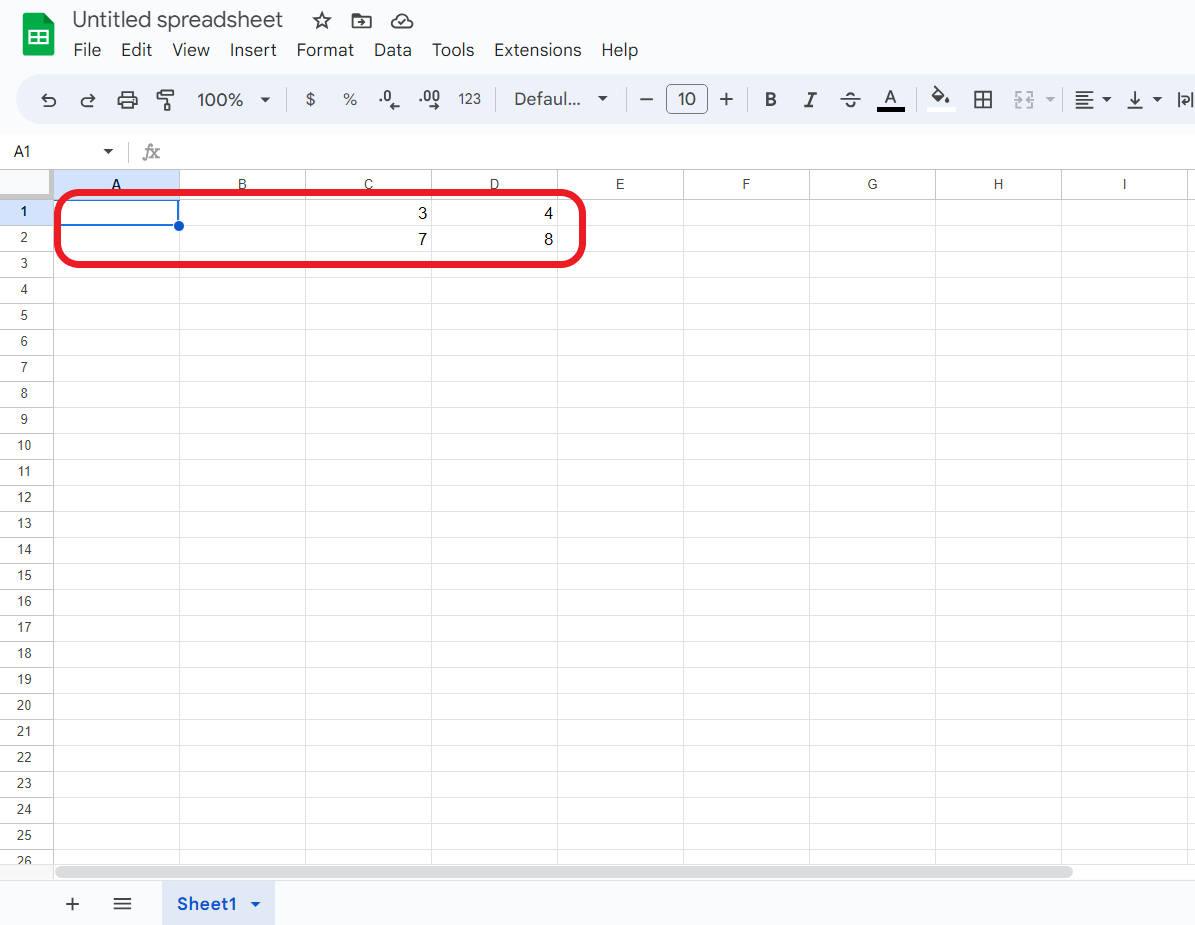
Arrange the parameters of the get_data() function and run the script.
Now, data in the target cells can be seen in the shell.
Updated 8 months ago