
Deploying ThingsBoard
Guide for deploying the ThingsBoard IoT platform on the ALPON X4 micro-edge computer using a containerized setup.
ThingsBoard is an open-source IoT platform designed for the rapid development, management, and scaling of IoT projects. This guide uses the thingsboard/tb-postgres container as an example, though other ThingsBoard containers can be configured with different port and environment values as specified in the ThingsBoard documentation.
This guide provides a step-by-step approach to deploying the ThingsBoard container on ALPON X4. It covers the necessary prerequisites, deployment configuration, and final steps to ensure a successful installation.
Prerequisites
To continue with this guide we will need the following:
- Sixfab Connect Account
- ThingsBoard Account
- ALPON X4 Device – Registered and activated on Sixfab Connect with an active internet connection. Refer to the ALPON X4 Getting Started page for setup instructions.
- Basic Knowledge – Familiarity with IoT concepts, containerized applications, and ThingsBoard dashboards.
Create Device on ThingsBoard (Optional)
The integration can create a device even if there is no device yet, so skip this step if you want.
-
Log in to ThingsBoard:
-
Access your ThingsBoard instance.
-
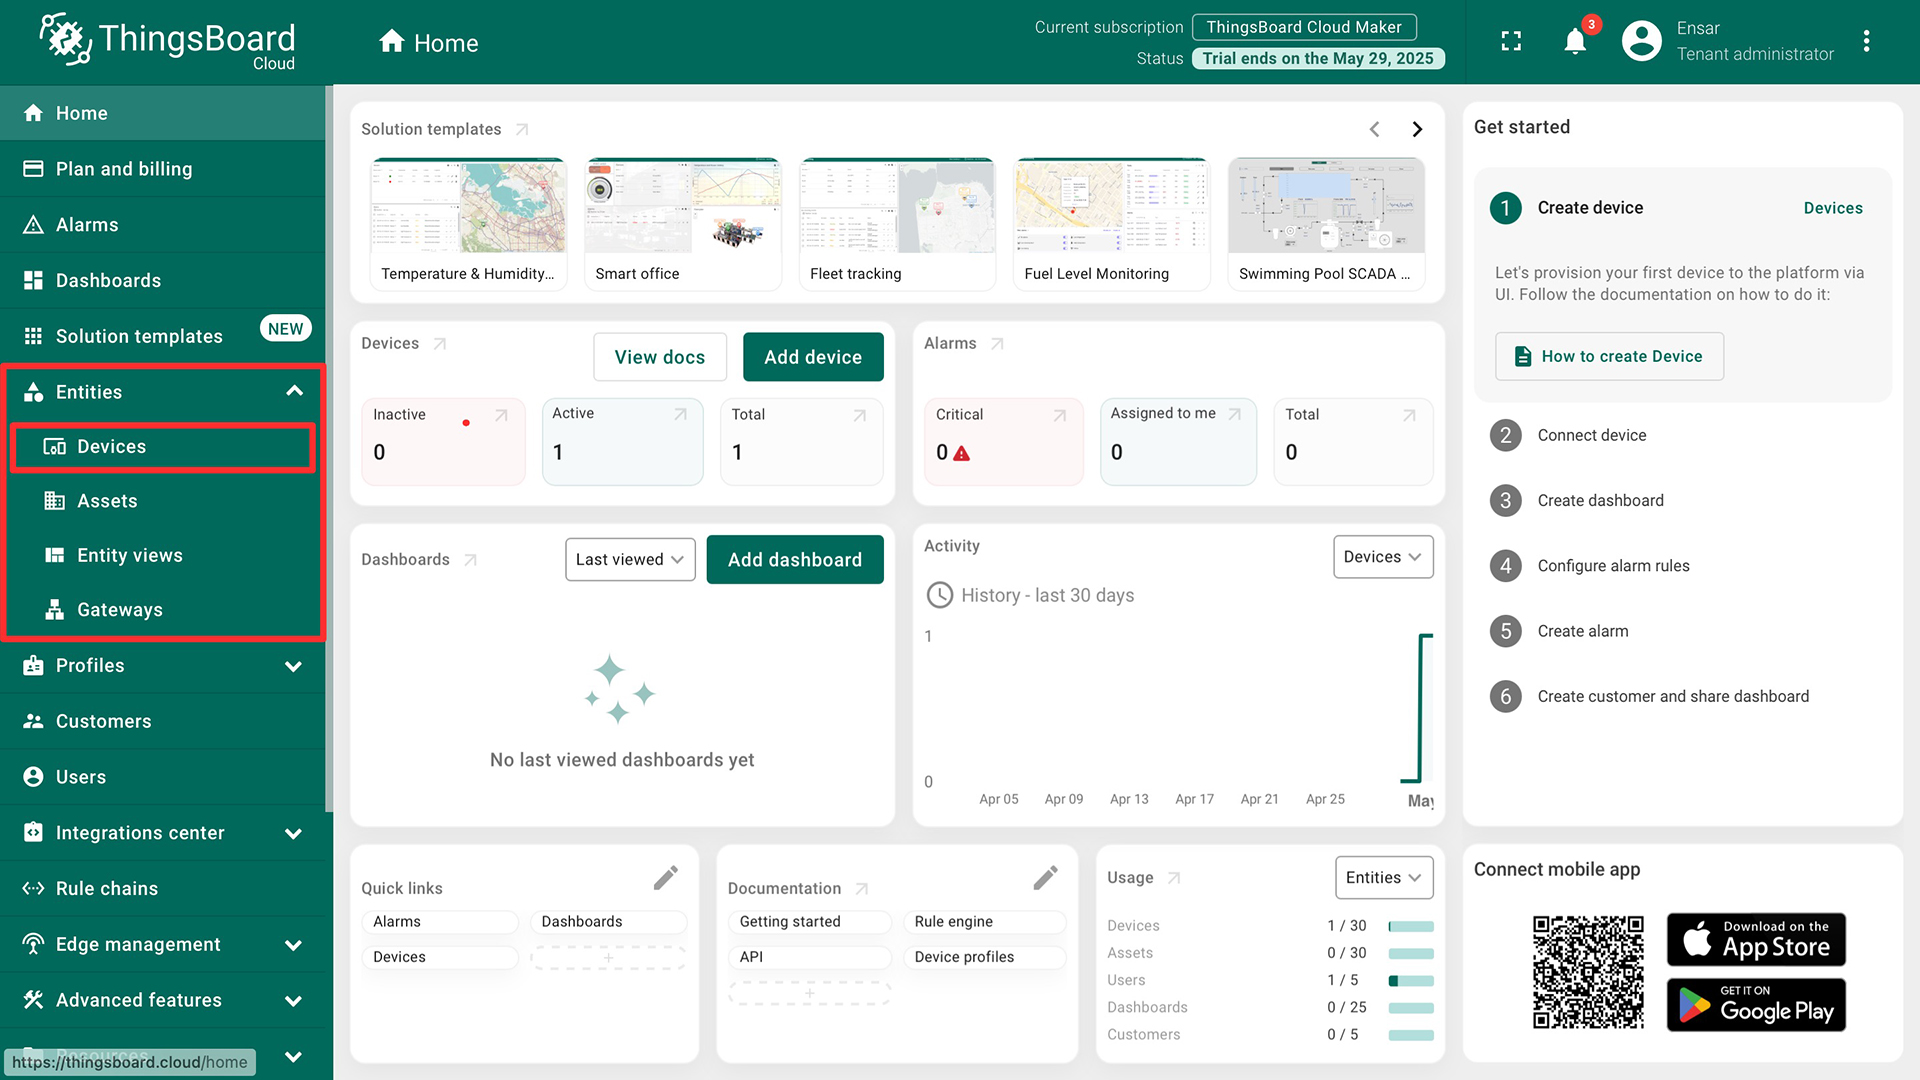
Navigate to Entities > Devices in the sidebar.
-
-
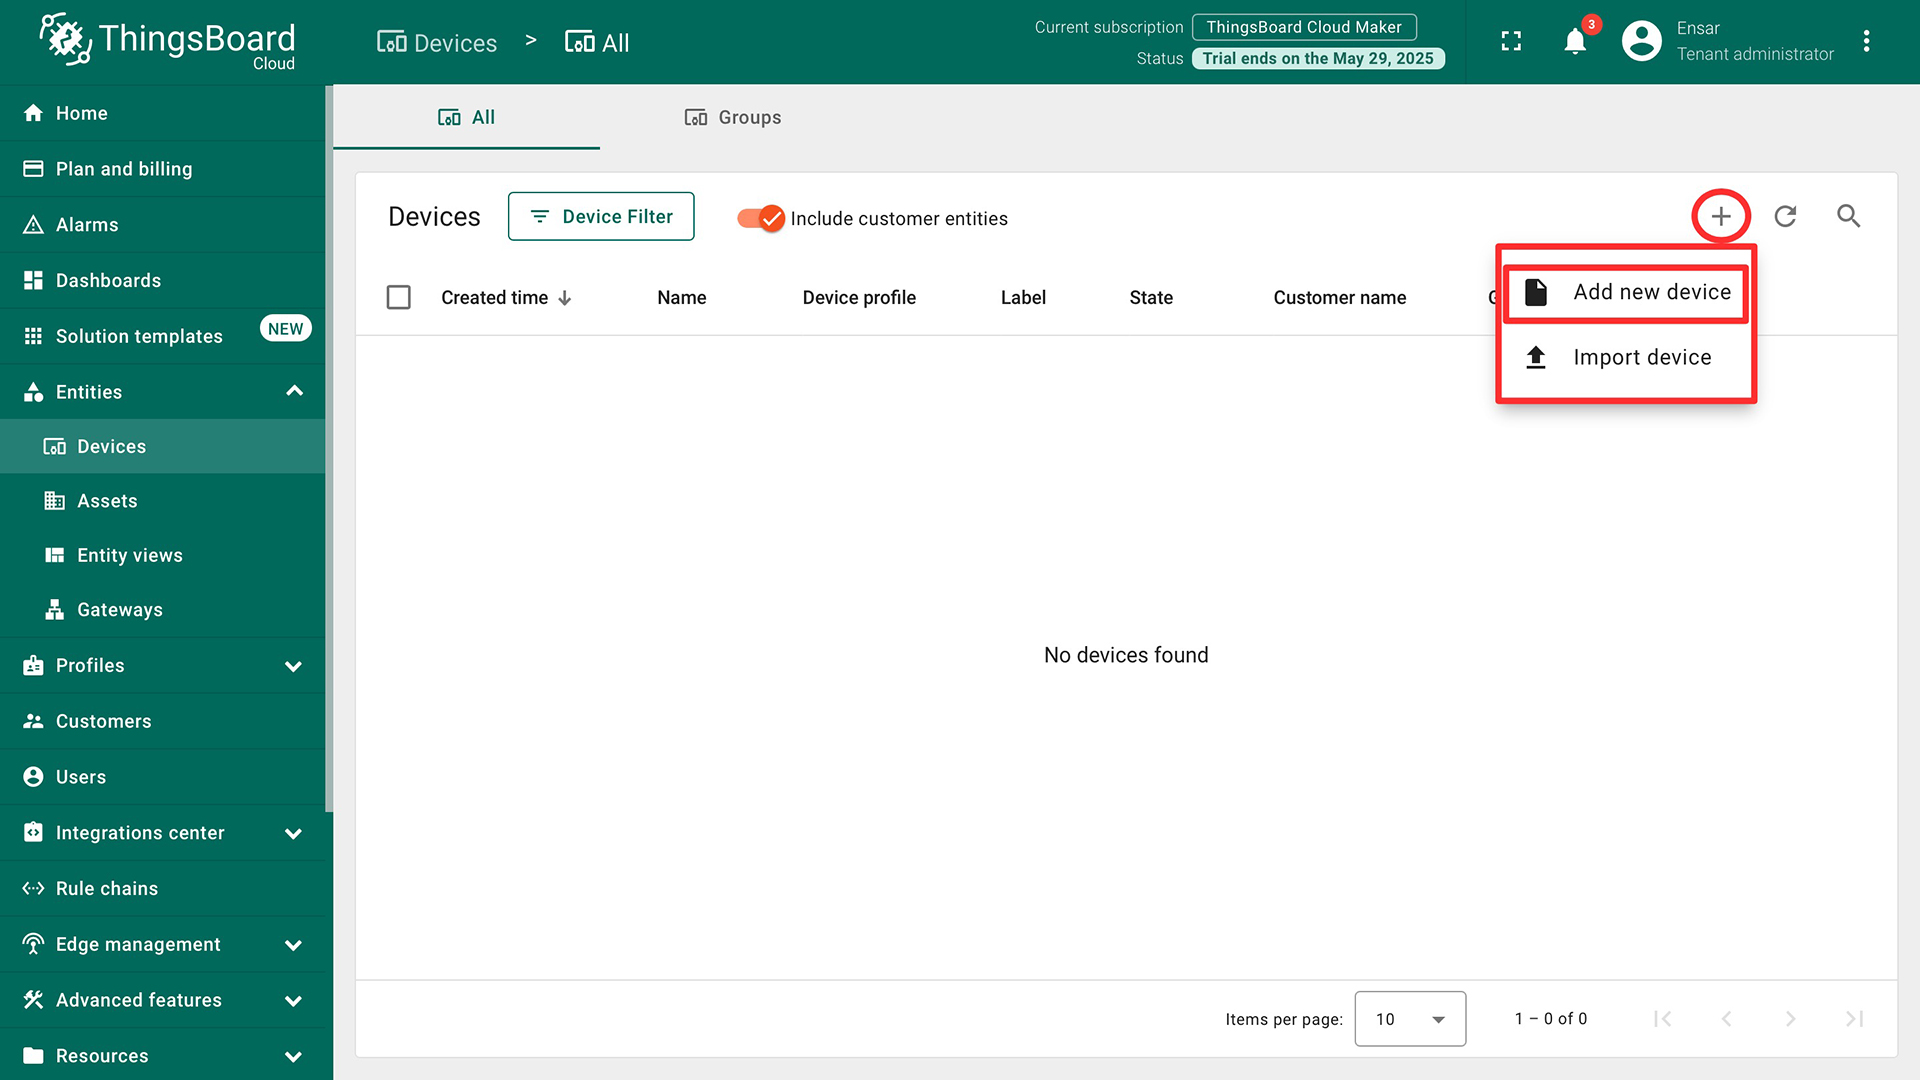
Add a New Device:
-
Click on the “+” icon in the top right corner of the table and then select “Add new device”.
-
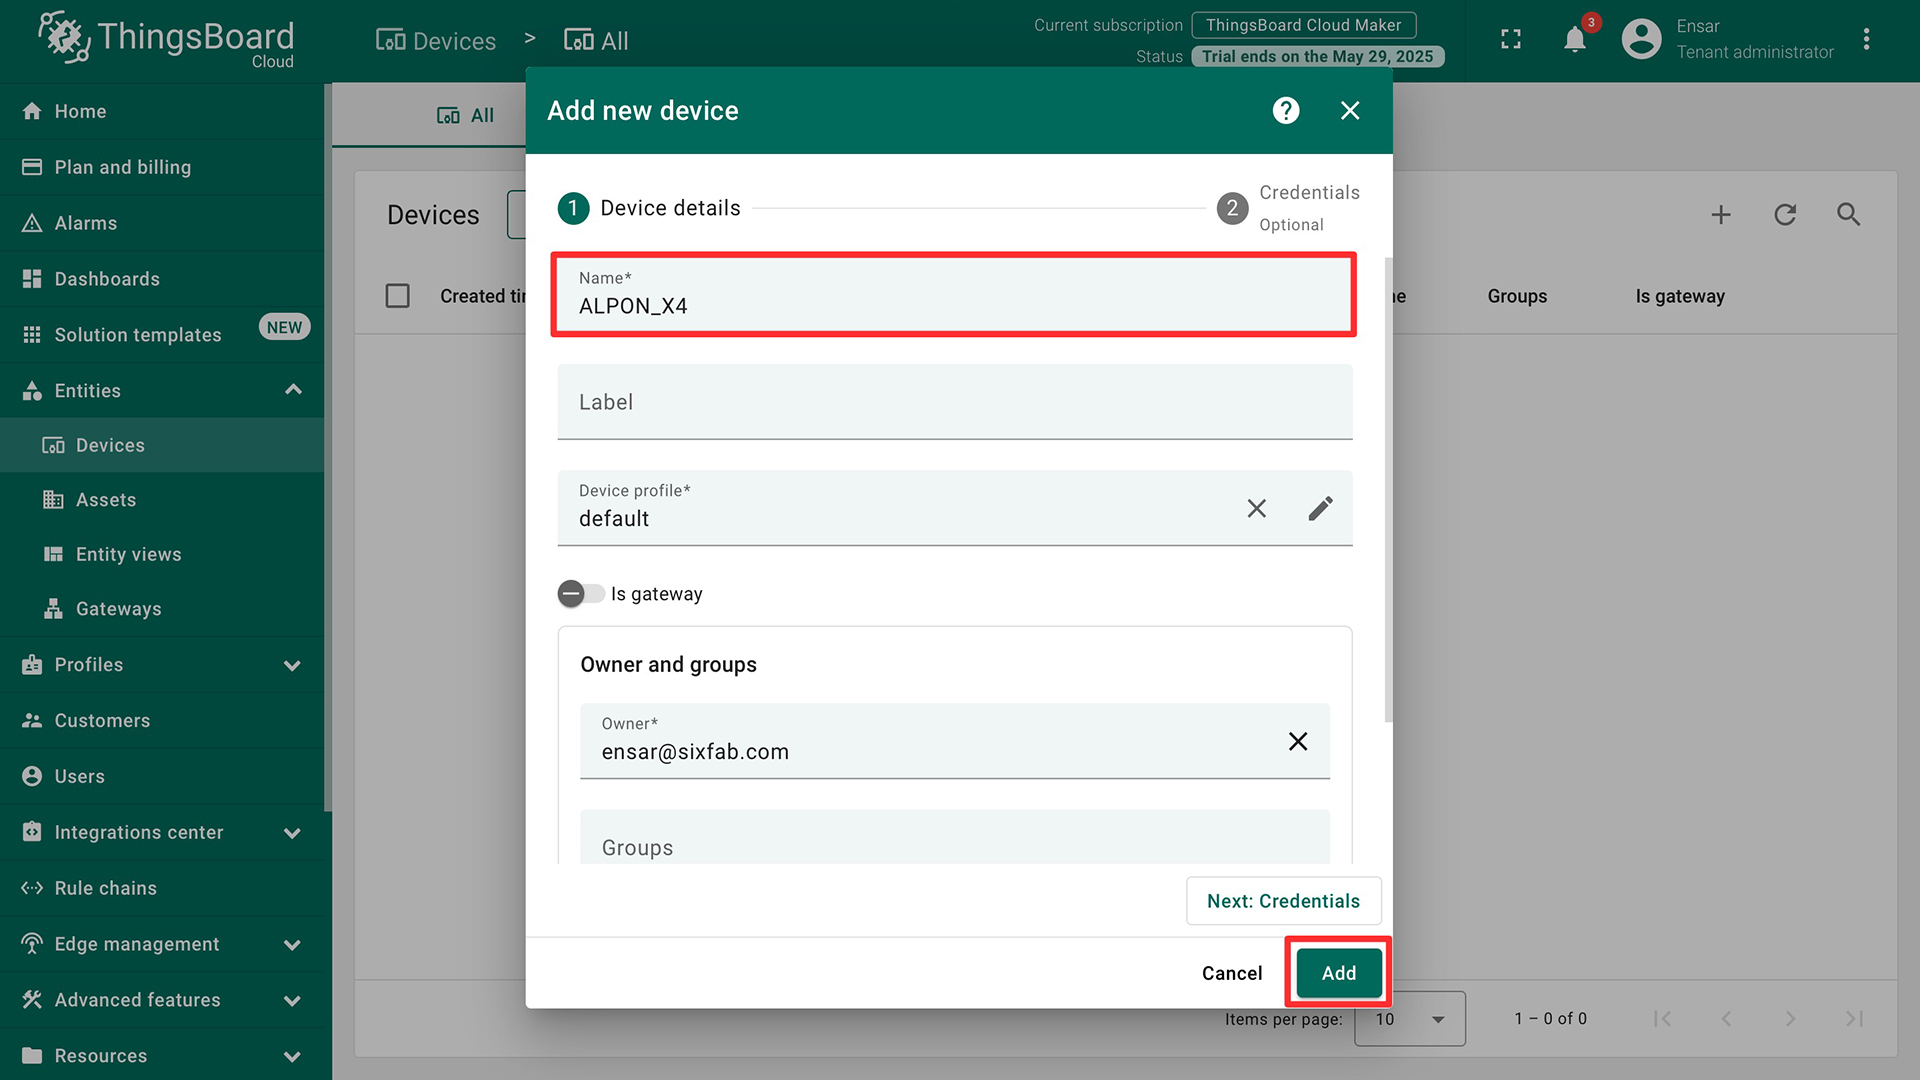
Enter the device name (e.g., ALPON_X4). No other changes are required at this time.
-
Click “Add” and close the window. Device is created.\
-
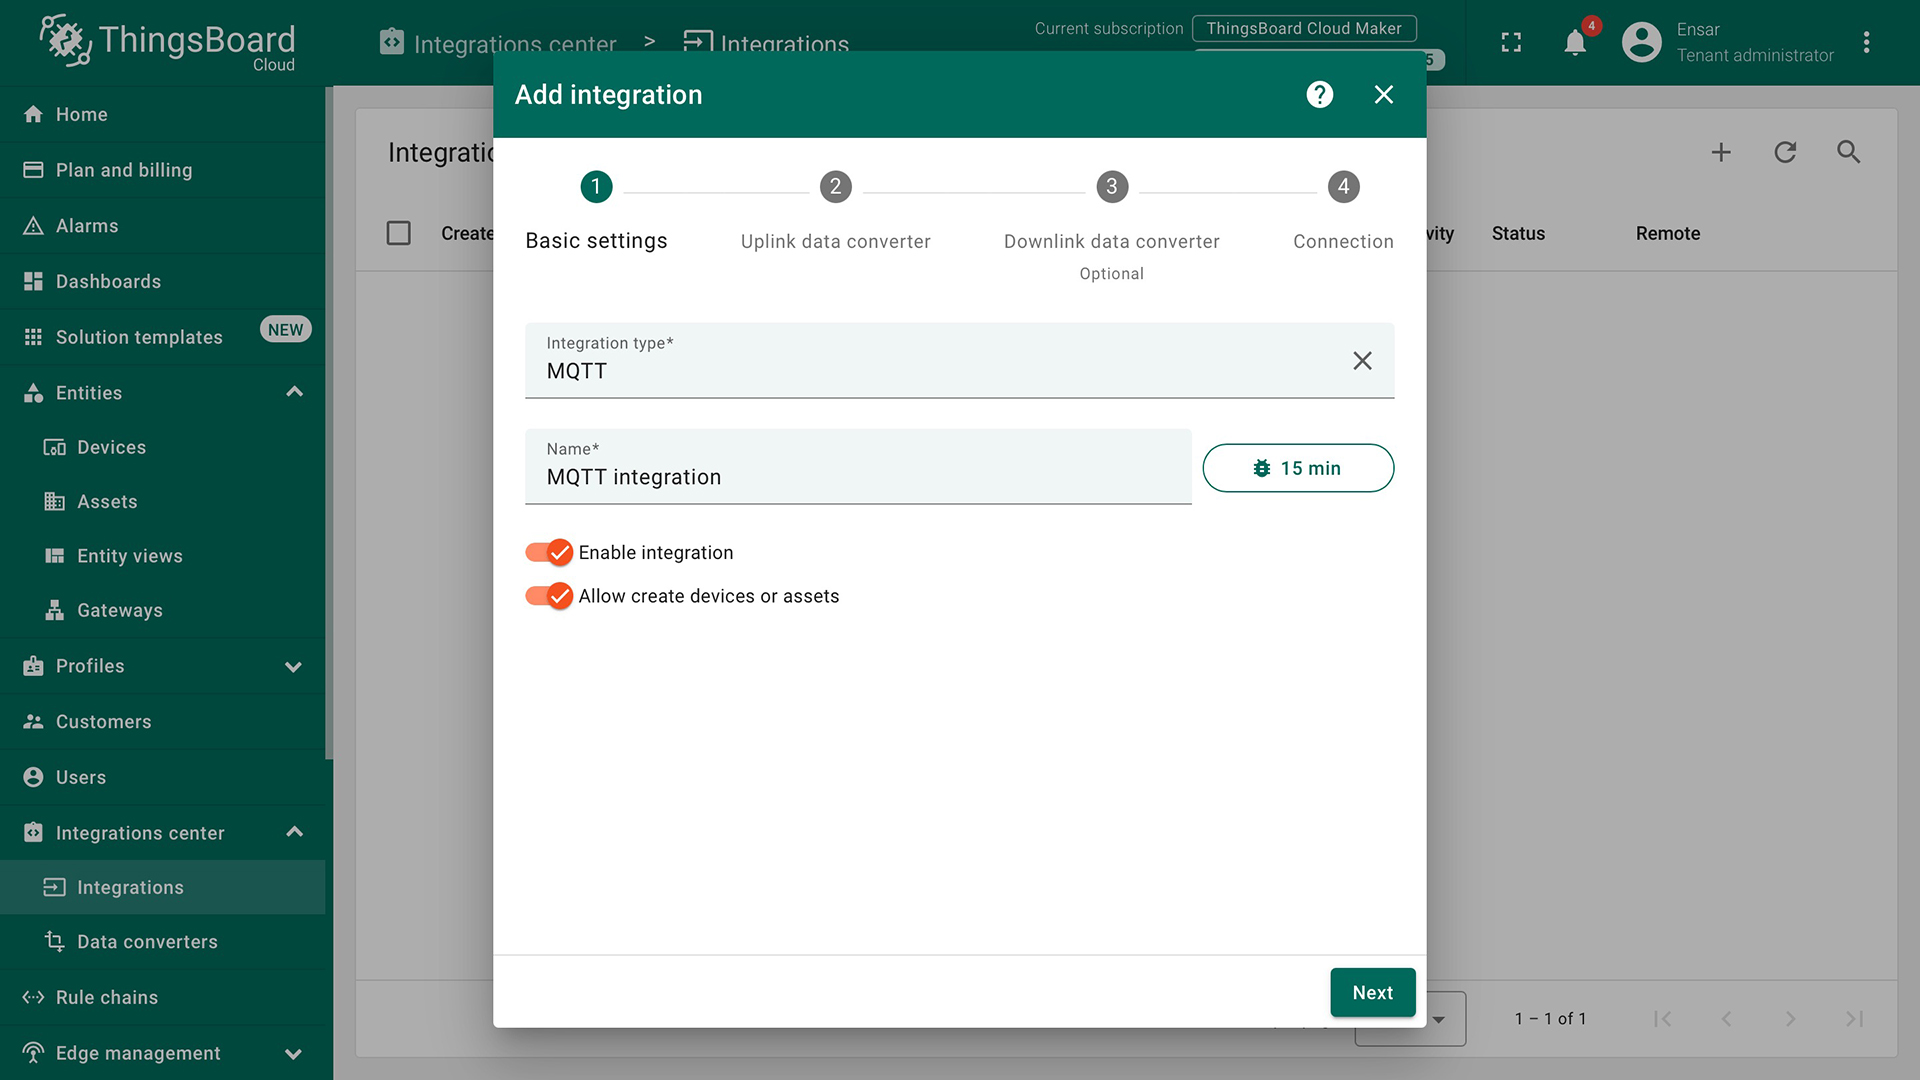
Add Integration and Topic Filter
To transfer data from the ALPON X4 to ThingsBoard via an external MQTT broker, you need to set up an MQTT Integration in ThingsBoard. This integration uses a Topic Filter to specify which MQTT topics to listen to and a Data Converter written in TBEL to process incoming data and map it to the appropriate device.
-
Create an MQTT Integration:
-
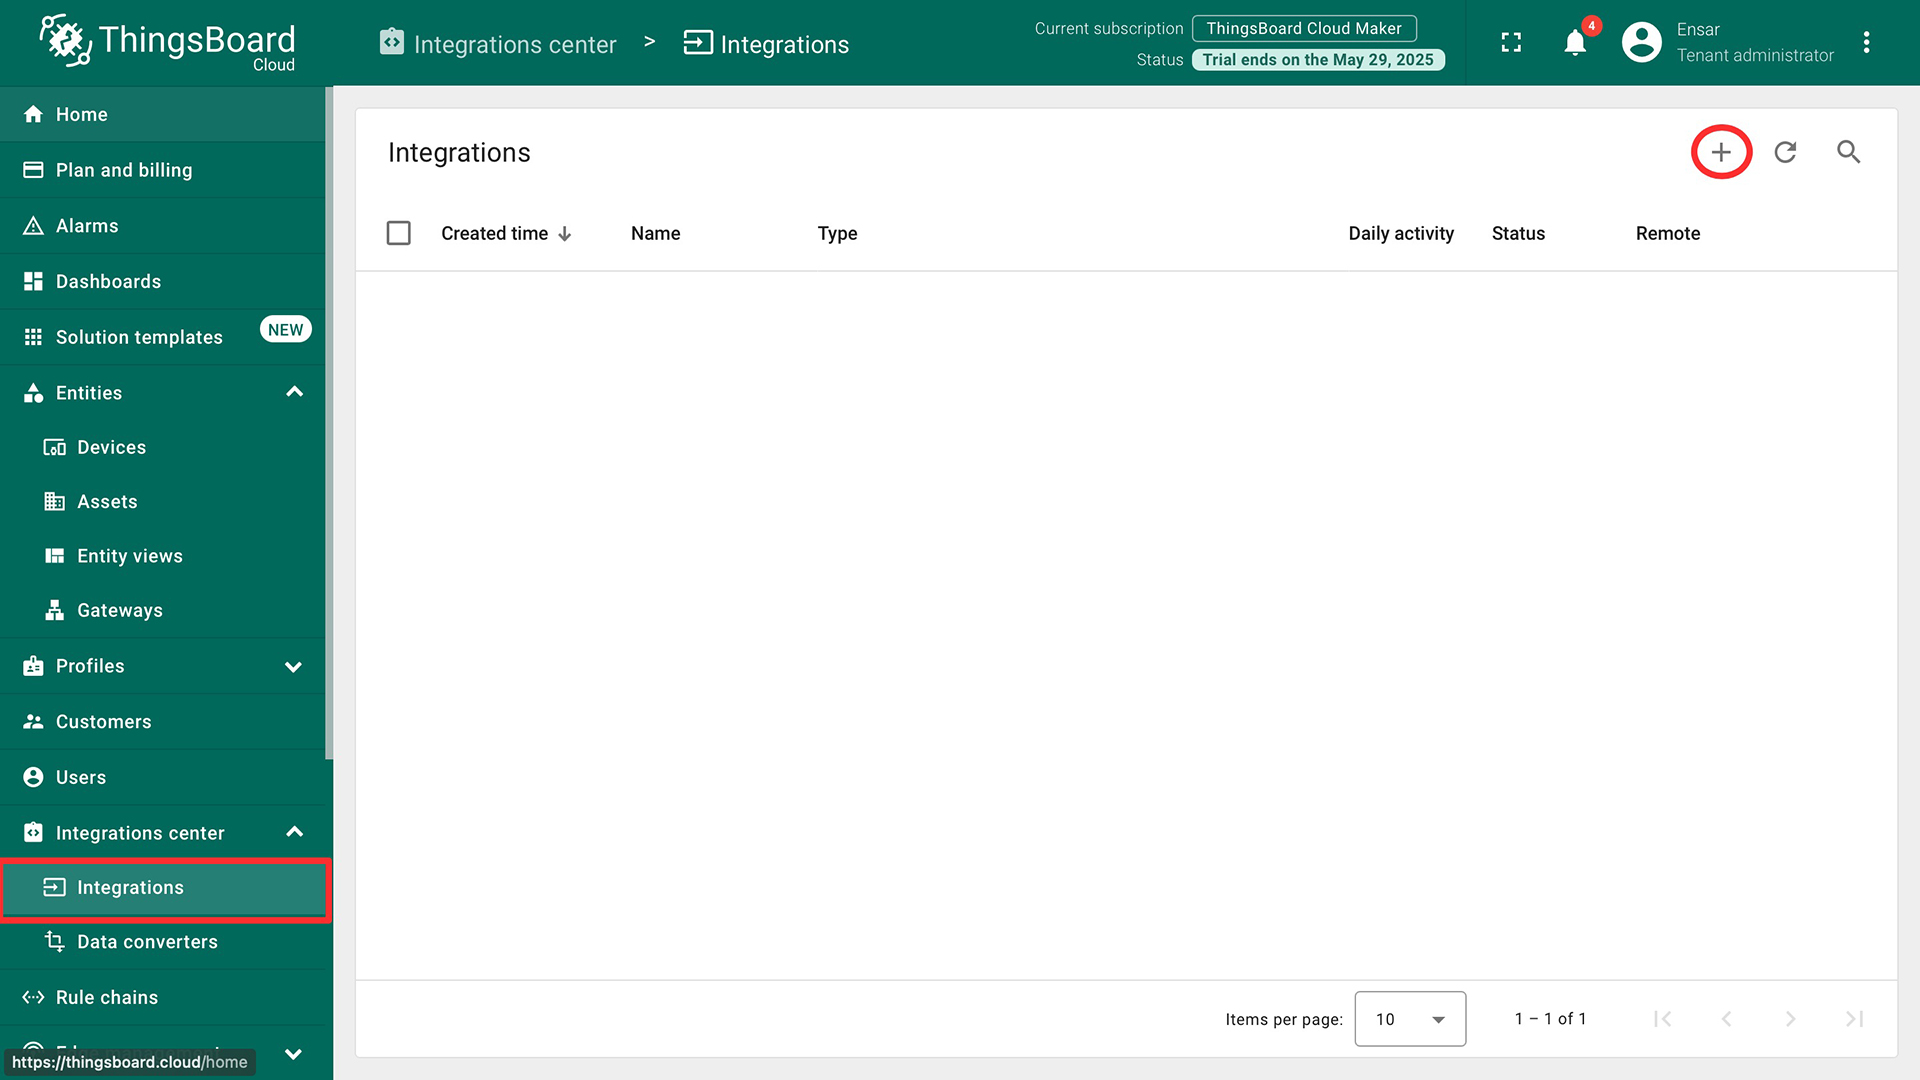
Log in to ThingsBoard and navigate to the "Integrations" section in the left-side menu.
-
Click the "+" icon to add a new integration.
-
Select "MQTT" as the integration type.
-
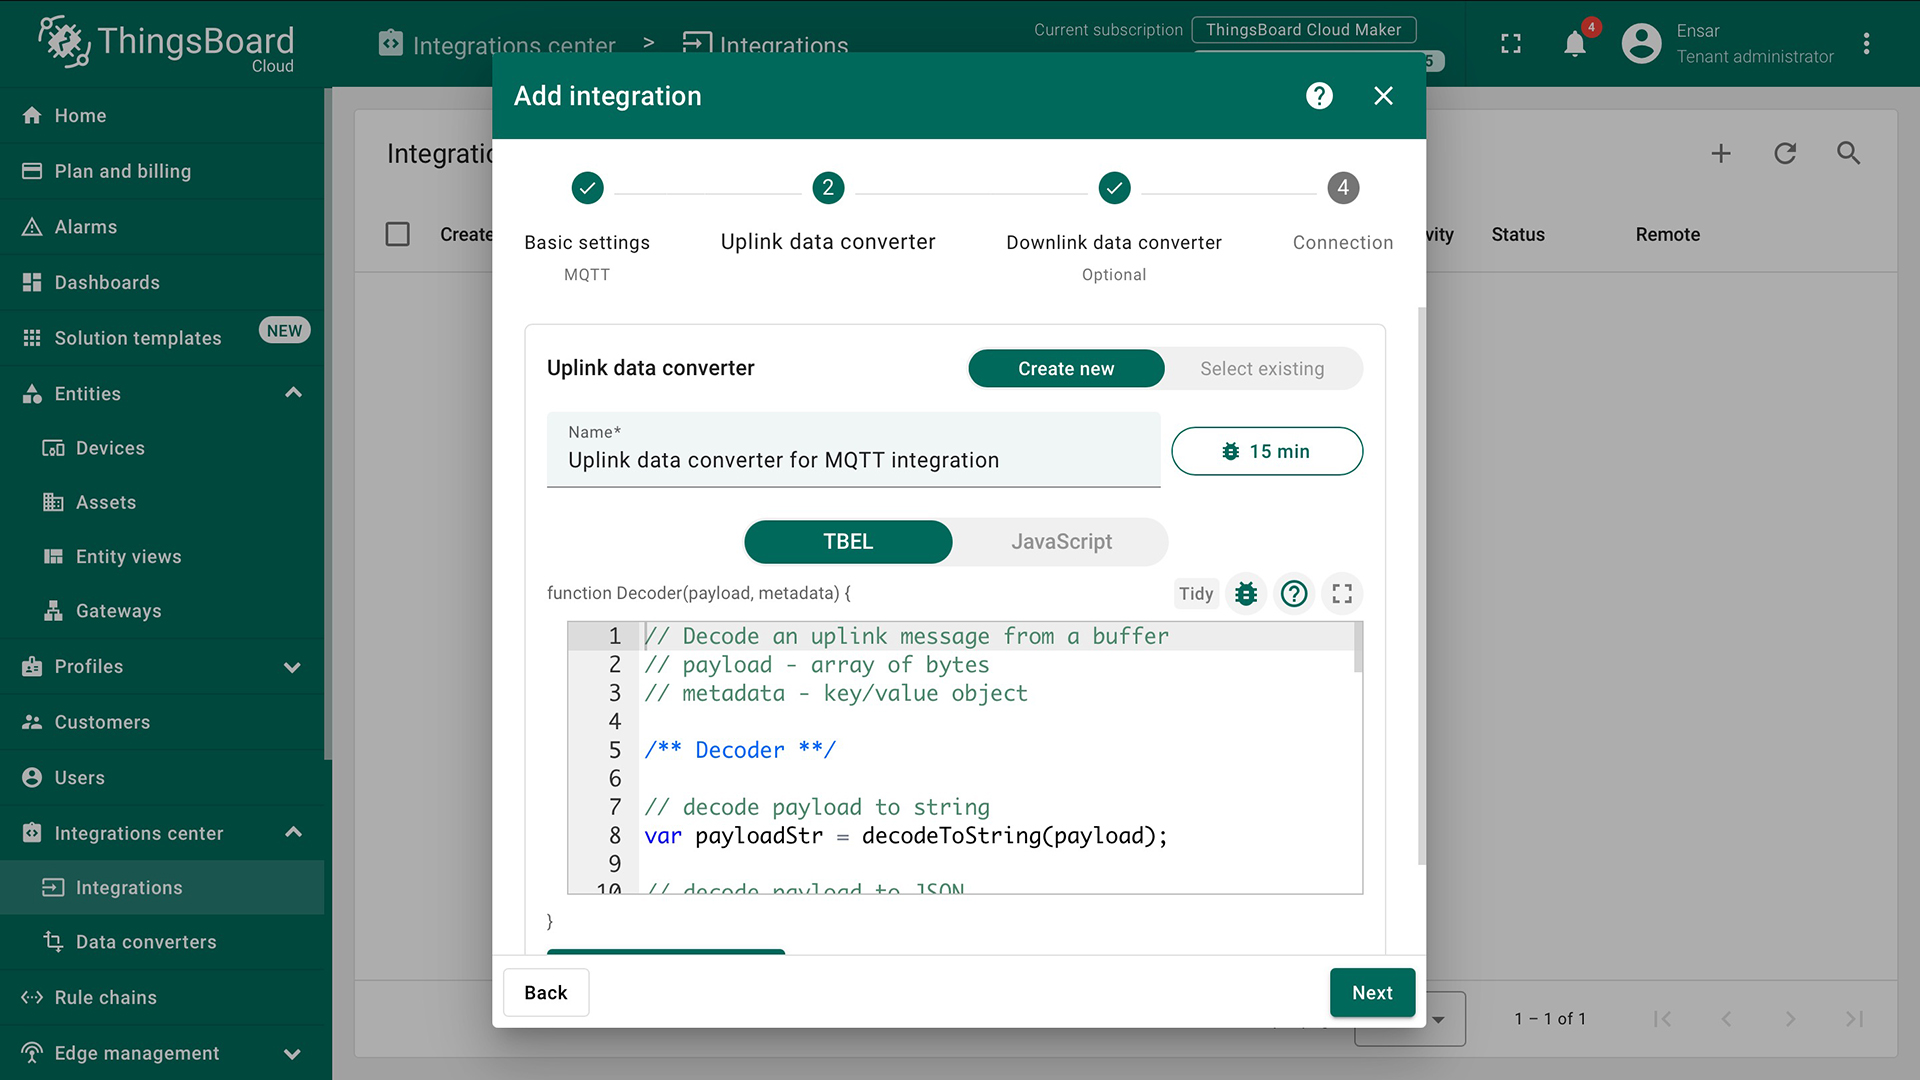
Select “TBEL” as Downlink data converter.
-
Copy and paste the following code into the decoder function window and click “Next”.
// Decode an uplink message from a buffer
// payload - array of bytes
// metadata - key/value object

/** Decoder **/

var payloadObj = decodeToJson(payload);

var deviceName = 'ALPON X4';
var deviceType = 'alpon';
var groupName = 'alpon devices';
var manufacturer = 'Sixfab';

var result = {
   deviceName: deviceName,
   deviceType: deviceType,

   groupName: groupName,
   attributes: {
       model: 'X4',
       serialNumber: '111111111',
       manufacturer: manufacturer
   },
   telemetry: {
       temperature: payloadObj.temperature,
   }
};

/** Helper functions 'decodeToString' and 'decodeToJson' are already built-in **/

return result;
-
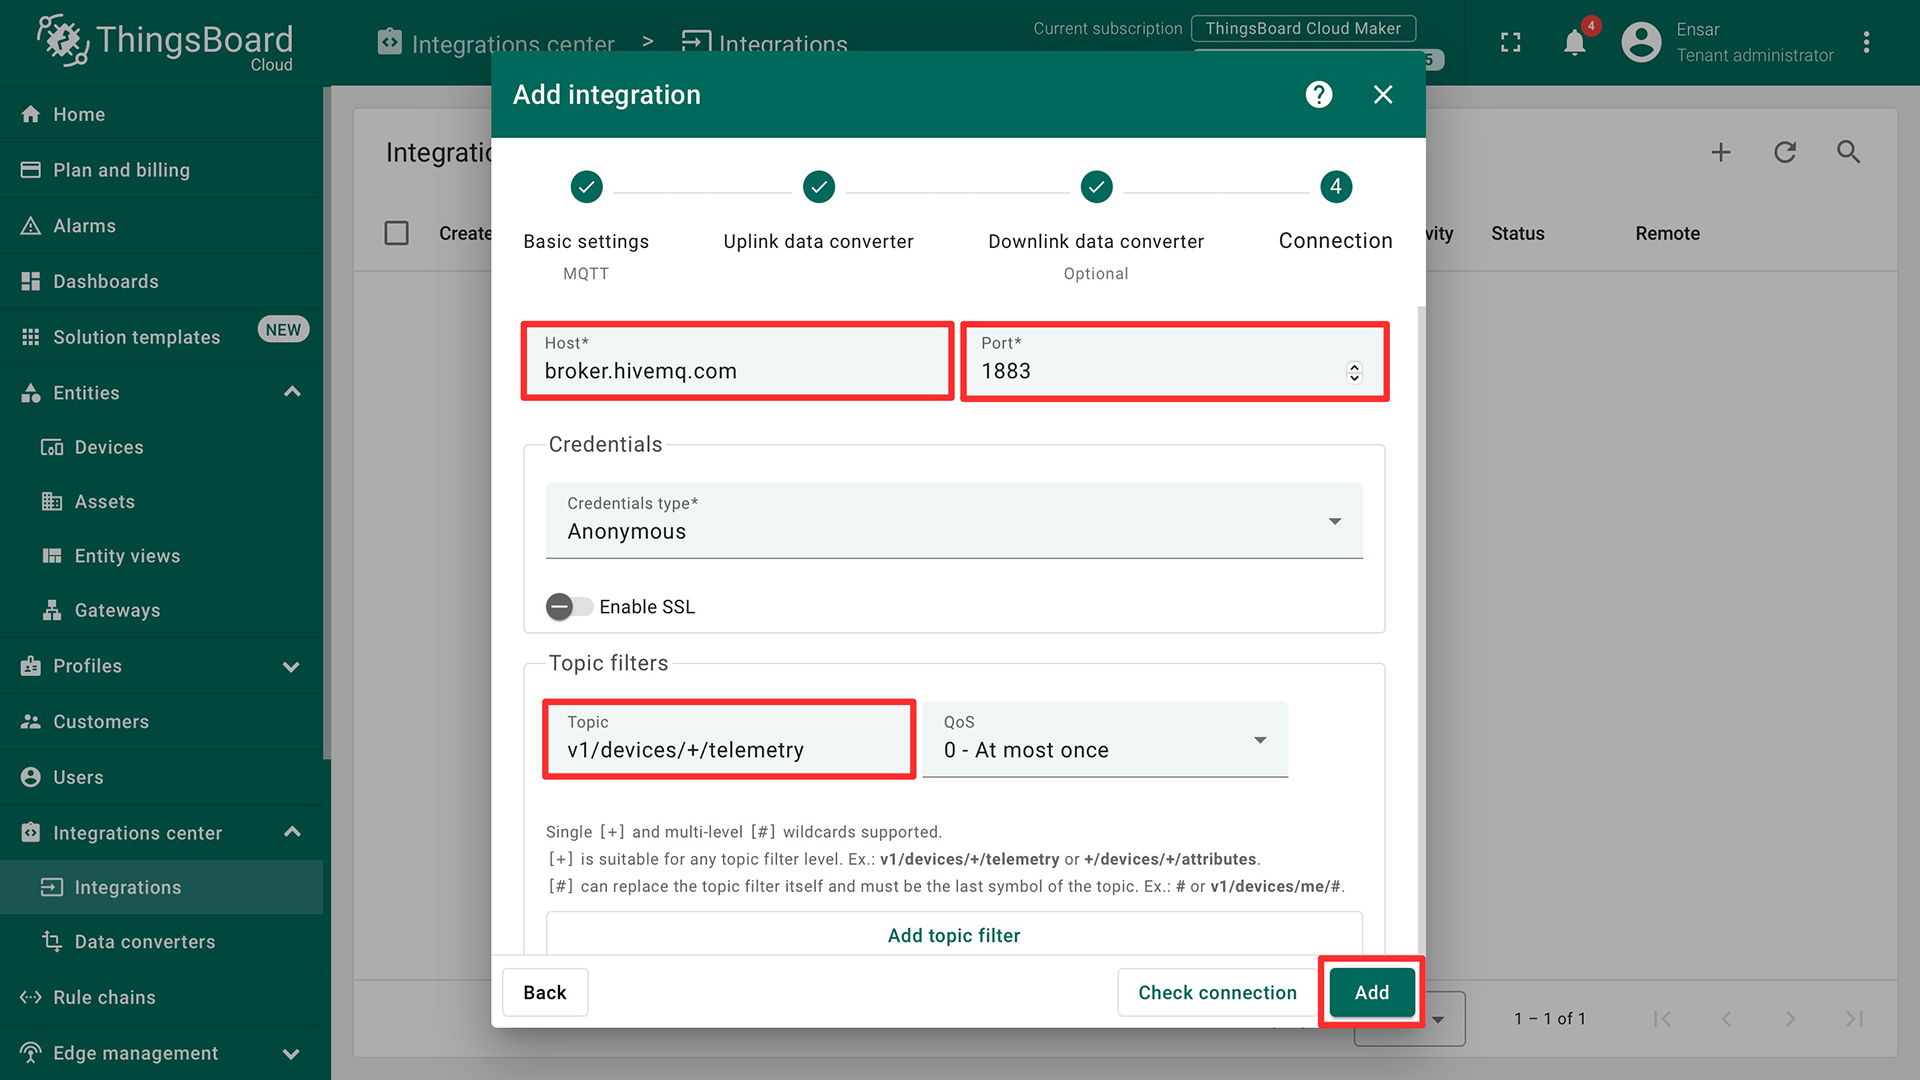
Configure the broker details:
- Host: broker.hivemq.com
- Port: 1883
- Topic: v1/devices/+/telemetry
This filter determines which topics the integration will listen to.\
-
Click “Add”.
-
- Understand the Topic Filter:
The Topic Filter v1/devices/+/telemetry uses a single-level wildcard (+) to match any single topic level in the specified position. For example, it will match topics like:
- v1/devices/device1/telemetry
- v1/devices/sensorA/telemetry
- v1/devices/room23/telemetry
It will not match topics such as:
- v1/devices/device1/sensor/telemetry (because + matches only one level)
- v1/devices/telemetry (because a level is missing)
- v1/attributes/+/client (different topic structure)
This structure allows the integration to process data from multiple devices, each using a unique identifier (e.g., device1, sensorA, room23) in the topic.
This setup allows the ALPON X4 to send telemetry data to ThingsBoard via an external MQTT broker, with the integration processing and mapping the data to the correct device based on the topic structure.
Docker Container Setup
Follow the steps below to prepare the MQTT client container on your local computer and then install Sixfab Registry.
-
Install Docker: Ensure Docker is installed on your local machine. Download and install it from docker.com if needed.
-
Create a Dockerfile: Create a file named Dockerfile with the following content to set up the environment for the MQTT client.
FROM alpine:latest RUN apk update && apk add \ mosquitto-clients \ mosquitto \ python3 \ py3-pip \ bash RUN pip3 install paho-mqtt --break-system-packages WORKDIR /app COPY mqtt_test.py /app/ CMD ["python3", "/app/mqtt_test.py"] -
Create the MQTT Test Script: Create a file named mqtt_test.py in the same directory as the Dockerfile. This script configures the ALPON X4 to publish telemetry data to ThingsBoard via MQTT.
import paho.mqtt.client as mqtt
import json
import ssl
import time
import os

MQTT_SERVER = os.getenv("MQTT_SERVER")
MQTT_PORT = os.getenv("MQTT_PORT")
CLIENT_ID = os.getenv("CLIENT_ID")
TOPIC = os.getenv("TOPIC")


def on_connect(client, userdata, flags, rc):
    print(f"Connected with result code {rc}")
    client.subscribe(TOPIC, qos=0)
    print(f"Subscribed to topic: {TOPIC}")

    # Publish a test message after connecting
    test_message = {
        "temperature": 26
    }
    client.publish(TOPIC, json.dumps(test_message), qos=0)
    print("Test message published.")

def on_message(client, userdata, msg):
    print(f"RECEIVED MESSAGE on {msg.topic}:")
    try:
        message = json.loads(msg.payload.decode())
        print(json.dumps(message, indent=4))
    except Exception as e:
        print(f"Error decoding JSON: {e}")
        print(msg.payload.decode())
# Set up MQTT client
client = mqtt.Client(client_id=CLIENT_ID, clean_session=True)

# Set up callbacks
client.on_connect = on_connect
client.on_message = on_message

# Enable SSL/TLS
client.connect(MQTT_SERVER, int(MQTT_PORT), 60)

# Start the loop
client.loop_forever()-
Build the Docker Image:
- Open a terminal on your local machine in the directory containing the Dockerfile and mqtt_test.py.
- Run the following command to build the Docker image:
docker build --platform=linux/arm64 -t thingsboard-mqtt-alpon-x4:latest .
-
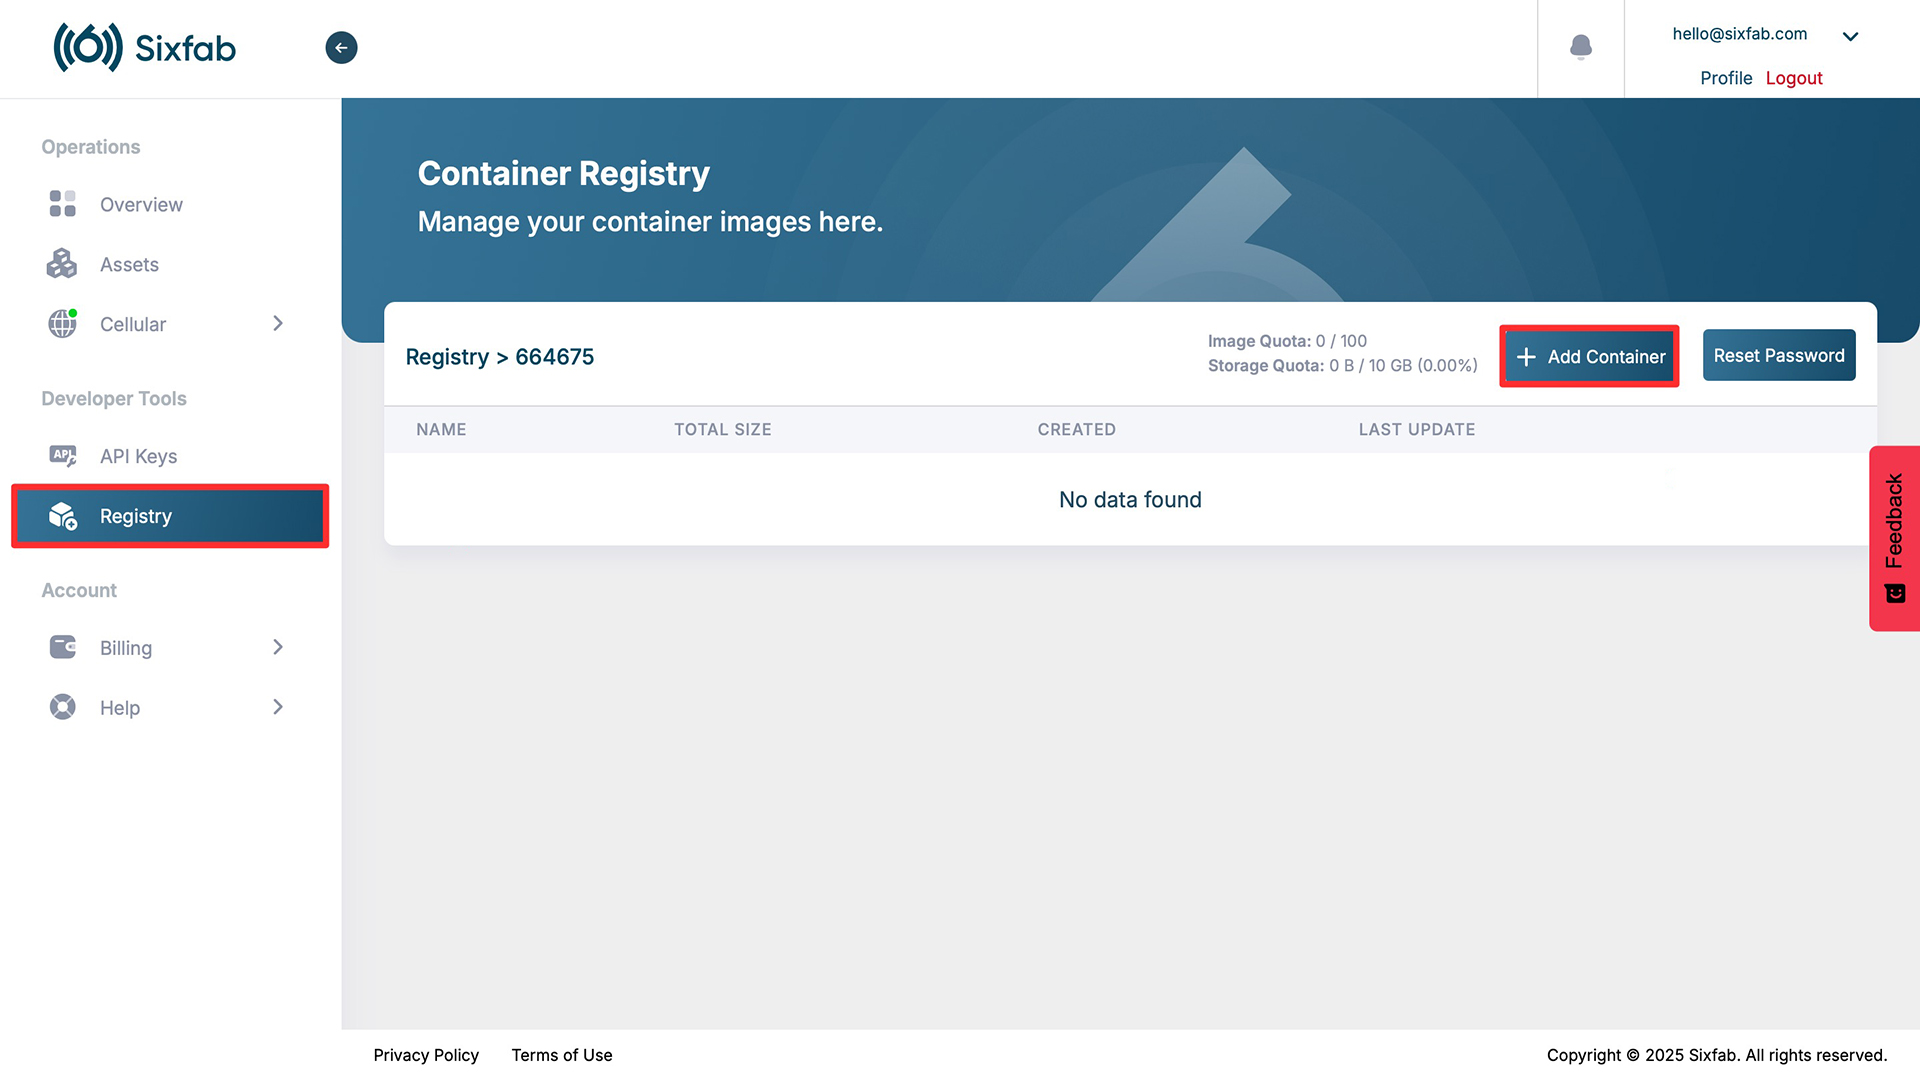
Upload the Docker Image:
-
Log in to the Sixfab Connect platform, navigate to the Sixfab Registry page.
-
Click on "+ Add Container" and follow the prompts to push container to Sixfab registry.
Visit the Manage & Deploy Applications page for all the necessary details on pushing your container image to the Sixfab Registry.
-
Deployment Configuration
-
Go to the Application section of your asset on Sixfab Connect.
-
Click the + Deploy button to configure and deploy the container.
-
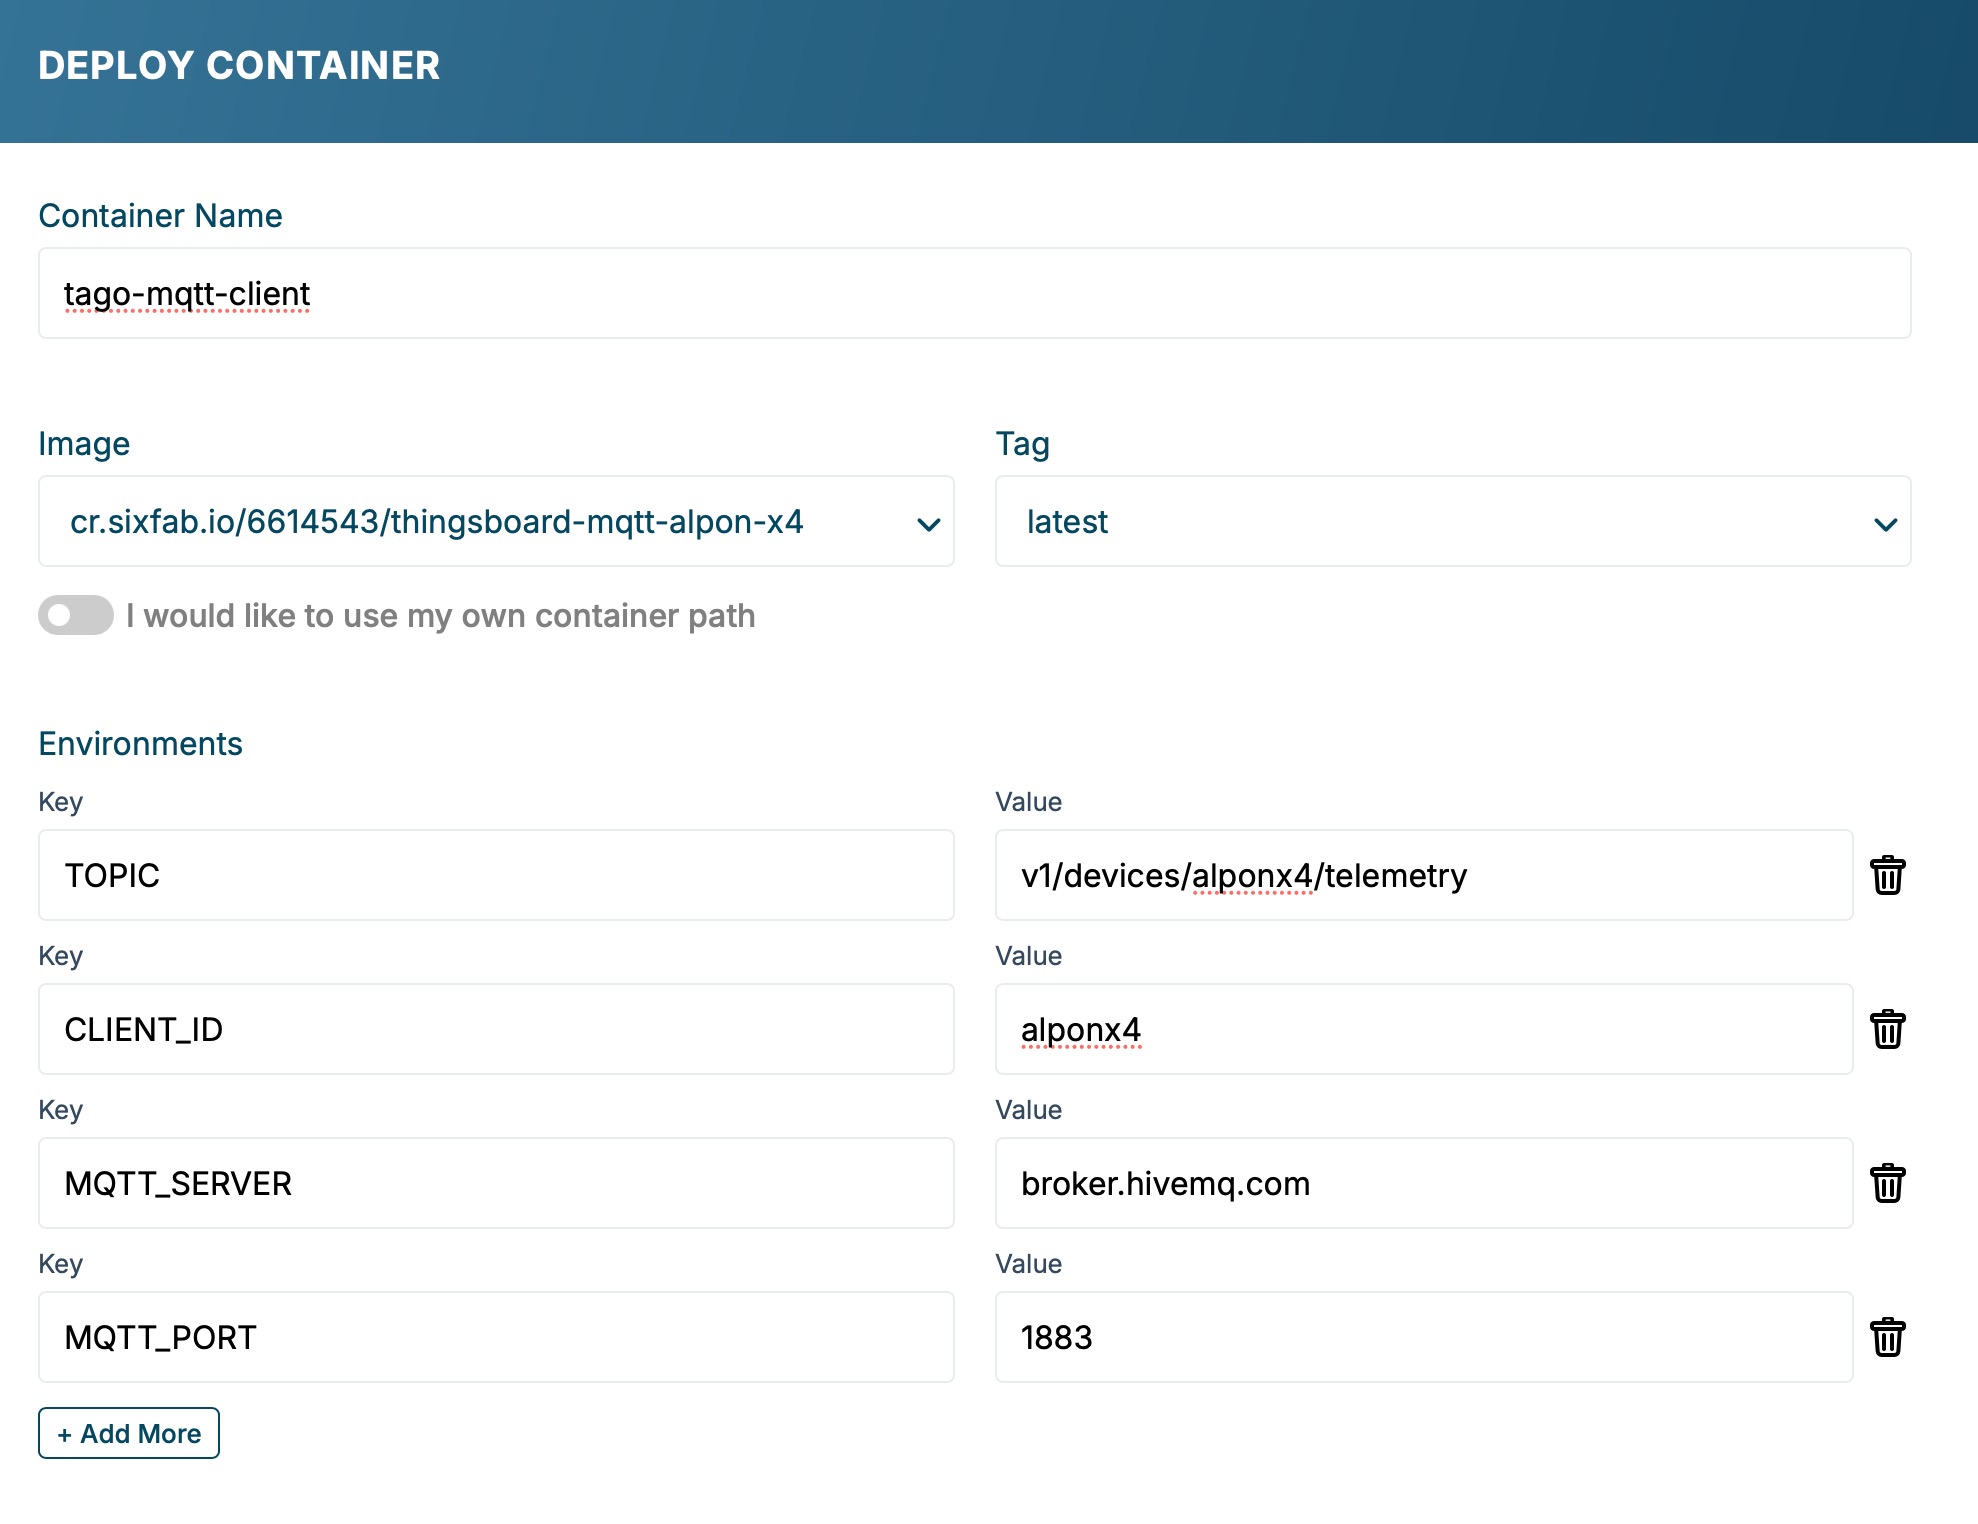
In the Deploy Container window, use the following settings:
-
Container Name: tago-mqtt-client
-
Image: Select the ThingsBoard image and tag pushed to the Sixfab Registry, or follow the steps mentioned in the 'Alternative Deployment Option'.
-
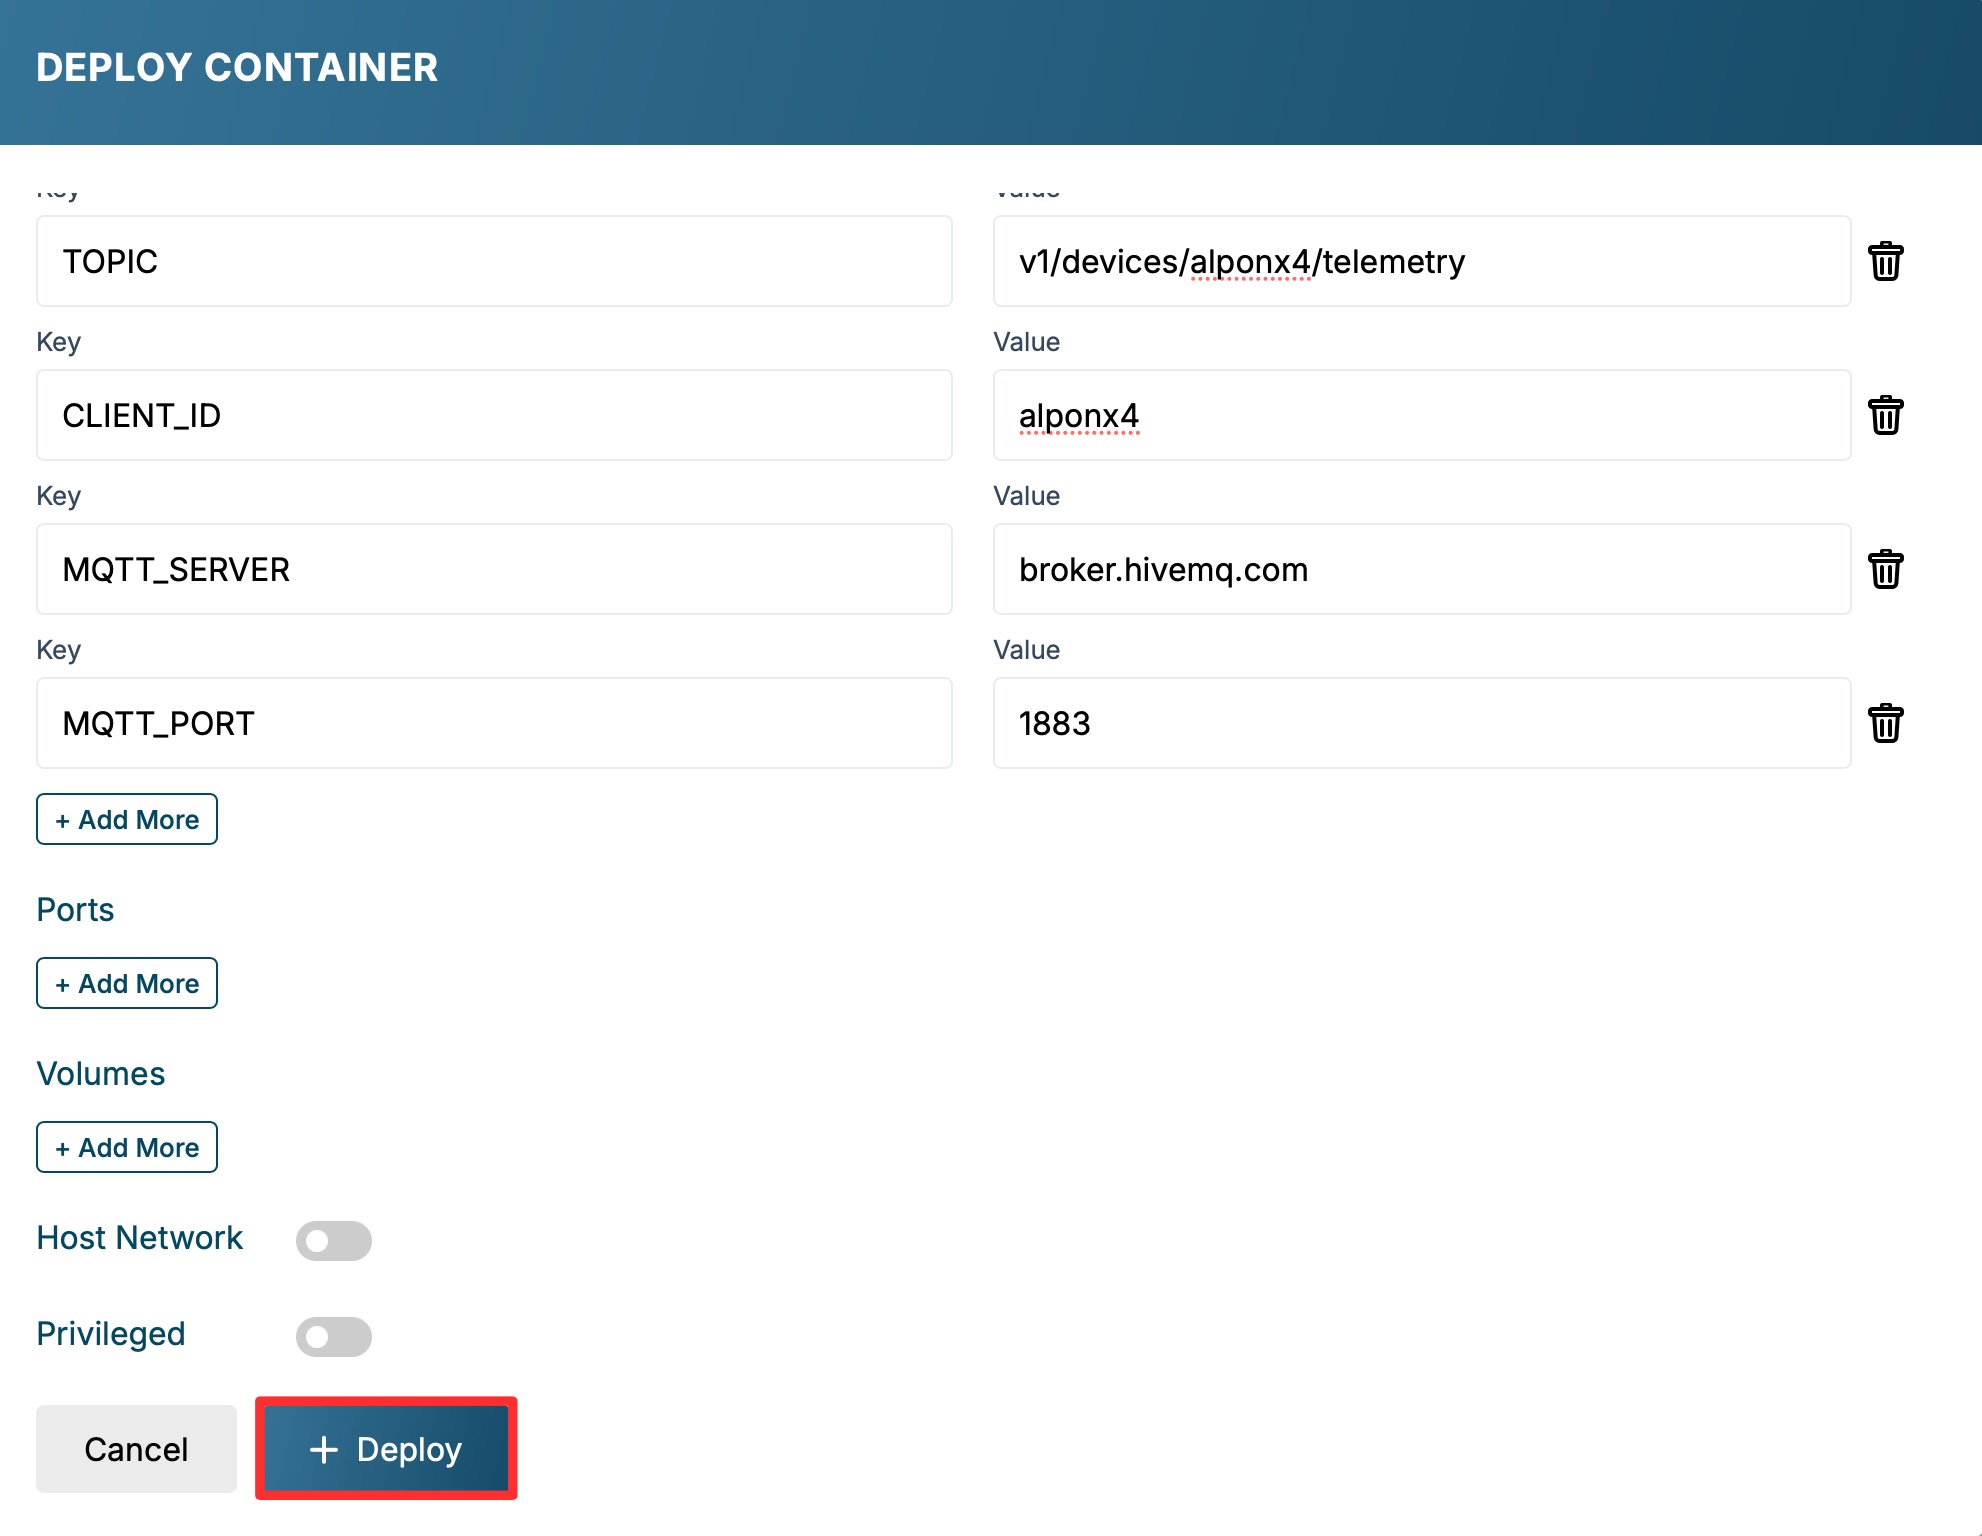
Environment: Click "+ Add More" in the environment section and add the following values:
Key Value TOPIC v1/devices/alponx4/telemetry CLIENT_ID alponx4 MQTT_SERVER broker.hivemq.com MQTT_PORT 1883
-
Click the "+ Deploy" button to deploy ThingsBoard.\
-
Check Data on ThingsBoard
Verify that telemetry data is received and displayed in ThingsBoard.
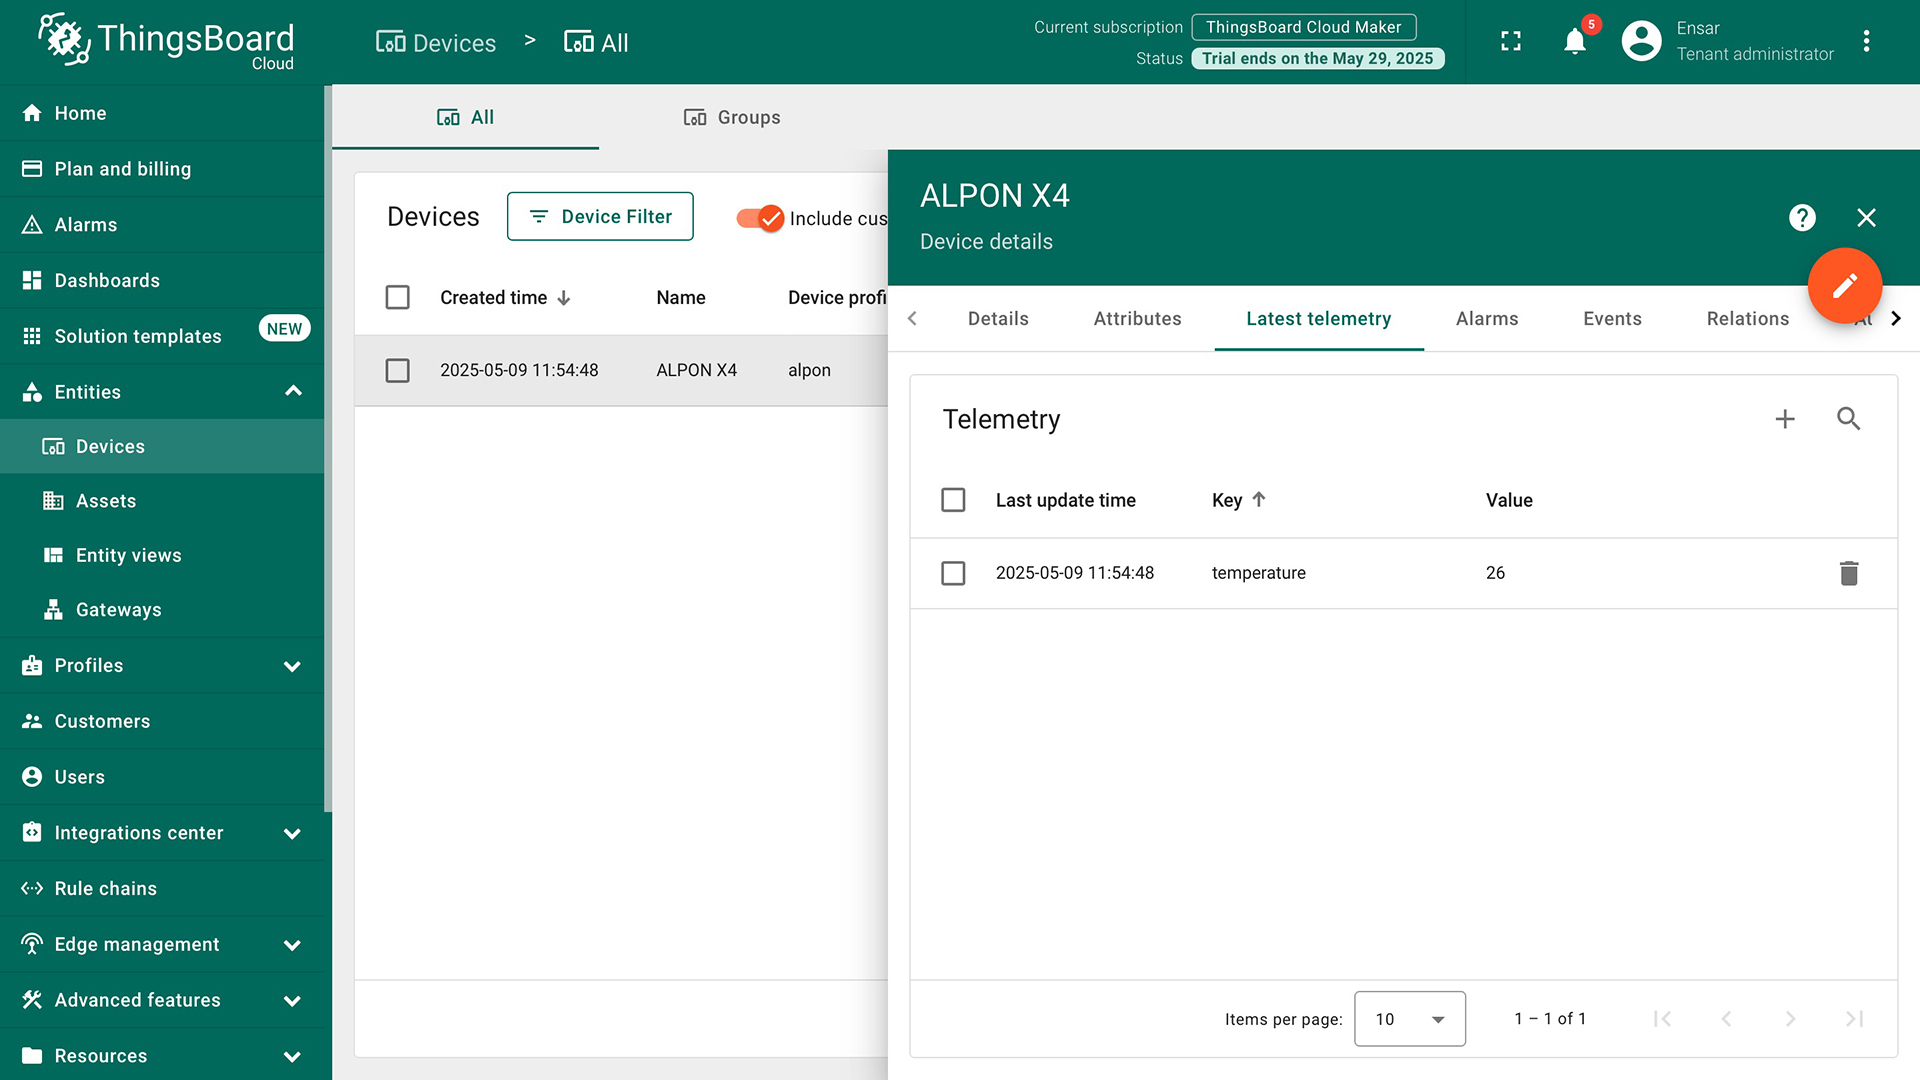
- Log in to your ThingsBoard instance.
- Navigate to Entities > Devices and select your ALPON X4 device.
- Go to the Latest Telemetry tab to view the temperature and humidity data sent.
Conclusion
This guide demonstrated how to integrate the ALPON X4 with ThingsBoard using MQTT for real-time data collection and device control. By following the steps, you created a device in ThingsBoard, deployed an MQTT client on Sixfab Connect.
For further assistance, refer to the ThingsBoard documentation or contact Sixfab support.
Updated 3 months ago