
Deploying OpenPLC
Build a reviewable ARM64 OpenPLC runtime image, push it to the Sixfab Container Registry, and deploy it on ALPON X5 AI or ALPON X4 through ALPON Cloud with the web interface and Modbus TCP ports mapped.
Deploy OpenPLC on ALPON
Run the OpenPLC runtime as a container on your ALPON X5 AI or
ALPON X4 and program it like a PLC from a browser. This guide builds a pinned
arm64 image, pushes it to the Sixfab Container Registry, deploys it through
ALPON Cloud, and opens the OpenPLC web interface on port 30880.
Build an arm64 OpenPLC runtime image from a pinned OpenPLC_v3 release with the
Dockerfile and entrypoint below, push it to your Sixfab Container Registry, then use the
Applications → Deploy panel on ALPON Cloud to launch the container on your
ALPON X5 AI or ALPON X4 with port 30880 → 8080 (and
30502 → 502 for Modbus TCP). Open http://<DEVICE_IP>:30880 in a browser to
reach the OpenPLC web interface.
Overview
OpenPLC is an open-source, IEC 61131-3 compliant soft PLC: you write ladder logic or structured text in the OpenPLC Editor, upload it through the runtime’s web interface, and the runtime executes it and exposes I/O over Modbus TCP. Running it as a container on an ALPON X5 AI or ALPON X4 turns the device into a network-attached controller that stays manageable through ALPON Cloud.
This guide builds an arm64 OpenPLC runtime image, pushes it to the Sixfab Container Registry,
and deploys it on the device. The example targets the OpenPLC web interface and Modbus TCP; add a hardware layer
only after reviewing its device-access and privilege requirements. The steps below are identical on ALPON X4 and
ALPON X5 AI.
You need an ALPON X5 AI or ALPON X4 registered on ALPON Cloud, and Docker installed on your build machine to build and push the image. New to container deployment? Start with Containerize Apps for ALPON.
Project file structure
Your OpenPLC containerized application has the following file structure:
openplc_project/
├─── hardware_layers/
├──── .donotdelete
├─── entrypoint.sh
└─── Dockerfile
| Path | Purpose |
|---|---|
hardware_layers/ | Optional reviewed hardware-specific files; keep .donotdelete if the folder is otherwise empty. |
entrypoint.sh | Starts OpenPLC and handles container termination without running an SSH daemon. |
Dockerfile | Builds the pinned ARM64 OpenPLC runtime image. |
-
1
Create a reviewable ARM64 Dockerfile
Do not bake SSH into the containerThe previous version of this guide enabled SSH with a fixed
root:rootpassword and added end-of-life Debian Buster repositories withapt-key. Do not use that pattern. A container does not need an SSH daemon: use ALPON Cloud Shell for application access and the device Remote Terminal for host diagnostics.Pin the OpenPLC source to a reviewed release tag or commit when building. The example below intentionally requires
OPENPLC_REF; replacing it with an unpinned branch would make later builds non-reproducible. Save it asDockerfileinopenplc_project/:Dockerfile dockerfileFROM debian:bookworm-slim ARG OPENPLC_REF RUN test -n "$OPENPLC_REF" \\ && apt-get update \\ && apt-get install -y --no-install-recommends \\ ca-certificates git build-essential autoconf automake \\ bison flex cmake libtool pkg-config python3 python3-pip \\ && rm -rf /var/lib/apt/lists/* RUN git clone https://github.com/thiagoralves/OpenPLC_v3.git /OpenPLC_v3 \\ && cd /OpenPLC_v3 \\ && git checkout "$OPENPLC_REF" \\ && ./install.sh docker # Add only hardware layers you have reviewed and need. COPY ./hardware_layers/ /OpenPLC_v3/webserver/core/hardware_layers/ COPY ./entrypoint.sh /usr/local/bin/openplc-entrypoint RUN chmod 0755 /usr/local/bin/openplc-entrypoint EXPOSE 8080 502 STOPSIGNAL SIGTERM ENTRYPOINT ["/usr/local/bin/openplc-entrypoint"] -
2
Create the entrypoint
The entrypoint starts OpenPLC without an SSH daemon or embedded password. It also forwards termination to the runtime when the container is stopped. Save it as
entrypoint.shnext to the Dockerfile:entrypoint.sh sh#!/bin/sh set -eu cd /OpenPLC_v3 stop_openplc() { if [ -x ./stop_openplc.sh ]; then ./stop_openplc.sh || true fi exit 0 } trap stop_openplc INT TERM ./start_openplc.sh # OpenPLC starts its services in the background; keep PID 1 available # to receive the stop signal from the container runtime. while :; do sleep 3600 & wait $! doneUse the web interface on port
8080for OpenPLC administration. Do not expose an SSH port from the container. -
3
Build and push the OpenPLC image
Build the image for
arm64and pass the reviewed OpenPLC tag or commit. On an x86 Linux build host, register ARM emulation first as described in Deploy Applications.bash · build the imagedocker buildx build --load --platform linux/arm64 \\ --build-arg OPENPLC_REF=<reviewed-tag-or-commit> \\ -t openplc-container:<version> .
Then log in to Sixfab Registry, click + Add Container, and follow the prompts to push the image.
Pushing images to the Sixfab Container RegistryFor the full walkthrough of tagging and pushing an image, see Update Containers from the Sixfab Container Registry.
-
4
Deploy the container on ALPON
Once the image is in the Sixfab Container Registry, open your device in ALPON Cloud, go to the Applications section, and click + Deploy. In the Deploy Container window, use these settings:
Container NameThe application name, e.g.openplc-application.ImageThe OpenPLC image and tag you pushed to the Sixfab Container Registry.PortsClick + Add More and add the port mappings in the table below.Hardware accessOptional — only for a reviewed GPIO hardware layer; see the callout below. Leave Privileged off for a Modbus TCP-only deployment.From To Purpose 308808080OpenPLC web interface 30502502Modbus TCP, only when required by the deployment Hardware access (optional)For a reviewed GPIO hardware layer, add a Read/Write bind mount from
/dev/gpiomemto/dev/gpiomemin the Volumes section and enable Privileged mode. Do not enable Privileged mode for a Modbus TCP-only deployment. The ALPON GPIO Add-on 5 V rail must also be enabled through GPIO 21; see Access GPIO, Push Buttons, and USB from Containers.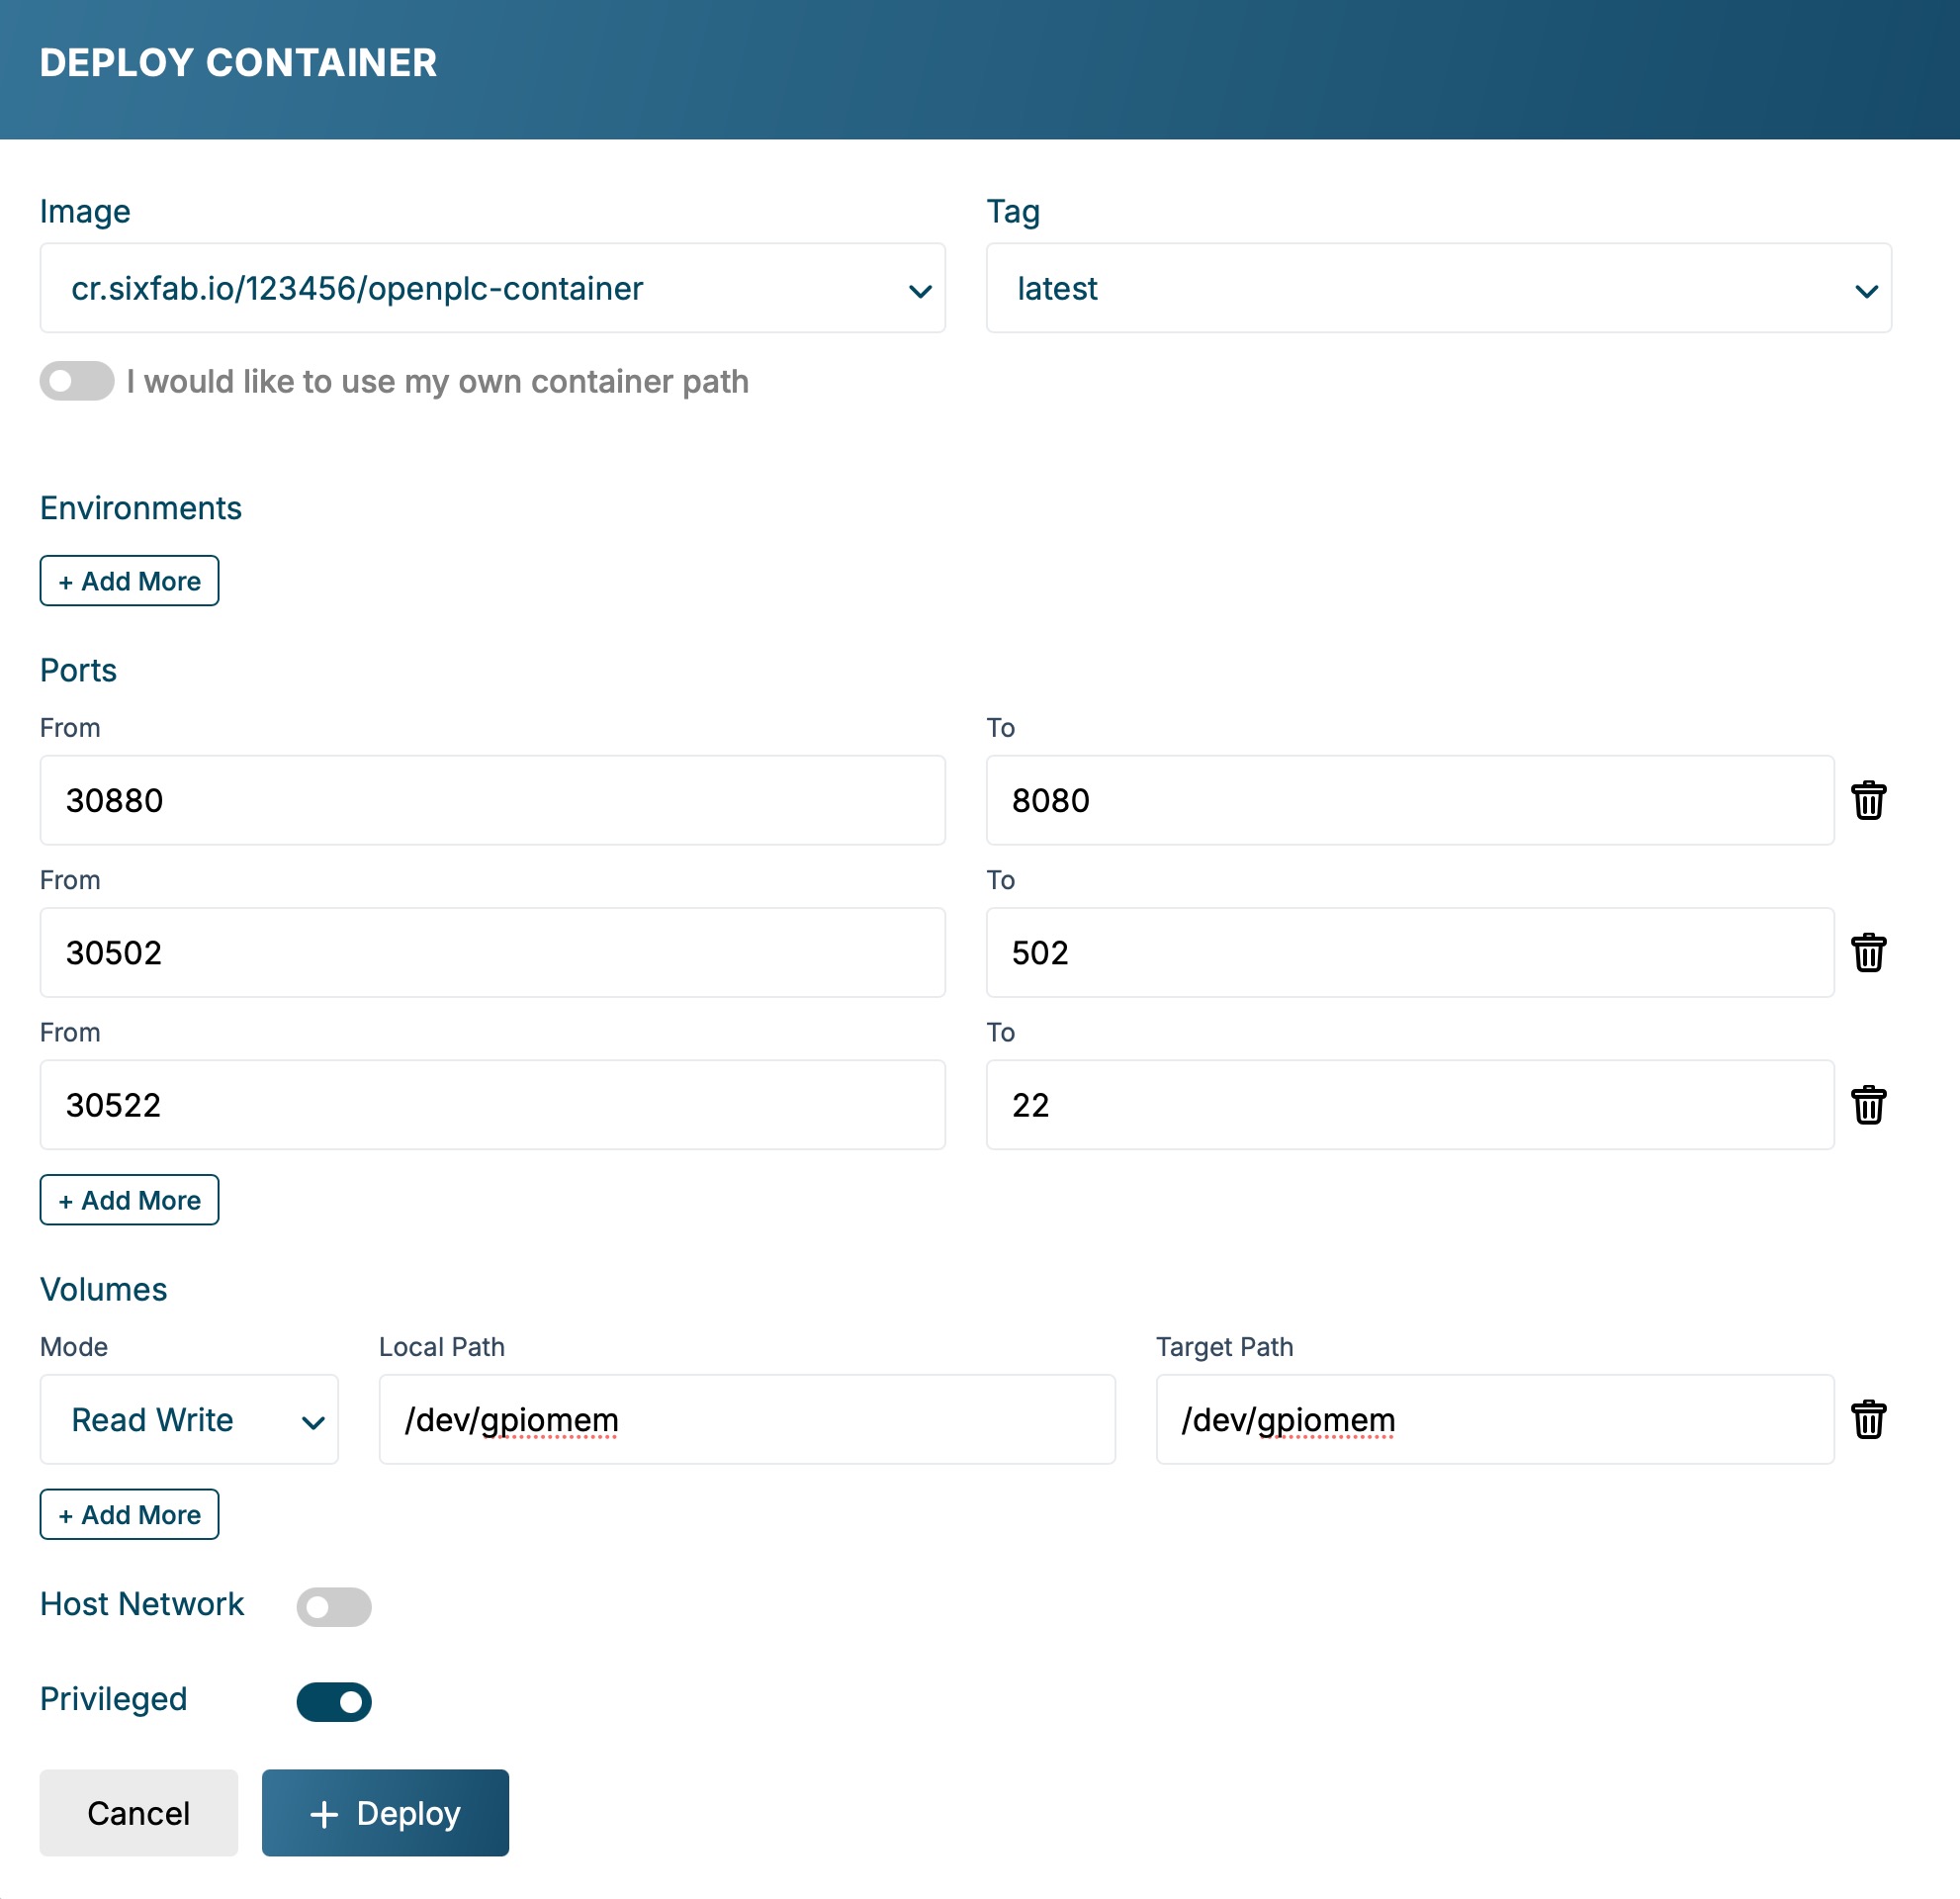
The Deploy Container window in ALPON Cloud with the OpenPLC image and port mappings configured. Click + Deploy to launch OpenPLC on the device.
-
5
Open the OpenPLC web interface
Once the deployment finishes, find the device's local IP address under Asset Details → Network tab → Interface Monitoring → Details, then open the web interface in a browser:
browser · OpenPLC web interfacehttp://<DEVICE_IP>:30880The OpenPLC login page should load. If it doesn't, double-check the Dockerfile, verify your registry credentials, confirm the container is running in the Applications section, and ensure any device access the hardware layer needs was granted in step 4.
- The
openplc-applicationcontainer shows as running in the Applications section. - The web interface loads at
http://<DEVICE_IP>:30880. - Modbus TCP clients can reach the runtime on
<DEVICE_IP>:30502(if you mapped that port).
OpenPLC is now running on the ALPON. Upload a program from the OpenPLC Editor and start the runtime from the web interface.
Production image policy: Replace floating
:latestreferences with a reviewed immutable tag or digest, then record the selected version for rollback.
Updated 5 days ago