
Flespi MQTT Connection
This detailed guide simplifies setting up an MQTT connection between ALPON X4 and the Flespi MQTT Broker, enabling seamless IoT data streaming with clear configuration and troubleshooting steps.
This guide is tailored for setting up an MQTT connection between your ALPON X4 device and the Flespi MQTT Broker, a powerful cloud-based platform for collecting and managing IoT device data. Flespi’s secure and flexible infrastructure is ideal for device tracking, data analysis, and IoT projects, leveraging the lightweight MQTT protocol for efficient communication. Follow these steps to deploy a containerized MQTT client on your ALPON X4 using ALPON Cloud.
For additional details on Flespi’s features, refer to the Flespi Documentation.
Preparations
Before you start, ensure the following:
- ALPON X4 Device: Your device must be powered on, operational, and connected to ALPON Cloud.
Step 1: Create an MQTT Channel in Flespi
To enable your ALPON X4 to send and receive MQTT messages, set up an MQTT channel in your Flespi account:
- Log in to your Flespi account at flespi.com.
- Navigate to Telematics Hub -> Channels in the Flespi dashboard.
- Create a new channel (e.g., named "ALPONX4-MQTT-CONNECTION") and configure it to listen for MQTT traffic. Ensure the channel is active and note the provided Flespi token for authentication.
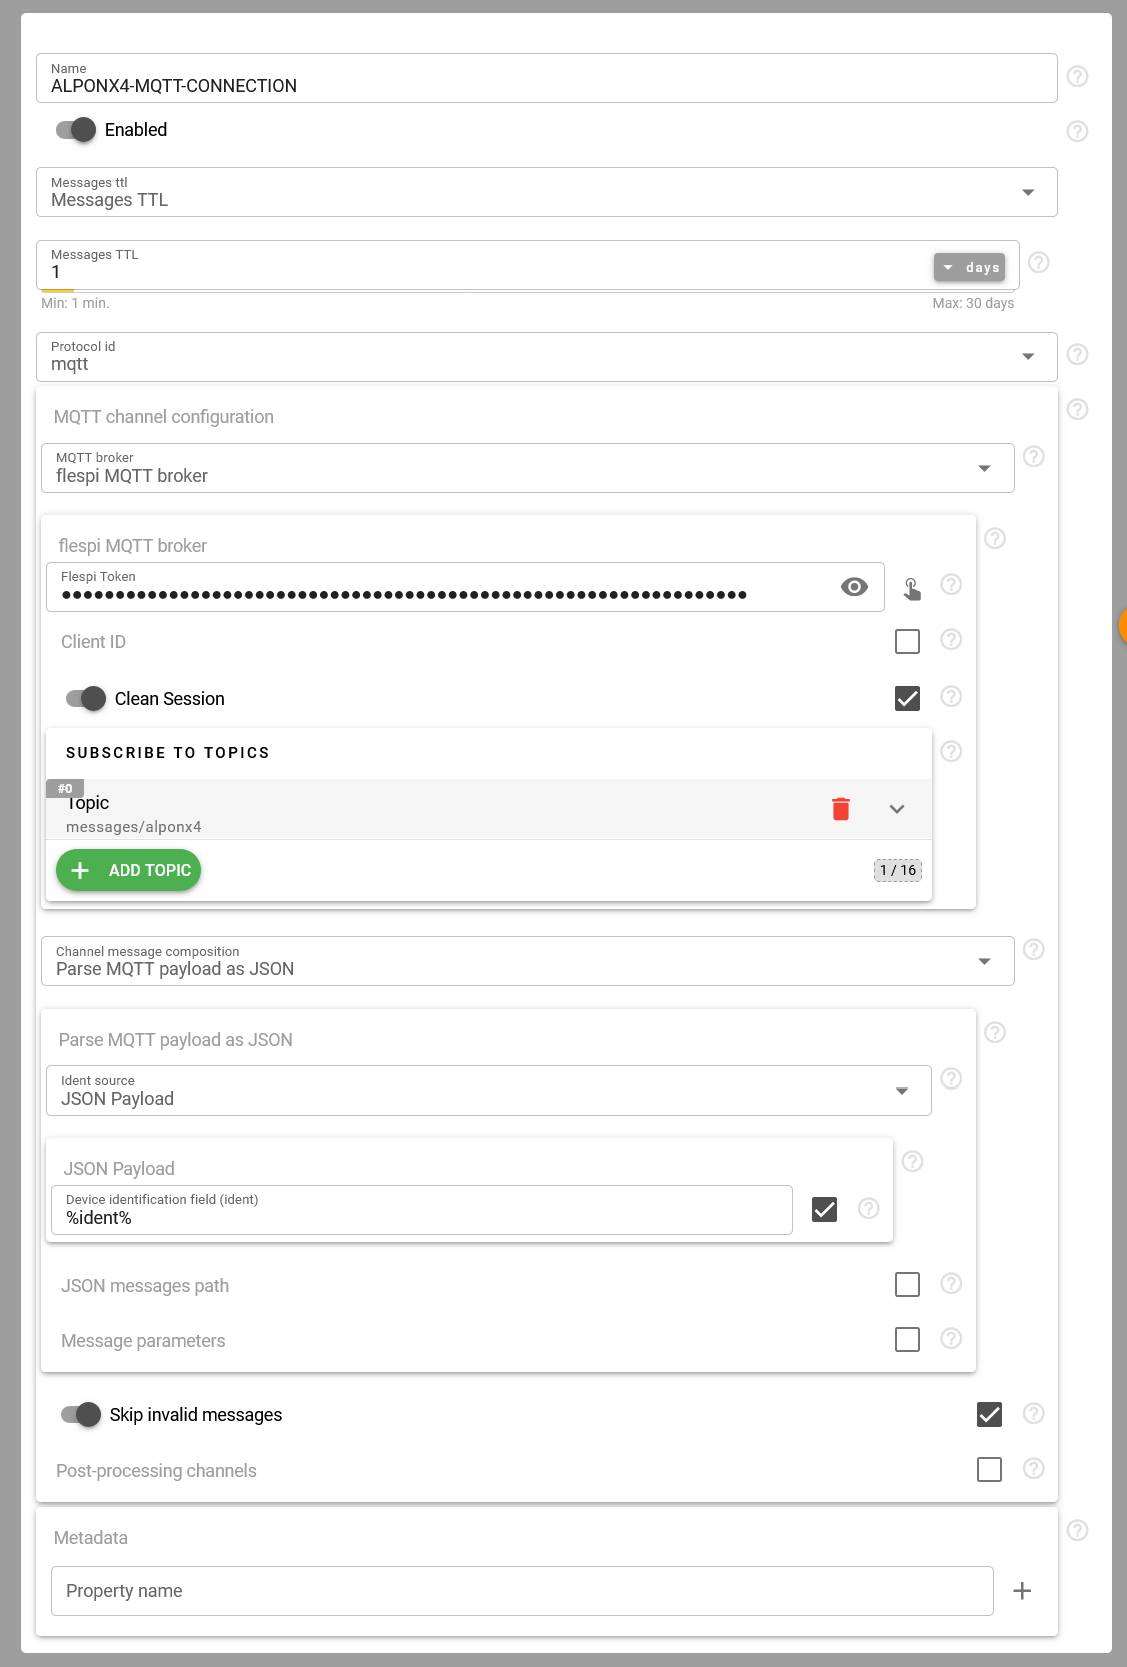
This channel will serve as the communication hub for your ALPON X4’s MQTT messages.
Step 2: Set Up the Docker Container
Deploy a containerized MQTT client on your ALPON X4 to handle communication with the Flespi broker. Follow these steps:
- Create a Dockerfile
On your local machine, create a file named Dockerfile to define a lightweight environment with the necessary MQTT and Python tools:
FROM alpine:latest

RUN apk update && apk add     mosquitto-clients     mosquitto     python3     py3-pip    bash

RUN pip3 install paho-mqtt

WORKDIR /app

COPY mqtt_test.py /app/

CMD ["python3", "/app/mqtt_test.py"]
This Dockerfile sets up a minimal Alpine Linux environment with Mosquitto clients and the paho-mqtt Python library for MQTT communication.
- Create the MQTT Client Script
Create a Python script named mqtt_test.py to connect to the Flespi MQTT broker, publish a test message, and subscribe to a topic:
import paho.mqtt.client as mqtt
import json
import ssl
import time
import os

# Your flespi token (replace with your actual token)
FLESPI_TOKEN = os.getenv("TOKEN")

# Topic to subscribe and publish to
TOPIC = os.getenv("TOPIC")

# Define callback functions
def on_connect(client, userdata, flags, rc):
    print(f"Connected with result code {rc}")
    client.subscribe(TOPIC, qos=1)
    print(f"Subscribed to topic: {TOPIC}")

    # Publish a test message after connecting
    test_message = {
        "ident": "alponx4",
        "device": {
            "id": 1,
            "name": "alponx4"
        },
        "message": "SAMPLE TEST MESSAGE",
        "timestamp": int(time.time())
    }
    client.publish(TOPIC, json.dumps(test_message), qos=1)
    print("Test message published.")

def on_message(client, userdata, msg):
    print(f"RECEIVED MESSAGE on {msg.topic}:")
    try:
        message = json.loads(msg.payload.decode())
        print(json.dumps(message, indent=4))
    except Exception as e:
        print(f"Error decoding JSON: {e}")
        print(msg.payload.decode())

# Set up MQTT client
client = mqtt.Client(client_id="alponx4", clean_session=True)
client.username_pw_set(FLESPI_TOKEN, password="")  # Token as username, empty password

# Set up callbacks
client.on_connect = on_connect
client.on_message = on_message

# Enable SSL/TLS
client.tls_set(cert_reqs=ssl.CERT_REQUIRED)

# Connect to flespi MQTT broker
client.connect(os.getenv("MQTT_SERVER"), int(os.getenv("MQTT_PORT")), 60)

# Start the loop
client.loop_forever()- Build the Docker Image
Navigate to the directory containing the Dockerfile and mqtt_test.py, then build the Docker image optimized for ALPON X4’s architecture:
docker build --platform=linux/arm64 -t flespi-mqtt-alpon-x4:latest .This creates a container image tagged flespi-mqtt-alpon-x4:latest.
- Upload the Container to ALPON Cloud
- Log in to the Sixfab Connect platform, navigate to the Sixfab Registry page
- Click on + Add Container and follow the prompts to push container to Sixfab registry.
Manage and Deploy ApplicationsVisit the Manage & Deploy Applications page for all the necessary details on pushing your container image to the Sixfab Registry.
Step 3: Deployment Configuration
-
Go to the Application section of your asset on Sixfab Connect.
-
Click the + Deploy button to configure and deploy the container.
-
In the Deploy Container window, use the following settings:
-
Container Name: flespi-mqtt-client
-
Image: Select the Flespi image and tag pushed to the Sixfab Registry.
-
Environment: Click "+ Add More" in the environment section and add the following values:
Key Value TOPIC messages/alponx4 TOKEN YOUR_FLESPI_TOKEN MQTT_SERVER mqtt.flespi.io MQTT_PORT 8883
-
Click the "+ Deploy" button to deploy Flespi.
-
Step 4: Verify and Monitor Messages
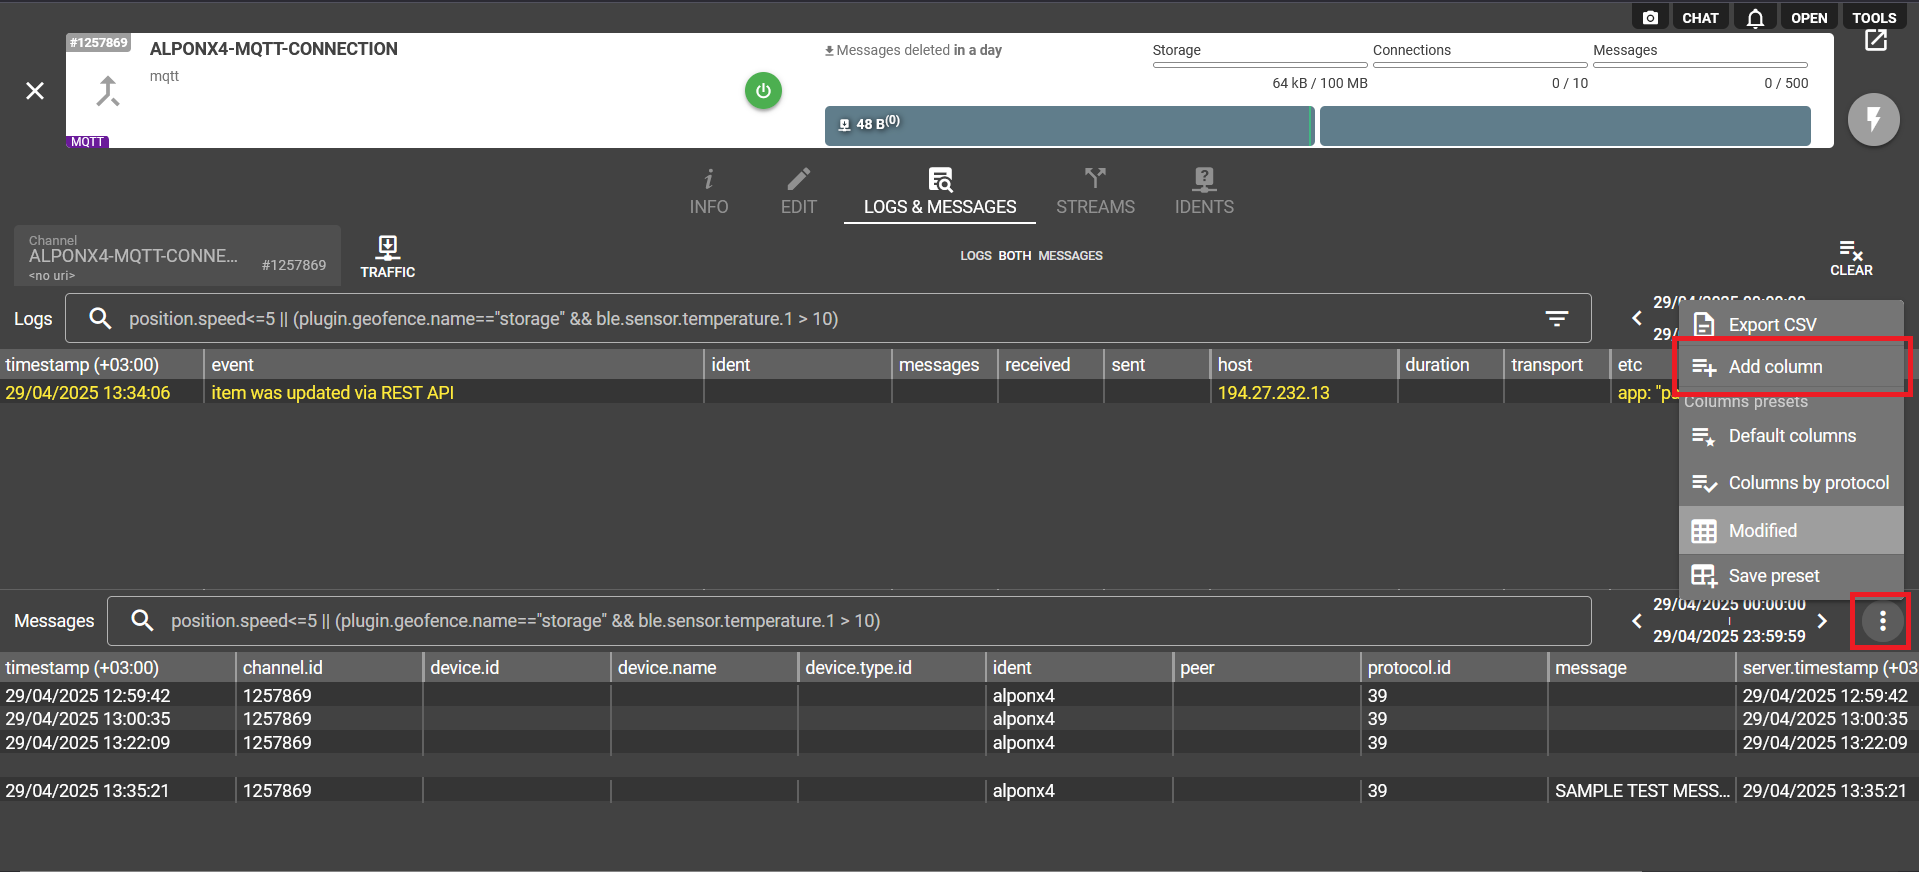
Once deployed, your ALPON X4 will connect to the Flespi MQTT broker, subscribe to the specified topic, and publish a test message. To verify:
- Log in to your Flespi account and navigate to Telematics Hub > Channels.
- Select the channel you created (e.g., "ALPONX4-MQTT-CONNECTION").
- Check the message log to confirm that the test message appears.
Troubleshooting Tips
- Environment Variables: Double-check that TOPIC, TOKEN, MQTT_SERVER, and MQTT_PORT are set correctly in ALPON Cloud.
- Flespi Token: Ensure the token from your Flespi MQTT channel is valid and correctly entered.
- Connection Issues: If messages don’t appear, verify the container status in ALPON Cloud logs and ensure the MQTT channel is active in Flespi.
If everything works correctly, the messages we sent will appear as shown in the image under the ALPONX4-MQTT-CONNECTION channel on Flespi -> Telematics Hub -> Channels tab. Optionally, you can click on "Add columns" to see the "messages" column sent in the code.
Updated 3 months ago