
AWS IoT Core Getting Started Guide
This guide provides a comprehensive walkthrough of setting up and running a demo on AWS IoT Core, using the ALPON X4 industrial-grade edge computing device.
Contents
- Document information
- Overview
- Hardware description
- Set up your development environment
- Set up your hardware
- Setup your AWS account and permissions
- Create resources in AWS IoT
- Provision the device with credentials
- Build the demo
- Run the demo
- Verify messages in AWS IoT Core
- Debugging
- Troubleshooting
1. Document Information
1.1. Document revision history
| Version | Date | Author | Changes Made | Approved By | Status |
|---|---|---|---|---|---|
| 0.1 | 2025-02-05 | FAE | Document Created | Okan Saraçoğlu | Release |
1.2. Applicable operating systems for this guide
This guide is designed for Linux-based operating systems, specifically ALPON OS and Raspberry Pi OS. It may also work with other Linux distributions, but some dependencies and configurations may vary.
2. Overview
The ALPON X4 is an industrial-grade edge computing device based on the Raspberry Pi platform, designed for reliable IoT deployments. Featuring LTE connectivity, eSIM support, and multi-level network redundancy, it ensures secure data transmission in challenging conditions. Its open architecture supports seamless application integration, while a cloud-based suite enables remote access, device monitoring, and fleet management. Ideal for industrial and IoT applications, the ALPON X4 meets diverse needs across various sectors.
3. Hardware description
3.1. Datasheet
Datasheet and all information about ALPON X4 can be found here.
3.2. Standard kit contents
The standard ALPON X4 shipping kit includes the following hardware components:
- Hardware Provided:
- ALPON X4 Edge Computer
- Debug Hardware:
- Not included.
- Cables Provided:
- USB-PD Type-C Power Adapters with Universal Plugs
- Power Source:
- Screw Terminal Male (for Terminal Power Option)
3.3. User provided items
None
3.4. 3rd party purchasable items
The following third-party products for ALPON X4 are available for purchase:
- ALPON DIN Rail Mount Kit
- ALPON Wall Mount Kit
- ALPON Combo Antenna
- ALPON GPIO Expansion with Cable
- ALPON GPIO Expansion
- ALPON Terminal DC Power Adapter
3.5. Additional hardware references
All additional hardware and software related documents are available here.
4. Set up your development environment
4.1. Tools installations (IDEs, Toolcahins, SDKs)
ALPON X4 does not require any specific SDK, IDE, or toolchain for application development. It is designed to operate in a container-based environment, and while containerization is optional, we strongly recommend containerizing applications and deploying them through the ALPON Cloud platform for ease of deployment and management. However, applications can still be developed and run directly on the device without containers if preferred. The only critical requirement is that your application must be properly containerized for ARM64 architecture and the container must run seamlessly on the target hardware, such as an ARM64-based development board or server.
4.1.1. IDE-Based Development
a. Supported IDEs
- Not applicable, as the device does not require a specific IDE for development.
b. IDE Setup Instructions
- Not applicable.
c. SDK Integration with IDE
- Not applicable.
4.1.2. CLI based, if supported (e.g. CMake)
- Not applicable.
4.1.3. Required Toolchains
- Not applicable. ALPON X4 does not require specific toolchain for development.
4.1.4. Specific Compiler Options
- ALPON X4 has arm64 architecture, this means that applications should support arm64 architecture and compilers should compile applications according to arm64 architecture.
5. Set up device hardware
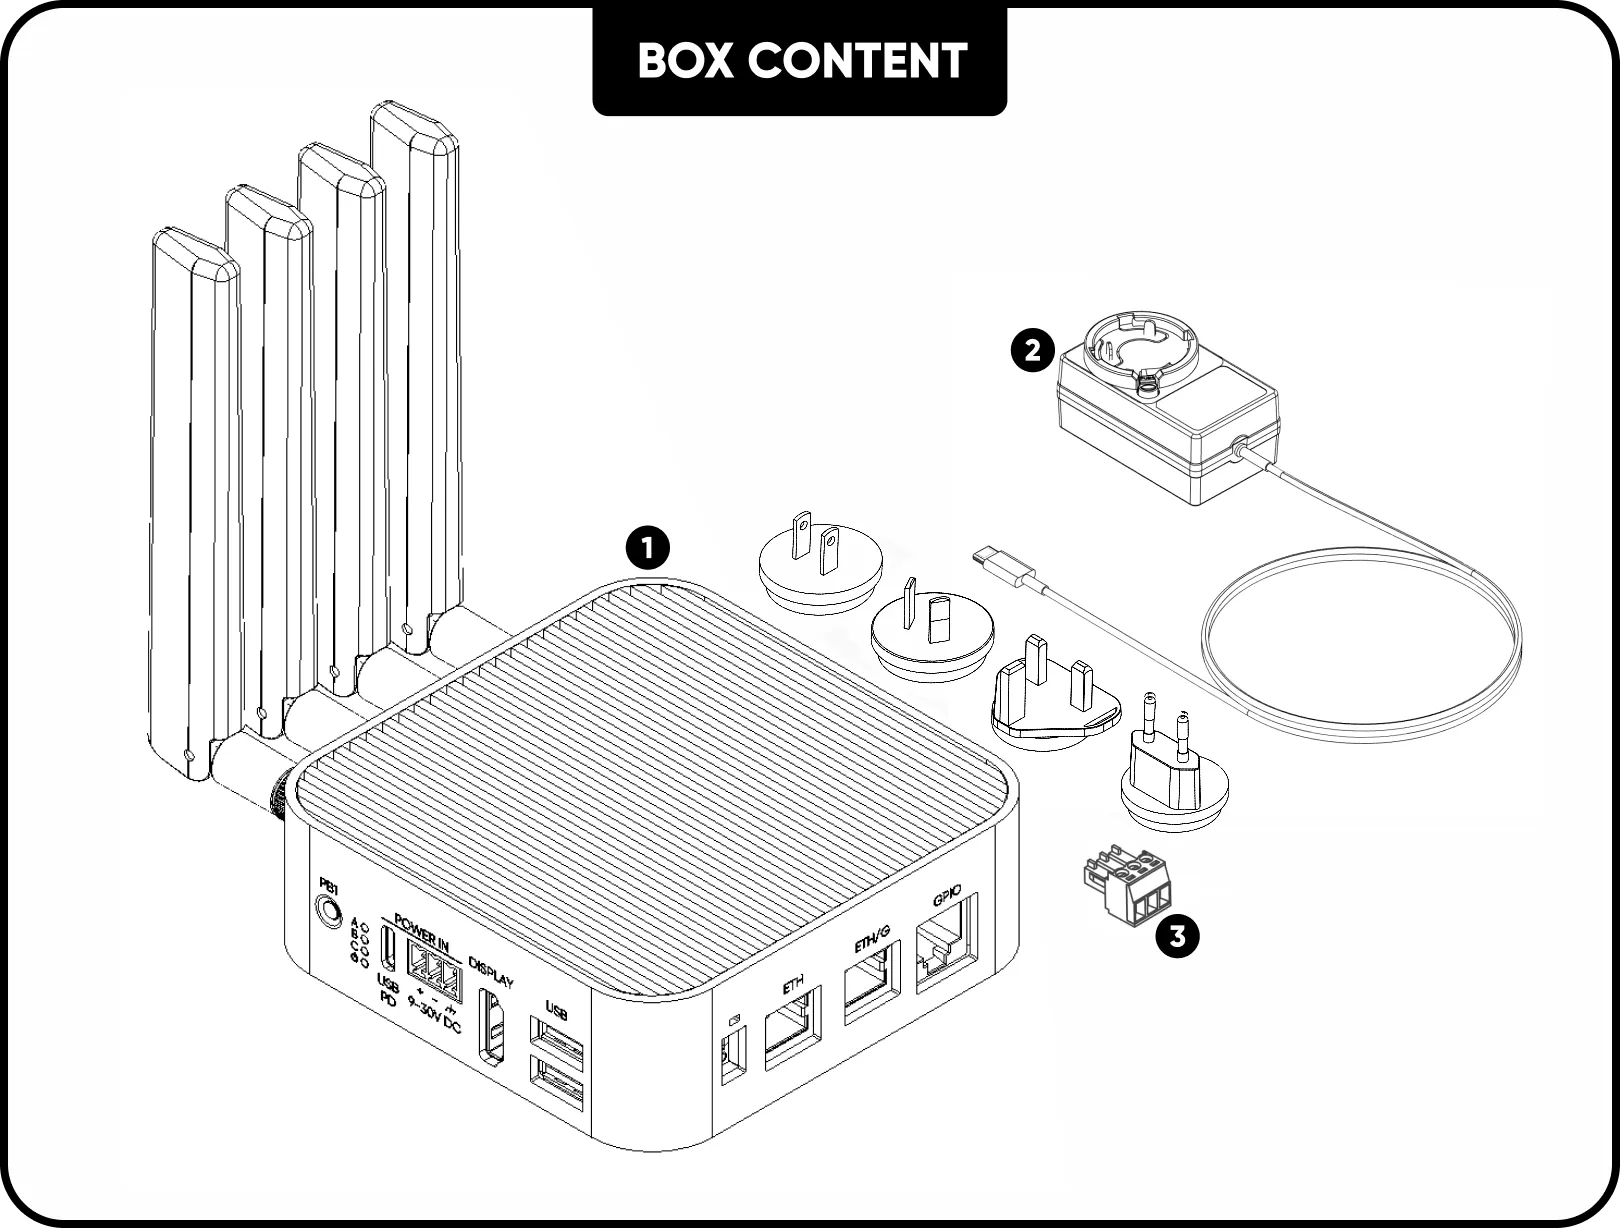
5.1. Box Content
- ALPON X4 Micro Edge Computer
- USB Type-C Power Adapter (27W PD) with Plug Adapters (x4)
- Screw Terminal Block
Please note that contents may vary by product variant, including differences in RAM, storage, PoE availability, and Wi-Fi features.
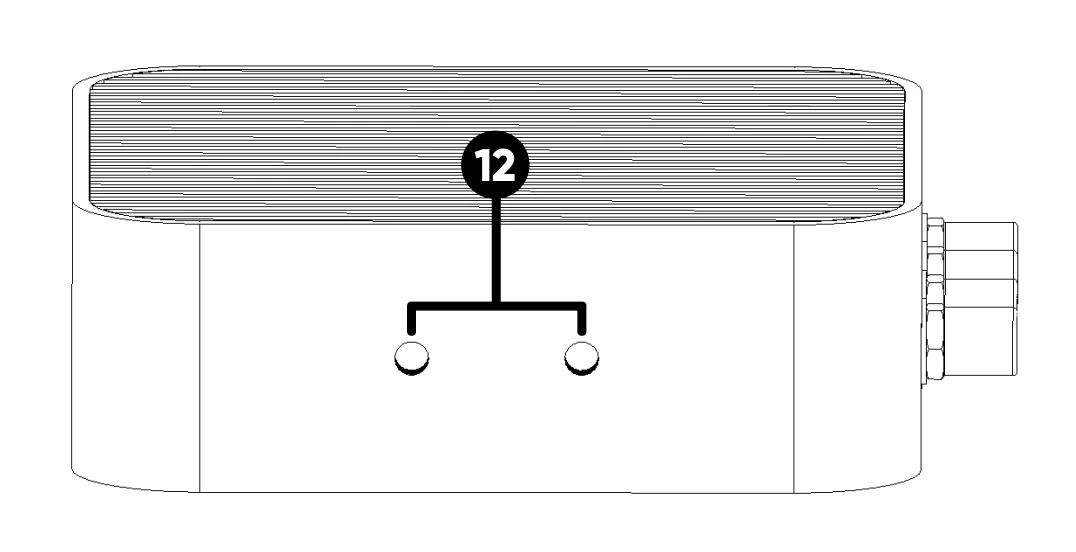
5.2. Layout
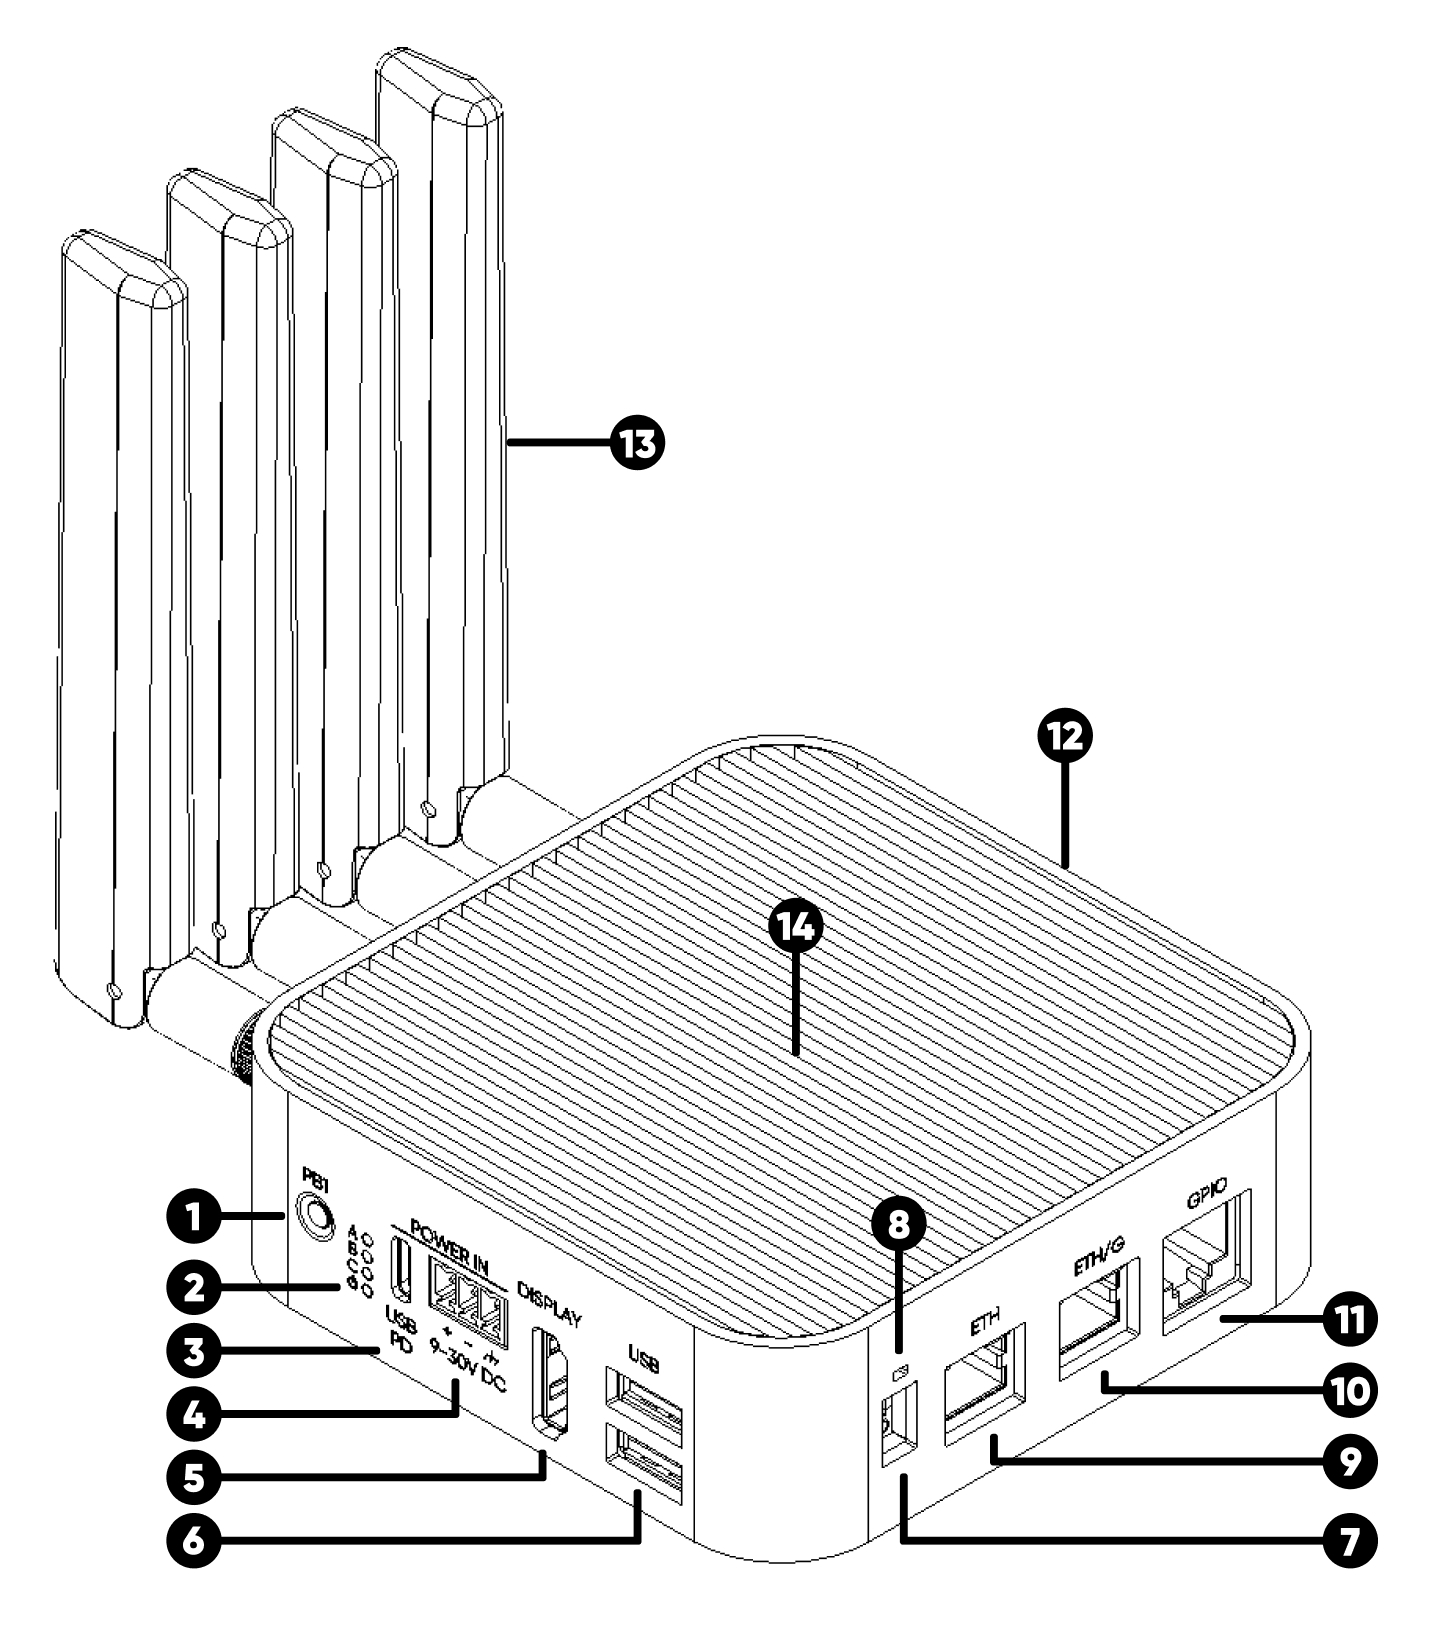
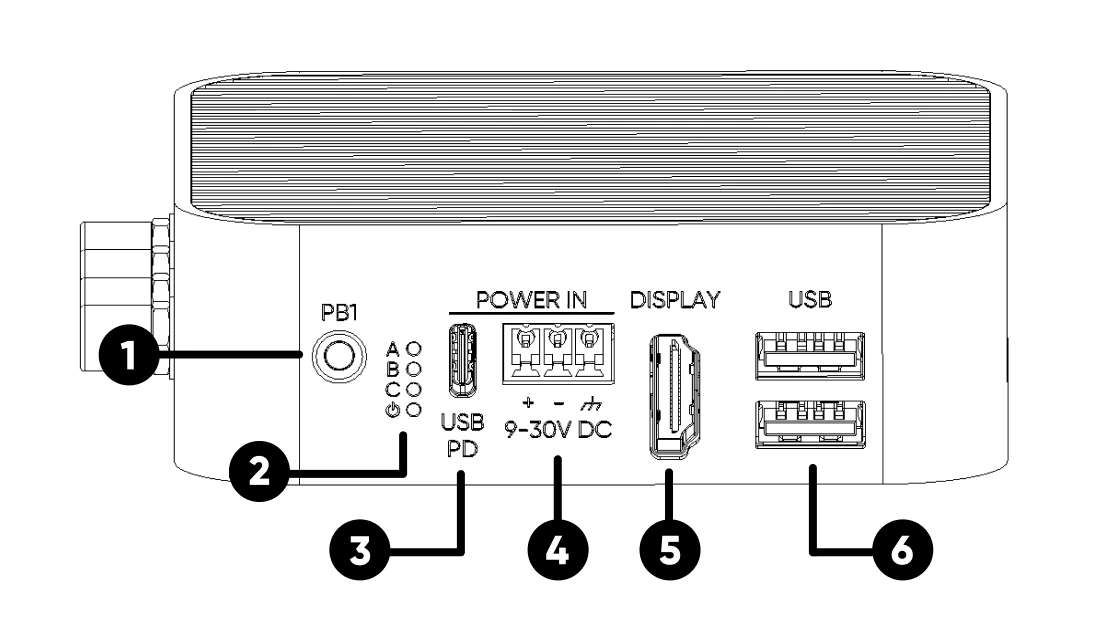
- User Programmable Push Button (PB1)
- 4x LED
- USB Type-C PD Power Input
- Screw Terminal Power Input (9-30V DC)
- Display (HDMI 2.0 port)
- 2x USB 2.0 Port
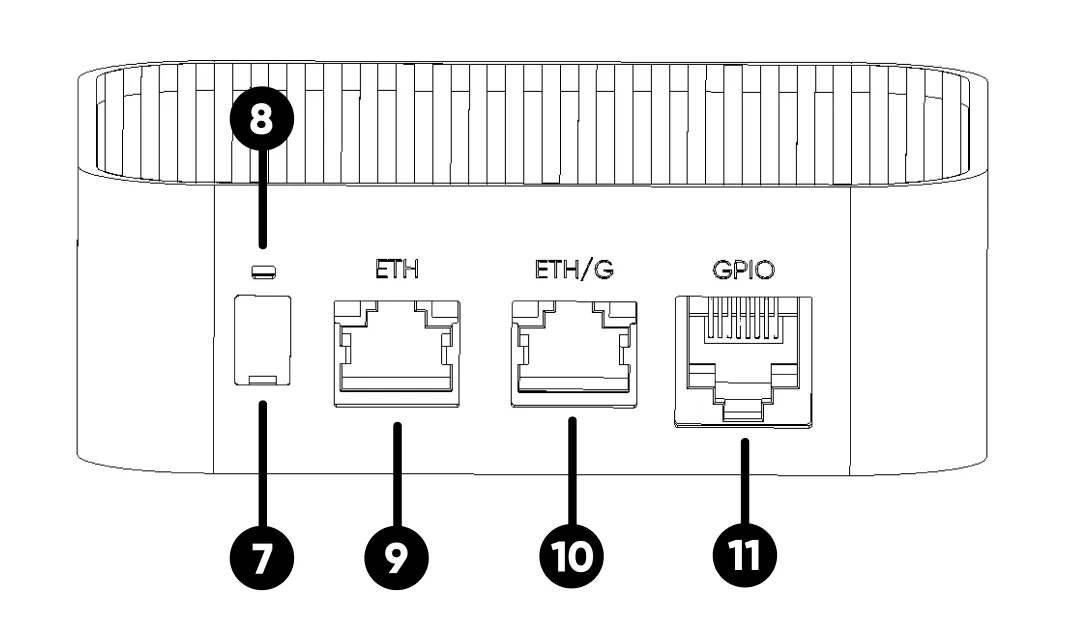
- Watchdog, Boot/Burn Switches
- User Programmable Push Button (PB2)
- 100 Mbps Ethernet Port
- 1 Gbps Ethernet Port*
- GPIO Port
In some variants, theETH/G port replaces the PoE port.
- Mounting Hole
Our product features 2x 4mm mounting holes. For industrial applications, these can be used to attach the device to a DIN rail with the appropriate accessories. For other uses, such as wall mounting, the necessary accessories can be purchased, and these holes can be utilized for secure installation. For more details on mounting options, please refer to the Accessories page.
- Antennas
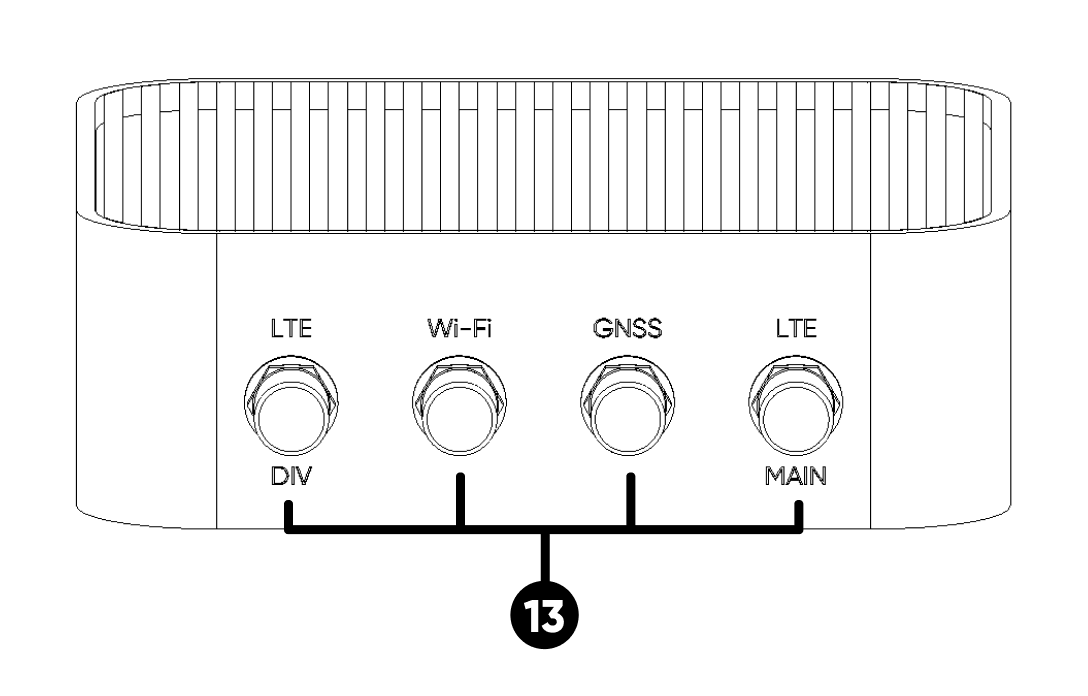
On the side of the antennas, G is for GNSS, W is for Wi-Fi, and L (x2) is for LTE.
- Passive Cooling Case
5.3. Device Registration
To begin using the device, two options are available for registering the device. The QR code on the device can be scanned for quick and automatic registration, or manual registration can be done through the ALPON Cloud platform. Both methods securely link the device to the account, ensuring a smooth setup process.
Scanning the QR Code
- Locate the QR code on the bottom of the ALPON X4 and scan it using your device's camera.
- After scanning, you will be automatically redirected to the ALPON Cloud website.
- Log in to ALPON Cloud.
- After logging in, your device will be automatically registered to your account.
Manual Registration (Alternative)
- Log in to ALPON Cloud.
- Navigate to "Assets -> + Register Asset".
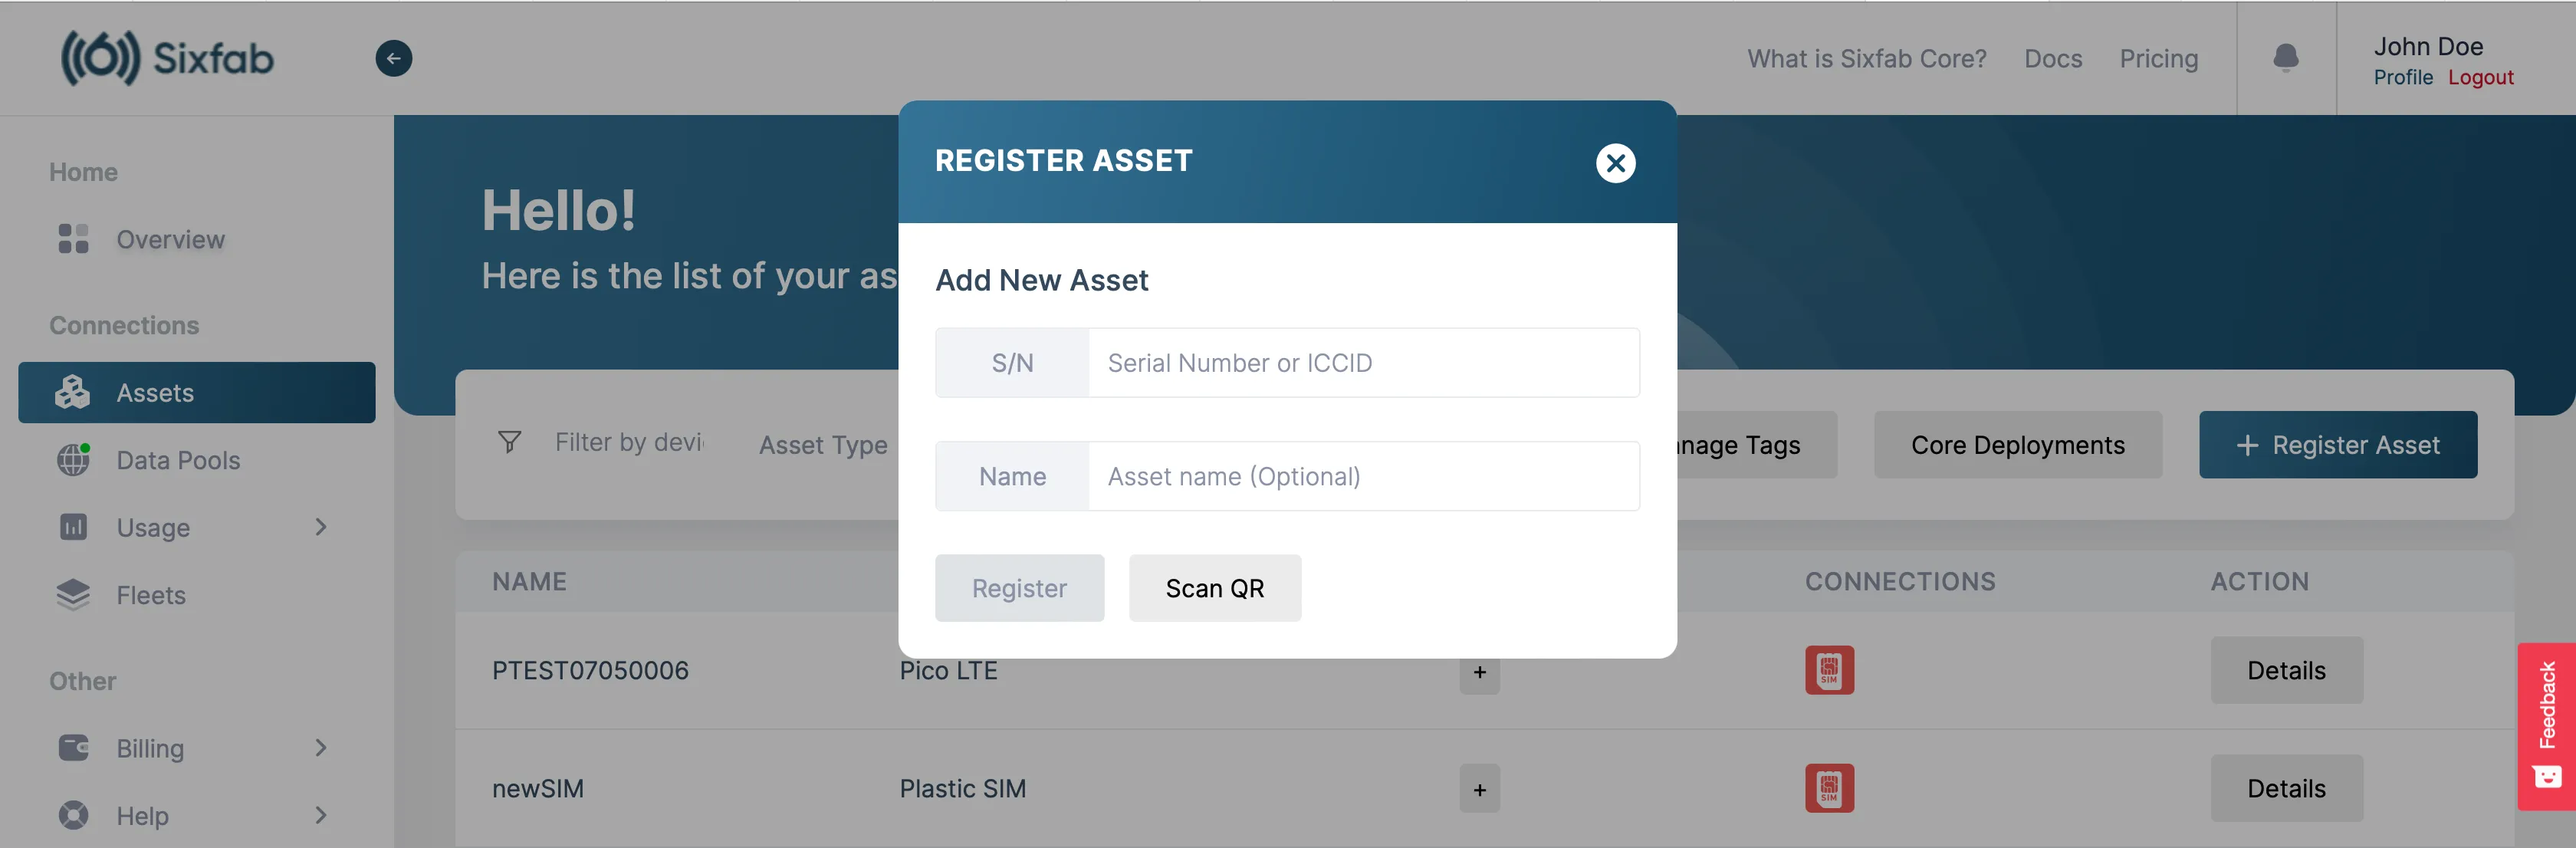
- Enter your ALPON X4's serial number.
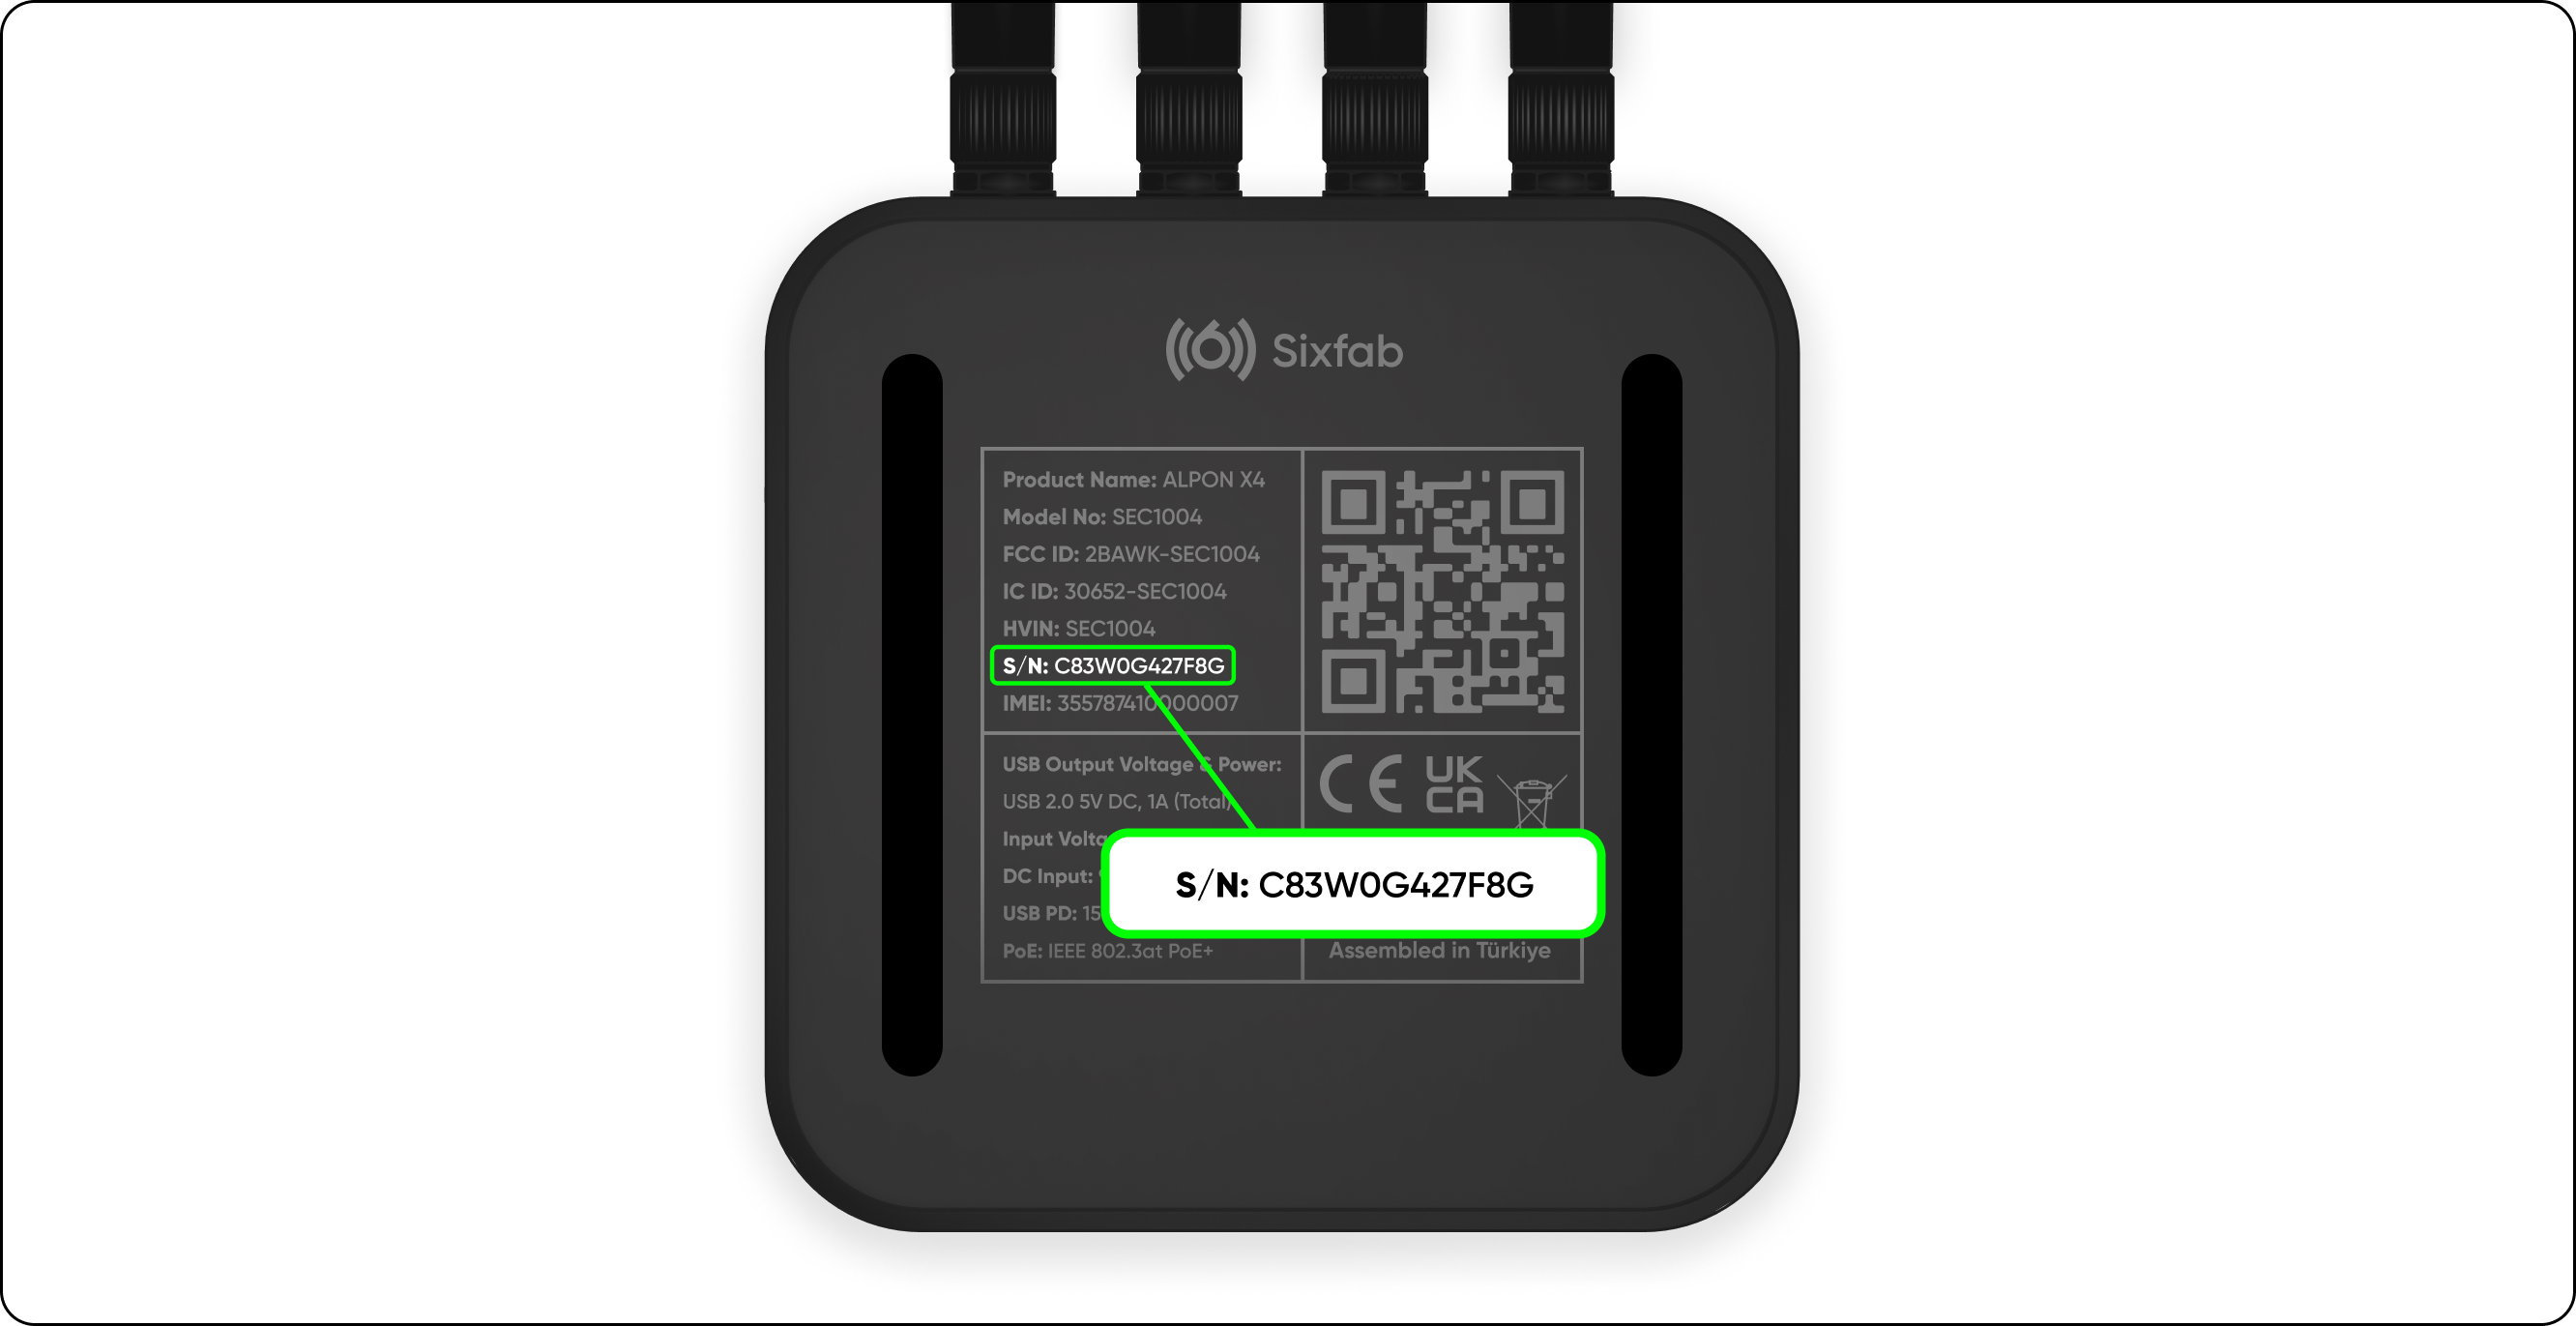
Serial number (S/N) is on the bottom of the device
- Complete the registration process by clicking the "Register" button.
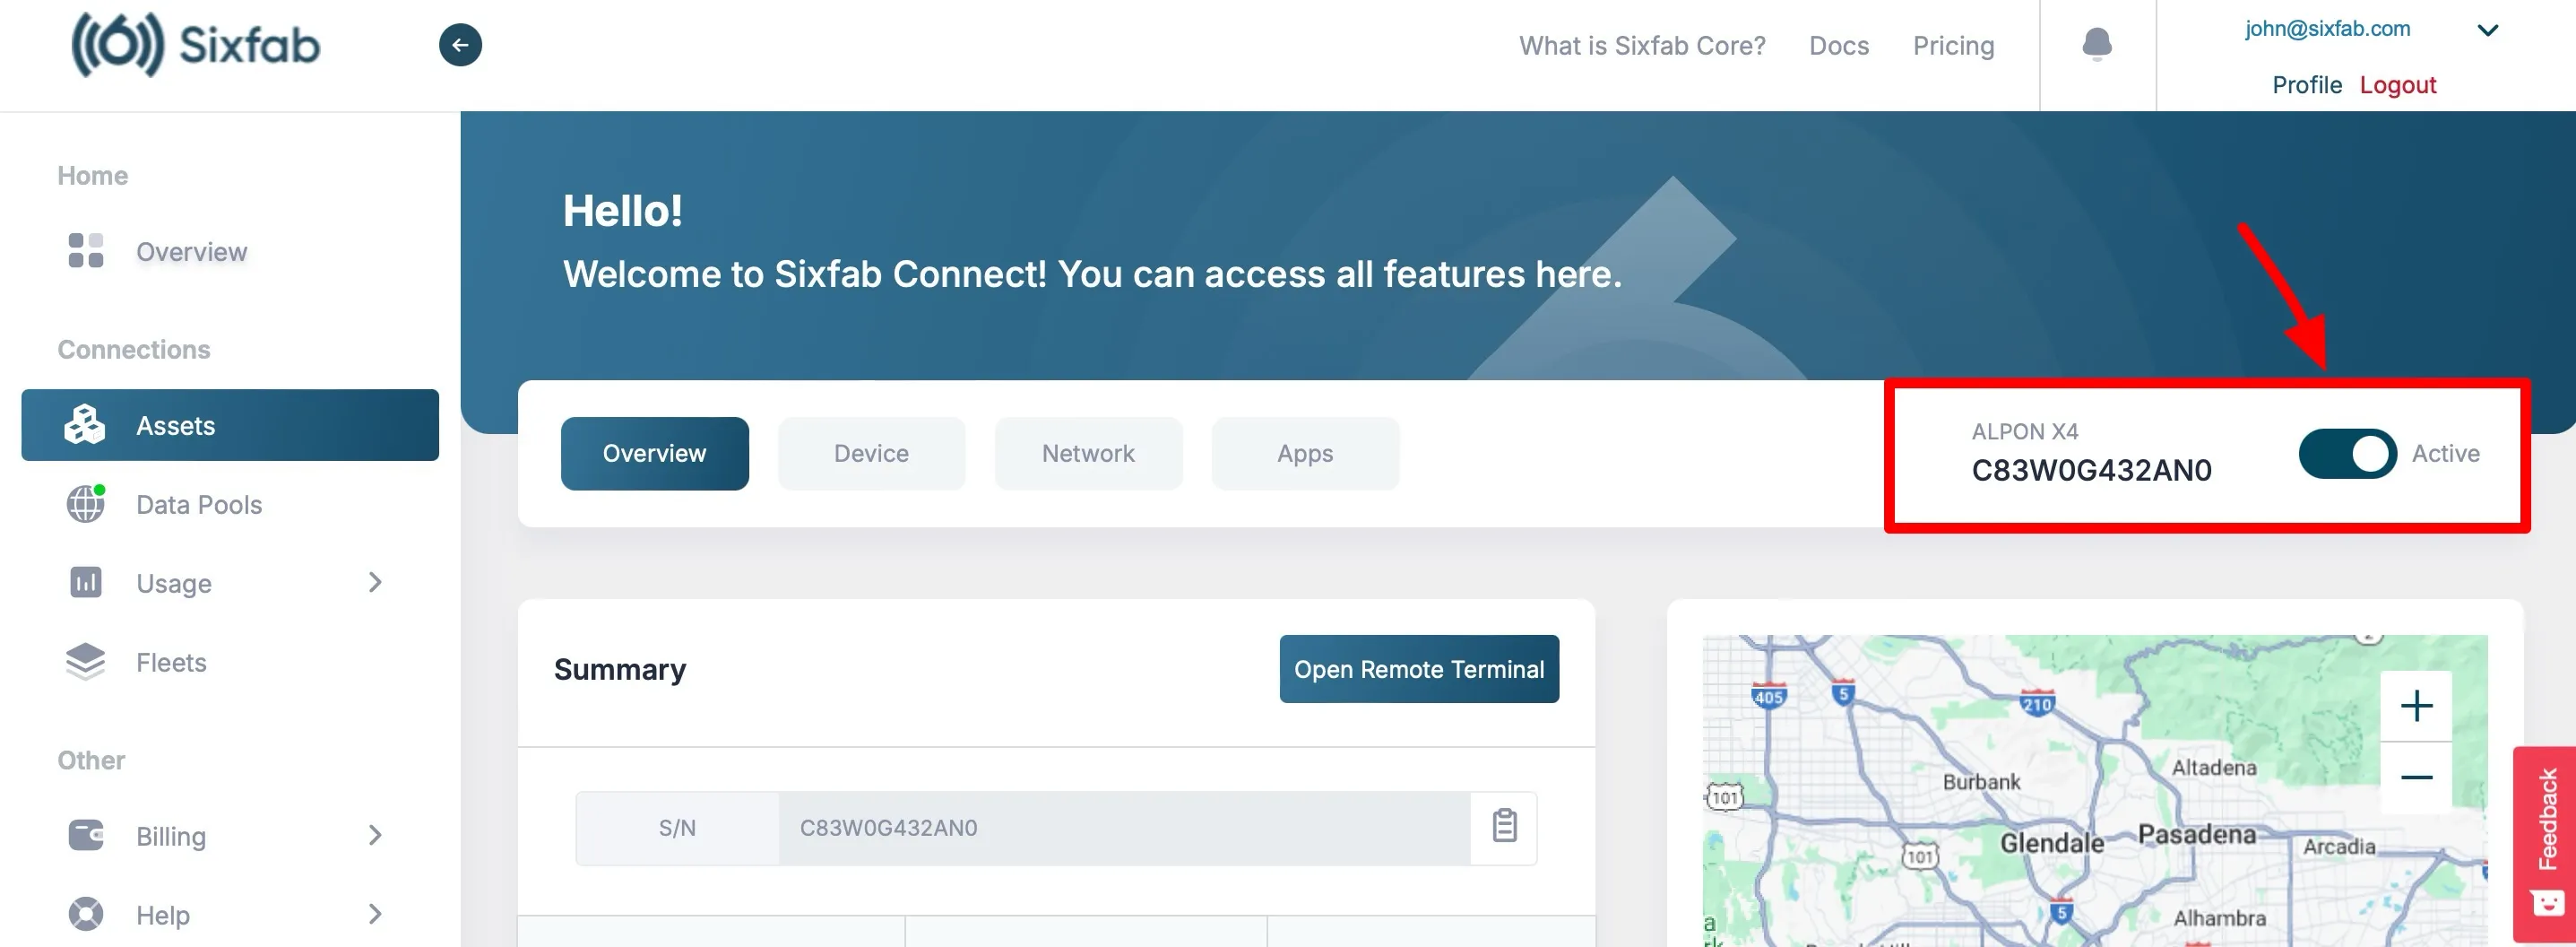
5.4. Activating the Asset
- After registering the asset, navigate to the "Assets" section.
- Locate the registered device in the list.
- Click the "Details" button for that asset.
- Find the toggle button in the top right corner and switch it to activate the asset.
5.5. Power Connection
Plug in a 27W PD AC/DC Type-C power adapter. Wait for the device to power on.
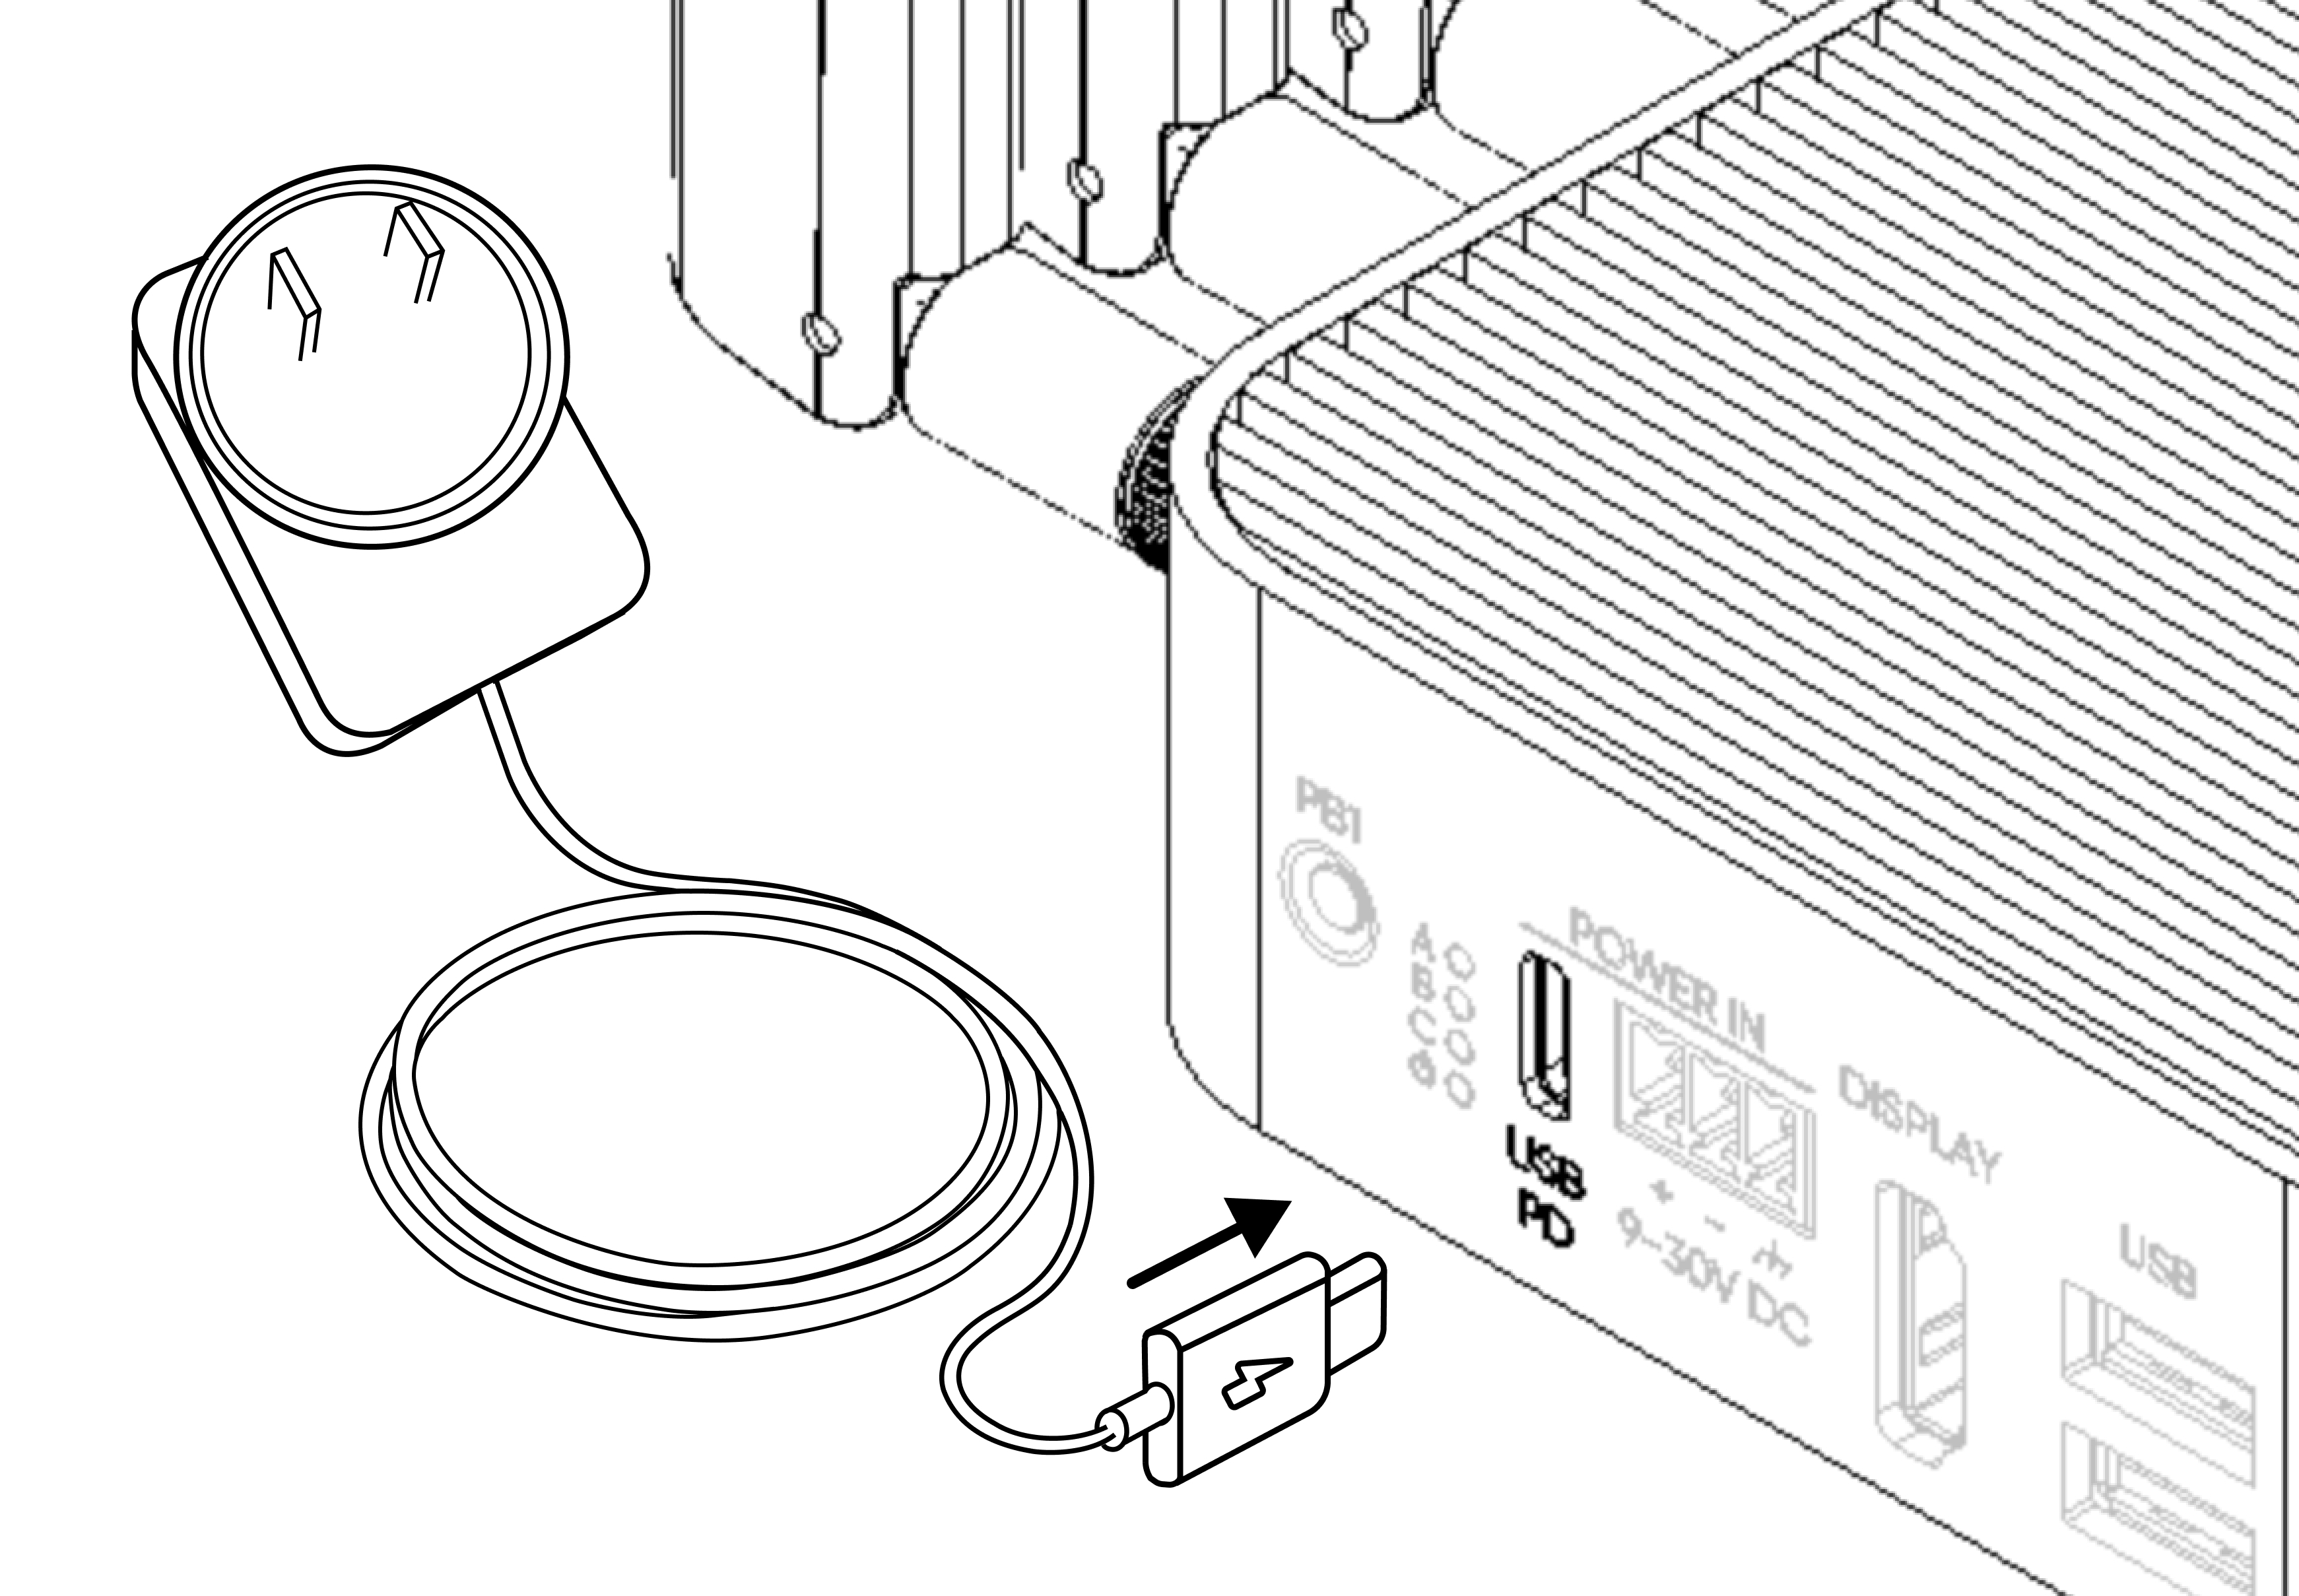
For more information on the available power options for this device, please refer to the Technical Details - Power section.
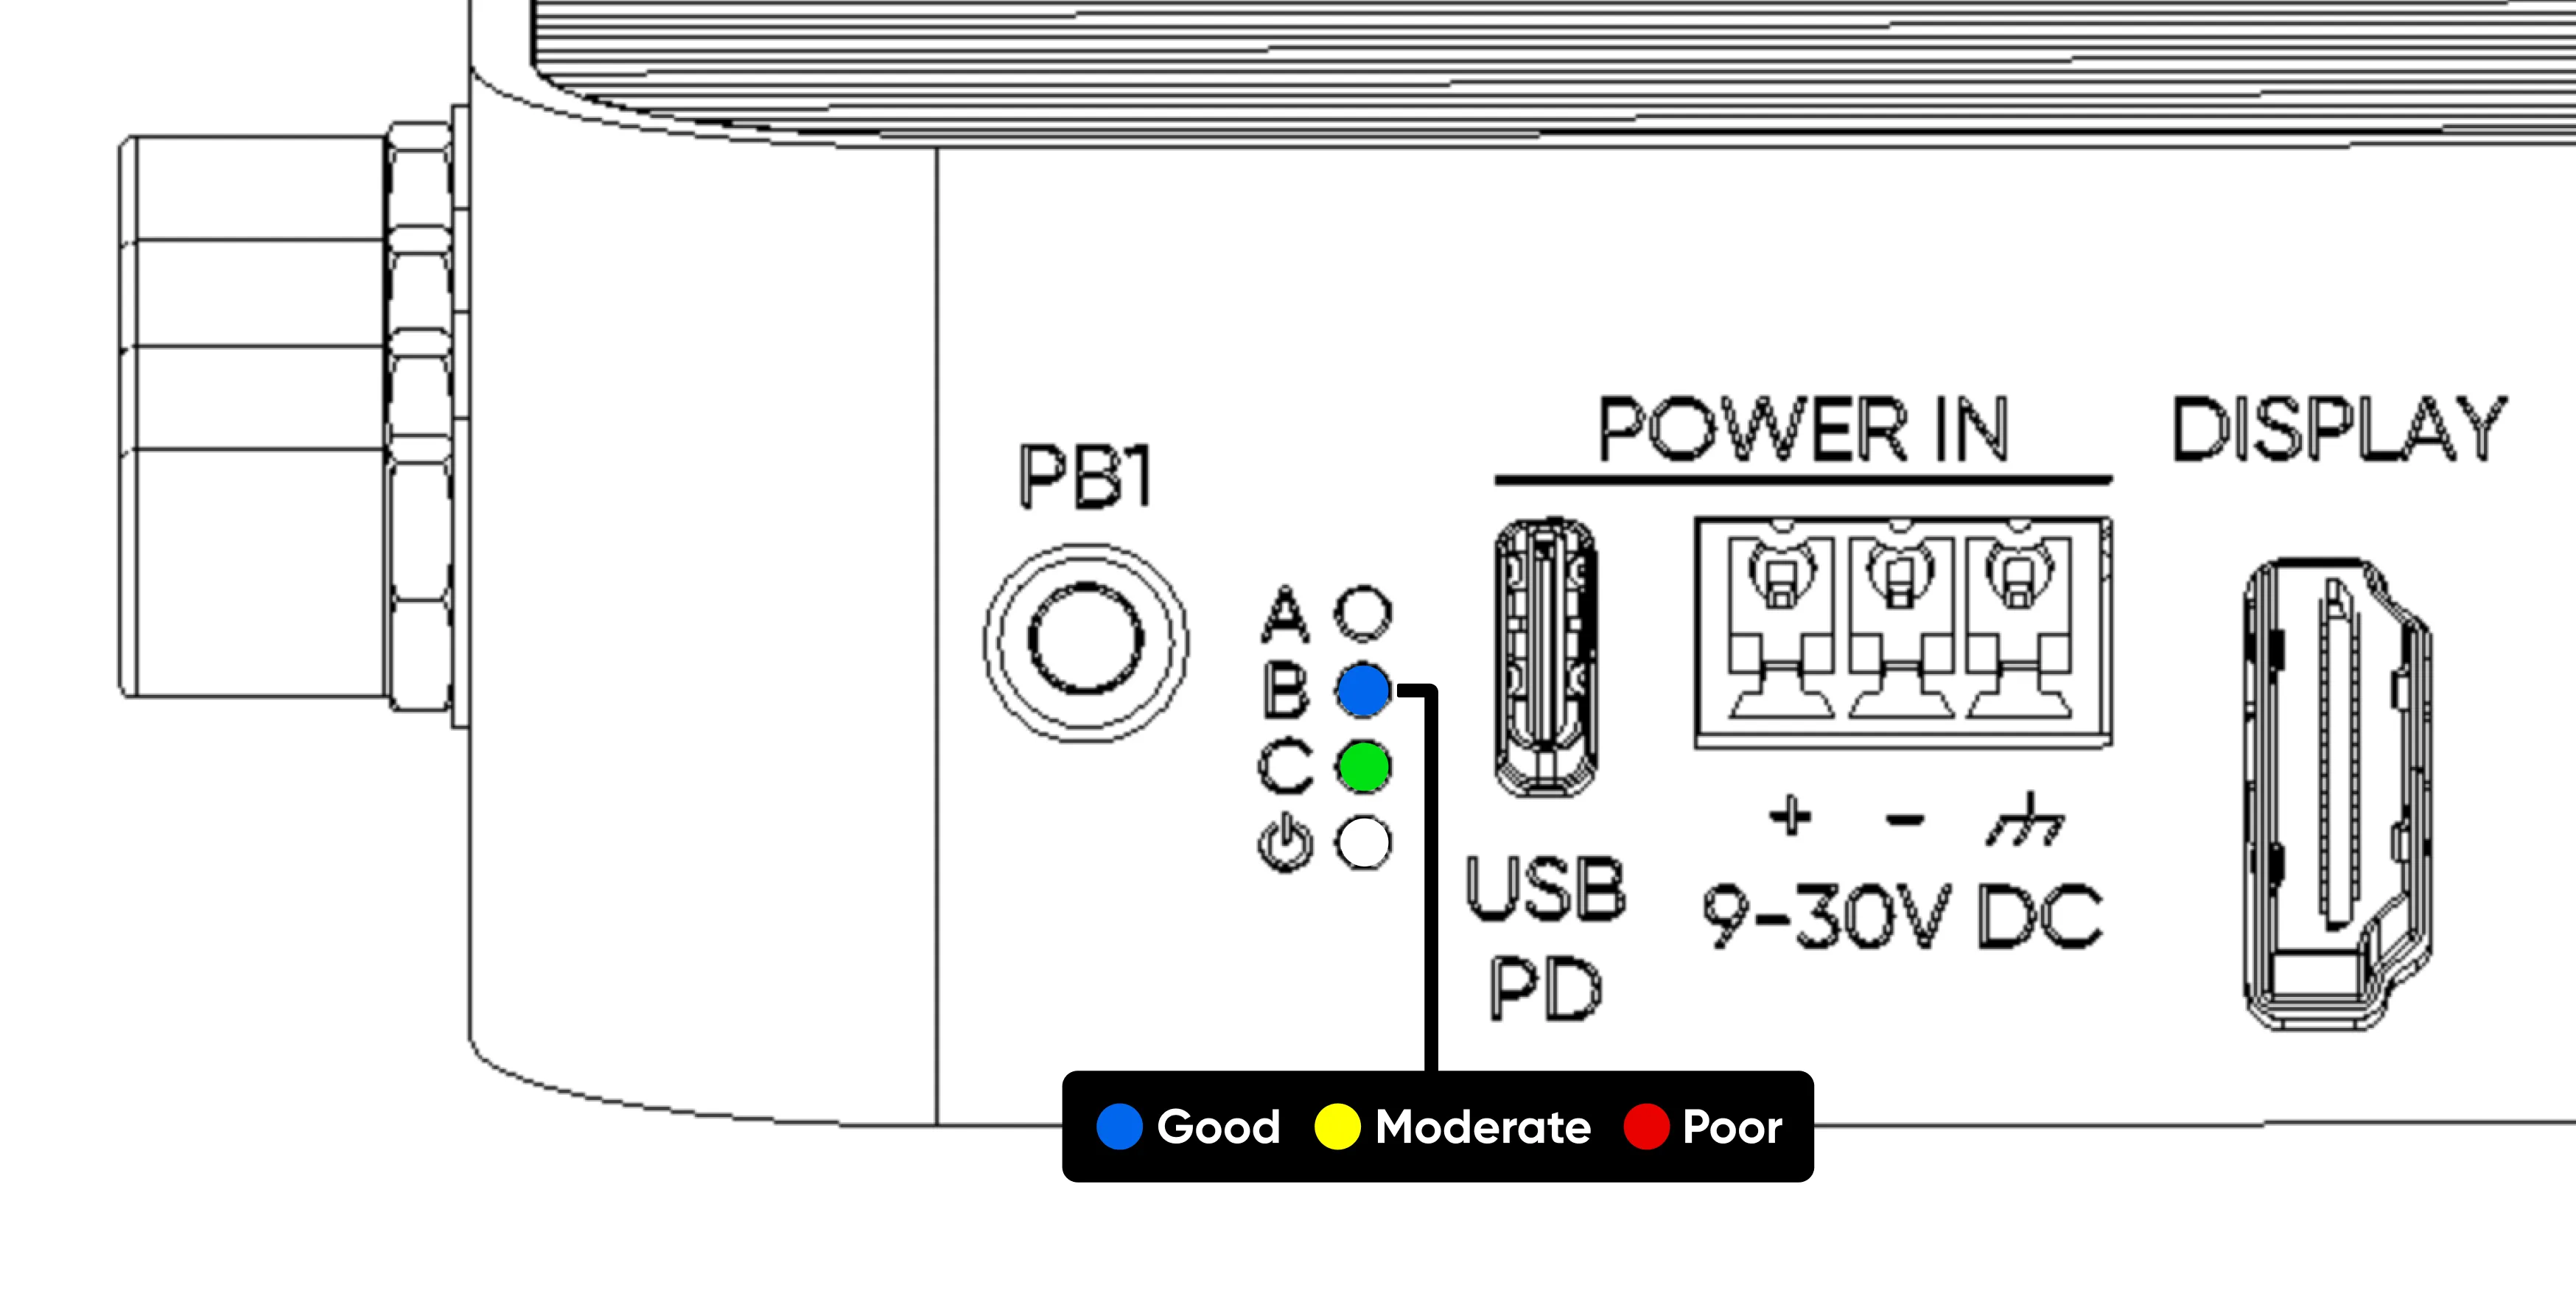
5.6. Ready to Use
The system is now ready for use. When the "C" LED is green the device is now online, the "B" LED indicates the cellular status. For more detailed information about the LEDs, please refer to the "Technical Details -> LEDs" section.
5.7. Device Update
After successfully registering your device, it is recommended to check for updates to ensure optimal performance.
- Log in to your ALPON Cloud account and navigate to the "Assets" section.
- Select your device from the list and go to the "Device" tab.
- In the "Device Maintenance" section, click the "Update Device" button.
Follow the prompts to install any updates to keep your device running with the latest features and improvements.
5.8. Application Deployment on ALPON X4
For optimal performance and scalability, we strongly recommend encapsulating your applications within Docker containers and managing them via the ALPON Cloud. This approach not only ensures the highest level of reliability but also facilitates seamless scaling. By using Docker containers, you isolate your application environment, streamline deployment processes, and enhance operational consistency across different devices.
By adopting this method, you benefit from:
- Enhanced Reliability: Containerized applications are less likely to interfere with one another, which significantly reduces the risk of system-wide failures.
- Scalability: Effortlessly scale your operations by managing multiple container instances across several devices without the need for extensive configuration adjustments.
- Maintainability: Simplify updates and maintenance with minimal disruption to your existing operations, ensuring continuous service availability.
We encourage you to leverage the ALPON platform’s capabilities to maximize the effectiveness and efficiency of your application deployments.
After the device registration to deploy and manage your own application, go to the "Manage & Deploy Applications" page for instructions. This guide covers setting up and running container-based applications on the ALPON X4. Sixfab Field Application Engineers are always open to help you with your software containerization. Please contact our support team if you need assistance.
6. Setup your AWS account and permissions
If you do not have an existing AWS account and user, refer to the online AWS documentation at Set up your AWS Account. To get started, follow the steps outlined in the sections below:
Pay special attention to the Notes.
7. Create resources in AWS IoT
Refer to the online AWS documentation at Create AWS IoT Resources. Follow the steps
outlined in these sections to provision resources for your device:
Pay special attention to the Notes.
8. Provision the device with credentials
The device can be provisioned using multiple approaches. For AWS IoT Core integration, we recommend downloading only the necessary certificate files specific to AWS IoT Core. After downloading the files to the device, we will use them while deploying through ALPON Cloud. Therefore, make sure to save the full file paths for reference.
To connect to the device, you can use the Open Remote Terminal button on the relevant asset in ALPON Cloud to obtain an SSH terminal. You can then perform your operations directly from there.
Step-by-Step Instructions:
- Obtain AWS IoT Core Certificates
- Navigate to the AWS IoT Core Console.
- Create a new device (Thing) and generate certificates.
- Download the following files:
- Device Certificate (
.pem.crt) - Private Key (
.pem.key) - Amazon Root CA Certificate
- Device Certificate (
- Load Certificates onto the Device
- Transfer the downloaded certificate and key files to the device.
- Create a directory and store certificate files in a directory (e.g.,
/etc/aws-iot/).
9. Build the demo
This section provides step-by-step instructions to build a Docker container that enables the device to communicate with AWS IoT Core. This section will be run on a personal computer, not on ALPON X4. Docker Buildx must be pre-installed on your personal computer.
9.1. Create Example Python File
Create a example.py file with the following content:
import sys
import os
import random
import time
import string
from awscrt import io, mqtt, auth, http
from awsiot import mqtt_connection_builder
import uuid

endpoint = os.environ.get("ENDPOINT", "")
cert_filepath = os.environ.get("CERT_FILENAME", "/certs/certificate.pem.crt")
key_filepath = os.environ.get("KEY_FILENAME", "/certs/private.pem.key")
ca_filepath = os.environ.get("CA_FILENAME", "/certs/AmazonRootCA1.pem")
client_id = os.environ.get("CLIENT_ID", "alponx4_thing")

mqtt_connection = mqtt_connection_builder.mtls_from_path(
    endpoint=endpoint,
    cert_filepath=cert_filepath,
    pri_key_filepath=key_filepath,
    ca_filepath=ca_filepath,
    client_id=client_id,
    clean_session=True,
    keep_alive_secs=60
)

print(f"Connecting to {endpoint} with client ID '{client_id}'...")
connect_future = mqtt_connection.connect()

try:
    connect_future.result(10)
    print("Connected!")
except Exception as e:
    print(f"Connection failed: {e}")
    sys.exit(1)

def generate_random_message():
    message = ''.join(random.choices(string.ascii_letters + string.digits, k=16))
    return '{"random_message":"' + message + '"}'

topic = os.environ.get("TOPIC", "demo/test")

try:
    while True:
        message = generate_random_message()
        print(f"Publishing message: {message}")

        publish_future = mqtt_connection.publish(
            topic=topic,
            payload=message,
            qos=mqtt.QoS.AT_LEAST_ONCE
        )
        time.sleep(5)
except KeyboardInterrupt:
    print("Terminating...")
except Exception as e:
    print(f"An error occurred: {e}")
finally:
    # Bağlantıyı kes
    try:
        disconnect_future = mqtt_connection.disconnect()
        disconnect_future.result()
        print("Disconnected successfully.")
    except Exception as e:
        print(f"Disconnect error: {e}")
9.2. Create Dockerfile
Create a Dockerfile with the following content:
FROM alpine:latest

RUN apk update && apk add python3 py3-pip wget

WORKDIR /app
COPY ./example.py /app
RUN python3 -m pip install awsiotsdk --break-system-packages
CMD python3 example.py
9.3. Build the Docker Image
- Navigate to the directory containing the Dockerfile and example.py file.
cd /path/to/folder- Build the Docker image:
docker buildx build --platform=linux/arm64 -t aws-iot-demo .- In ALPON Cloud, navigate to the Registry tab of your asset.
- Click on + Add Container and follow the prompts to add the pulled container to your registry.
10. Run the demo
10.1. Accessing the Device Interface
- Go to ALPON Cloud.
- Navigate to the Applications tab of your asset and select Deploy App.
10.2. Deployment Configuration
In the Deploy App window, configure the deployment as follows:
- Container Name:
awstest - Select the image and tag of the pushed AWS IoT test container
- Environments:
| Key | Value |
|---|---|
| ENDPOINT | AWS_IOT_CORE_ENDPOINT |
| TOPIC | ExampleTopicName |
| CLIENT_ID | ALPONX4_Client |
| CA_FILE_NAME | CACertFileName.pem |
| CERT_FILE_NAME | CertFileName.pem.crt |
| PRIVATE_KEY_FILE_NAME | PrivateKeyFileName.pem.key |
- Volumes:
| Read/Write | From | To |
|---|---|---|
| Read/Write | /path/to/your/cert/folder/on/alpon | /certs |
11. Verify messages in AWS IoT Core
To verify that your demo works successfully by observing MQTT messages received by AWS IoT Core using the IoT Core test MQTT client, follow these steps:
Step-by-Step Instructions:
- Log in to AWS Management Console
- Go to the AWS Management Console.
- Navigate to IoT Core.
- Navigate to MQTT Test Client
- In the left-hand sidebar, under Test, click on MQTT test client. This will open the MQTT test interface where you can send and receive MQTT messages.
- Get Your MQTT Client Endpoint
- In the MQTT Test Client tab, click on Connection details.
- Copy the Endpoint
xxxxxx.iot.<region>.amazonaws.com).
- Subscribe to the Topic
- In the Topic field, type the topic name that your demo is using to publish messages. For example:
demo/topic. - Click Subscribe. This will allow you to receive messages published to that topic.
- In the Topic field, type the topic name that your demo is using to publish messages. For example:
- Observe the Incoming MQTT Messages
- If your demo is successfully publishing messages to the topic, you will see the messages appear in the Message log section after they are received by the test client.
- Verify that the message format and content match the expected output of your demo.
- Verify Successful Demo
- If you see the messages in the MQTT test client, your demo is successfully working by sending and receiving MQTT messages via AWS IoT Core.
12. Troubleshooting
12.1. Unable to Connect to AWS IoT Core
- Issue: The MQTT client fails to connect to the AWS IoT Core endpoint.
Possible Causes:- Incorrect endpoint: Ensure the endpoint in the script matches your AWS IoT Core custom endpoint (found in the AWS IoT console under "Settings").
- Network issues: The container might not be able to access the network. Check network connectivitiy through ALPON Cloud’s container shells.
- AWS IoT Core authentication failure: Verify that the provided certificate, private key, and root CA are correct and valid.
- Firewall/Proxy: If you're behind a firewall or using a proxy, ensure that the necessary ports (like 8883 for secure MQTT) are open and accessible.
Solution: - Double-check the endpoint and verify it in the AWS IoT console.
- Check the network configuration of your Docker container.
- Validate that your certificates are correctly mounted and readable inside the container.
12.2. Certificate Errors
- Issue: The MQTT client fails to load certificates or authentication fails.
Possible Causes:- Incorrect certificate paths: Ensure the file paths in the environment variables are correct.
- Wrong certificate format: Make sure the certificates are in PEM format and not corrupted.
- Missing certificates: One or more of the required certificates (client certificate, private key, or root CA) might be missing.
- Incorrect file permissions: The container might not have read access to the certificate files if permissions are set incorrectly.
Solution: - Verify that the certificates exist in the specified locations inside the container. Use
lsto check for the files. - Ensure that the correct certificate format (PEM) is being used.
- Re-upload or regenerate certificates if they are missing or corrupted.
- Ensure the certificate files are readable by the user running the script inside the container. Use the following commands:
chmod 644 /path/to/certificate.pem.crt
chmod 600 /path/to/private.pem.key
chmod 644 /path/to/AmazonRootCA1.pem
12.3. No Messages Being Published
- Issue: The script runs, but no messages are being sent to the AWS IoT Core topic.
Possible Causes:- Incorrect topic: Ensure the topic you're publishing to matches the one your device or application is listening to.
- MQTT QoS issue: The Quality of Service (QoS) level set for publishing might be preventing messages from being acknowledged or delivered.
- Publish function failing silently: The
publish()method might not be working as expected.
Solution: - Double-check the topic name in both the publisher and subscriber.
- Try changing the QoS level to
mqtt.QoS.AT_LEAST_ONCEto ensure messages are reliably delivered. - Add error handling or logging to verify that the
publish()function completes successfully.
12.4. Container Not Able to Reach the Internet
- Issue: The container is not able to reach external services like AWS IoT Core.
Possible Causes:- DNS resolution issues: The container might not be able to resolve the AWS IoT endpoint domain name.
Solution: - Test the container's internet access by trying to ping an external site (e.g.,
ping google.com) from within the container. To do this, access the container's shell through ALPON Cloud by navigating to the Applications tab of the relevant asset. From there, you can execute the necessary commands inside the container. - Verify the DNS settings and ensure the container can resolve domain names correctly.
- DNS resolution issues: The container might not be able to resolve the AWS IoT endpoint domain name.
You can find more information about AWS Troubleshooting here.
Updated 3 months ago