
Deploy Applications
Deploy and manage ARM64 Docker containers on ALPON X5 AI and ALPON X4 edge computers from ALPON Cloud, using Docker Hub images or the private Sixfab Container Registry.
Deploy Applications on ALPON
Deploy and manage containerized workloads on ALPON X5 AI and ALPON X4 edge computers from ALPON Cloud. This guide covers two image sources (Docker Hub and the private Sixfab Container Registry), container access, lifecycle management, log streaming, and CI/CD patterns for production fleets.
ALPON X5 AI and ALPON X4 run application workloads as Docker containers
managed from ALPON Cloud at
connect.sixfab.com. Open the device's Applications tab, click + Deploy, then either
pull an ARM64-compatible image from Docker Hub by typing its path (e.g. nginx:latest) or select
a custom image you have pushed to your private Sixfab Container Registry at cr.sixfab.io.
Configure host ports in the 30000–32767 range, environment variables, and volumes, then deploy.
The container starts on the device once the image finishes pulling.
Both ALPON X5 AI (Raspberry Pi CM5 · Cortex-A76) and ALPON X4 (Raspberry Pi CM4 · Cortex-A72) run on
ARM64. Every container image must include a linux/arm64 variant. Most official
images on Docker Hub (nginx, redis, postgres, node) ship multi-arch manifests with ARM64 included. Custom
images must be built with docker buildx build --platform linux/arm64.
Video walkthrough
Watch the two-part screen recording for an end-to-end walkthrough of the workflow on ALPON. Click any timestamp to jump to that section of the video.
How to containerize apps for ALPON devices
Build an ARM64 Docker image on your workstation, log in to the Sixfab Container Registry at cr.sixfab.io, and push the image so it's ready to deploy to any ALPON device. Click a chapter to jump to that section in the video.
Chapter timestamps
- 00:00Introduction
- 00:15Docker Desktop
- 00:31Setting up project folder
- 00:44Creating Python script
- 01:03Requirements file
- 01:17
.dockerignorefile - 01:27Writing the Dockerfile
- 02:02Building the image
- 02:18Testing the container locally
- 02:23Registry setup & login
- 02:42Tagging the image
- 02:58Pushing to Sixfab Registry
- 03:13Verification & conclusion
How to deploy & update apps remotely
Deploy the pushed image to an ALPON device from ALPON Cloud, configure ports, environment variables, volumes, and security toggles, then manage the running container — including rolling back to a previous image tag. Click a chapter to jump to that section in the video. The rollback recipe is written up under Manage & lifecycle; connectivity and network-failover behaviour covered in the opening chapter is documented in ALPON Cloud.
Chapter timestamps
- 00:00Introduction & recap
- 00:16Reliability & network failover
- 00:36Navigating to application deployment
- 00:55Selecting custom images from Registry
- 01:10Config: env, ports & volumes
- 01:23Security: host network & privileged
- 01:57Deploying & status monitoring
- 02:12Remote management
- 02:27Rolling back updates
- 02:46Conclusion
Overview
ALPON treats every workload as an isolated Docker container. The runtime is preinstalled on each device and
authenticated against the Sixfab Container Registry out of the box, so deployment is driven entirely from the
ALPON Cloud dashboard. There is no SSH-based provisioning, no manual docker pull, and no per-device
credential management.
What you can deploy
How deployment works
Every ALPON device opens a persistent connection to the ALPON Cloud control plane. When a deploy is triggered from the dashboard, the platform sends a structured manifest to the device, which then pulls the image, applies port and volume mappings, and starts the container. Status streams back to the cloud in real time.
Deployment methods
ALPON supports two image sources. Both deploy through the same Applications tab in ALPON Cloud; the difference is where the image lives.
Pull any public ARM64 image directly from Docker Hub. Best for trying out off-the-shelf services like nginx, Grafana, or MQTT brokers without building anything.
- No build step required
- Type the image path and deploy
- Subject to Docker Hub rate limits
Build, push, and deploy custom images from the private registry at cr.sixfab.io. Required for
proprietary code, custom AI models, fleet-specific configurations, and any production deployment.
- Private storage scoped to your own account namespace
- Devices auto-authenticate, no per-device login
- 10 GB / 100 tags default quota
Deploying from Docker Hub
The fastest way to run a container on ALPON. The example below deploys nginx; the same flow applies to any ARM64-compatible image.
-
1
Open the Applications tab
Log in to connect.sixfab.com, open Assets, select your registered ALPON device, then switch to the Applications tab. Click + Deploy to open the configuration panel.
-
2
Configure the container
Fill in the deployment form. The minimum required fields are Container Name, Image, and at least one Port mapping if the container exposes a service.
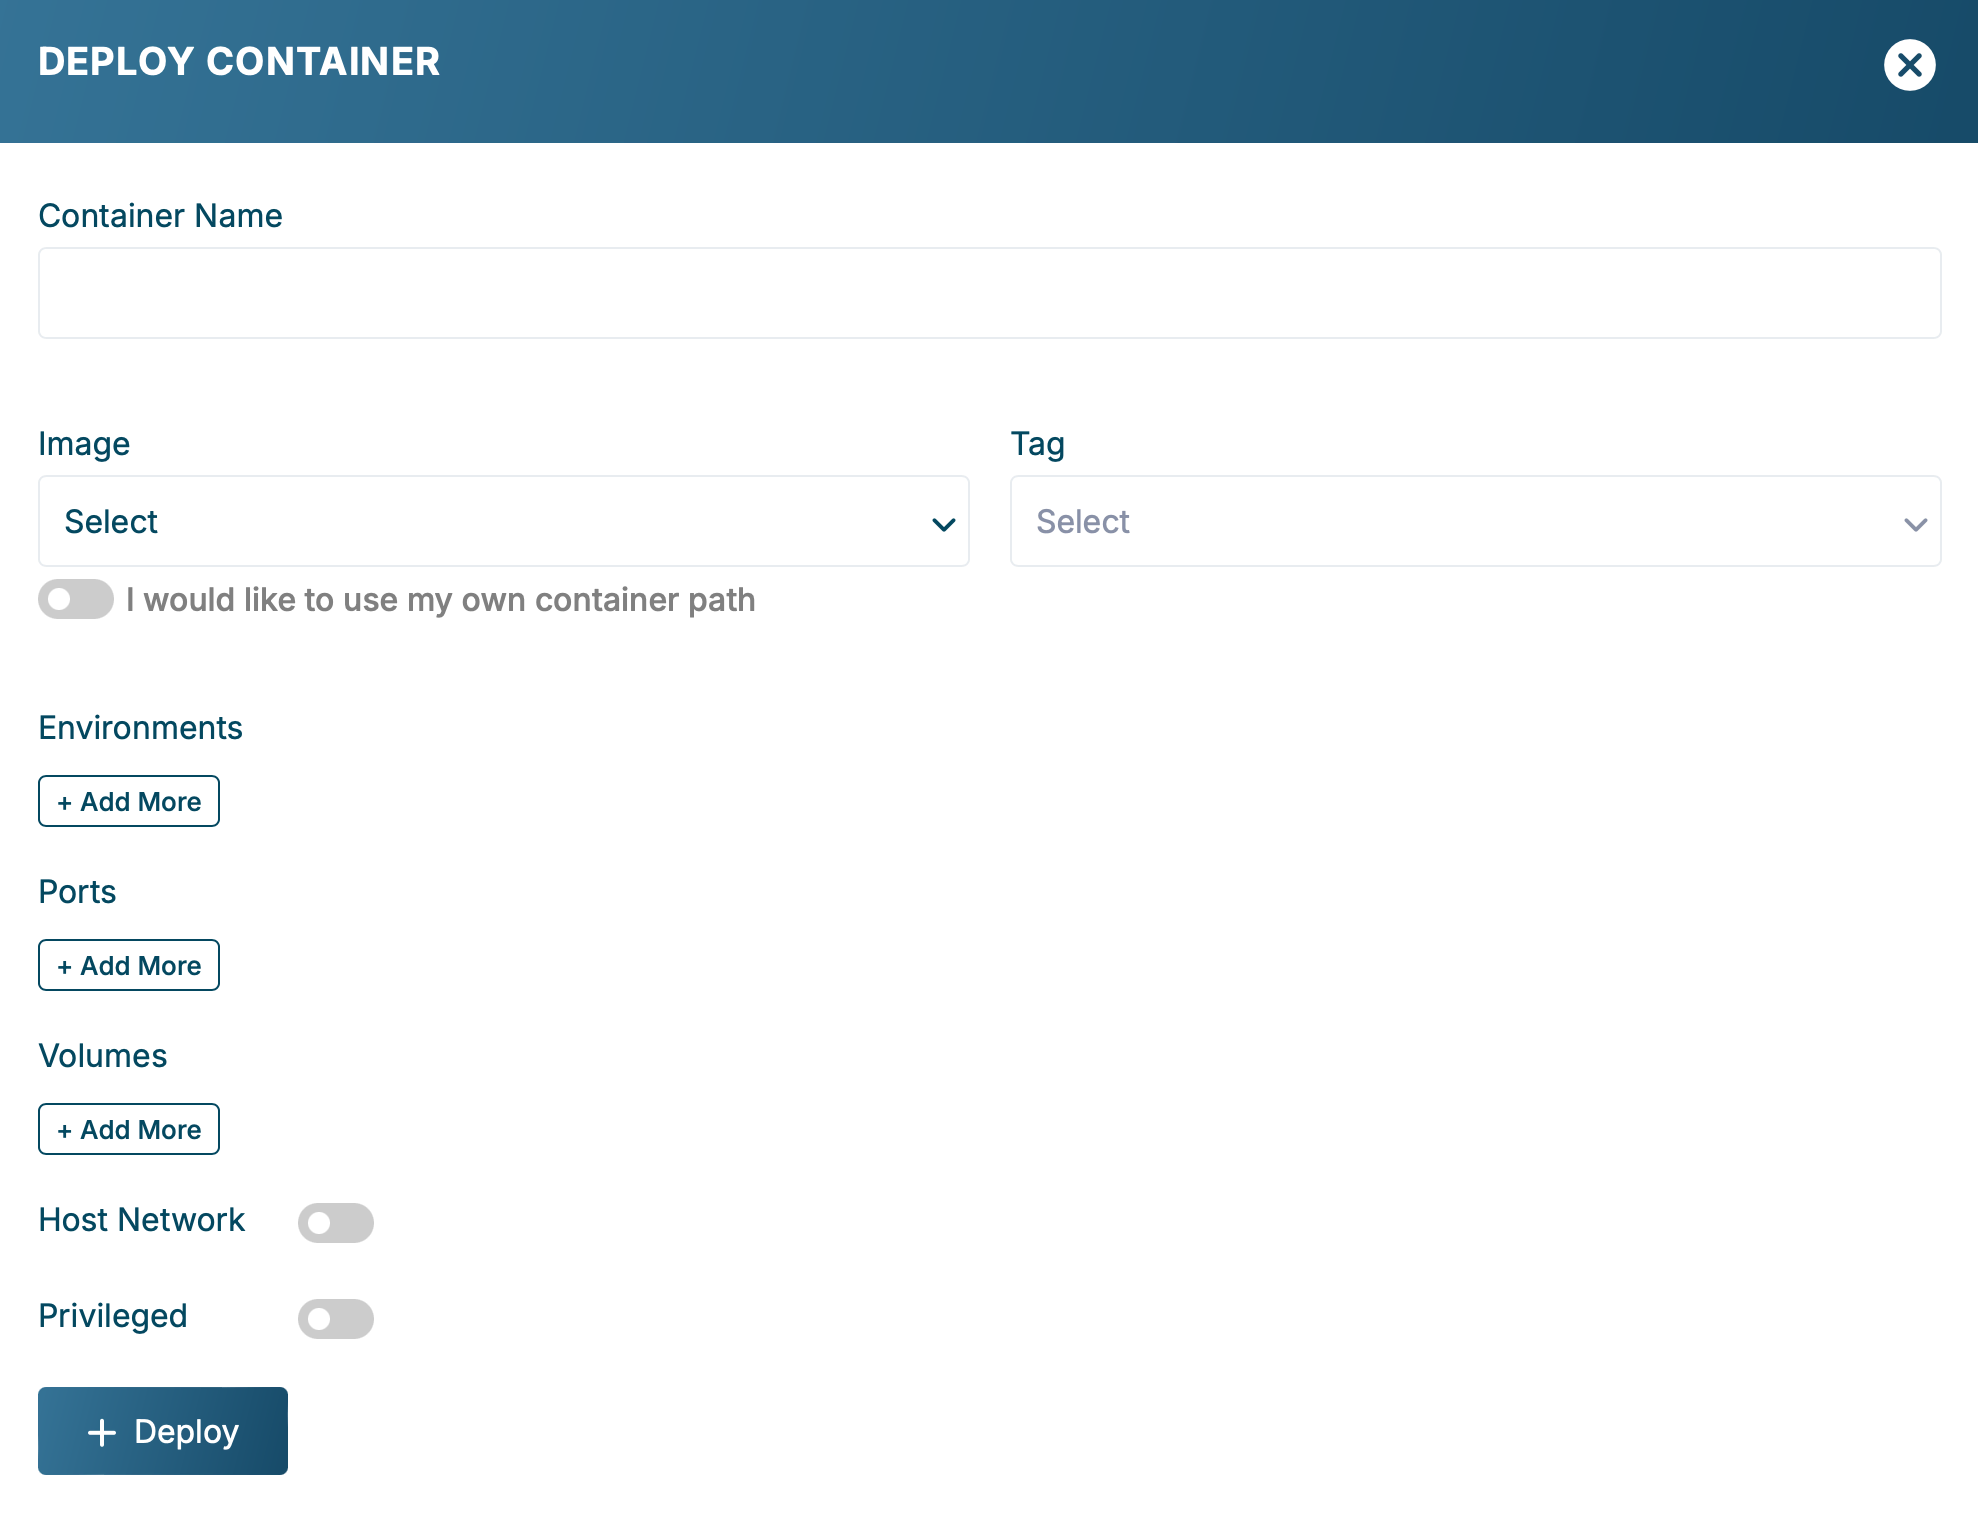
Container deployment form on the Applications tab. - Container Name: a descriptive identifier (e.g.
my-nginx). - Image: check "I would like to use my own container path" and enter the Docker Hub image, e.g.
nginx:latestorredis:7-alpine. - Ports: map device ports to container ports (e.g. host 30800 → container 80). Host ports must be in 30000–32767.
- Environment, Volumes, Host Network, Privileged: see Configuration reference for full semantics.
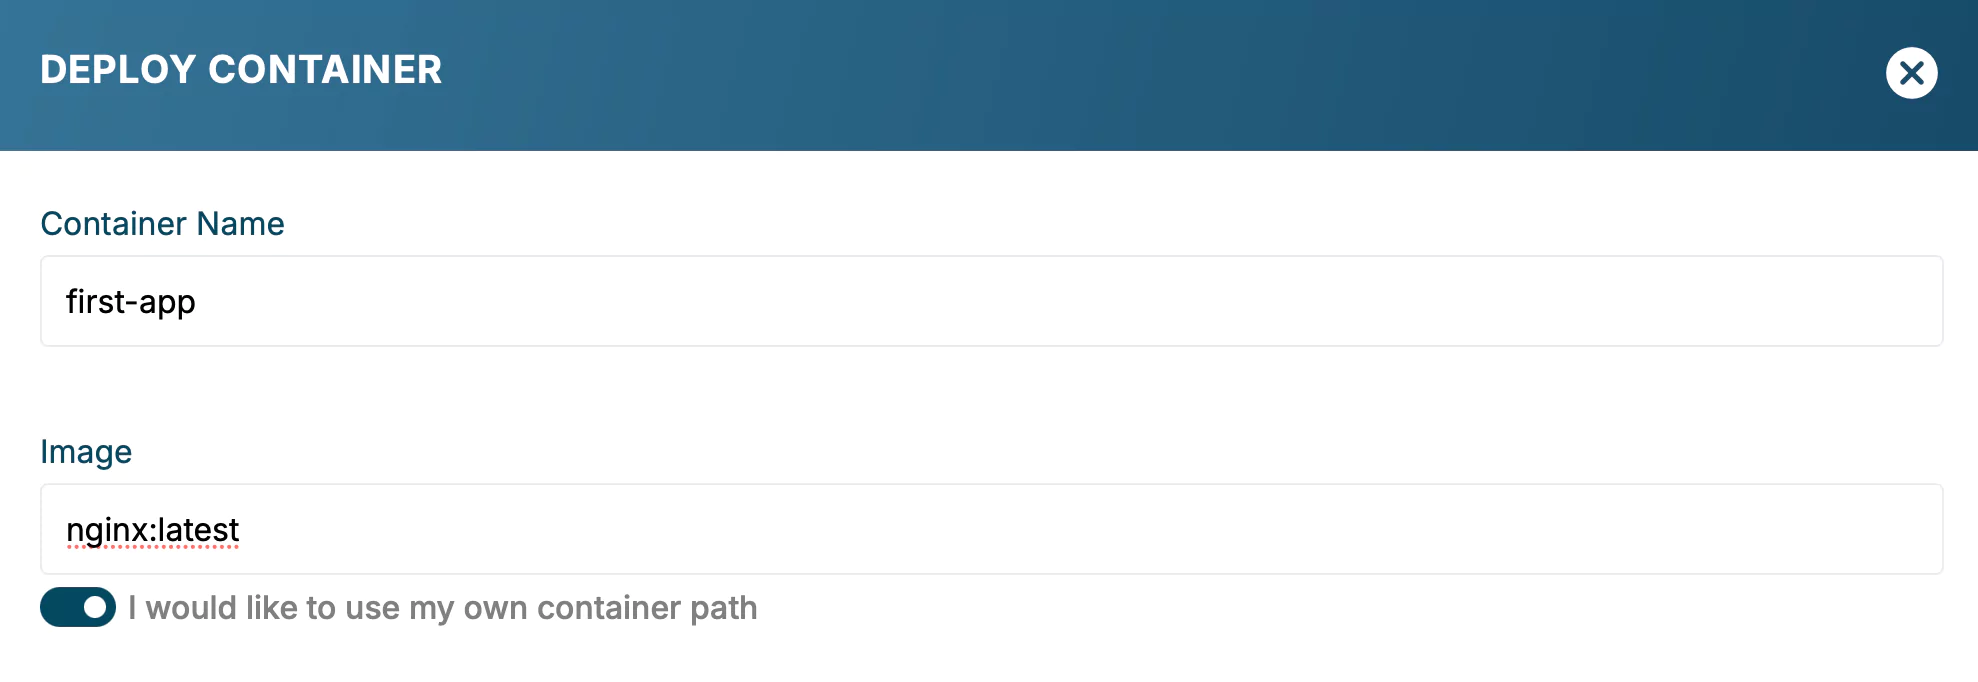
Port mapping and environment variable rows. 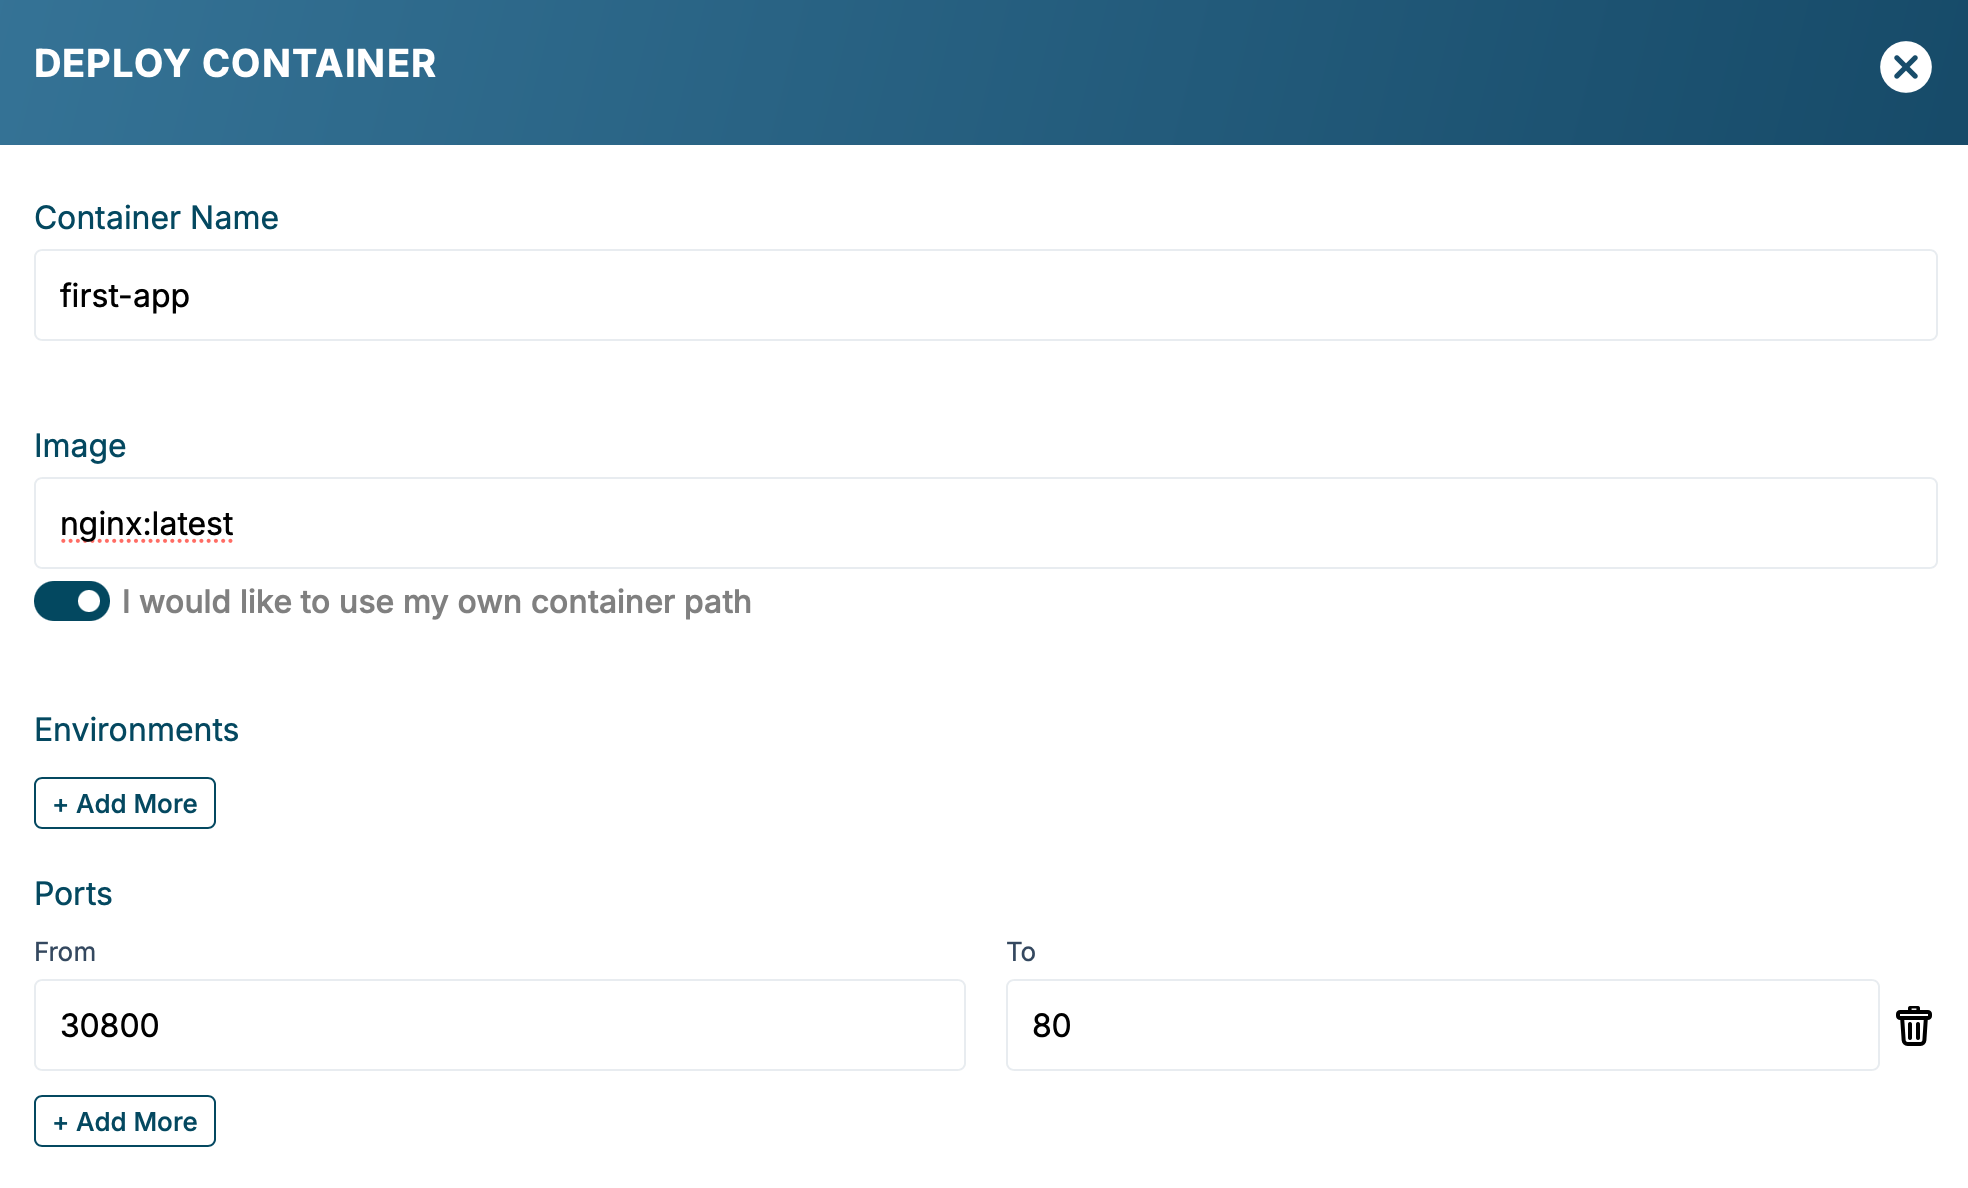
Volume mounts, Host Network, and Privileged toggles. - Container Name: a descriptive identifier (e.g.
-
3
Deploy
Review the form and click + Deploy. The device pulls the image and starts the container; status flips to Running in the Applications list once the container is live.
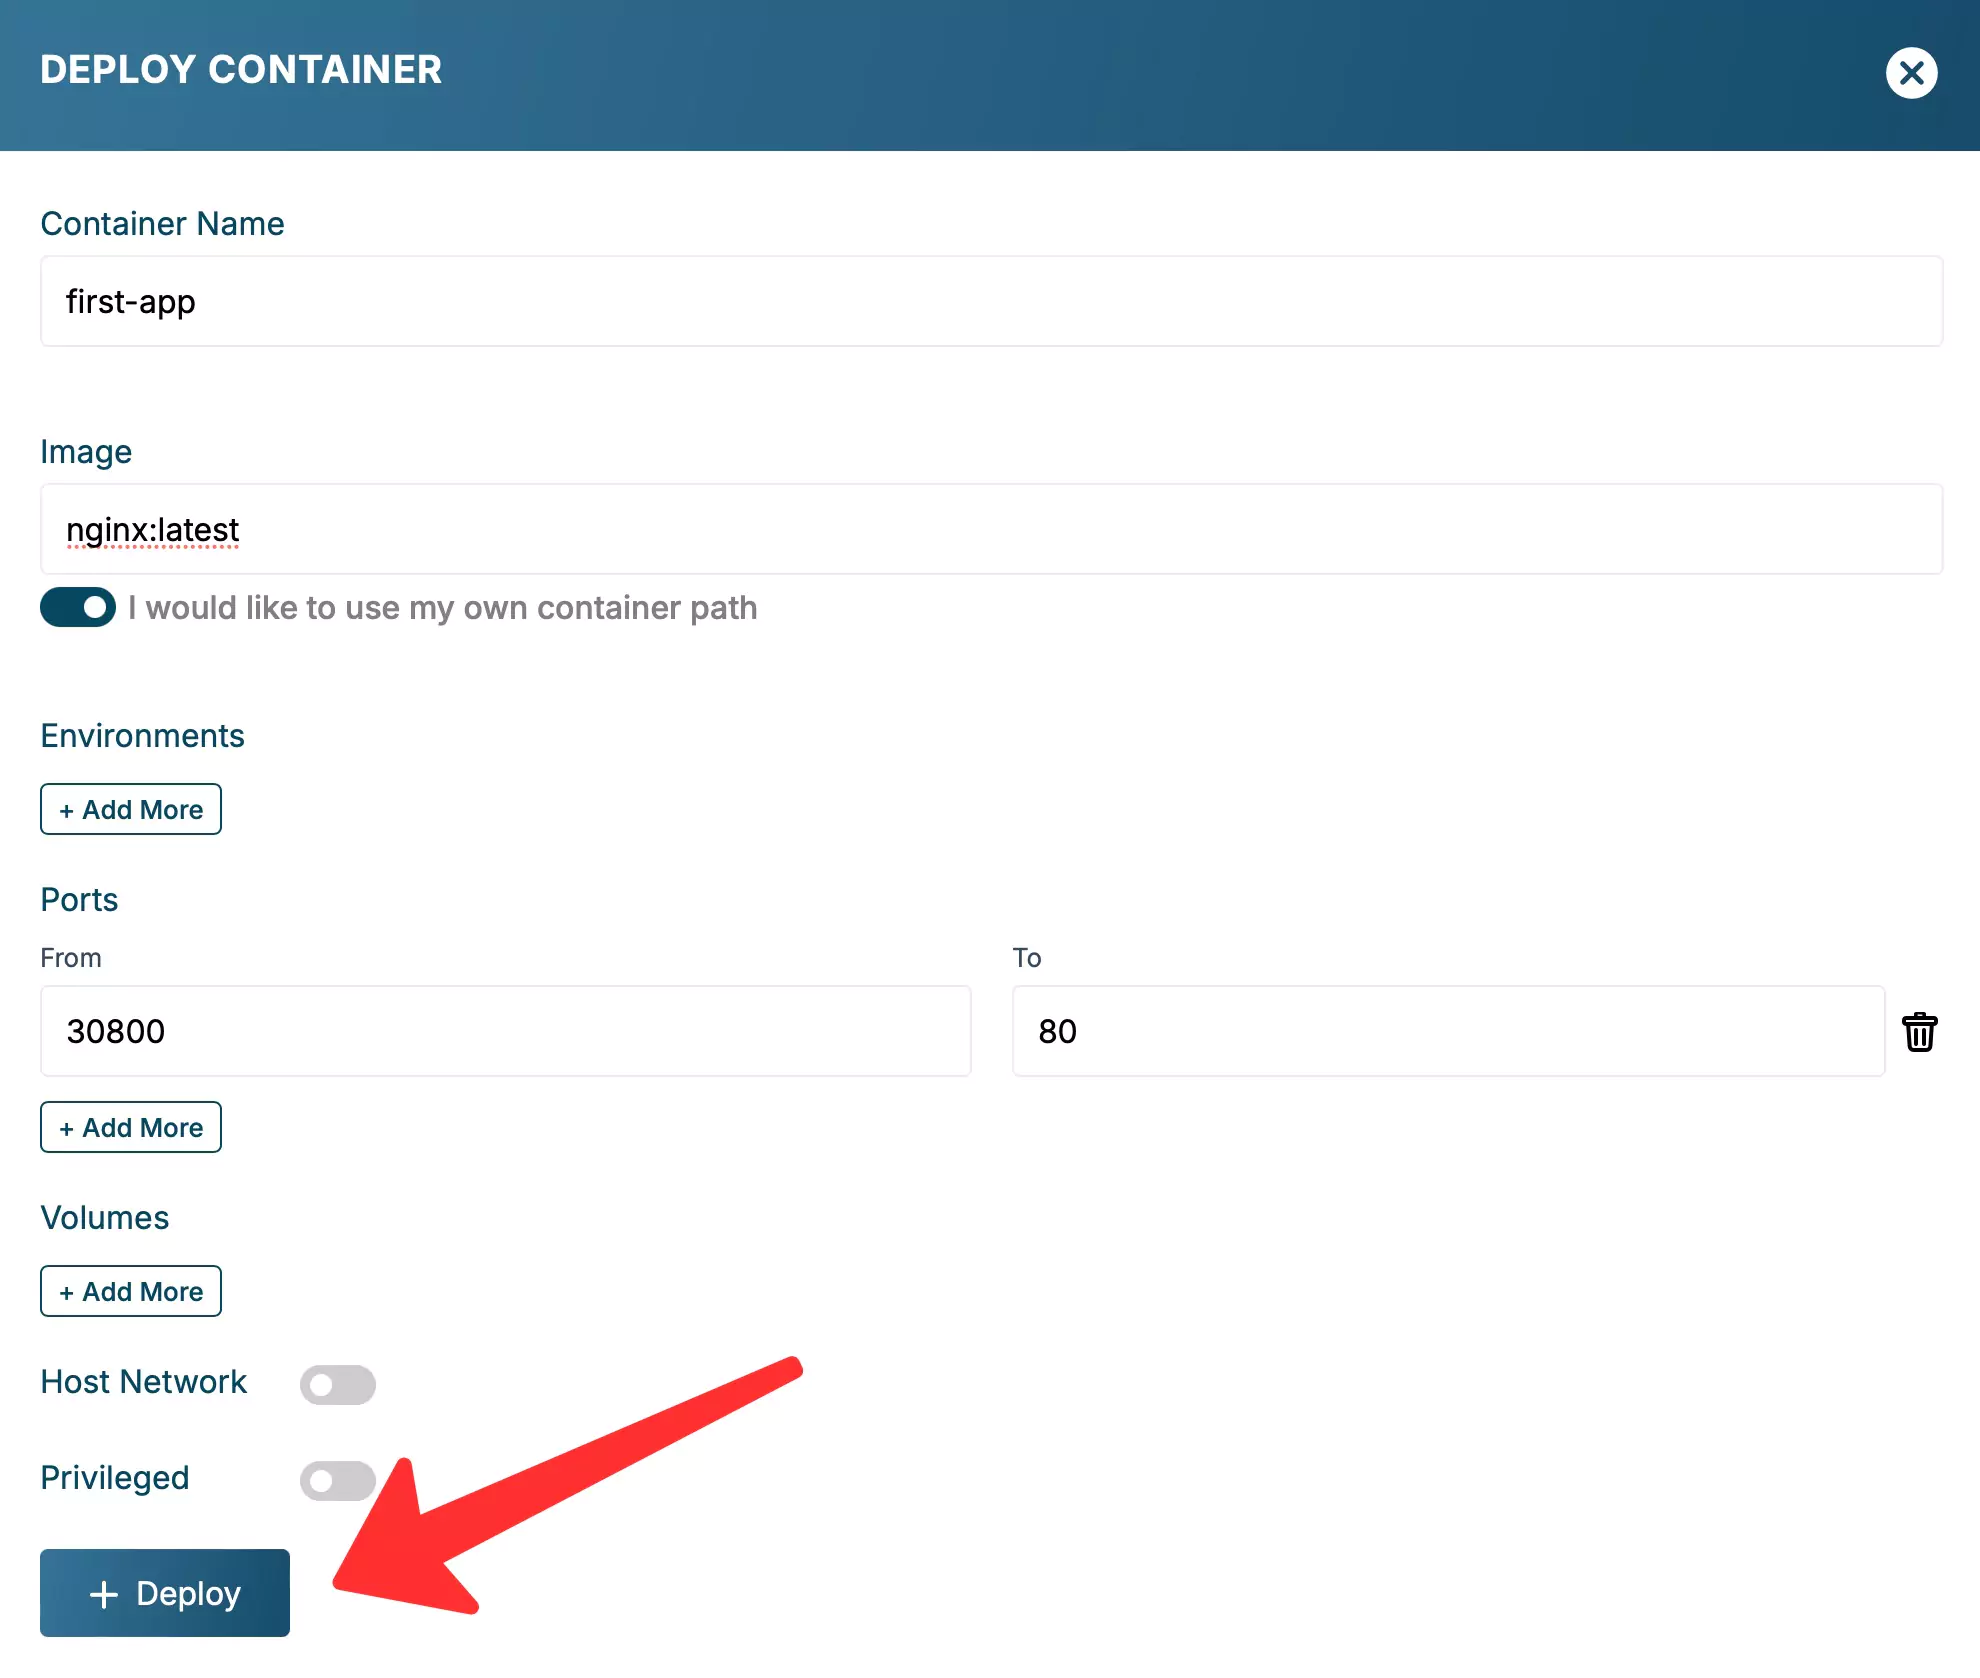
Final review screen before clicking + Deploy. 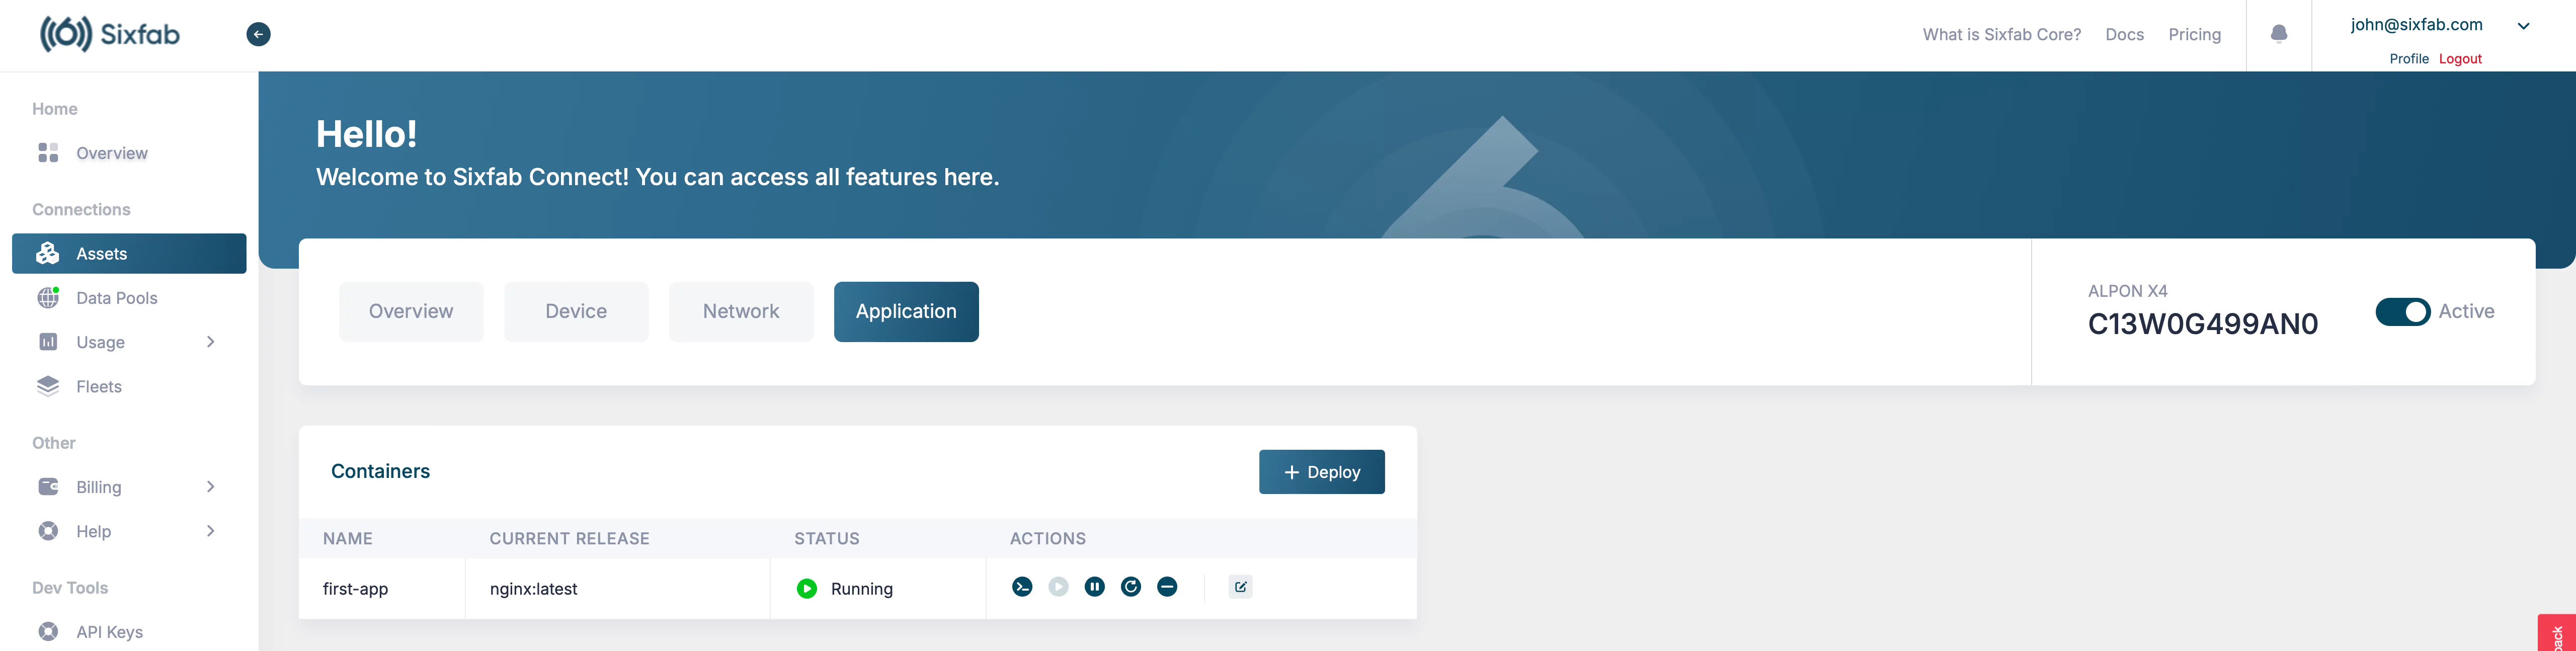
Deployed container appears in the Applications list with Running status. First pull may take a minuteInitial pulls over cellular links can be slow for large images. After the first pull the image is cached on the device, so later restarts reuse the cached image instead of downloading it again.
Sixfab Container Registry
The Sixfab Container Registry is a private OCI-compatible registry hosted at
cr.sixfab.io, scoped to your account. ALPON devices authenticate against it automatically and pull
from your own repositories and from official Sixfab images. This section is the canonical reference for registry
quotas and credentials; other ALPON pages link here.
Registry overview
The Registry is accessible from Developer Tools → Registry in ALPON Cloud. It shows each repository with size, creation date, and quota usage.
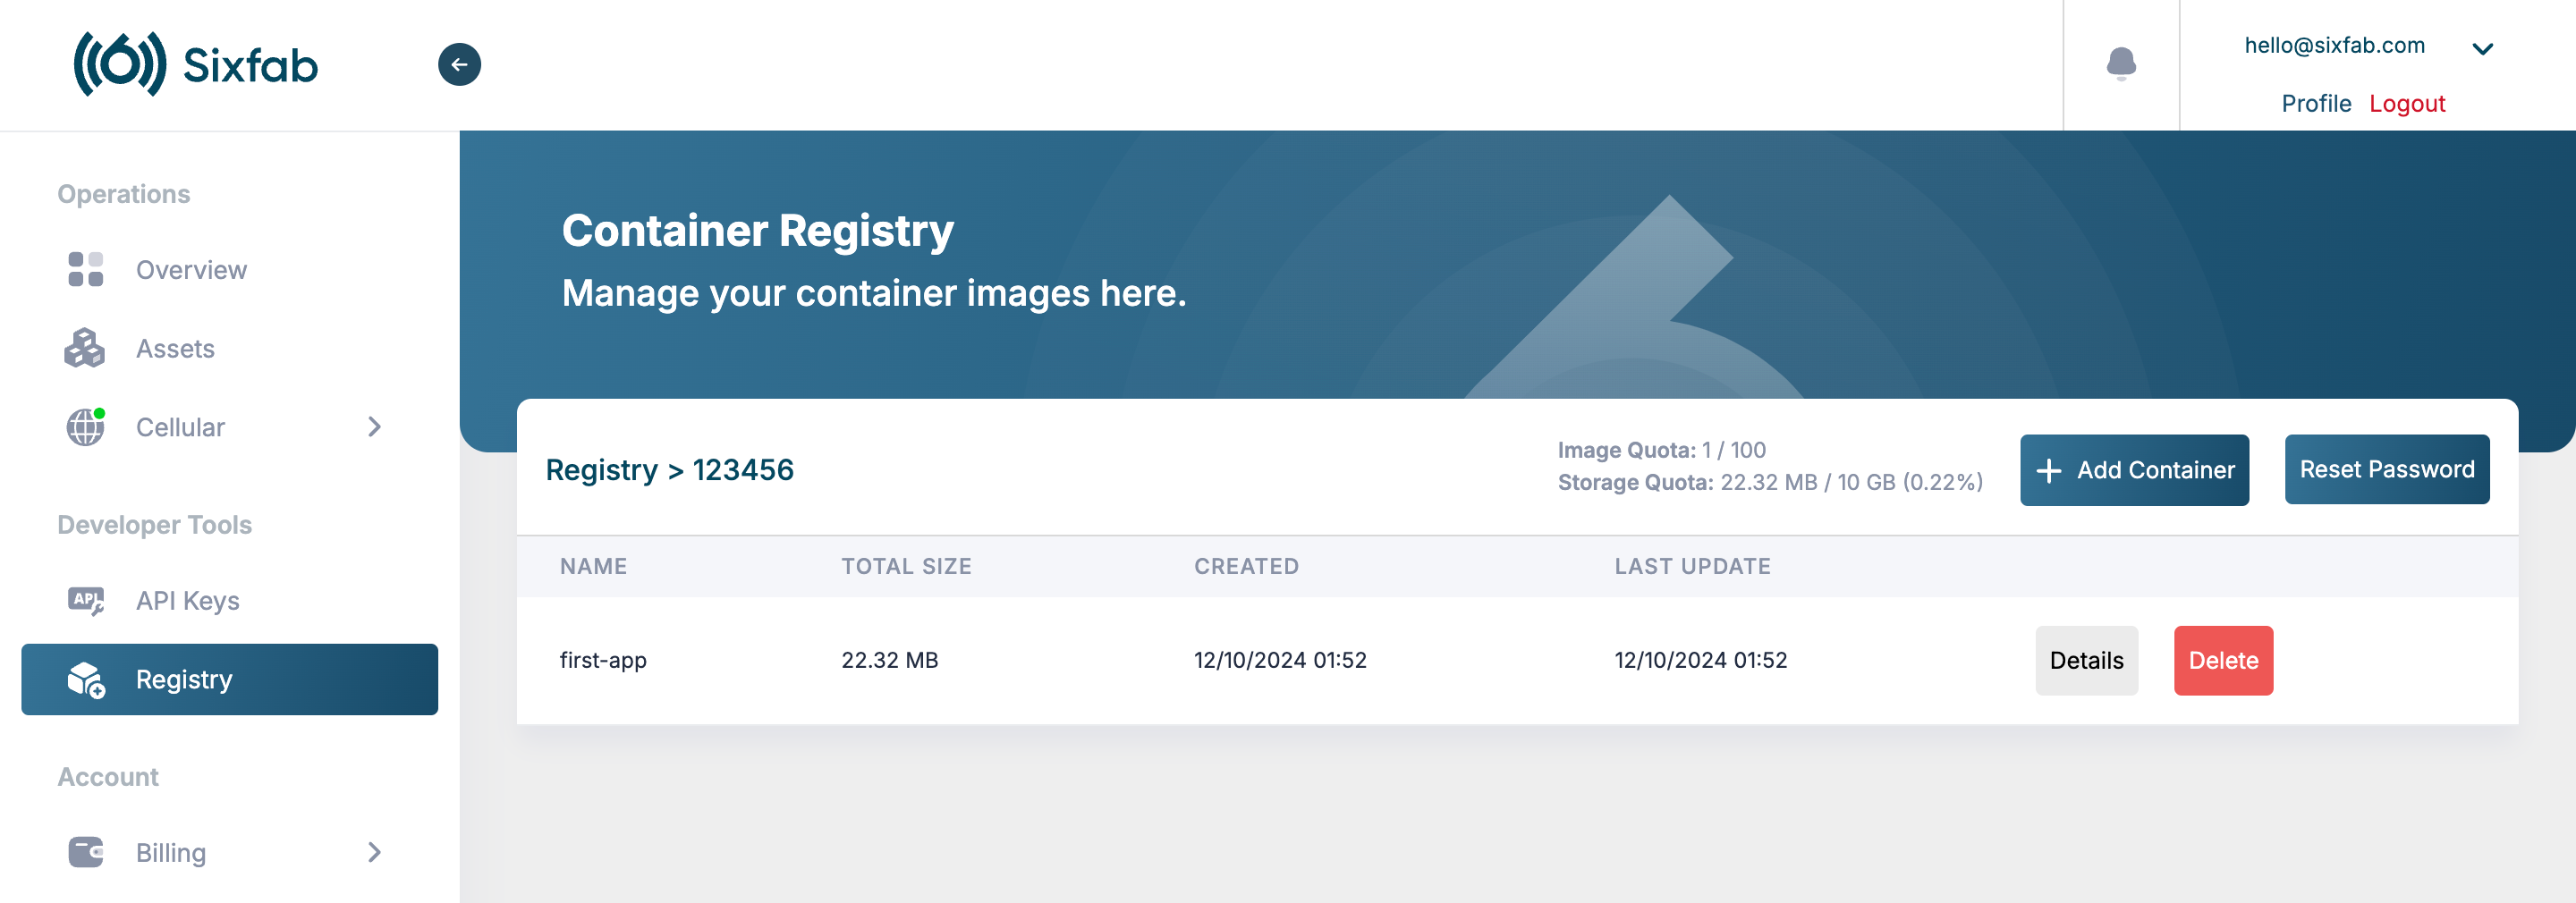
Each account starts with 10 GB total storage and 100 image tags. A push that would exceed either limit fails. To ask for a quota increase, contact Sixfab.
Push an image to the Registry
Run the following commands on your build machine (laptop, server, or CI runner) to push a local image to your registry namespace.
-
1
Set the registry password
Open Sixfab Registry and click Reset Password. The password is shown once; copy and store it in a secrets manager. Your username is the 6-digit number visible at the top of the Registry page.
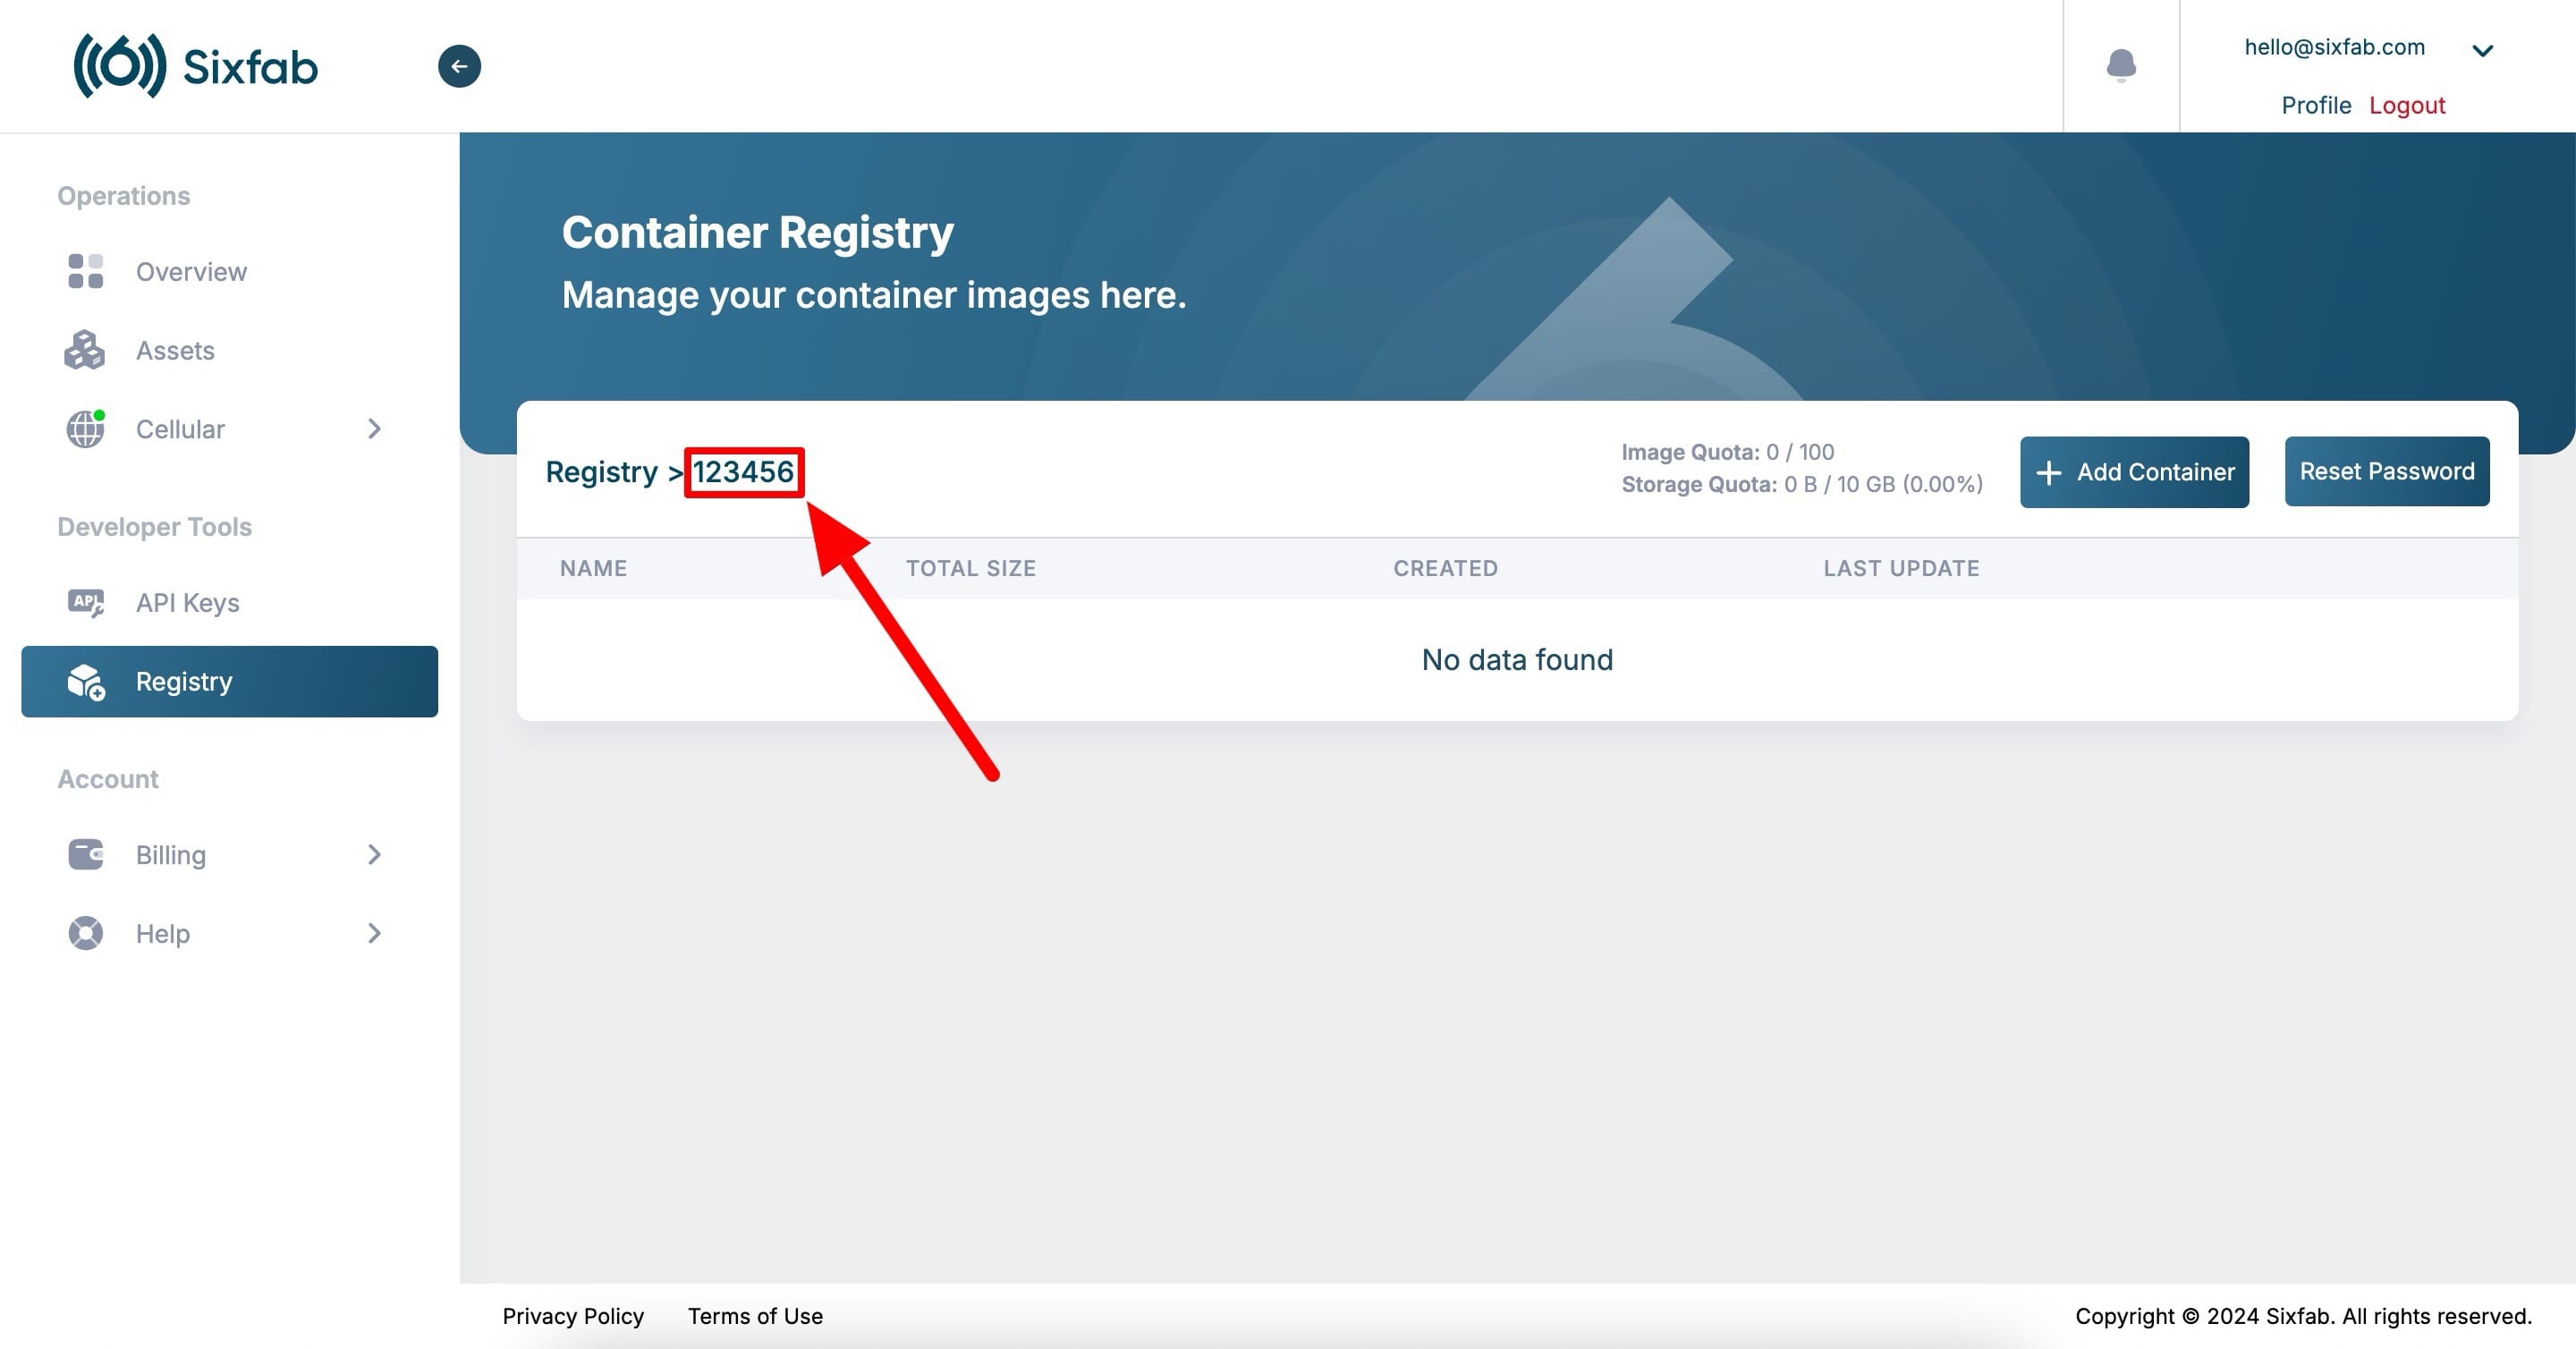
Your registry username is the 6-digit number at the top of the Registry page. 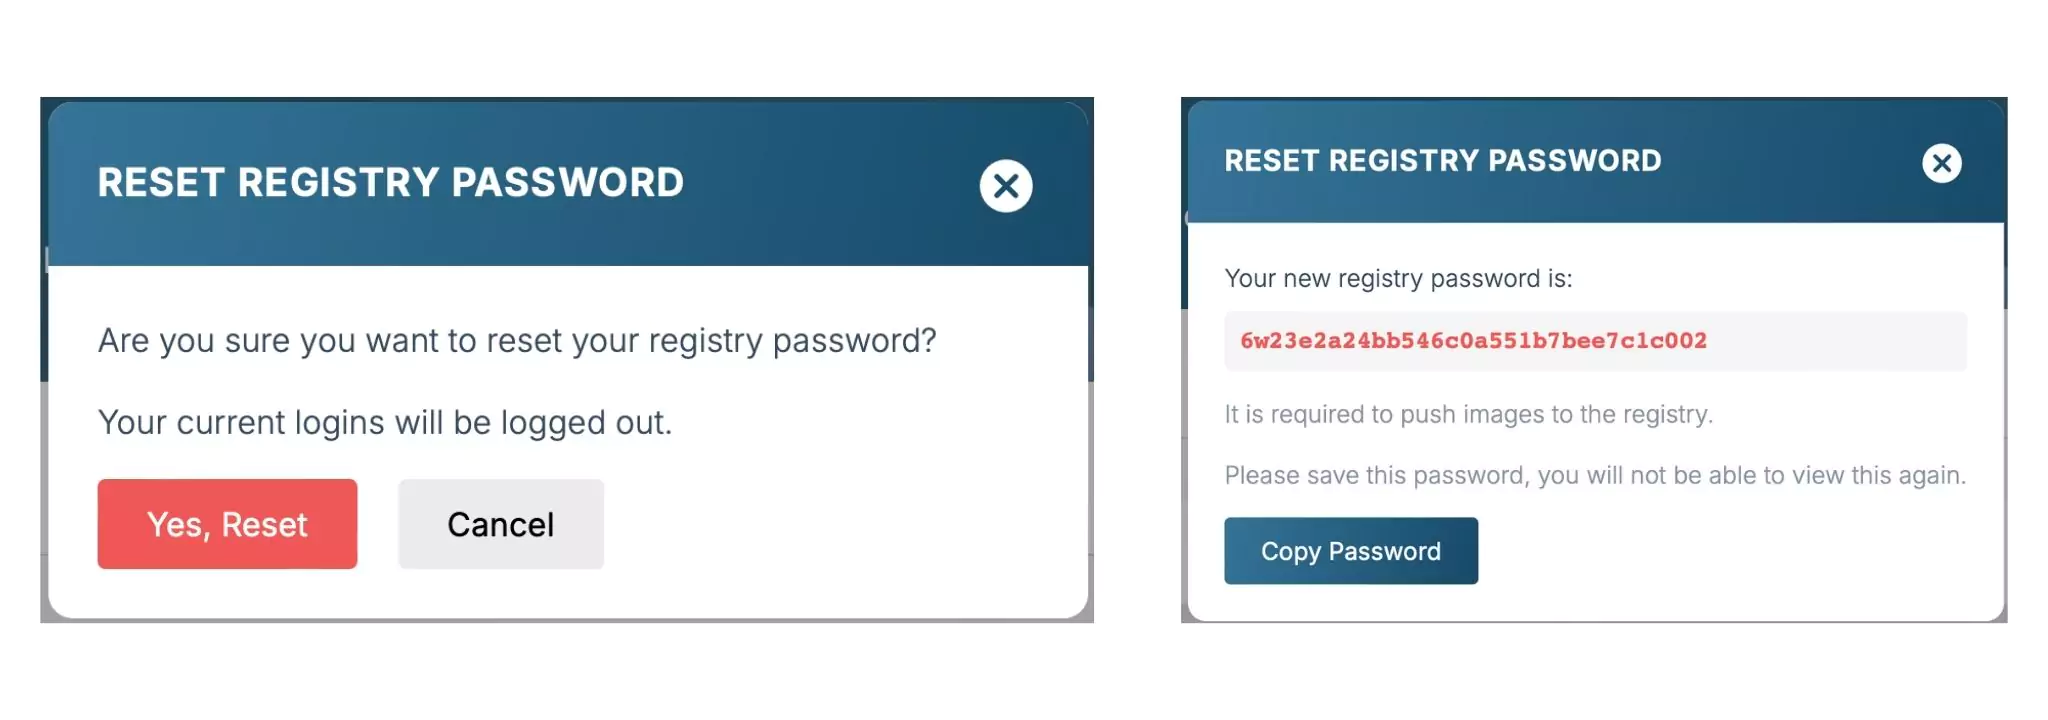
Reset Password issues a new registry credential. Save the password immediatelyRegistry credentials are independent from your ALPON Cloud account login. If lost, the only recovery is to issue a new password via Reset Password, which invalidates the previous one.
-
2
Log in to the registry
Authenticate Docker against
cr.sixfab.io. Replace<your_username>with your own 6-digit registry username.bash# 1. Authenticate Docker to the Sixfab Container Registry docker login cr.sixfab.io --username <your_username> # Password: paste the registry password (input is hidden)
-
3
Build for ARM64
Build the image with Docker Buildx, targeting
linux/arm64. The--loadflag makes the resulting image available locally so you can tag and push it.bash# 1. From the directory containing your Dockerfile docker buildx build --load --platform linux/arm64 \ -t my-app:latest .
Buildx availabilityDocker Buildx is preinstalled on Windows and macOS with Docker Desktop. On Linux, verify with
docker buildx version. On an x86 Linux host, also register the ARM emulator once withdocker run --privileged --rm tonistiigi/binfmt --install arm64; without it,RUNsteps in anarm64build fail withexec format error. -
4
Tag with the registry path
Tag the image so Docker knows where to push it. The path format is
cr.sixfab.io/<your_username>/<image>:<tag>.bashdocker tag my-app:latest cr.sixfab.io/<your_username>/my-app:latest -
5
Push the image
Upload the image to your private repository. Layer caching means subsequent pushes only transfer changed layers.
bashdocker push cr.sixfab.io/<your_username>/my-app:latest # The push refers to repository [cr.sixfab.io/719663/my-app] 571fd9f78ac9: Pushed latest: digest: sha256:2aeab3830f8eaf2775fd599fda6a516a95c1480239ba5e64a632a68c1f3bd53d size: 1786
-
6
Verify in the Registry
Refresh the Registry page in ALPON Cloud. The new image appears in the repository list with size, creation date, and last-update timestamp. Click Details on a repository to inspect tags, digests, and the underlying manifest. Each tag shows a See Usage button to identify which devices run it. Drilling into a tag reveals the full manifest, architecture (
arm64), OS (linux), runtimeConfig, and layer-level breakdown. -
7
Deploy from the Registry
Open the device's Applications tab and click + Deploy. In the Image field, leave the custom-path checkbox unchecked to pick from your registry dropdown. Select the image and tag, configure ports and environment, then deploy.
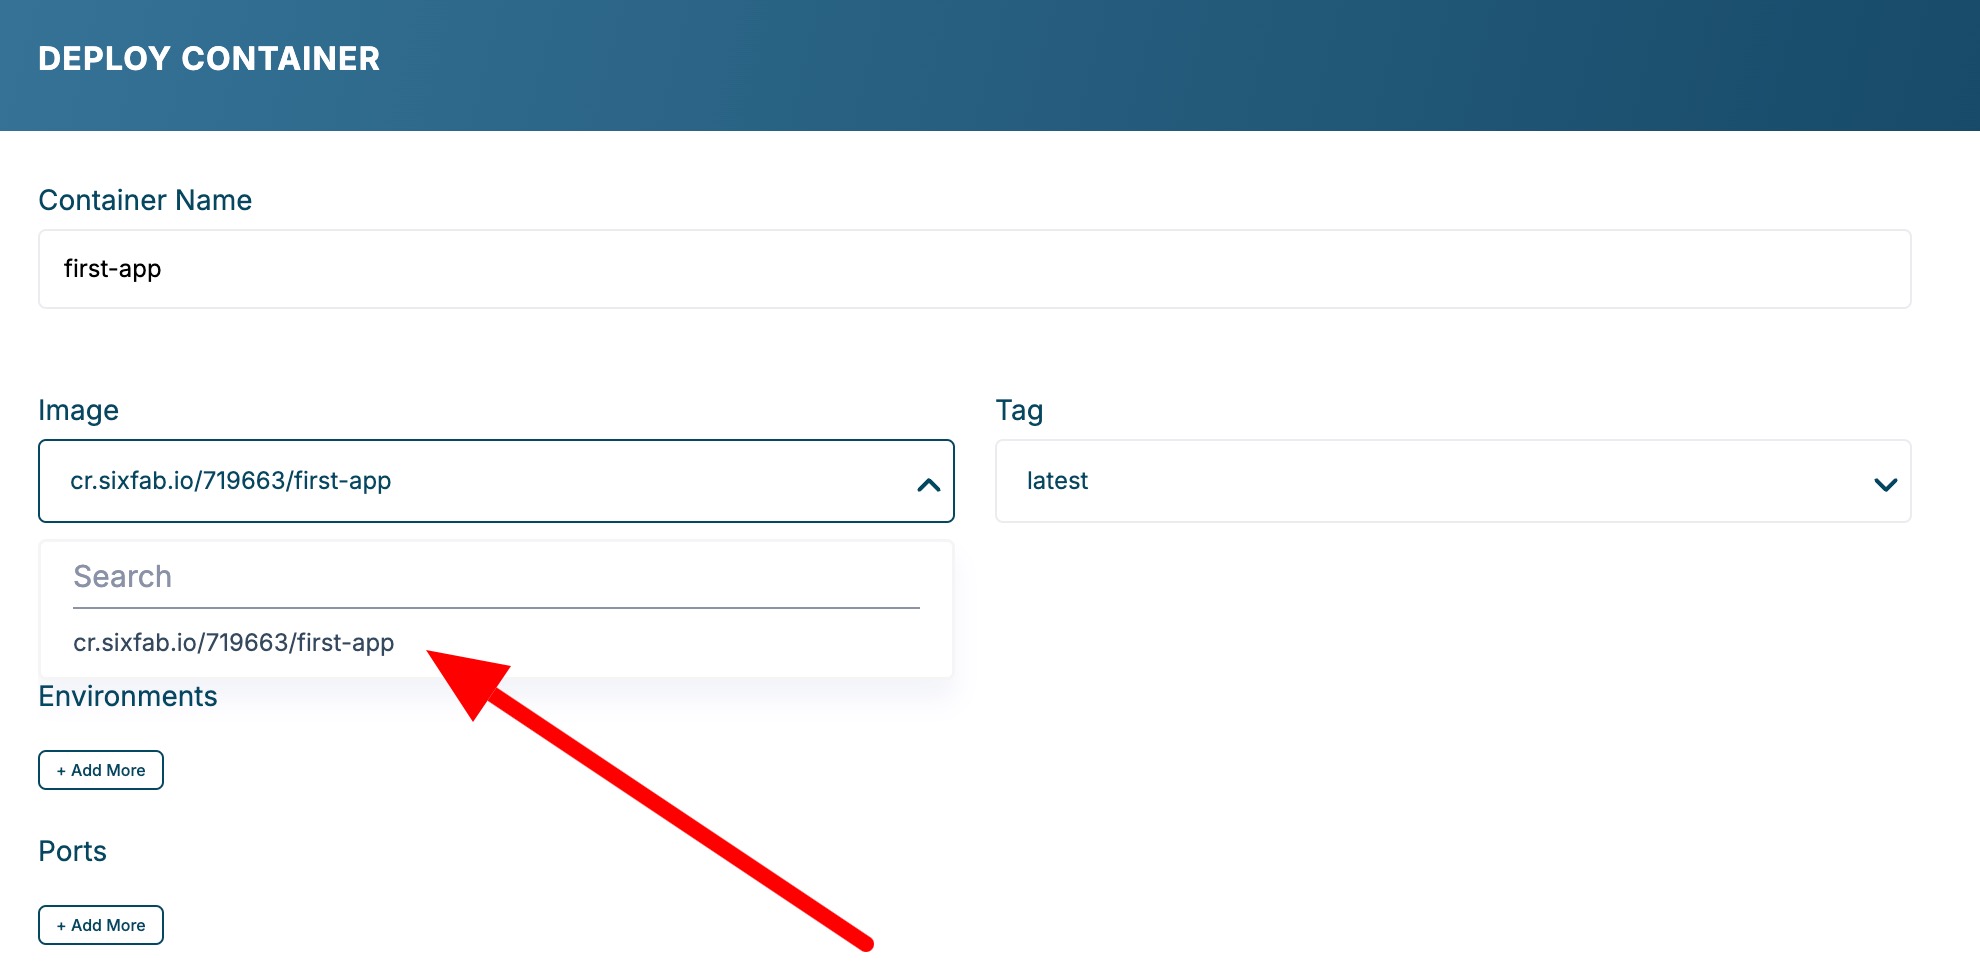
The Image dropdown lists every repository in your Sixfab Registry namespace. 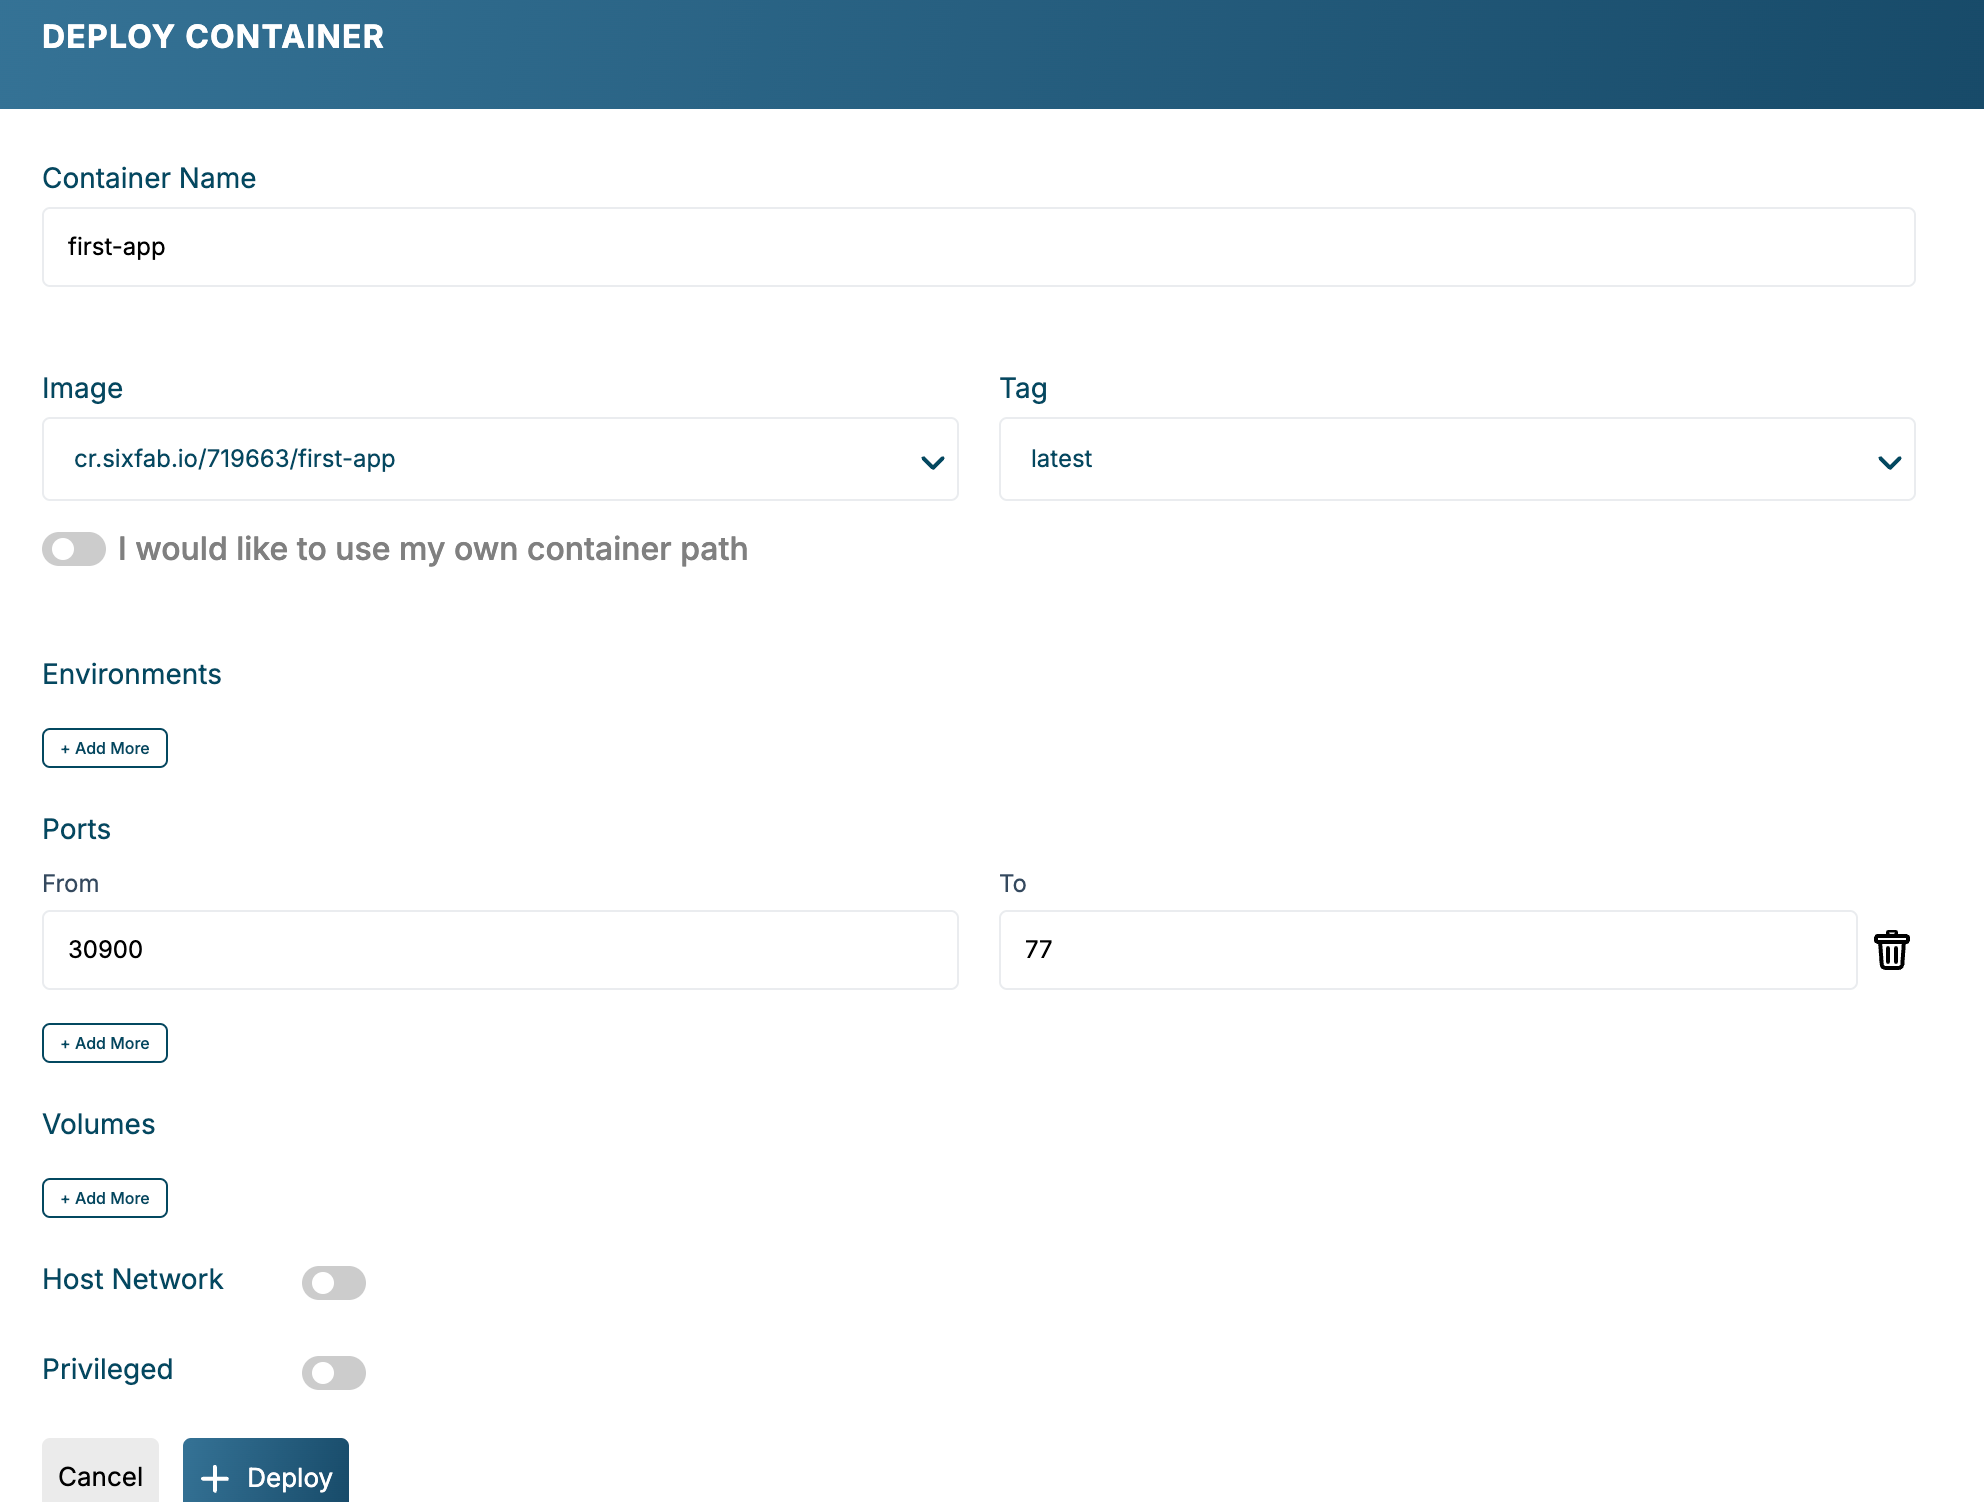
Final review before clicking + Deploy with a Sixfab Registry image.
You do not need to run docker login on the ALPON device. Every ALPON ships
preconfigured with credentials scoped to its owner's registry namespace plus official Sixfab images, so a
device pulls only the images in that namespace.
Configuration reference
Every field exposed in the deployment form, with semantics and constraints.
my-nginx, vision-pipeline-v2).cr.sixfab.io/<your_username>/my-app:latest) when picking from the dropdown, or a Docker Hub path (e.g. nginx:latest) when "I would like to use my own container path" is checked. Always ARM64.DATABASE_URL=postgres://..., API_KEY=...). Values are sent to the device over its outbound TLS connection, and are shown again in the form whenever you reopen Edit Deployment./dev/gpiomem is handed to a GPIO workload). The host path must already exist on the device. Container writes survive restart and redeploy. The form does not create named Docker volumes./dev/gpiomem — see Access GPIO, Push Buttons, and USB from Docker Containers. Two hardware limits still apply inside a privileged container: the GPIO Add-on port's 5 V rail and signal path only come up once GPIO 21 is driven HIGH, and ALPON X4 supplies 5 V at 1 A in total, shared across both USB ports. Significant security risk; enable only when necessary.Port range explained
The deployment form accepts host ports in the 30000–32767 range. Map the container's own port (unrestricted) to a host port in that range, then use the host port when you reach the service from the local network or from the device itself.
Access the container
Once a container is running, three options are available depending on your network position relative to the device.
Access from the local network
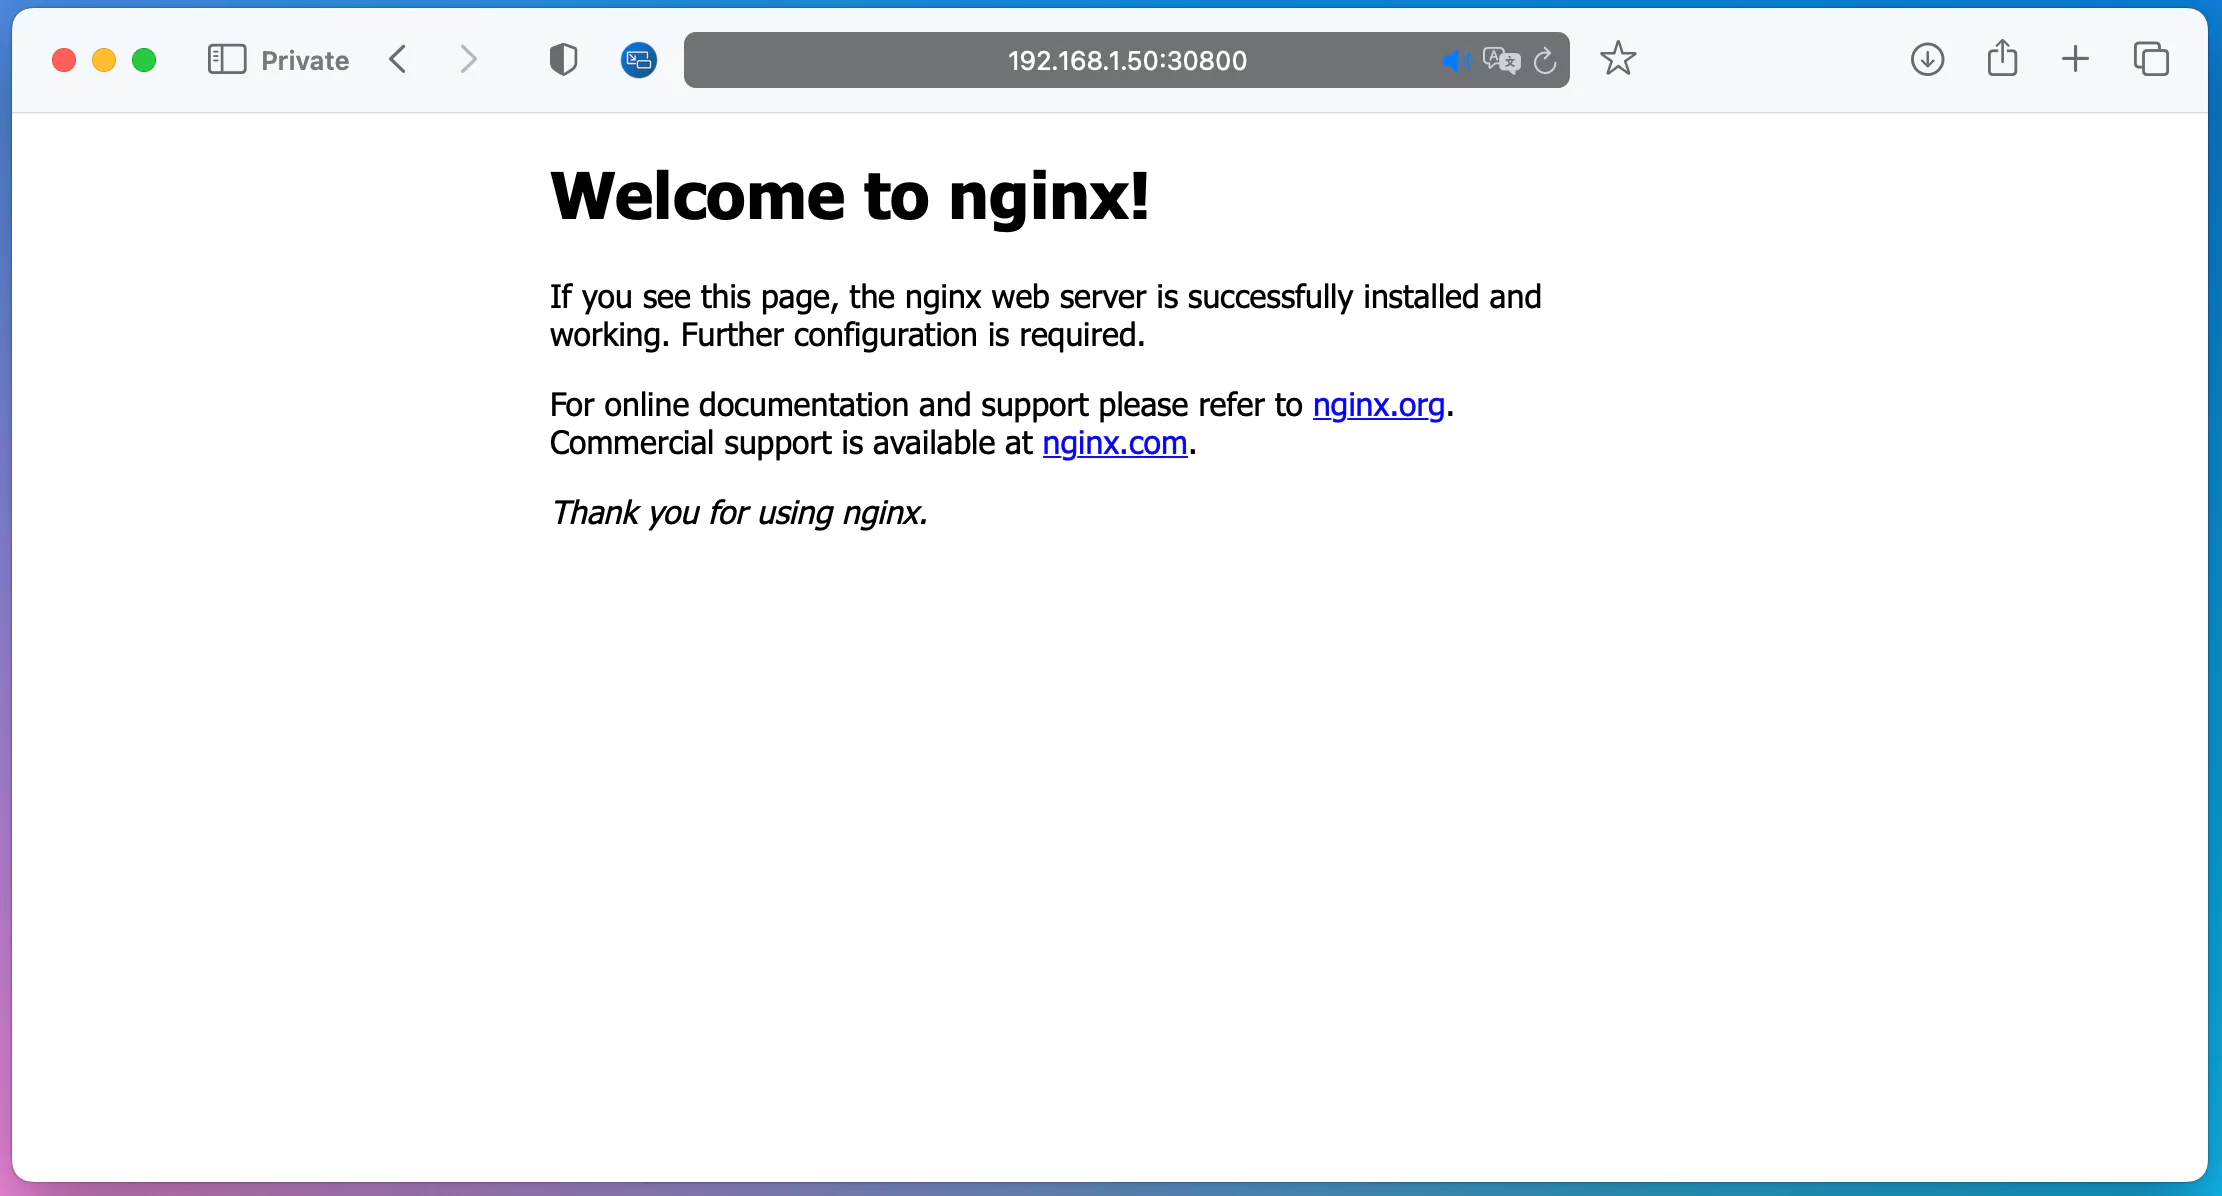
Find the device's IP on the Network tab of the Asset Detail page, then open a browser on any machine in the same network.
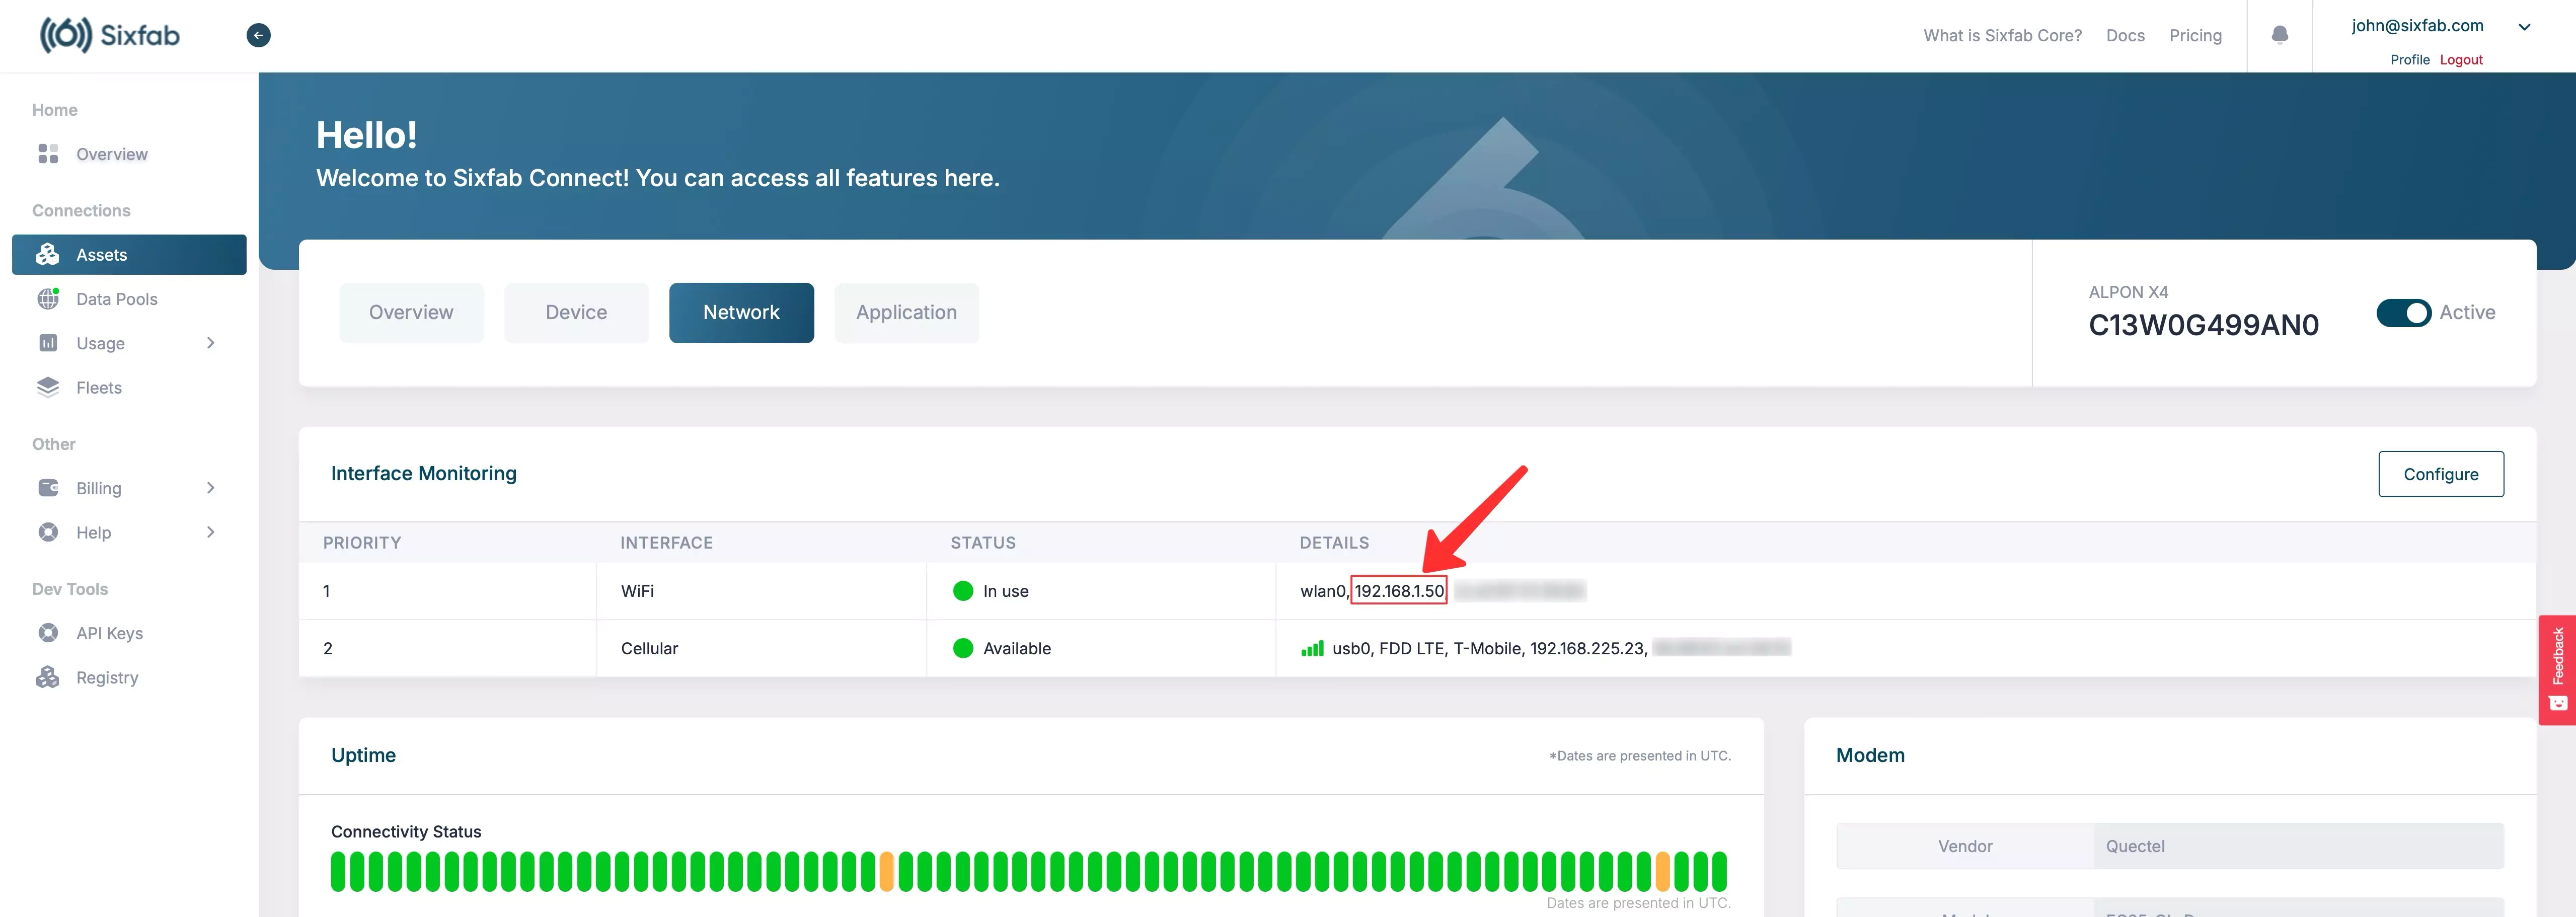
# Replace <device_ip> with the value from the Network tab
http://<device_ip>:30800
Access via the remote terminal
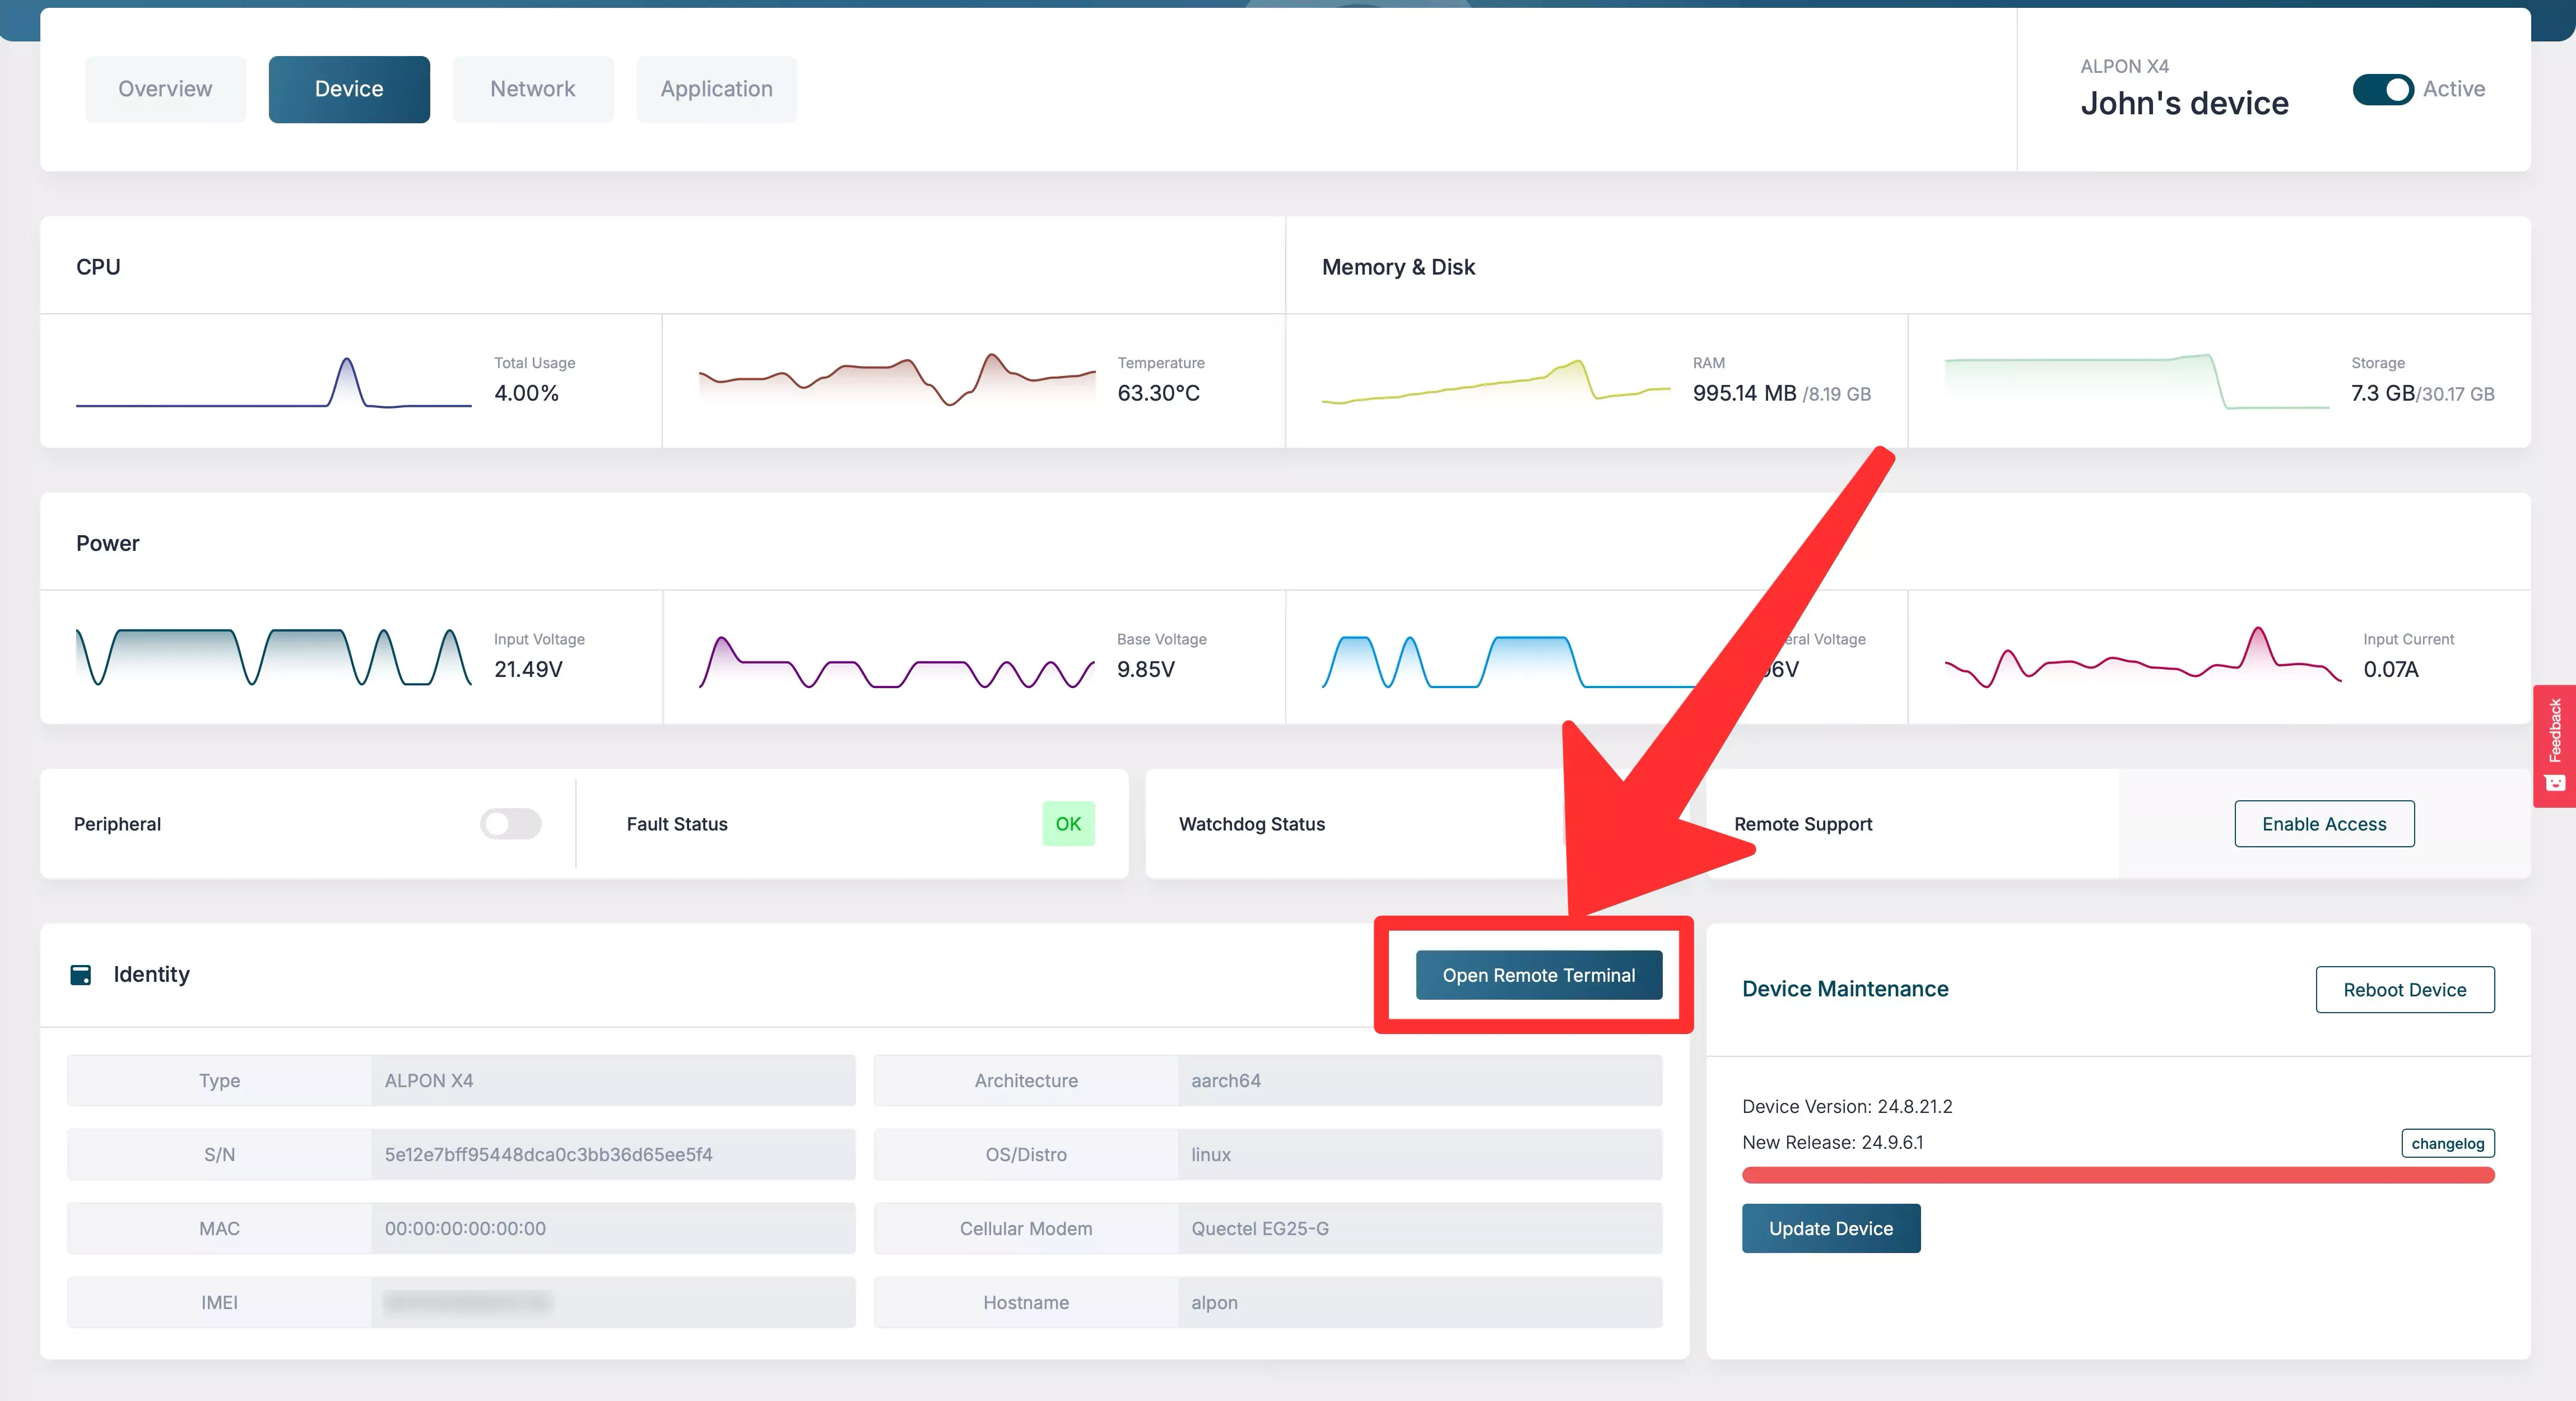
If the device is offsite or behind NAT, open the Device tab and click Open Remote
Terminal. The terminal session runs on the device itself, so 127.0.0.1 resolves to the
device.
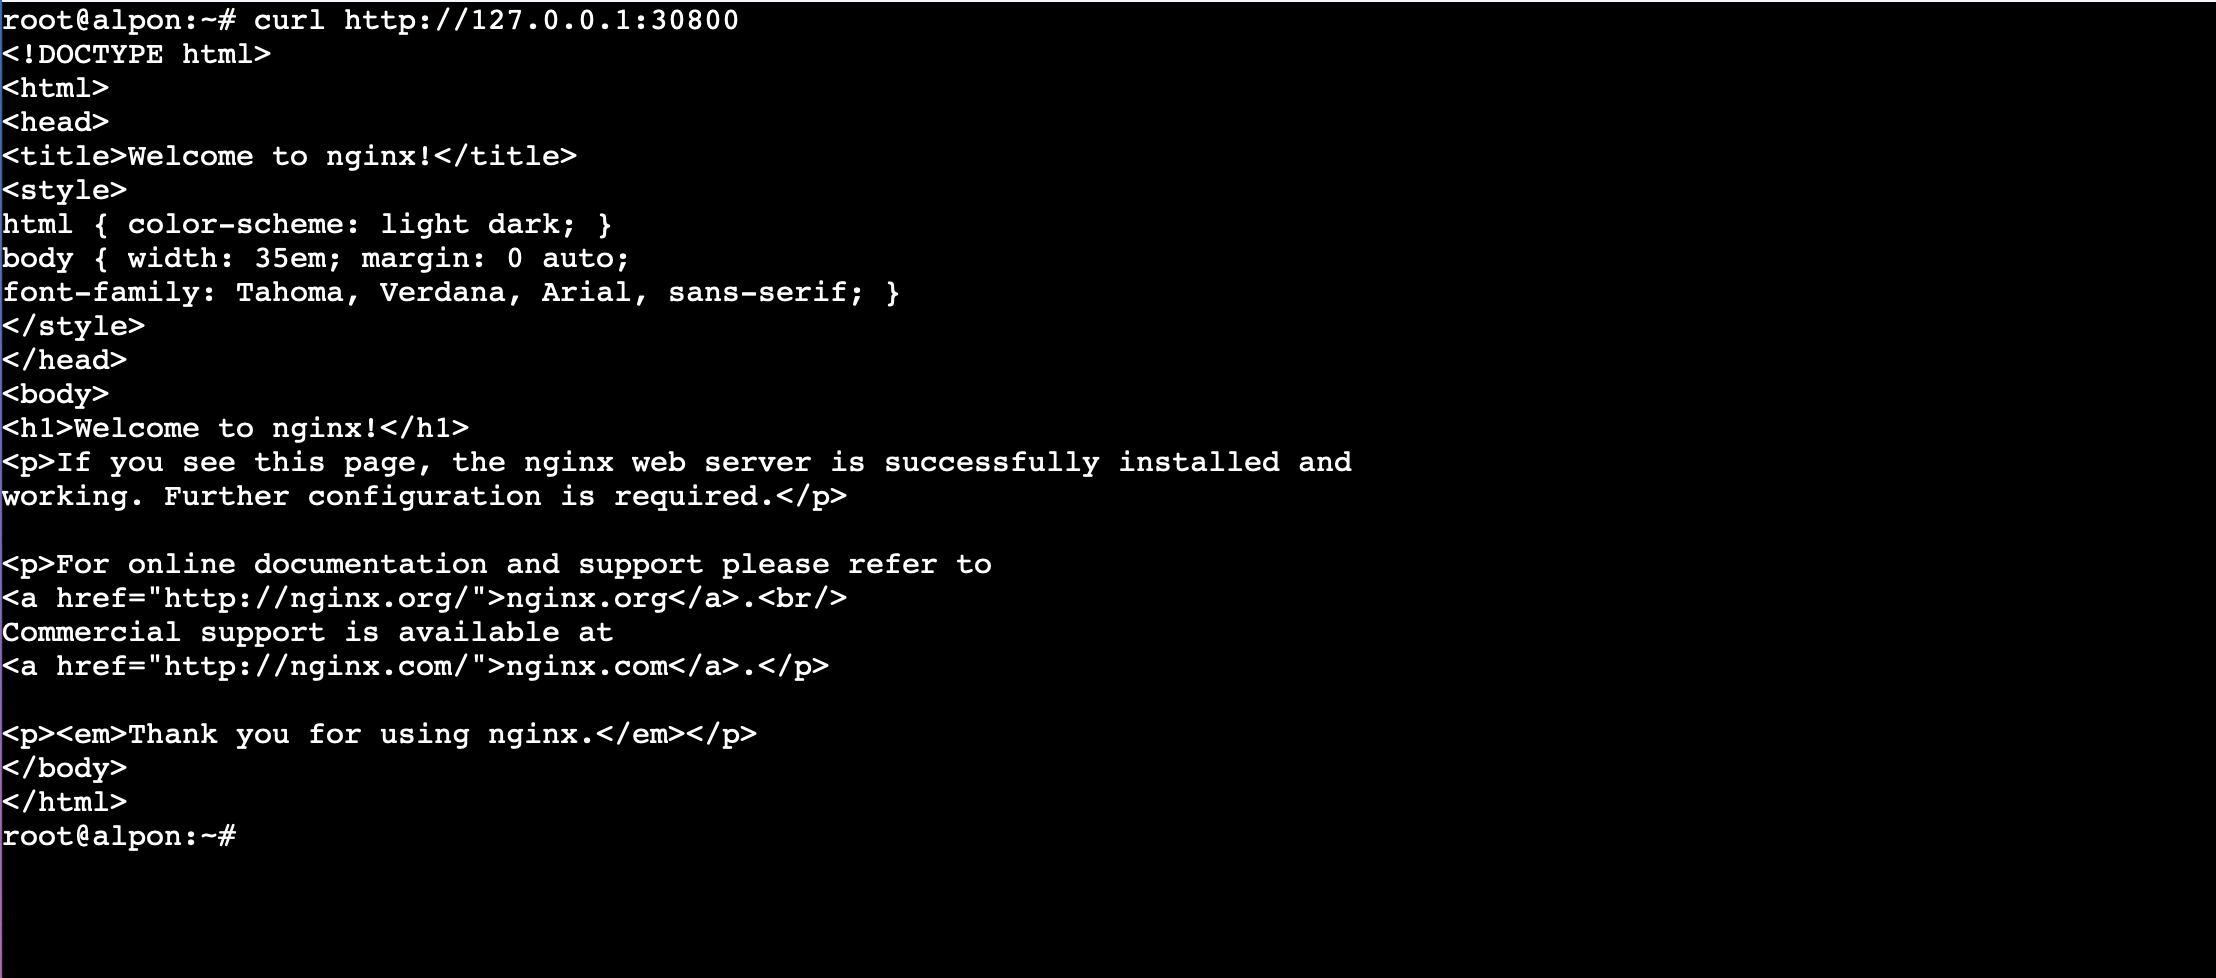
# 1. Verify the container is reachable on the device itself
curl http://127.0.0.1:30800

# <!DOCTYPE html>
# <html>
# <head><title>Welcome to nginx!</title>...
Access via a connected display
Connect a monitor to the device, open a browser locally, and navigate to http://127.0.0.1:30800.
Suitable for digital signage, kiosk dashboards, and on-device debugging.
Manage & lifecycle
Every running container exposes lifecycle controls in the Applications tab. Operations are issued from the cloud and applied as soon as the device receives the command.

Updating to a new image version
Two patterns work, depending on how you tag releases:
- Mutable tag (
:latest): push a new image with the same tag, then click Restart. The device pulls the new digest and recreates the container. - Immutable tag (
:v1.2.3): push a new tag, click Edit Deployment on the running container, change the image tag, and save. Recommended for production traceability.
Mutable tags like :latest make rollback impossible if a regression slips in. Tag every
release with an immutable identifier (semver, git SHA, or build number) and update deployments explicitly.
Rolling back to a previous version
Rollback uses the same Edit Deployment path, pointed at an older tag that is still in the Registry:
- Open Developer Tools → Registry, select the repository, and note the immutable tag of the last known-good build (e.g.
:v1.2.2). - On the device's Applications tab, click Edit Deployment on the running container.
- Change the image tag to that previous tag, leave the rest of the form unchanged, and save. The device pulls the older tag and recreates the container.
- Open Logs and confirm the container reaches a healthy start.
This works only while the previous tag still exists and has not been overwritten, which is why every release should carry its own immutable tag.
Logs & debug
Containerized applications write to stdout and stderr; ALPON captures both streams
and exposes them in the dashboard. For deeper inspection, open the container's Shell.
Stream logs from the dashboard
On the Applications tab, click Logs next to the container. The view tails the last 1000 lines and streams new output in real time. Use it to confirm startup, watch request traffic, or catch crash loops.
Inspect a running container
Open the container's Shell from its detail view in the dashboard to drop into an interactive
session. It uses the image's default shell (typically /bin/sh for Alpine, /bin/bash
for Debian-based images).
# 1. Inspect environment
env | grep -i DATABASE

# 2. Tail application log files written inside the container
tail -f /var/log/app.log

# 3. Check listening ports
netstat -tlnp 2>/dev/null || ss -tlnp
Use the device terminal for Docker-level operations
The Shell session runs inside the container. To inspect Docker itself (image cache, volumes, networks), open the Remote Terminal on the Device tab.
# 1. List running containers on the device
docker ps

# 2. Inspect a specific container's runtime config
docker inspect <container_name>

# 3. View resource usage live
docker stats
CI/CD integration
The Sixfab Container Registry is a standard OCI registry, so any CI system that can run Docker can build and
push to it. Both examples below register the ARM emulator before building: hosted runners are x86_64, and an
arm64 build without binfmt registered fails with exec format error.
GitHub Actions: build & push to Sixfab Registry
Store the registry password in repository secrets as SIXFAB_REGISTRY_PASSWORD and your username
as SIXFAB_REGISTRY_USERNAME.
name: Build and push to Sixfab Registry

on:
  push:
    tags: ['v*']

jobs:
  build:
    runs-on: ubuntu-latest
    steps:
      - uses: actions/checkout@v4

      - name: Set up QEMU (arm64 emulation)
        uses: docker/setup-qemu-action@v3
        with:
          platforms: arm64

      - name: Set up Docker Buildx
        uses: docker/setup-buildx-action@v3

      - name: Log in to Sixfab Registry
        uses: docker/login-action@v3
        with:
          registry: cr.sixfab.io
          username: ${{ secrets.SIXFAB_REGISTRY_USERNAME }}
          password: ${{ secrets.SIXFAB_REGISTRY_PASSWORD }}

      - name: Build and push (linux/arm64)
        uses: docker/build-push-action@v5
        with:
          context: .
          platforms: linux/arm64
          push: true
          tags: |
            cr.sixfab.io/${{ secrets.SIXFAB_REGISTRY_USERNAME }}/my-app:${{ github.ref_name }}
            cr.sixfab.io/${{ secrets.SIXFAB_REGISTRY_USERNAME }}/my-app:latest
          # The moving :latest tag is optional. Keep it only if you use the Restart-based rollout below.
GitLab CI example
build_arm64:
  image: docker:24
  services: [docker:24-dind]
  before_script:
    - echo "$SIXFAB_REGISTRY_PASSWORD" | docker login cr.sixfab.io \
        -u "$SIXFAB_REGISTRY_USERNAME" --password-stdin
  script:
    - docker run --privileged --rm tonistiigi/binfmt --install arm64
    - docker buildx create --use
    - docker buildx build --platform linux/arm64 \
        -t cr.sixfab.io/$SIXFAB_REGISTRY_USERNAME/my-app:$CI_COMMIT_TAG \
        --push .
Triggering deployment from CI
Pushing a new tag does not automatically redeploy running containers. For automated rollout you have two choices:
- Edit Deployment from the dashboard after CI publishes the new tag. Suitable for staged or manual rollouts.
- Use mutable tags (
:latest) plus the Restart action. CI overwrites:latest, then Restart the container from the device's Applications tab to force a fresh pull. That restart step is manual: there is no documented ALPON Cloud API endpoint for restarting a container. Sacrifices traceability for speed.
Troubleshooting
Common failure modes and their fixes.
Image
Image fails to start with "exec format error"
Cause
The image was built for linux/amd64 instead of linux/arm64. ALPON runs on ARM64 (Raspberry Pi CM5 or CM4) and cannot execute x86 binaries.
Fix
Rebuild with docker buildx build --platform linux/arm64 (on an x86 host, register the emulator first: docker run --privileged --rm tonistiigi/binfmt --install arm64). Confirm the result with docker buildx imagetools inspect <image>, which prints the platform of every manifest in the image; the listing must include linux/arm64.
Auth
"unauthorized: authentication required" on push
Cause
The local Docker session is not authenticated against cr.sixfab.io, or the password has been reset since you last logged in.
Fix
Run docker login cr.sixfab.io --username <your_username> and paste a current password. Use Reset Password on the Registry page if you have lost it.
Port
Port already in use; cannot deploy on port 30800
Cause
Another container on the device is bound to the same host port. Each host port can be used by only one container at a time.
Fix
Pick a different port within 30000–32767 (e.g. 30900), or stop / edit the conflicting container first.
Network
Pull stuck or extremely slow over cellular
Cause
Large images over cellular links (especially uncompressed AI model weights) can take many minutes per layer. Large layers over cellular simply take time — the pull is usually still progressing rather than stuck.
Fix
Minimize image size with multi-stage builds, .dockerignore, and slim base images. For first-time provisioning of large images, attach the device to Wi-Fi or Ethernet temporarily; subsequent updates only transfer changed layers.
Quota
Quota exceeded on push (10 GB / 100 tags)
Cause
The registry account has hit the default storage or tag-count quota.
Fix
Delete unused tags or whole repositories from the Registry page. Images currently in use by a deployed device are protected and cannot be deleted; stop the deployment first. To ask for a quota increase, contact Sixfab.
Runtime
Container starts then exits immediately
Cause
The application crashed during startup or the entrypoint completed without keeping the process alive.
Fix
Open Logs on the container to see the exit reason. Common cases: missing environment variable, invalid config file path, port already bound inside the container, missing volume source on the device. Fix and use Edit Deployment to relaunch.
Updated 5 days ago