
Build Your Own Secure VPN
Learn how to create a secure, private VPN using the ALPON X4 and WireGuard with this easy-to-follow guide. Set up your network step-by-step and connect confidently from anywhere.
Welcome to this step-by-step guide for setting up your very own Virtual Private Network (VPN) using the ALPON X4 and WireGuard. Whether you’re securing your internet connection or creating a private network for remote access, the ALPON X4 offers a powerful and flexible solution. In this tutorial, we’ll walk you through everything you need to know—from preparing your tools to connecting your devices—without overwhelming you with technical jargon.
A quick heads-up: Avoid using the subnets 100.0.0.0/16 and 10.42.0.0/24 for your VPN setup, as these are reserved for the ALPON X4’s default applications. We’ll use custom subnets instead to keep things running smoothly.
What You’ll Need to Get Started
Before diving in, let’s make sure you have everything ready. Here’s what you’ll need:
Docker: You’ll need Docker installed on your computer to build and manage the VPN container. If you don’t have it yet, grab it from the official Docker website. It’s free and easy to set up.
Forward Port on Your Router: If your ALPON X4 is behind a router (like most home setups), forward port 22222 from your router to the ALPON X4. Check your router’s manual for instructions. This step ensures your VPN is accessible from outside your network.
Set Up a Domain Name: To access your VPN from outside your network, you'll need a domain name or dynamic DNS (DynDNS) service. This allows connection even when your public IP address changes. Try these popular options:
Step 1: Generate Your Client Keys
For Linux Users
- Install WireGuard Tools: Open your terminal and run these commands to get the tools you need:
sudo apt-get update
sudo apt-get install wireguard-tools- Generate Private Key and Public Key:
wg genkey | tee client-private.key | wg pubkey > client-public.keyThis command generates client-private.key (private key) and client-public.key (public key) files.
- Generate Pre-Shared Key (PSK):
wg genpsk > client.pskThis command generates the client.psk file.
- What You’ll Have
client-private.key: Client's private key (keep it safe!).client-public.key: Client's public key (share this with the server).client.psk: Pre-shared key (PSK).
For macOS Users
- Install WireGuard Tools: Use Homebrew (a macOS package manager) by running:
brew install wireguard-tools- Generate Private Key and Public Key:
wg genkey | tee client-private.key | wg pubkey > client-public.keyThis command generates client-private.key (private key) and client-public.key (public key) files.
- Generate Pre-Shared Key (PSK):
wg genpsk > client.pskThis command generates the client.psk file.
- What You’ll Have
The same three files: client-private.key, client-public.key, and client.psk.
For Windows Users
Windows doesn’t support WireGuard tools directly in the command line, but you’ve got two easy options:
Option 1: Use the WireGuard App
- Install WireGuard: Download and install the Windows application from the WireGuard official website
- Generate Private Key and Public Key: Open a command prompt and run:
wg genkey > client-private.key
type client-private.key | wg pubkey > client-public.key- Generate Pre-Shared Key (PSK): Run the following command to generate PSK:
wg genpsk > client.psk- What You’ll Have
The same three files: client-private.key, client-public.key, and client.psk.
Option 2: Use WSL (Windows Subsystem for Linux)
If you prefer, install WSL and follow the Linux steps above—perfect for tech-savvy users!
Step 2: Set Up the WireGuard Server with Docker
Now, let’s configure the ALPON X4 as your VPN server using a Docker container.
The following Dockerfile sets up a WireGuard VPN server. The server will use the client's public key (CLIENT_PUBLIC_KEY) and pre-shared key (CLIENT_PSK) passed as environment variables.
Here’s the Dockerfile you’ll use:
FROM alpine:latest

RUN apk update && apk add wireguard-tools wireguard-tools-wg-quick bash gettext
RUN mkdir -p /etc/wireguard
WORKDIR /etc/wireguard
RUN umask 077

# Generate server keys
RUN wg genkey | tee server.key | wg pubkey > server.pub

# Create WireGuard server configuration template
RUN echo "[Interface]" > /etc/wireguard/wg0.conf.template && \
    echo "Address = 10.200.0.1/24, fd09:4722::1/64" >> /etc/wireguard/wg0.conf.template && \
    echo "ListenPort = 22222" >> /etc/wireguard/wg0.conf.template && \
    echo "PrivateKey = $(cat server.key)" >> /etc/wireguard/wg0.conf.template && \
    echo "[Peer]" >> /etc/wireguard/wg0.conf.template && \
    echo "PublicKey = \${CLIENT_PUBLIC_KEY}" >> /etc/wireguard/wg0.conf.template && \
    echo "PresharedKey = \${CLIENT_PSK}" >> /etc/wireguard/wg0.conf.template && \
    echo "AllowedIPs = 10.200.0.2/32, fd09:4722::2/128" >> /etc/wireguard/wg0.conf.template

# Set the command to generate the config and start WireGuard
CMD sh -c "envsubst < /etc/wireguard/wg0.conf.template > /etc/wireguard/wg0.conf && \
           wg-quick up /etc/wireguard/wg0.conf && \
           sleep infinity"
Build and Deploy the Container
-
Build the Docker image: Open a terminal on your computer, navigate to the folder with your Dockerfile and run:
docker buildx build --platform linux/arm64 -t private-network:latest ./ -
Push your image to Sixfab Registry: Log in to the Sixfab Connect platform, navigate to the Sixfab Registry page. Click on + Add Container and follow the prompts to push container to Sixfab registry.\
Manage and Deploy ApplicationsVisit the Manage & Deploy Applications page for all the necessary details on pushing your container image to the Sixfab Registry.
-
Deploy Container:
Once the container image is uploaded to the Sixfab Connect registry, deploy it as follows:
- Go to the Application section of your asset on Sixfab Connect.
- Click the + Deploy button to configure and deploy the container.
- In the Deploy Container window, use the following settings:
- Container Name: Enter the application name (e.g., "private-network").
- Image: Select the your container image and tag pushed to the Sixfab Registry.
- Environment: Set
CLIENT_PSKandCLIENT_PUBLIC_KEYenvironment variables with your client’s values. - Enable “Host Network” and “Privileged” option.
- Click the "+ Deploy" button to start running the container on ALPON X4.
Step 3: Get Server’s Public Key for Client Configuration
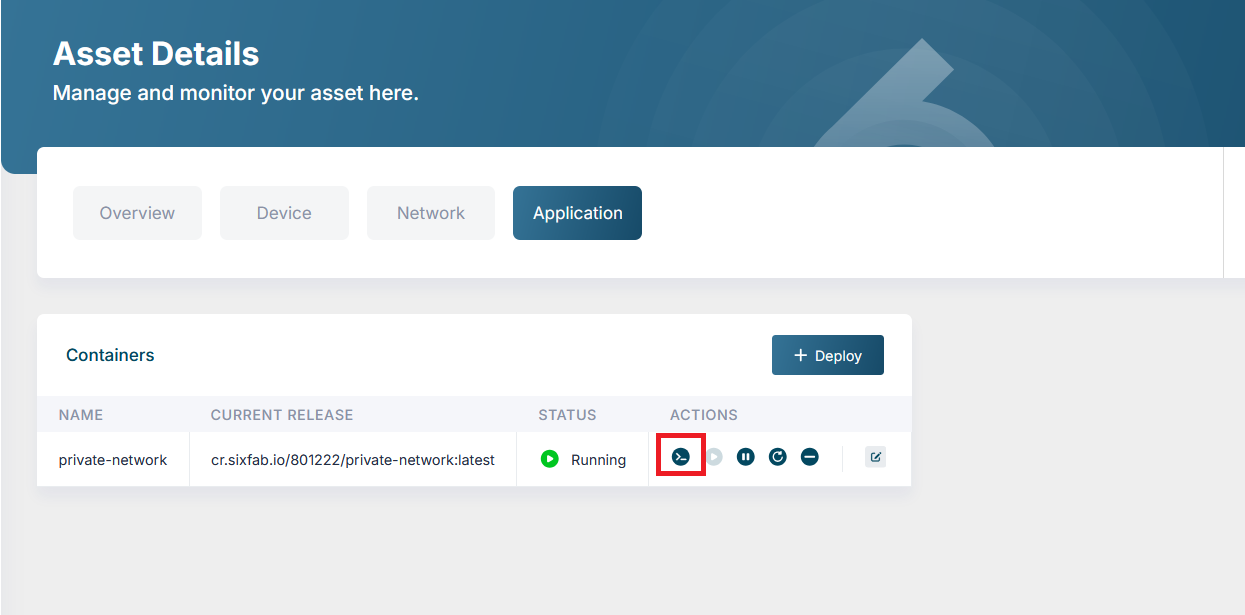
- After successfully deploying the
private-networkcontainer, access the container's shell using the button shown in the image below. Open the container’s shell (look for the shell button in the Sixfab dashboard).
- Then you can view the server's public key with the following code.
cat server.pub- Copy the output—this is your server-public-key.
Step 4: Configure Your Client
The client must create its own configuration file (client.conf) using the server's public key and the pre-shared key (PSK). Here’s an example configuration:
[Interface]
Address = 10.200.0.2/32, fd09:4722::2/128
DNS = 1.1.1.1
PrivateKey = <client-private-key>

[Peer]
PublicKey = <server-public-key>
PresharedKey = <client-psk>
AllowedIPs = 10.200.0.1/32, fd09:4722::1/128
Endpoint = <your-public-ip-or-domain>:22222
PersistentKeepalive = 25
Replace the following placeholders:
<client-private-key>: The client's private key (fromclient-private.key).<server-public-key>: The server's public key (fromserver.pubinside the container).<client-psk>: The pre-shared key (fromclient.psk).<your-public-ip-or-domain>: The public IP or domain of the server.
Step 5: Connect to Your VPN
- Import the Config: On the client device, import the
client.conffile into the WireGuard app.
- Open the WireGuard app on your device.
- Click + > Import from file, then select client.conf.
- Activate the VPN: On the client device, activate the VPN connection.
- In the WireGuard app, toggle the switch to connect to the VPN.
- Verify the connection by checking the status in the app.
Step 6: Test Your Connection
Let’s make sure everything’s working by deploying a simple Nginx server on your ALPON X4:
Deploy Sample Nginx
-
Add New Application:
- Go to the "Applications" section and select “+ Deploy.”
- Set Application Name: Choose a name like "nginx-test."
-
Configure Image and Tag:
- Check “I would like to use my own path” setting on deployment screen and type:
nginx:latest
- Check “I would like to use my own path” setting on deployment screen and type:
-
Set Ports:
- Press the “+ Add More” button and fill in the port values given in the table below.
From To 31080 80 -
Deploy the Application:
- Click “Deploy” to start the application on your ALPON X4 device.
To verify that the client is connected, you can check http://10.200.0.1:31080 address with your browser. If you you are connected successfully, you need to see Nginx welcome screen on your browser.
Troubleshooting
Container Crashes and wg0 Interface Already Exists
wg0 Interface Already ExistsIf the Docker container crashes or is restarted, you may encounter an error because the wg0 interface is already defined on the host system. This happens when the container is stopped abruptly, and the interface is not properly cleaned up.
Error Message:
RTNETLINK answers: File existsSolution:
To resolve this issue, manually delete the wg0 interface using the following command on the ALPON X4:
sudo ip link del wg0Wrapping Up
By following this guide, you’ve successfully set up a private VPN using WireGuard inside a container. The client handles its own key generation and configuration, while the server uses the provided keys to establish the connection. For further assistance, refer to the WireGuard documentation.
Updated 3 months ago