
Deploying IoT Data Streams to Ubidots
This guide provides a step-by-step approach to integrating an edge device with Ubidots using MQTT in a containerized environment, enabling seamless real-time IoT data transmission and visualization.
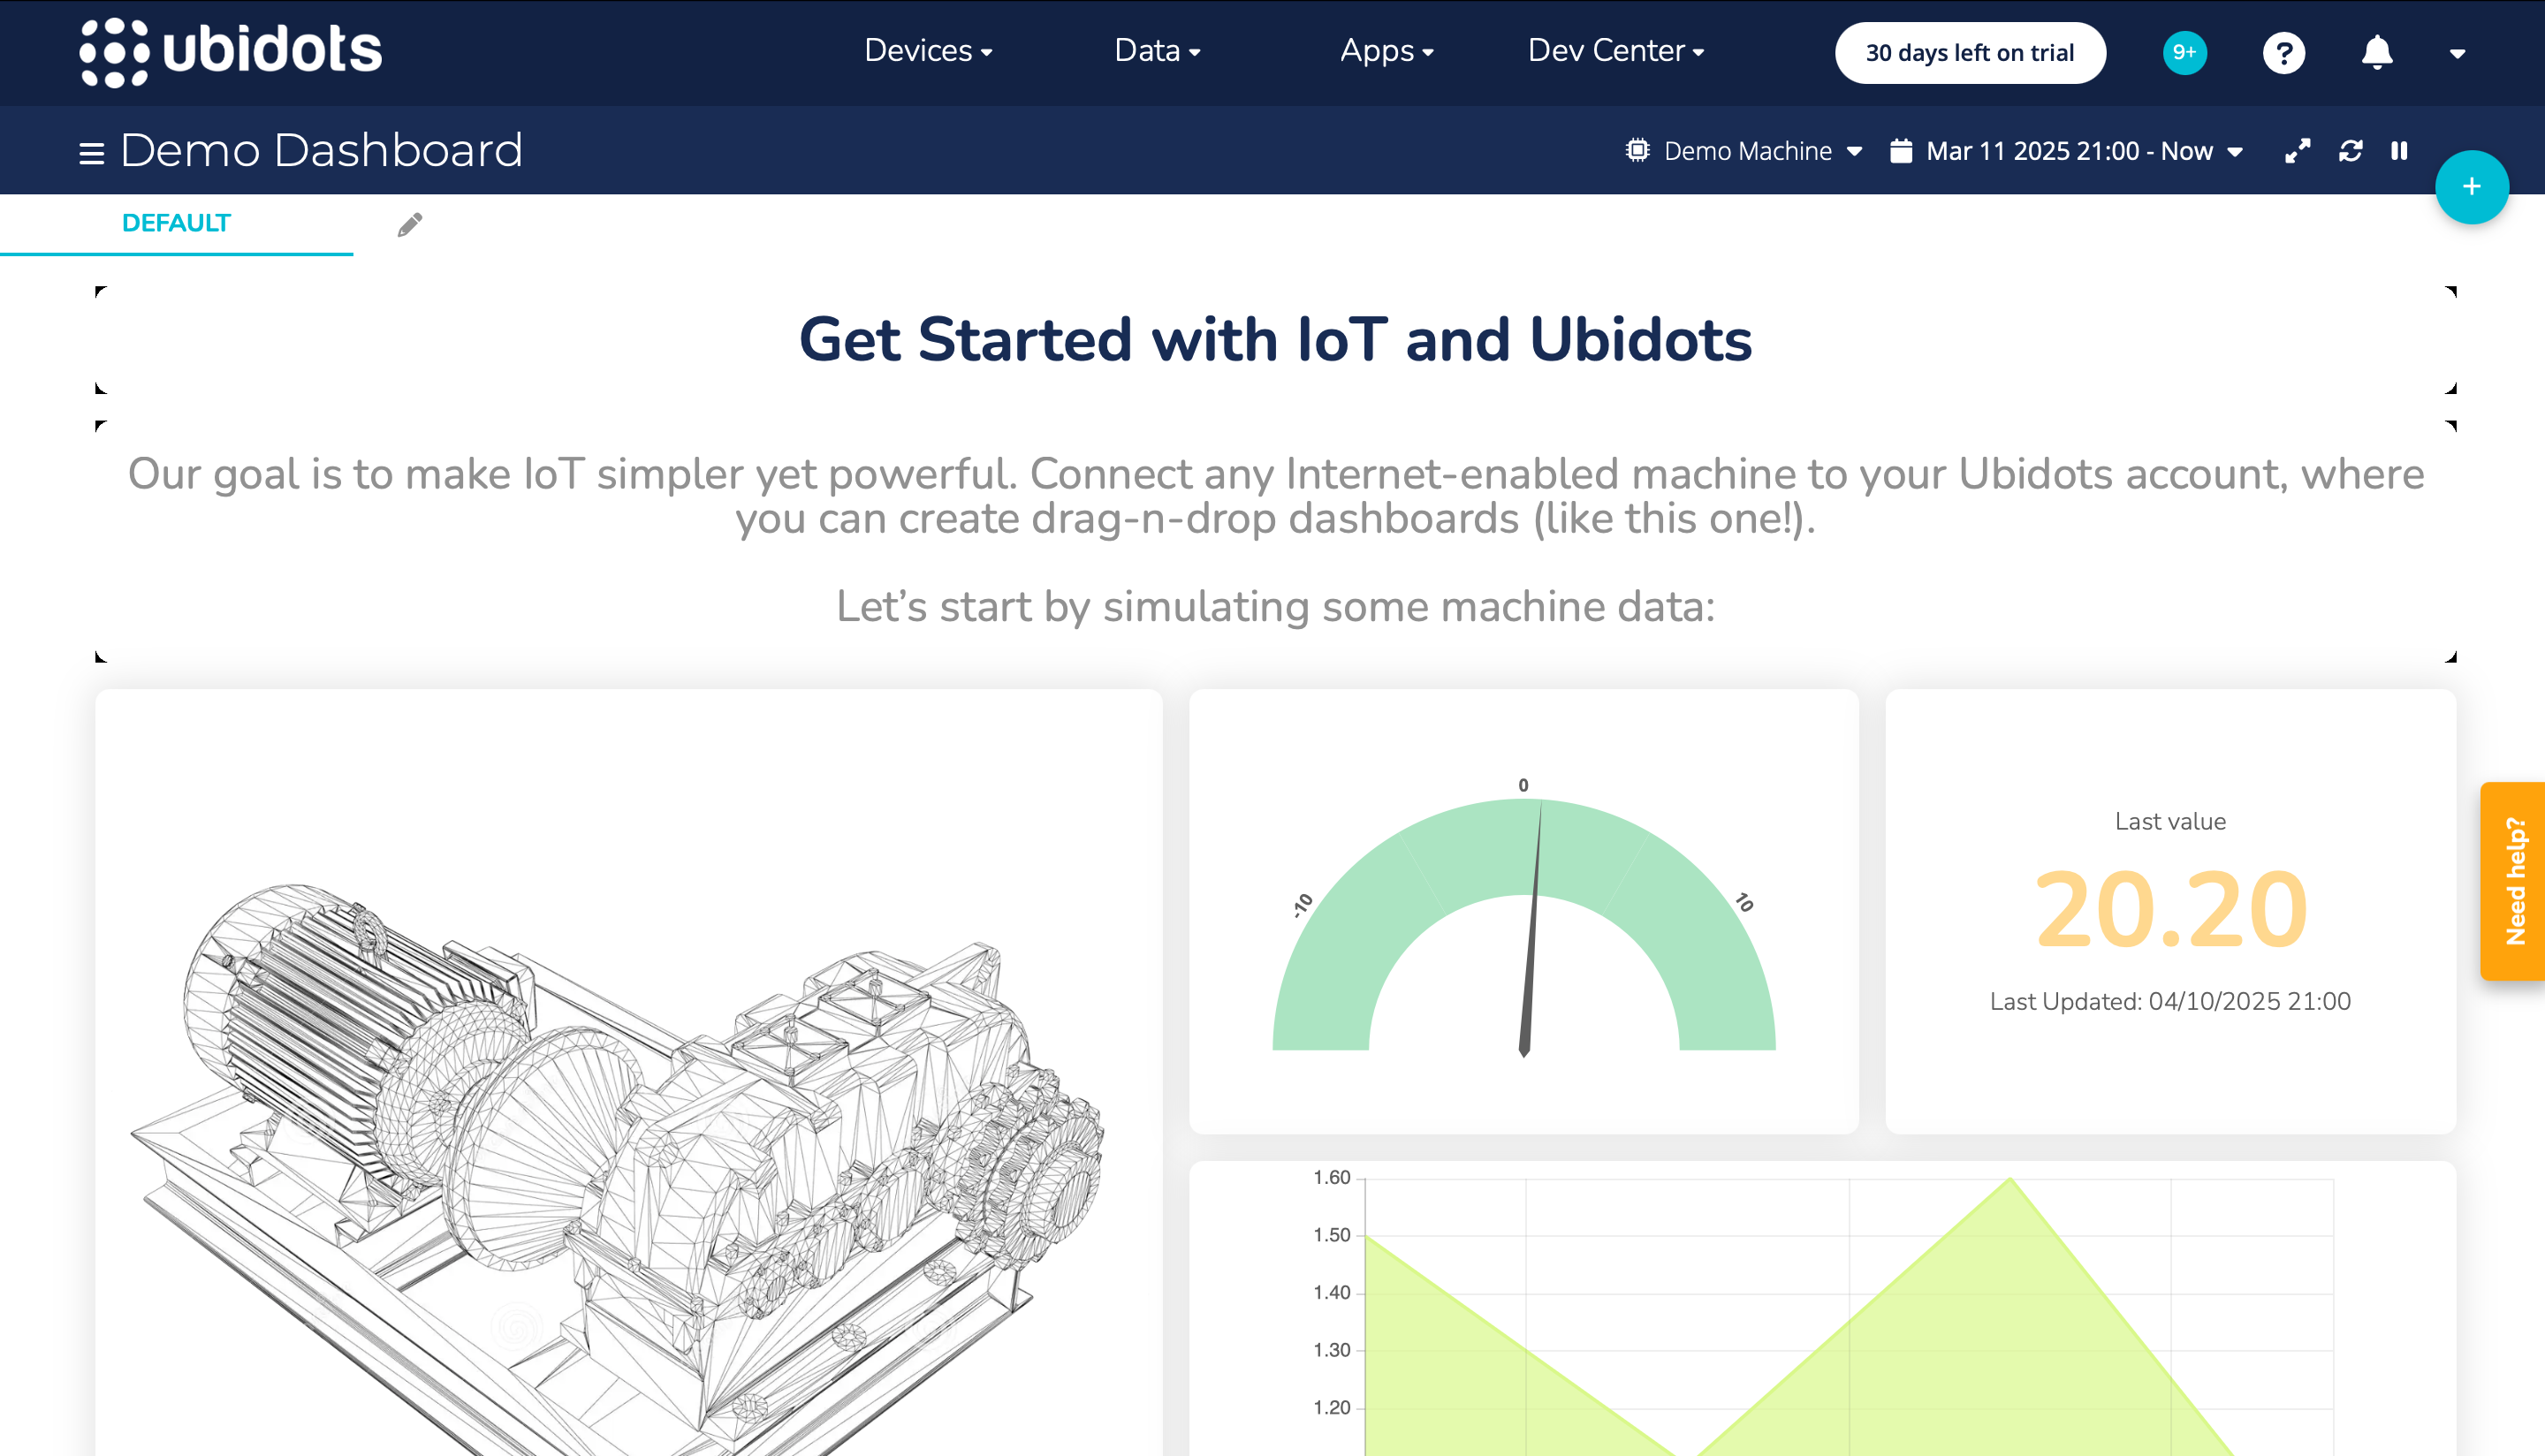
Imagine being able to monitor your IoT device’s data from anywhere in the world, with just a few clicks. Ubidots Web Dashboard makes this possible by providing a user-friendly way to collect, visualize, and analyze data in real time. In this guide, we will walk through the process of connecting ALPON X4 to Ubidots using MQTT, ensuring seamless data transmission in a containerized environment.
Getting Started
To ensure a smooth start, everything needed should be prepared beforehand. Here’s what’s required:
What You’ll Need
Ubidots is a powerful and user-friendly platform for managing IoT (Internet of Things) devices, visualizing data, and performing analytics. To integrate your ALPON X4 device with Ubidots, you first need to create a device on the platform. This device will represent the data sent by your ALPON X4 and allow you to visualize it through dashboards.
1. Log in to Your Ubidots Account
- Open your web browser and navigate to the Ubidots website.
- Sign in using your username and password. If you don’t have an account, you can create one for free.
- Once logged in, you’ll be directed to the Ubidots dashboard (control panel).
Note: Ubidots offers a free plan, but you can explore paid plans for additional features depending on your project’s needs.
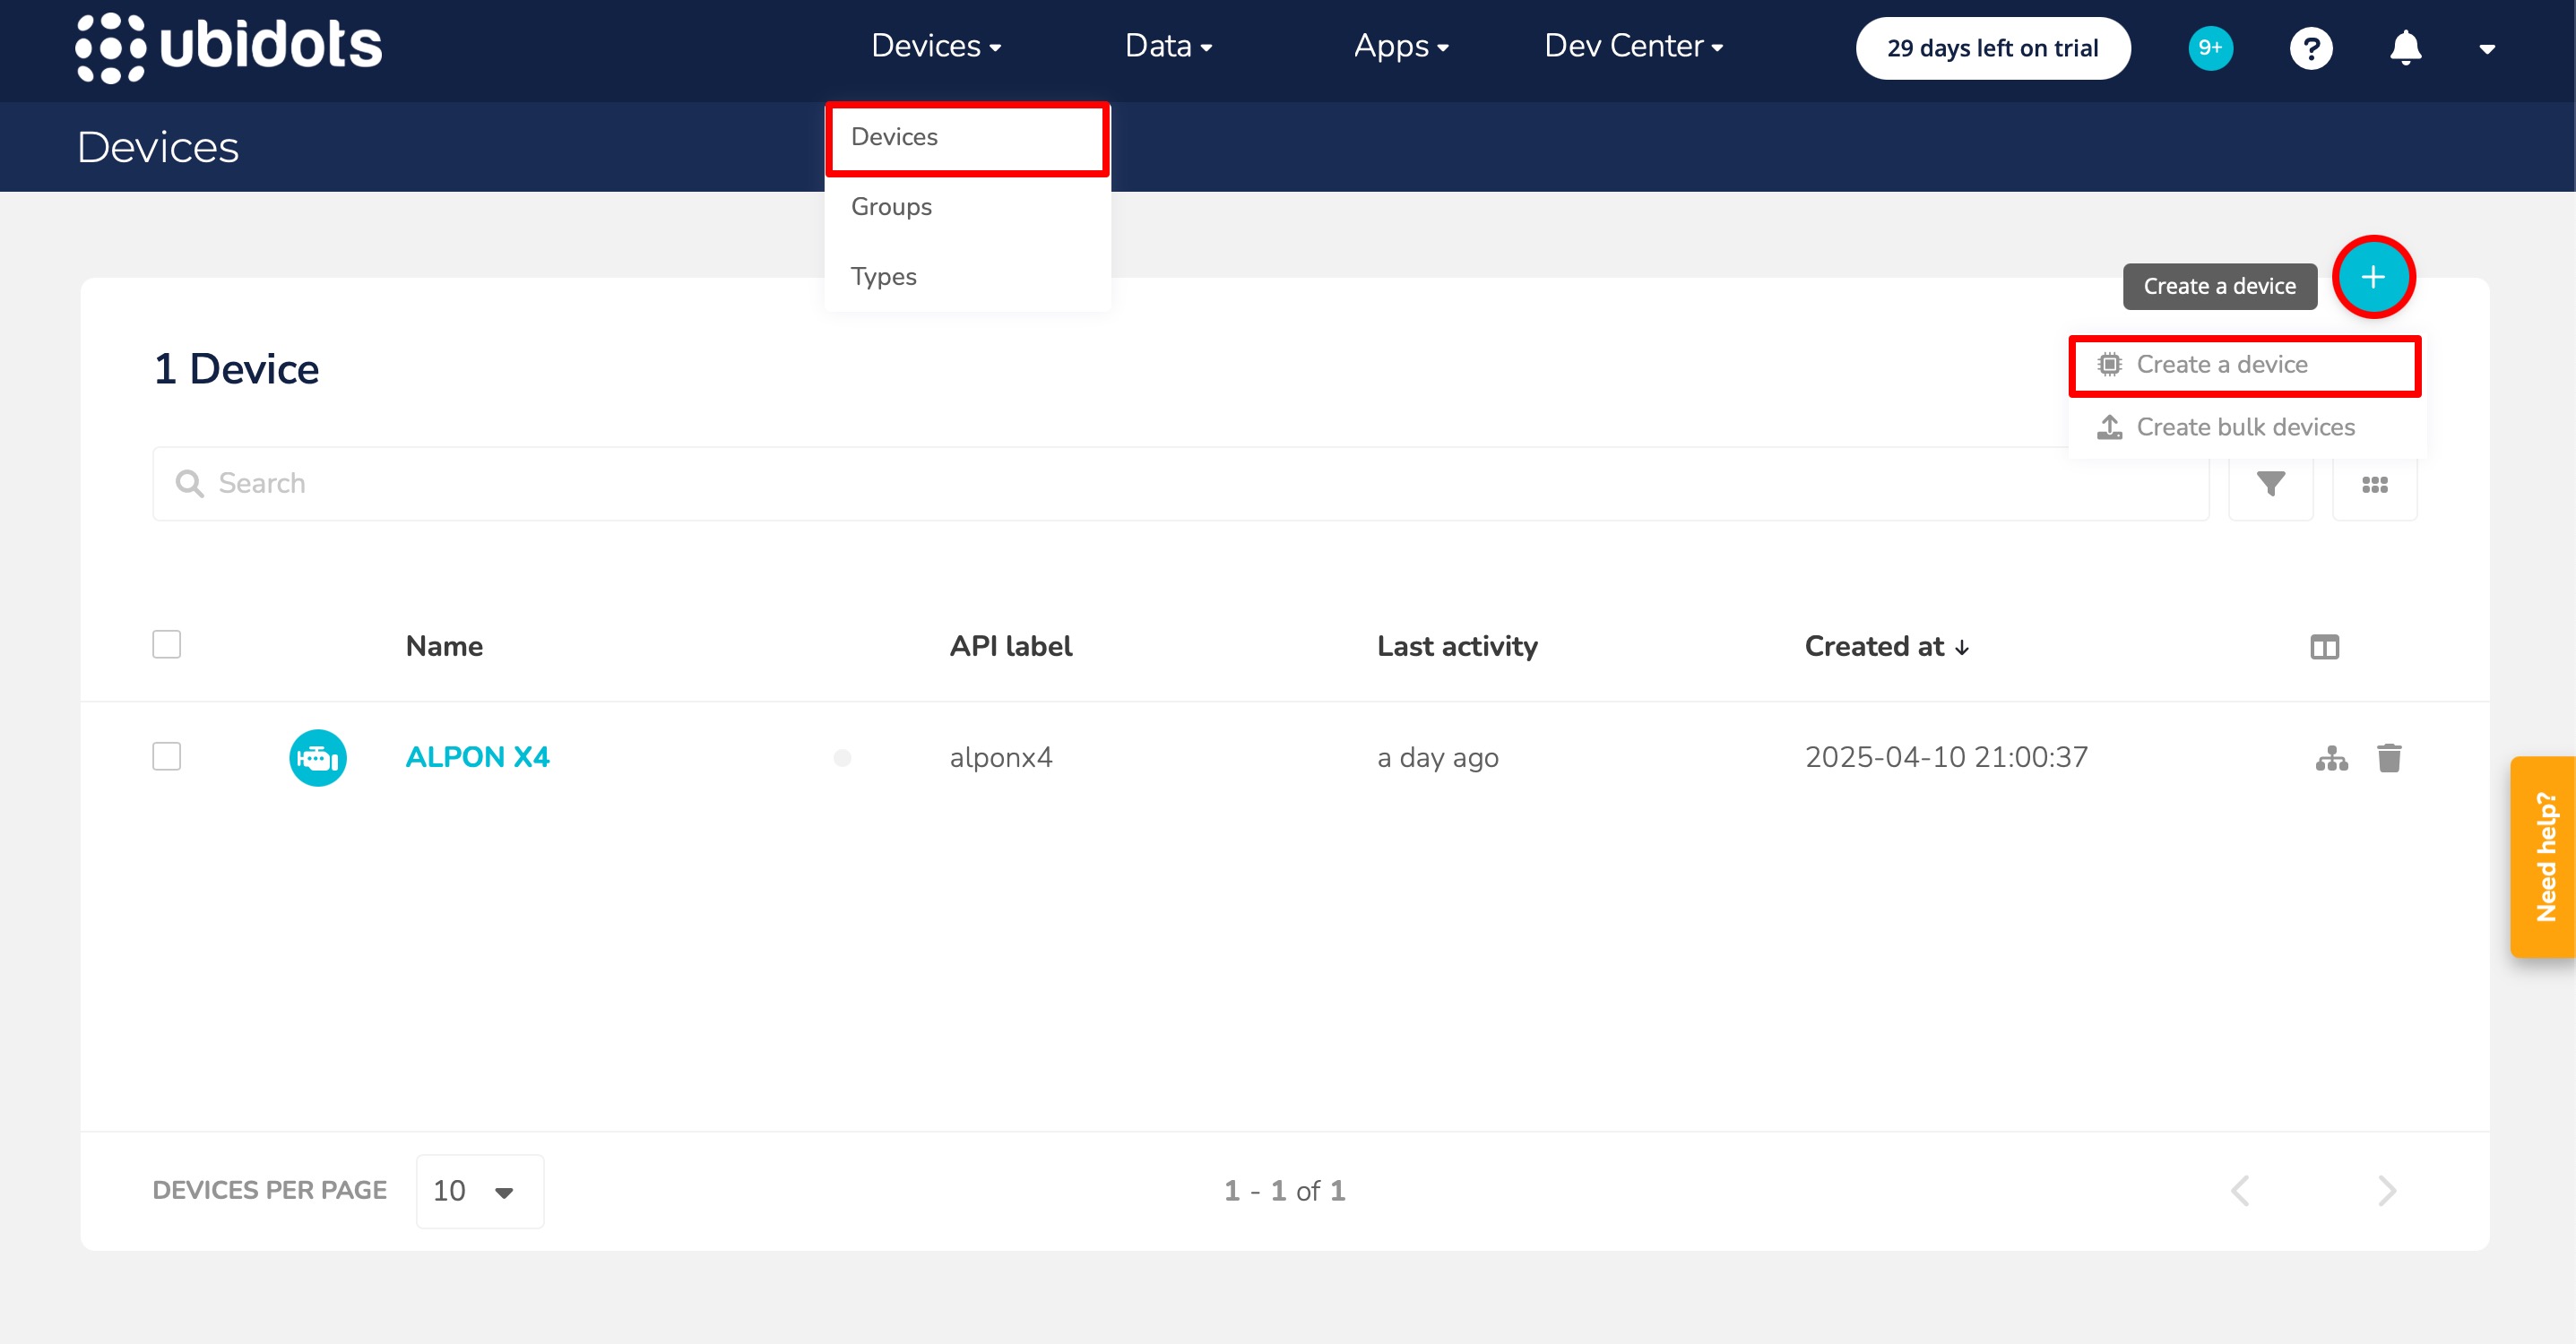
2. Navigate to the Devices Section
- In the Ubidots dashboard, locate the "Devices" tab in the top menu and click on it.
- This will take you to a page displaying any existing devices (if applicable). To create a new device, click the "Create Device" button or the "+" icon in the top-right corner.
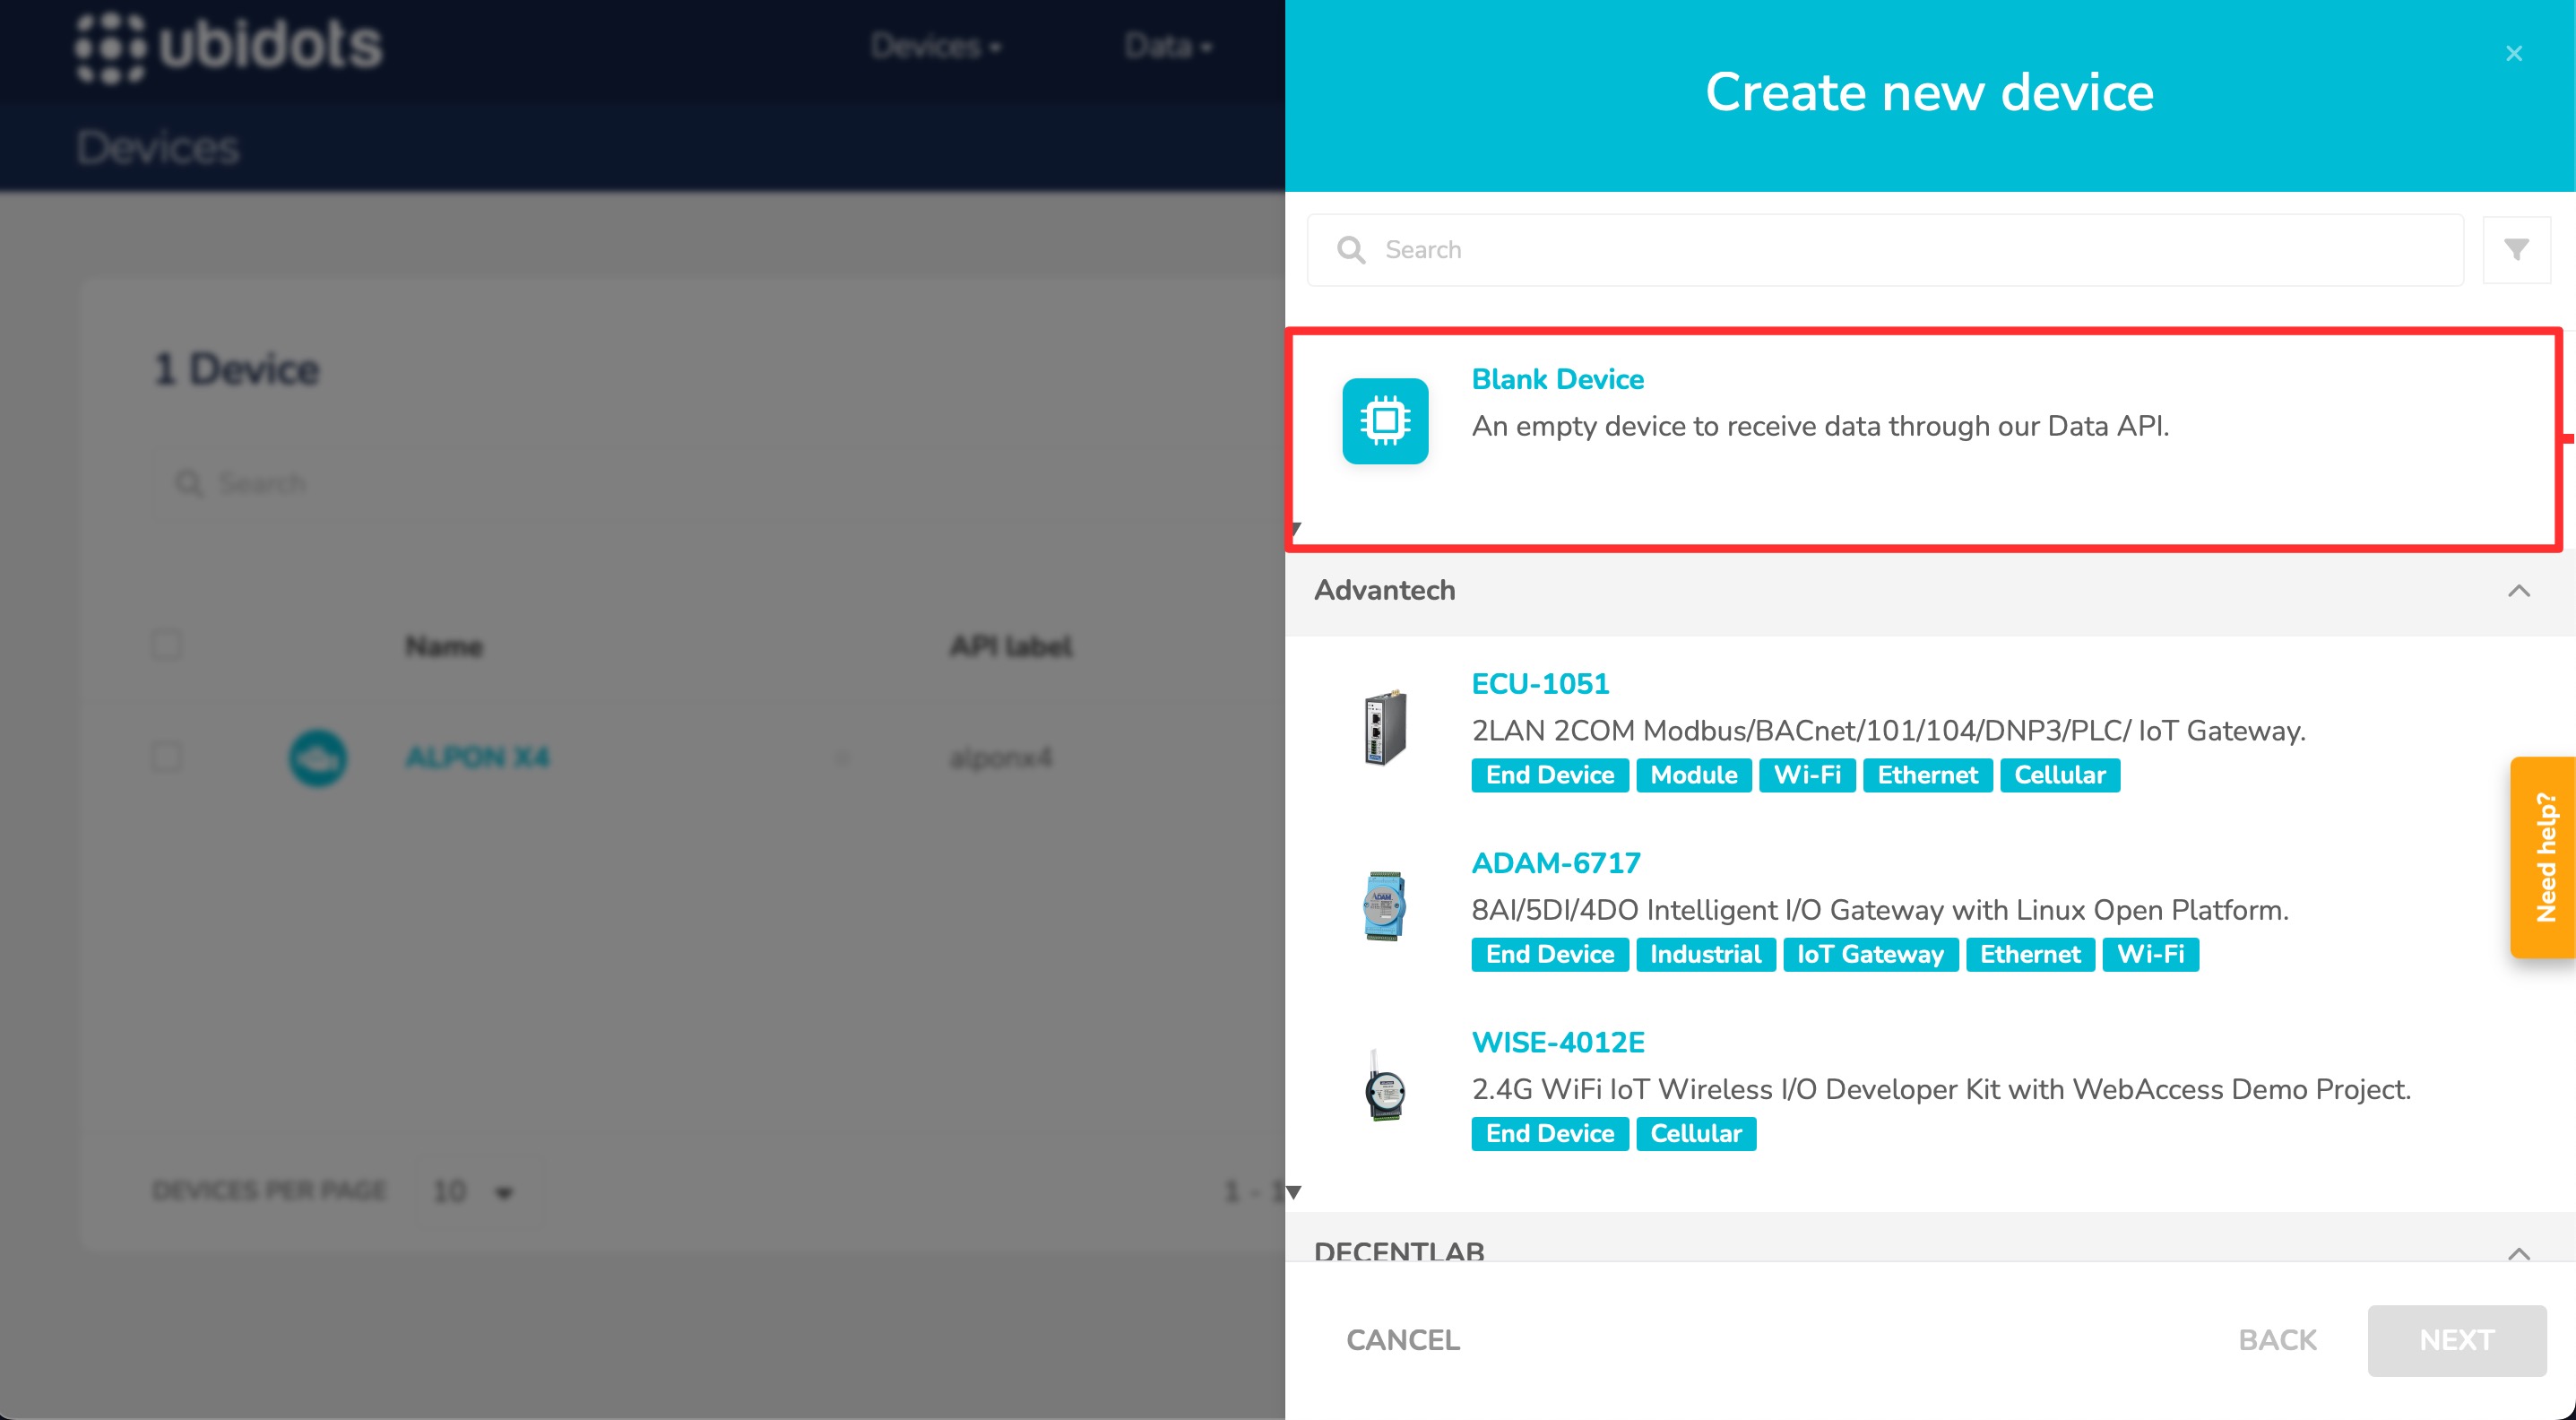
3. Select the Device Type
- After clicking "Create Device," Ubidots will prompt you to choose a device type. For your ALPON X4, select "Blank Device" since it allows you to send data without requiring a predefined template.
- Click on "Blank Device" and proceed.
Below is a step-by-step guide to creating a virtual device in Ubidots. For further details, you can refer to the official guide here: Ubidots Device Creation Guide.
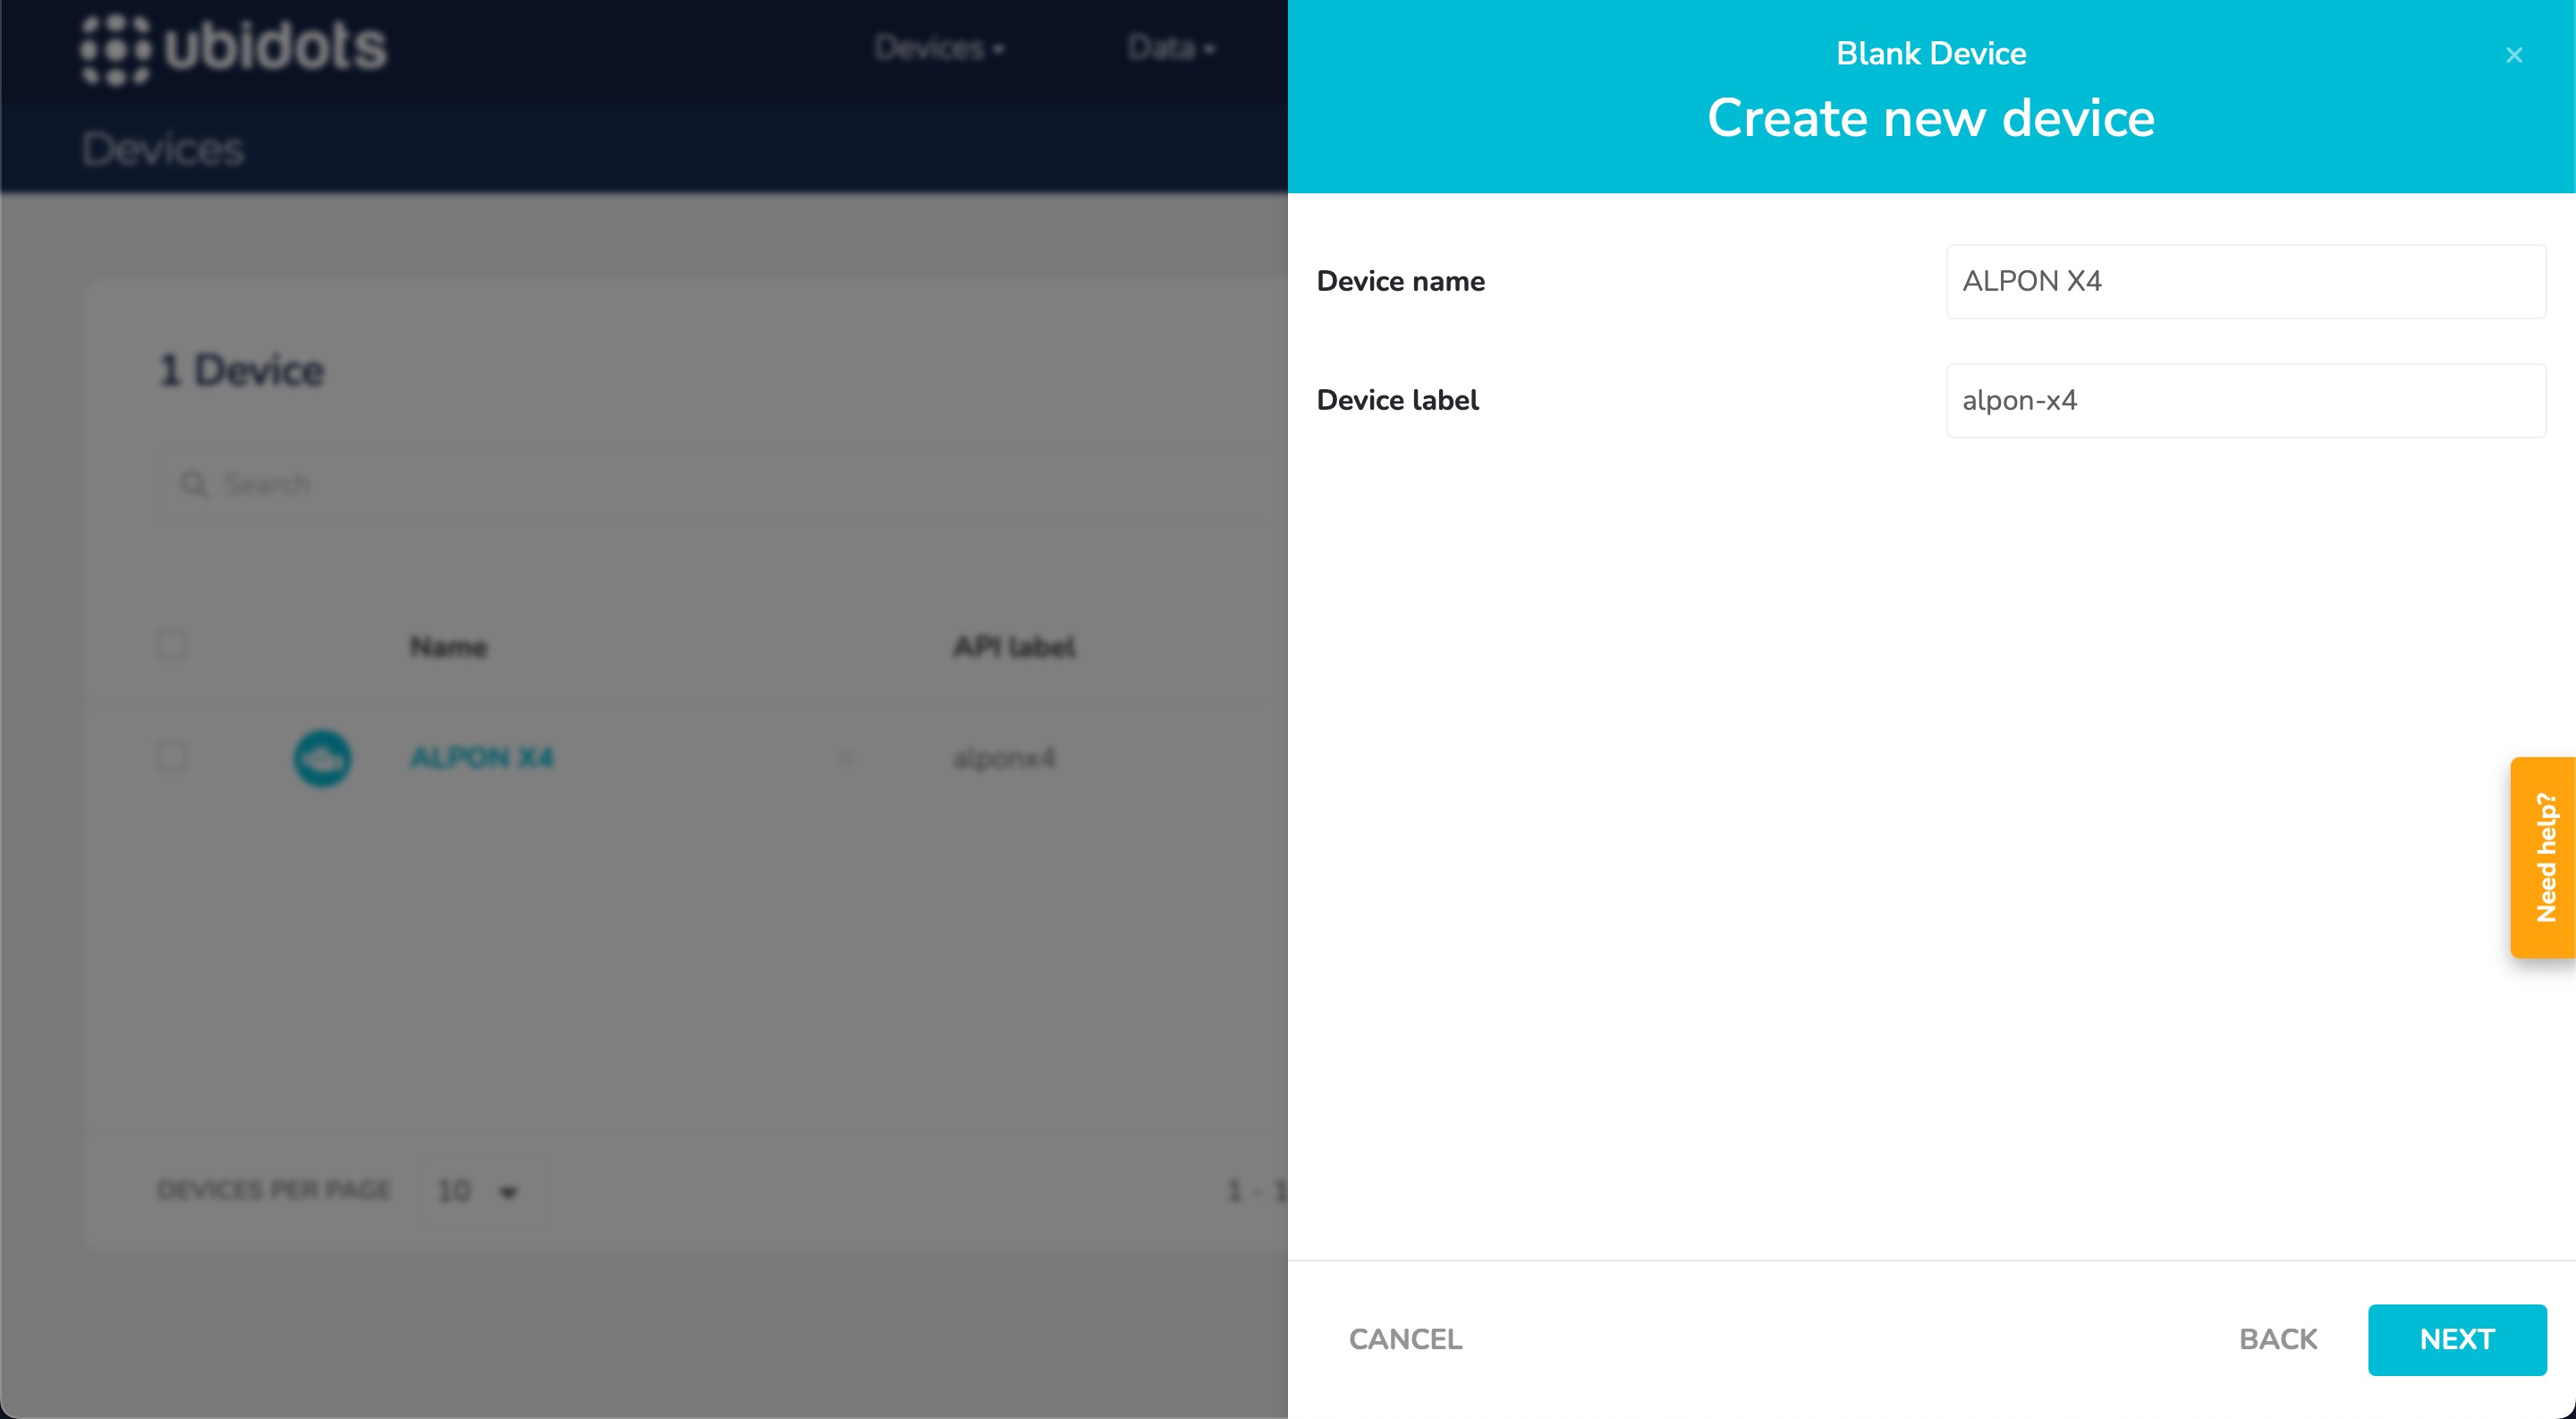
4. Enter Device Details
- In the form, name your device (e.g., "ALPON X4").
- Set a unique Device Label for API use (e.g., "alpon-x4"), which auto-generates but can be edited.
- Click "Next" to finish.
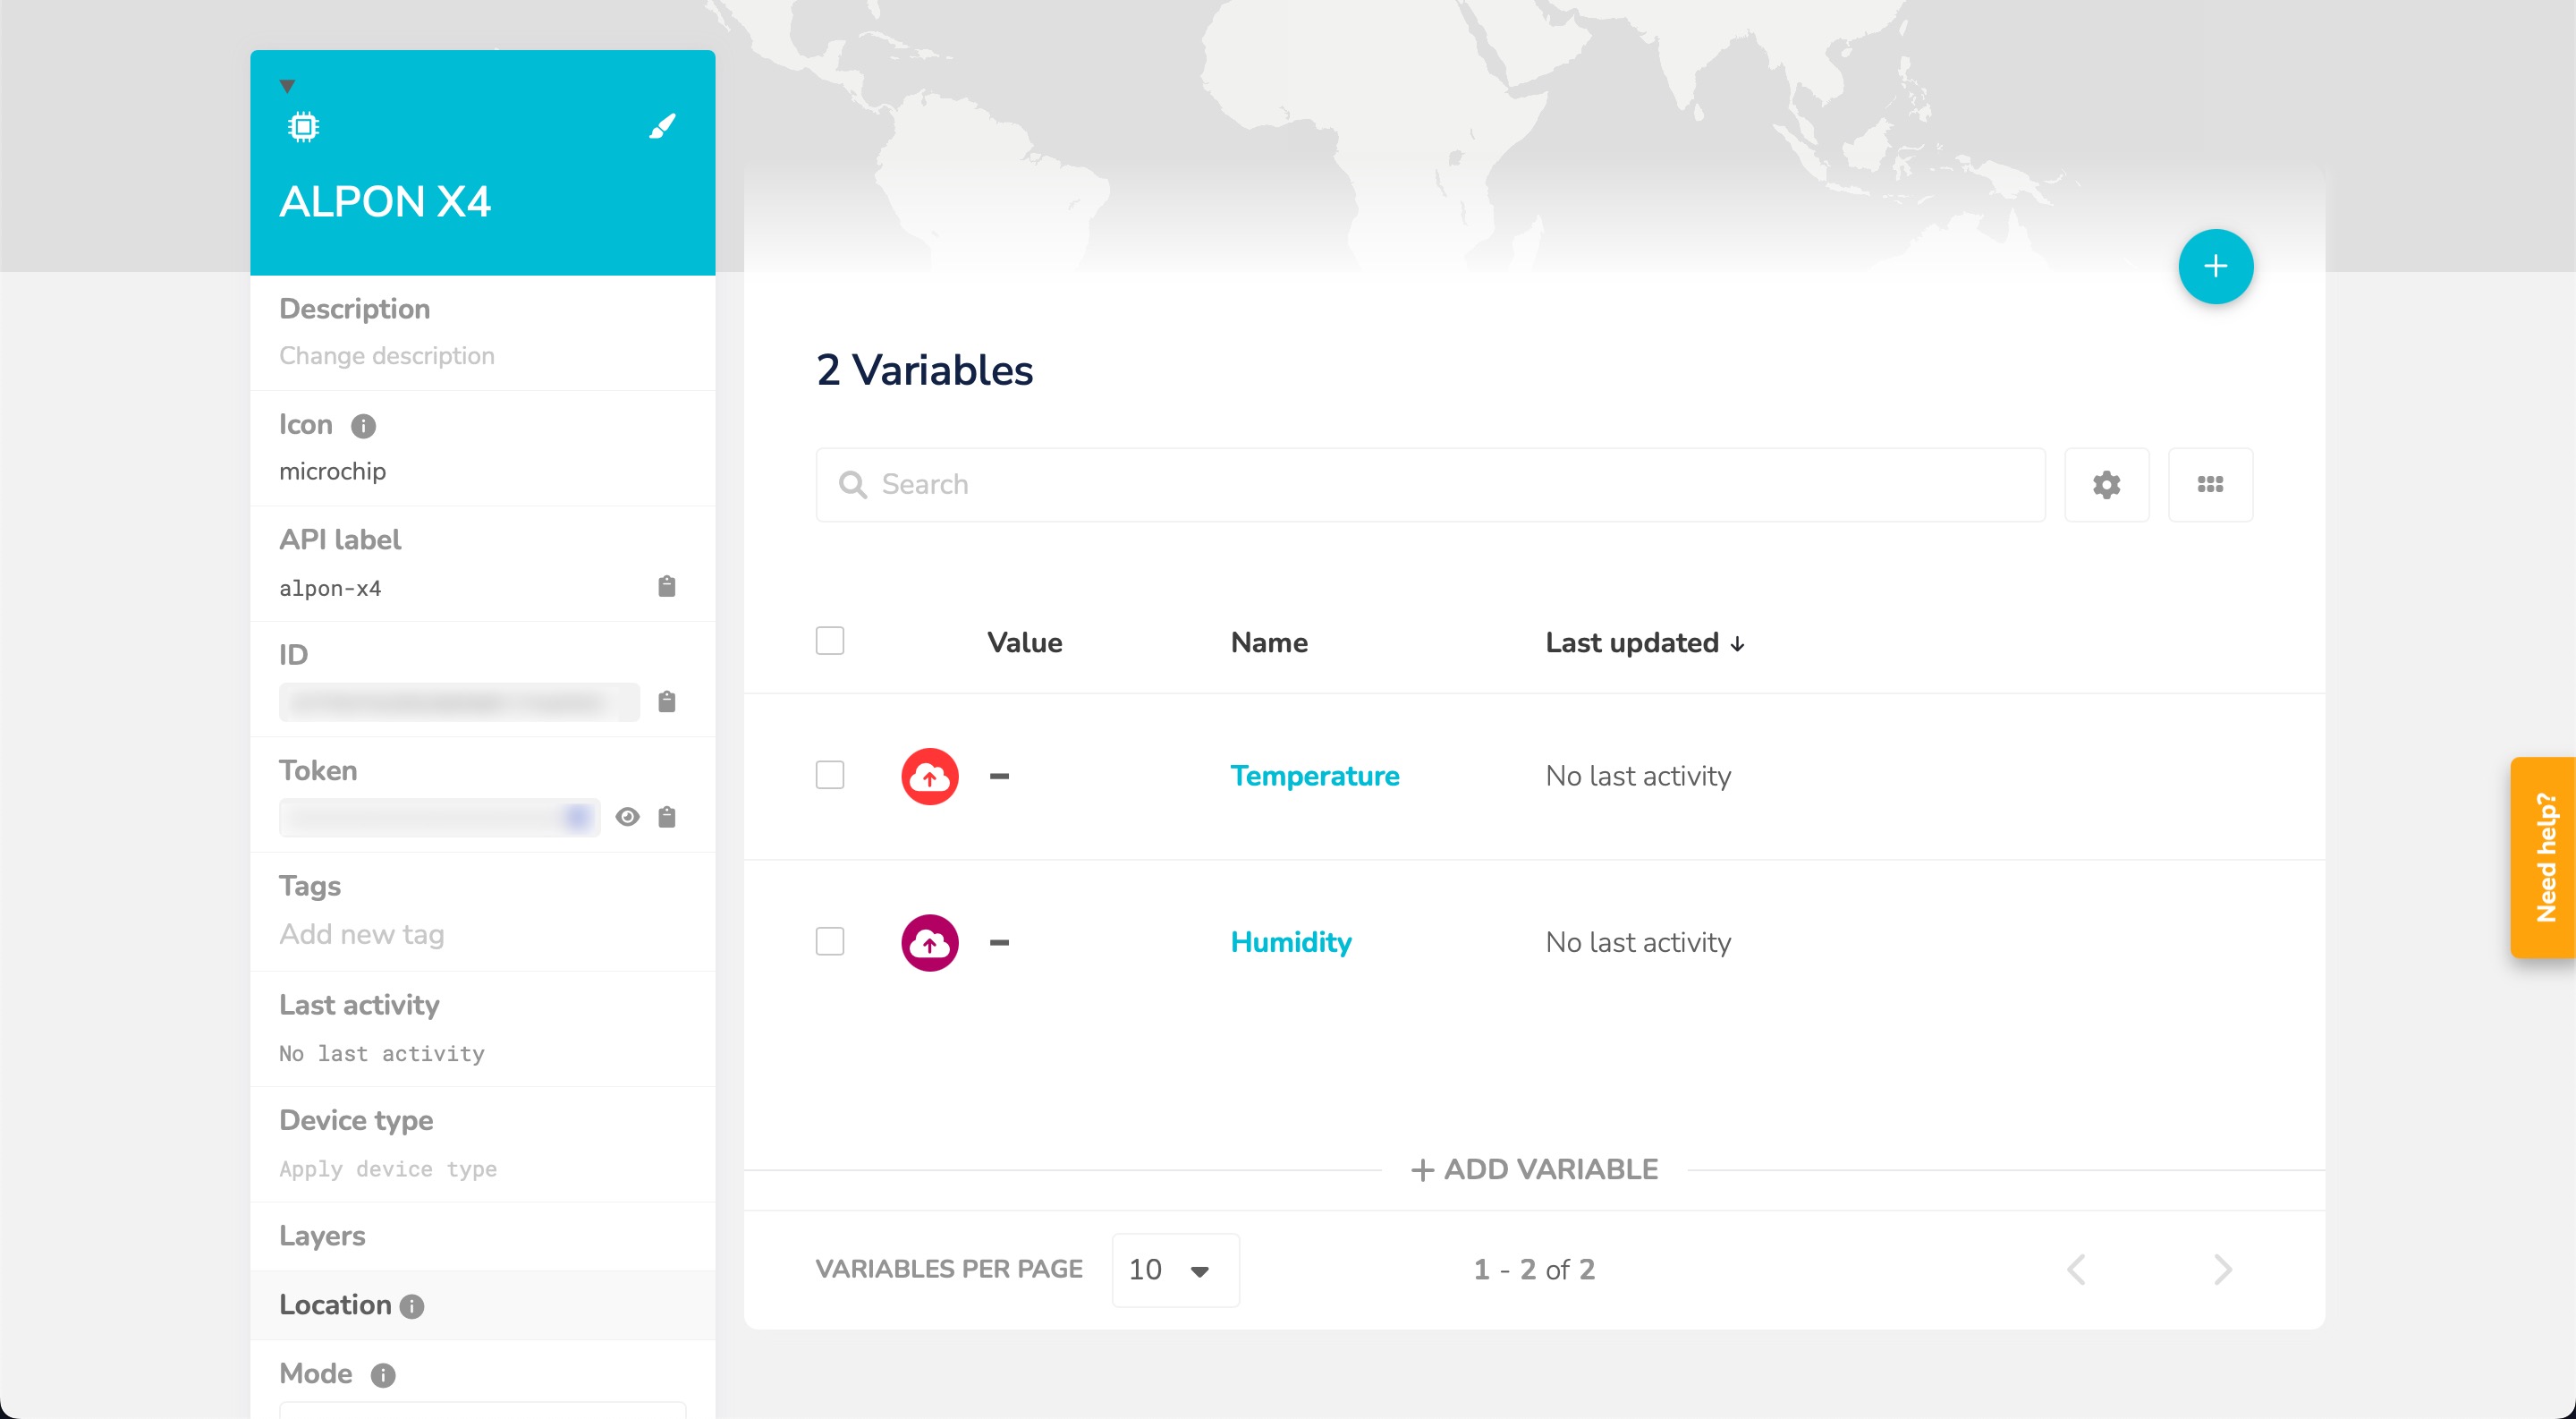
5. Verify and Configure the Device
- After creation, Ubidots will redirect you to the new device’s page, where you can view its basic information (name, label, creation date, etc.).

- Depending on the data your ALPON X4 sends, you’ll need to define variables. For example, if it sends temperature and humidity data, create two separate variables:
- From the Devices page, click on your ALPON X4 device to open its details.
- Click the "+ Add Variable" button or the "+" icon in the top-right corner, then select "+ Add Variable" to add a Raw variable.
- A new variable named "New variable" will appear. Click its name to edit it:
- Set the name (e.g., "Temperature" for one, "Humidity" for the other).
- Optionally, update the description, color, or API label as needed.
- Repeat to create both variables ("Temperature" and "Humidity").
- Save your changes, and the device will be ready to receive data.
6. Obtain Your API Token
To allow your ALPON X4 to securely send data to Ubidots, you’ll need a device token. Follow these steps:
- From the top navigation bar, go to Devices > Devices.
- Click on your ALPON X4 device to select it.
- In the device options, click the "Manage Device Tokens" button.
- A drawer will slide out from the right. Click the "+ Add new token" button.
- Assign a name to the device token and select one, both, or neither of the available permissions (leave blank for no permissions).
- Click the green checkmark button to confirm.
Security NoteKeep your API token confidential and avoid sharing it. If the token is compromised, you can generate a new one.
For more details on managing device tokens, refer to this guide: Ubidots Security: Managing Device Tokens.
Once these preparations are completed, the connection can be built with ease.
Step 1: Create the Docker Image
To ensure that our script runs consistently across different environments, we will use Docker to package it. Follow these steps to create a Dockerfile:
-
Open a terminal and create a new directory for your project.
-
Inside the directory, create a new file called
Dockerfileand add the following content:FROM python:3.11-slim RUN pip install --no-cache-dir paho-mqtt WORKDIR /app COPY send_to_ubidots.py . CMD ["python", "send_to_ubidots.py"]
This file tells Docker to:
- Use a lightweight Python 3.11 image
- Install the MQTT library (
paho-mqtt) - Set up a working directory
- Copy our Python script into the container
- Run the script when the container starts
Step 2: Writing the MQTT Client Script
Now, let’s create the Python script that will send data to Ubidots.
-
In the same directory as your
Dockerfile, create a new file called send_to_ubidots.py. -
Copy and paste the following code into the file:
import time
import os
from paho.mqtt import client as mqtt_client

broker = 'industrial.api.ubidots.com'
port = 1883
topic = f"/v1.6/devices/{os.getenv('DEVICE_NAME', 'default_device_name')}"
client_id = "alpon_x4_client"
username = os.getenv('API_TOKEN', 'default_api_token')
password = ""

def connect_mqtt():
    def on_connect(client, userdata, flags, rc):
        if rc == 0:
            print("Connected to MQTT Broker!")
        else:
            print(f"Failed to connect, return code {rc}\n")

    client = mqtt_client.Client(client_id)
    client.username_pw_set(username, password)
    client.on_connect = on_connect
    client.connect(broker, port)
    return client

def publish(client):
    while True:
        time.sleep(2)
        msg = '{"temperature": 25, "humidity": 60}'
        result = client.publish(topic, msg)
        status = result[0]
        if status == 0:
            print(f"Sent: `{msg}`")
        else:
            print(f"Failed to send message to topic {topic}")

def run():
    client = connect_mqtt()
    client.loop_start()
    publish(client)

if __name__ == '__main__':
    run()
This script will:
- Connect to the Ubidots MQTT broker
- Continuously send temperature and humidity data every 2 seconds
- Print a message each time data is successfully sent
Step 3: Build and Push the Container to Sixfab Registry
After setting up the Dockerfile, use Docker’s build command to create the container image.
To deploy the container on ALPON X4, the image must be built on your personal computer for the ARM64 architecture.
docker buildx build --platform=linux/arm64 -t ubidots-mqtt-client:latest .This will create an image named ubidots-mqtt-client, optimized for the ALPON X4’s ARM64 architecture.
Push to Sixfab Registry:
- Log in to the Sixfab Connect platform, navigate to the Sixfab Registry page
- Click on + Add Container and follow the prompts to push container to Sixfab registry.\
Manage and Deploy ApplicationsVisit the Manage & Deploy Applications page for all the necessary details on pushing your container image to the Sixfab Registry.
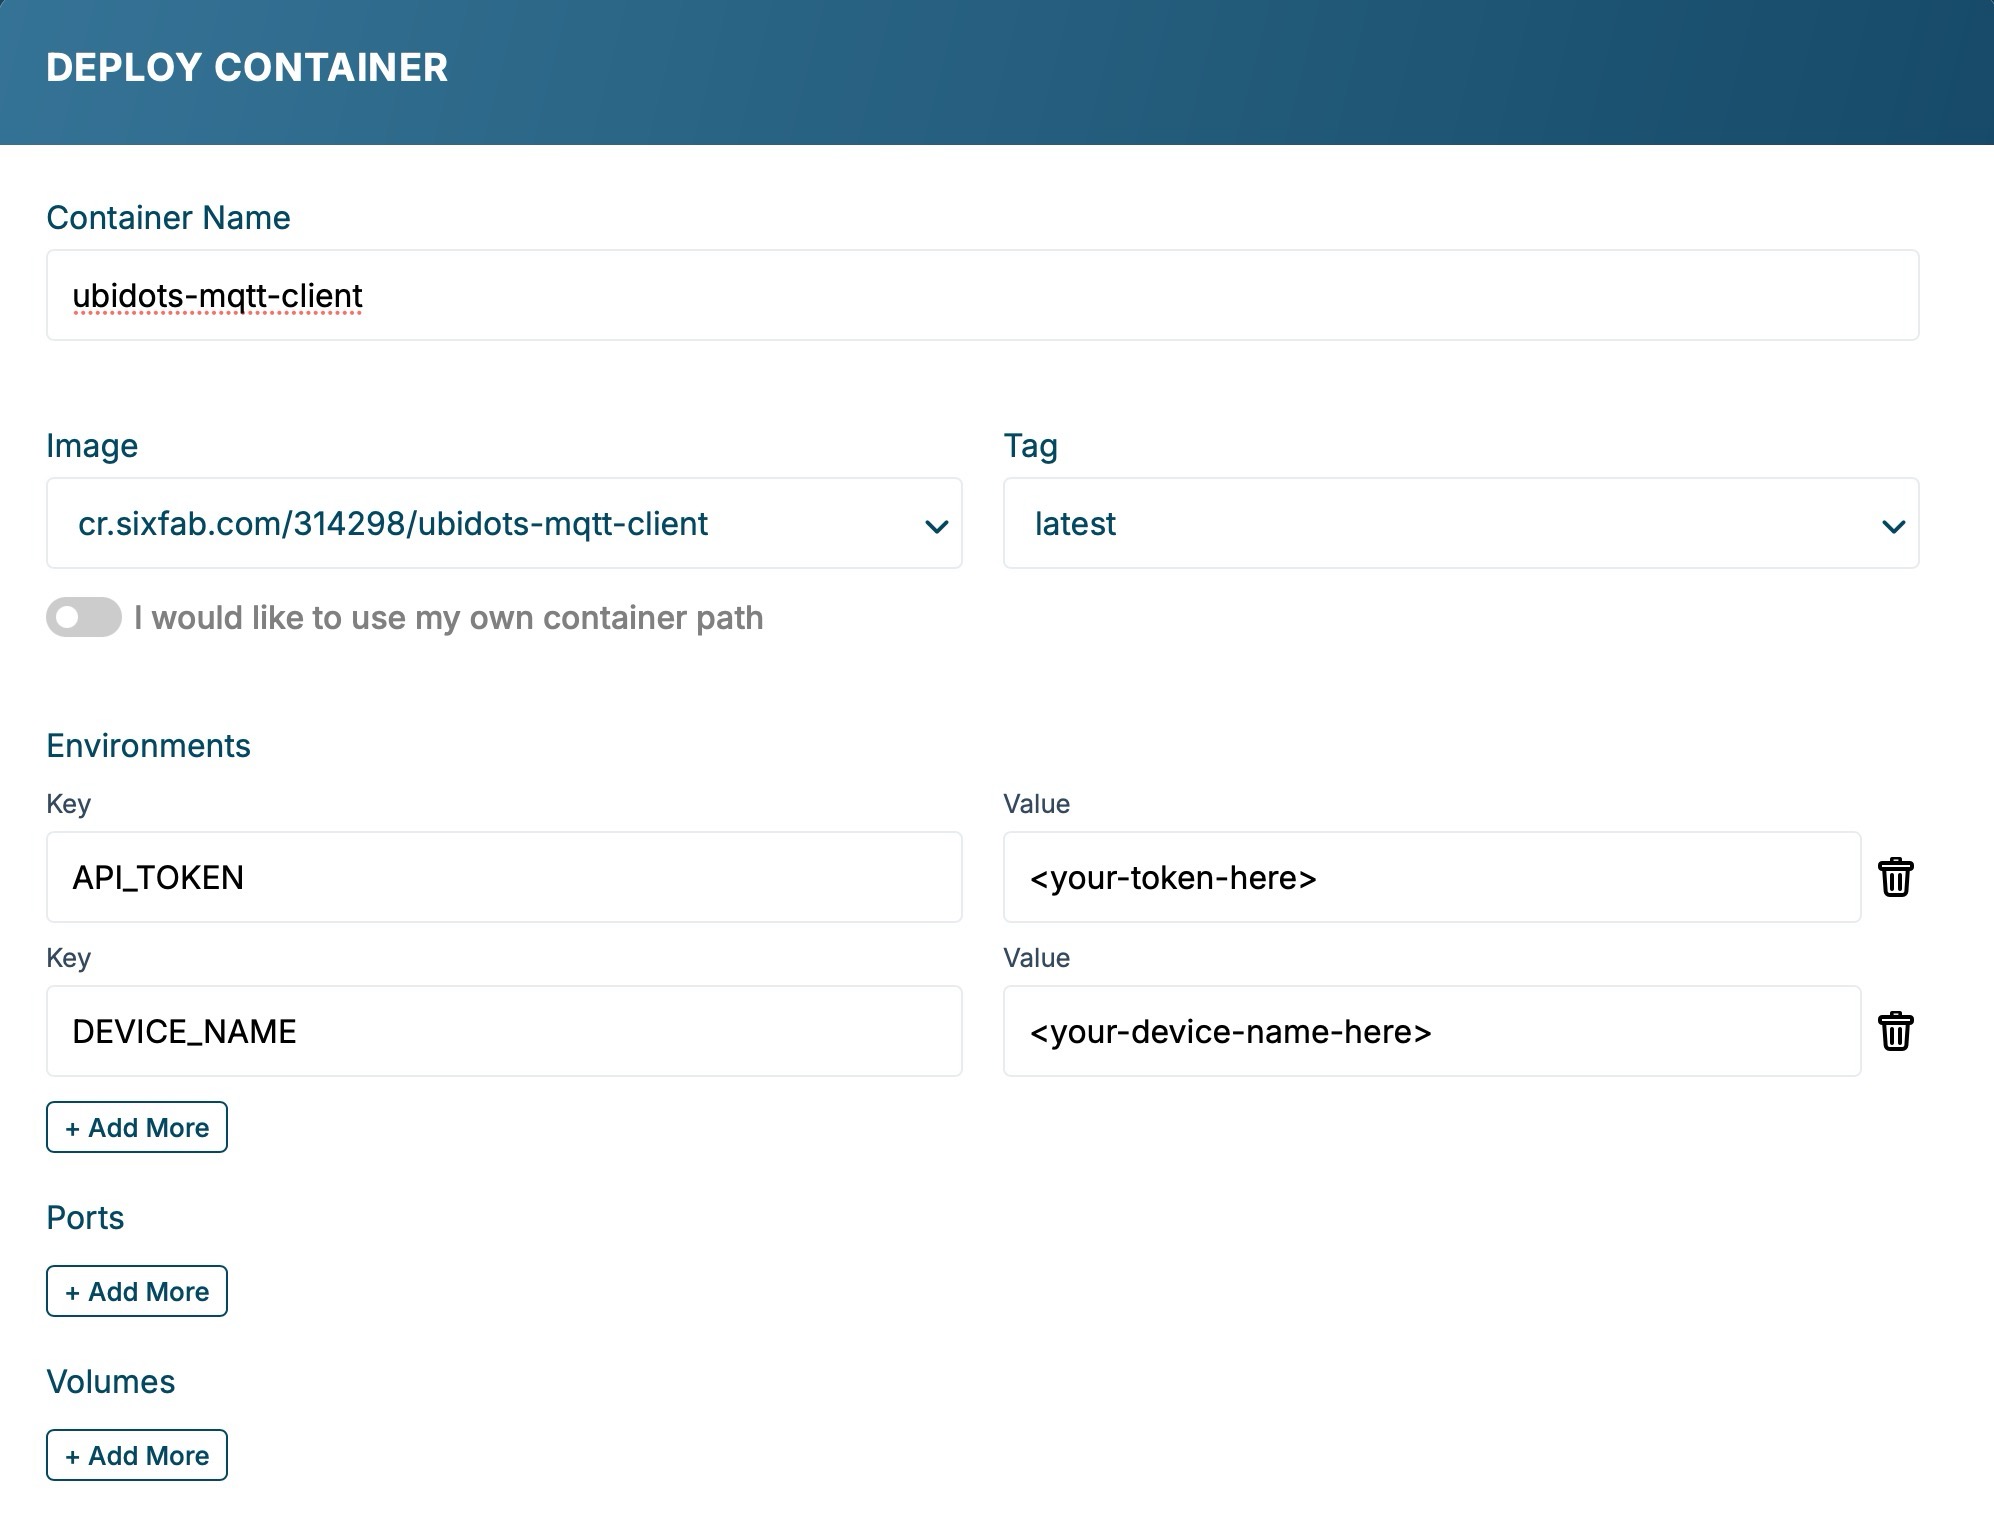
Step 4: Deployment
Once the container image is uploaded to the Sixfab Connect registry, deploy it as follows:
-
Go to the Application section of your asset on Sixfab Connect.
-
Click the + Deploy button to configure and deploy the container.
-
In the Deploy Container window, use the following settings:
-
Container Name: Enter the application name (e.g., "ubidots-mqtt-client").
-
Image: Select the Ubidots container image and tag pushed to the Sixfab Registry.
-
Environment: Click "+ Add More" in the environment section and add the following values:
Key Value API_TOKEN <your-token-here> DEVICE_NAME <your-device-name-here>
-
Click the "+ Deploy" button to start running the container on ALPON X4.
-
Step 5: View Data on Ubidots
Now that everything is set up, it’s time to verify that our device is successfully sending data to Ubidots.
- Log in to your Ubidots account.
- Go to the Devices section.
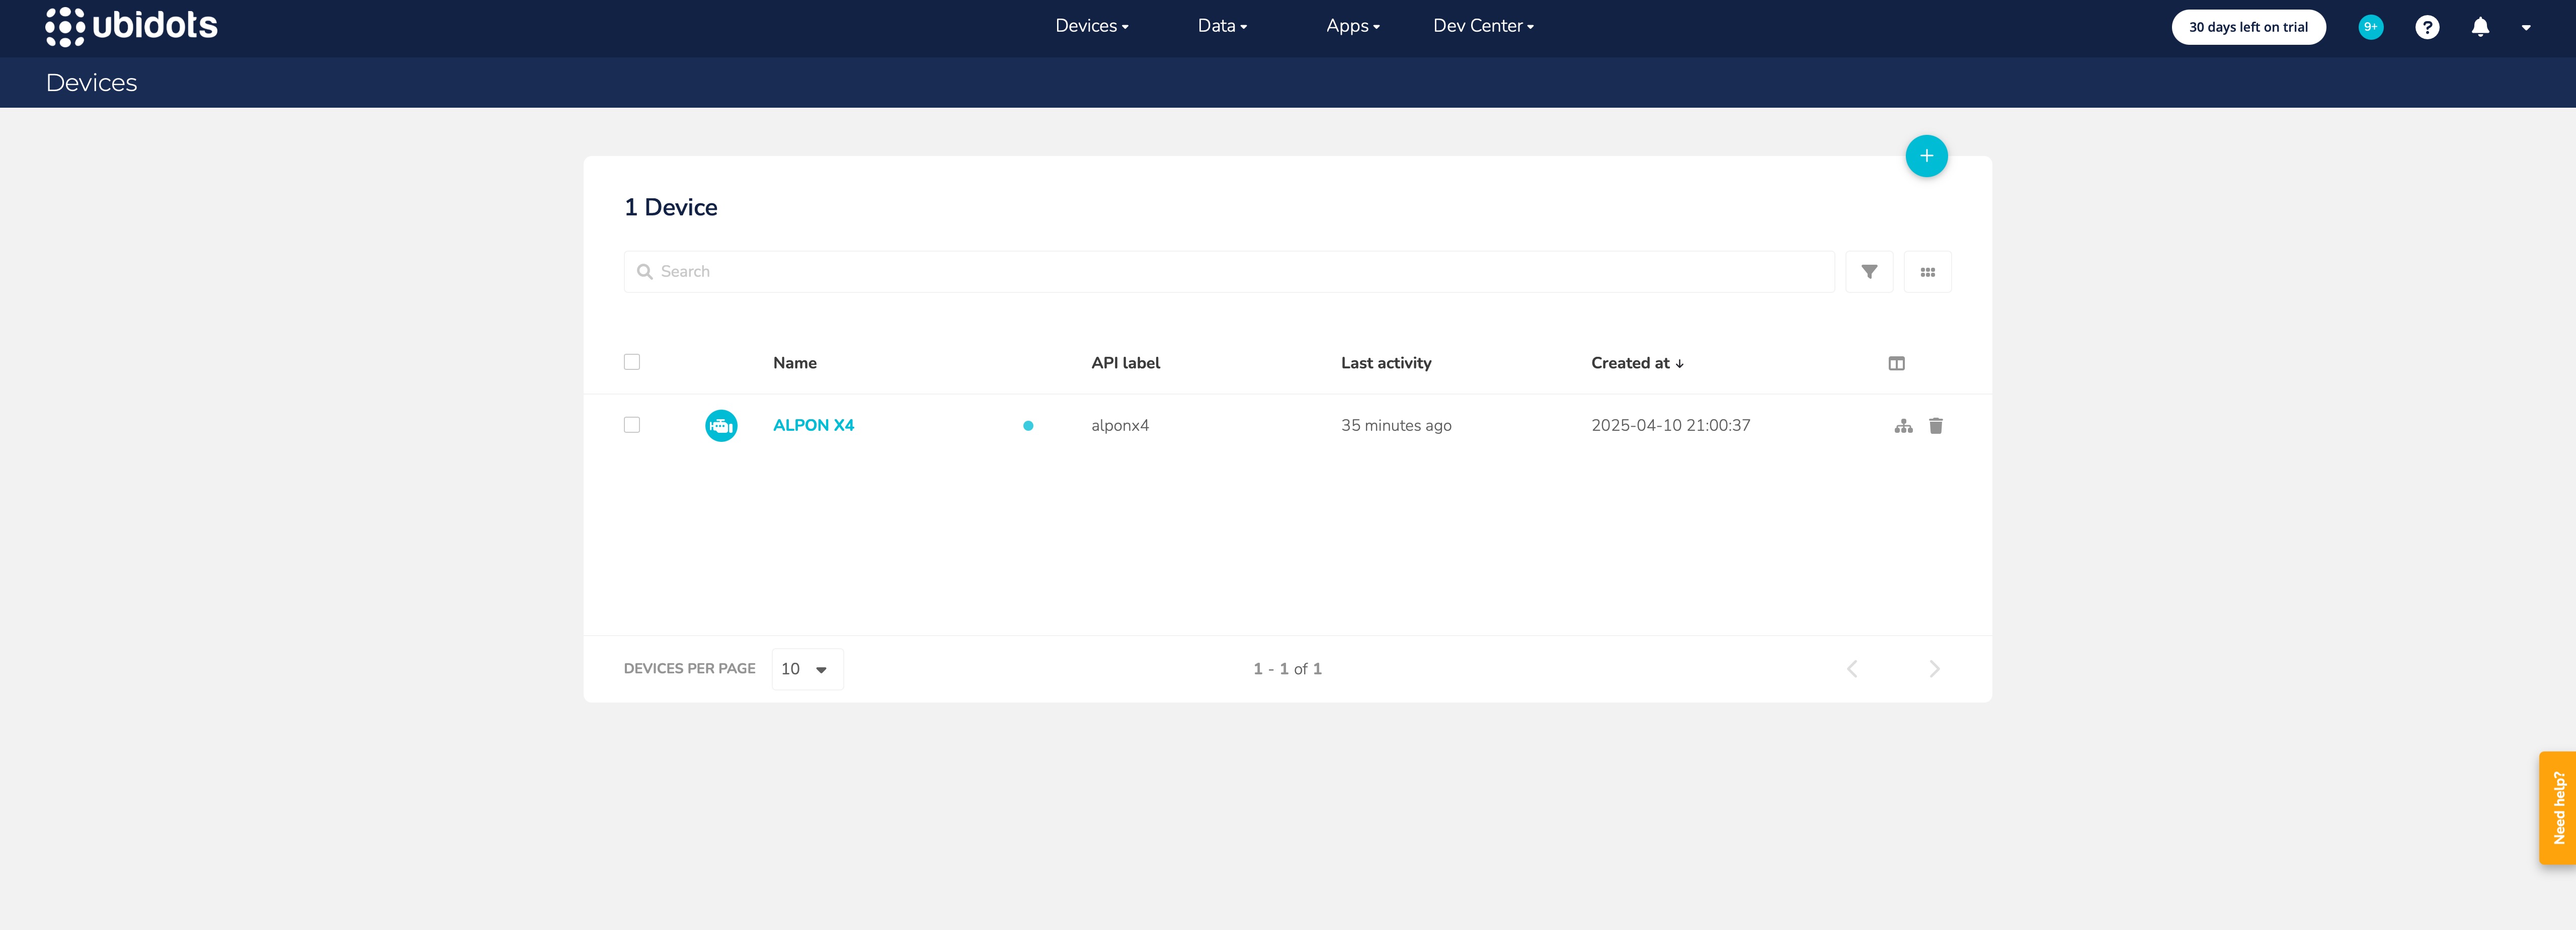
- Select your device (e.g.,
ALPON_X4). - Check if temperature and humidity data is appearing in real time.
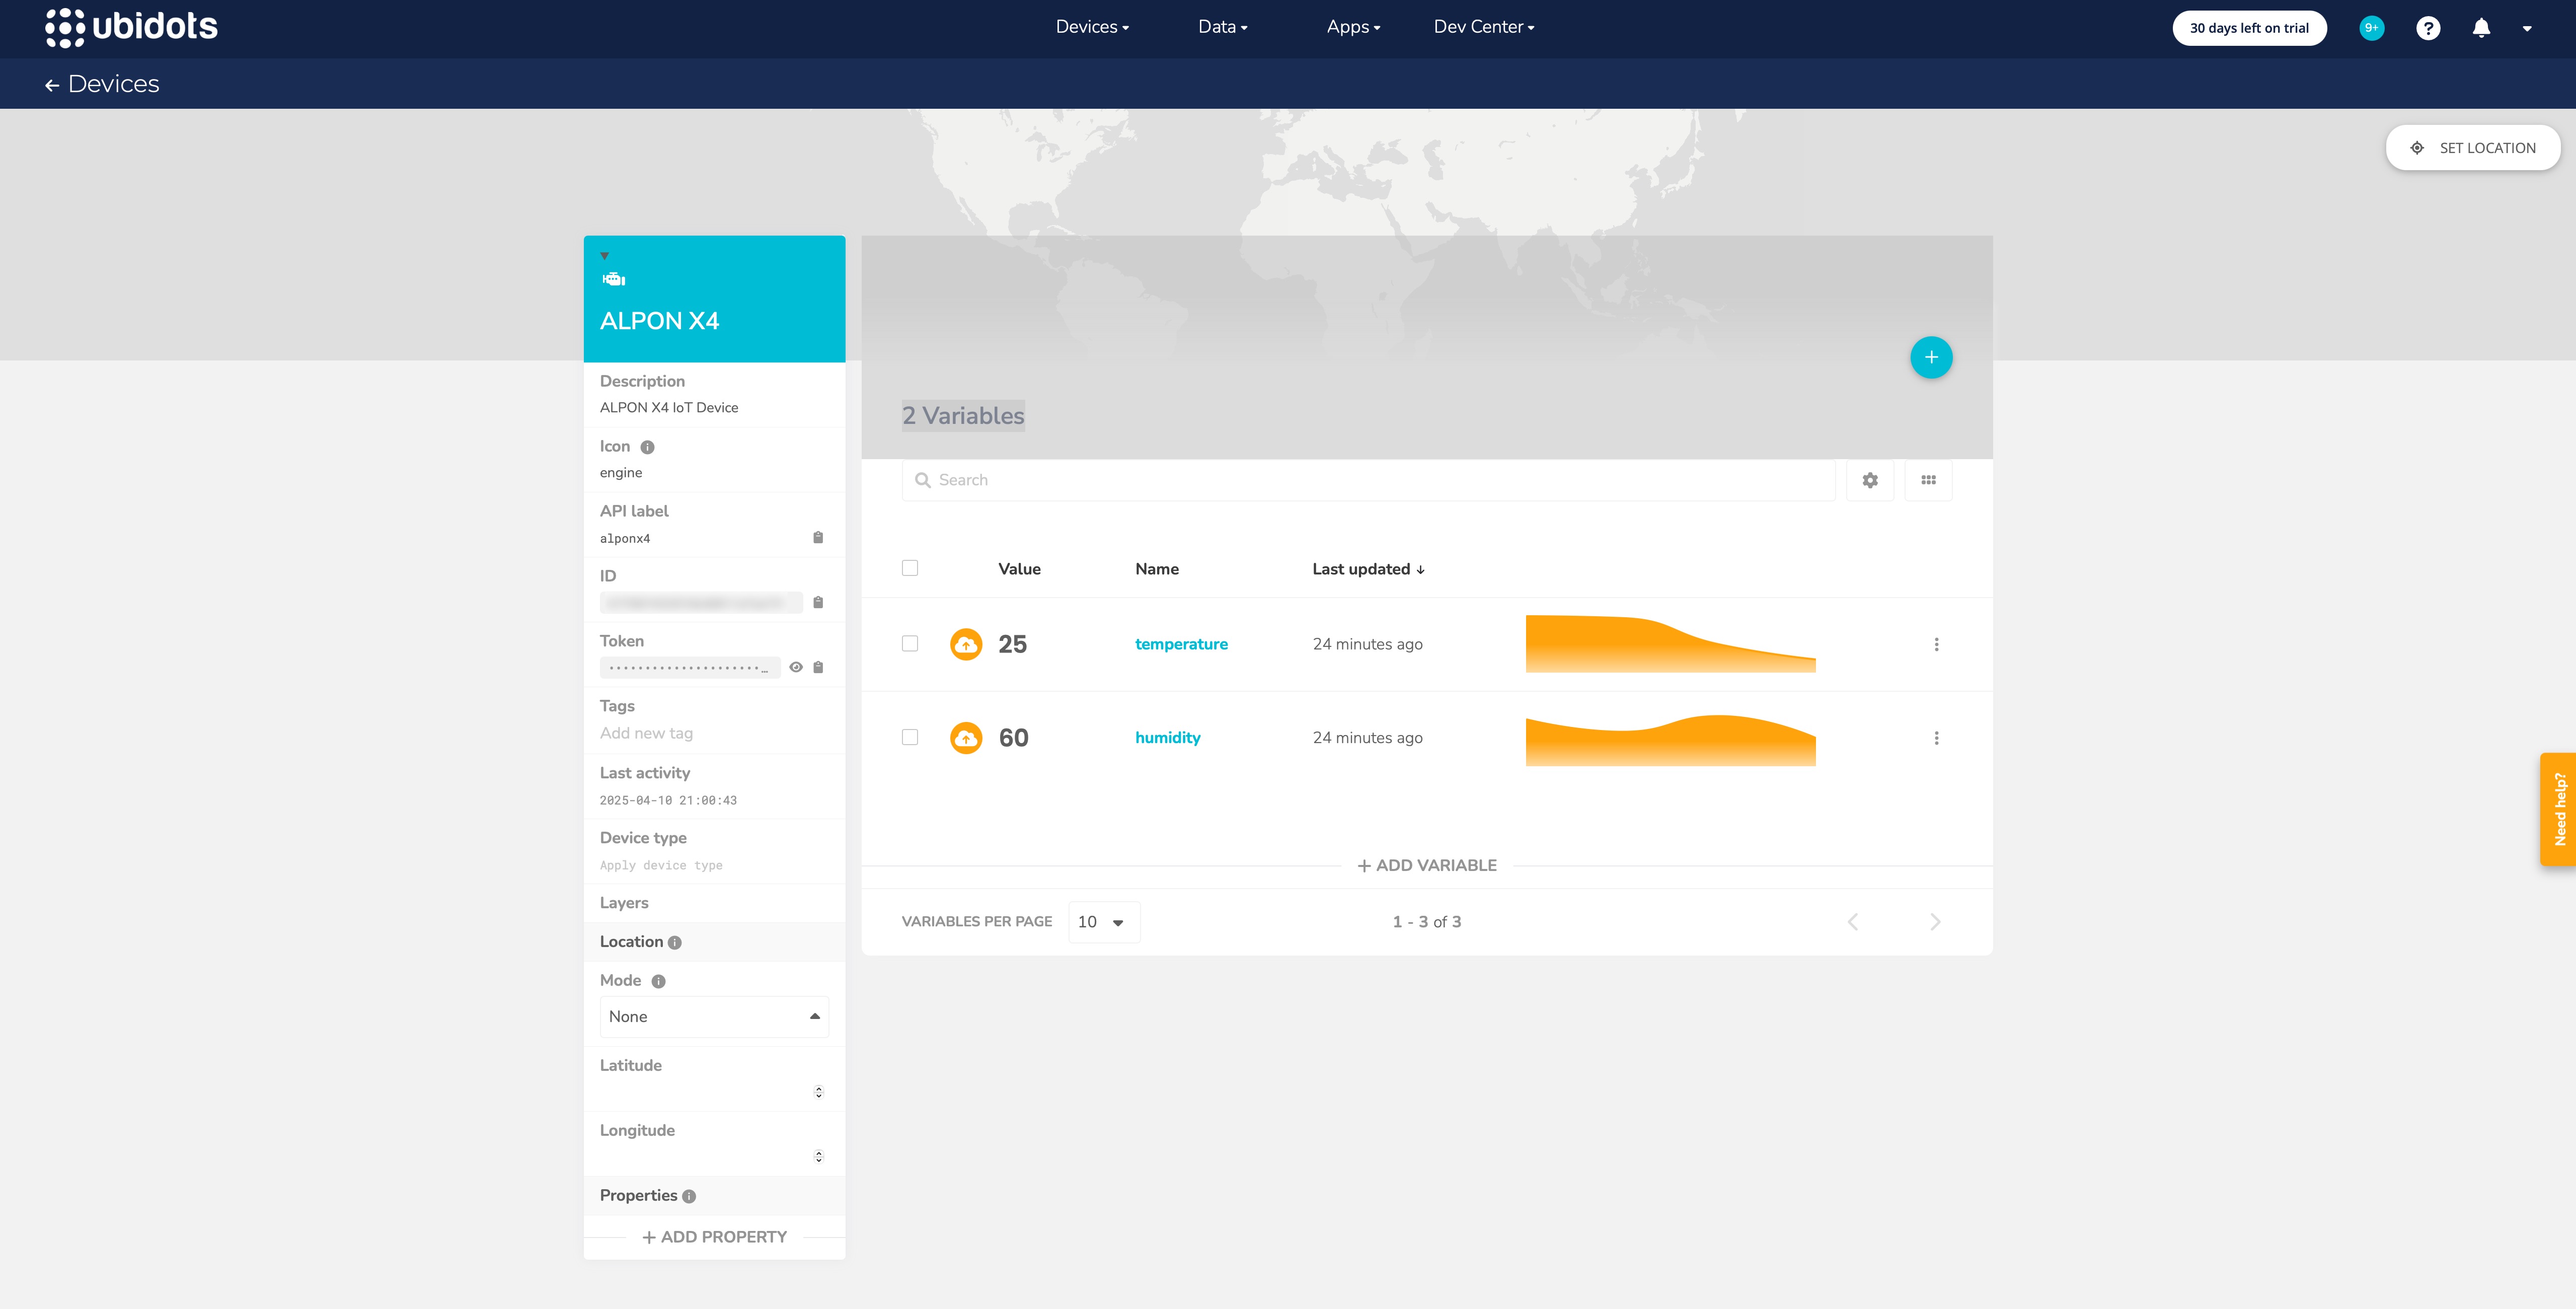
If you see the data flowing in, congratulations!🎉 Your ALPON X4 is now successfully connected to Ubidots.
Updated 3 months ago