
Access GPIO, Push Buttons, and USB from Docker Containers
Access GPIO, Push Buttons, and USB from Containers
Run hardware-aware applications on ALPON X5 AI and ALPON X4 from inside Docker containers. This guide walks through controlling a GPIO output, reading the on-board push buttons (PB1 and PB2), packaging your script as an ARM64 image, and deploying it through ALPON Cloud with the correct privileged mode and volume mounts.
Build your application as an ARM64 Docker image, push it to the Sixfab Container Registry, and deploy it from the Applications tab in ALPON Cloud with Privileged Mode enabled. For GPIO and push-button access, mount /dev/gpiomem into the container. For USB devices such as serial dongles or sensors, Privileged Mode exposes the host's USB tree at paths like /dev/ttyUSB0, where tools like lsusb, minicom, or Python pyserial can talk to them. The same workflow works identically on ALPON X5 AI and ALPON X4.
Before you start
Make sure you have the following set up before you begin. Each item links to the related ALPON documentation.
cr.sixfab.io
Sixfab Container Registry account
If you have not deployed a container to an ALPON device before, start with Deploy Applications on ALPON for the full end-to-end workflow. This guide focuses on the specific changes needed to give a container access to GPIO, push buttons, and USB.
What you’ll build
By the end of this guide you’ll have a containerized Python application running on your ALPON device that can drive a GPIO output, read the on-board user buttons, and talk to a USB peripheral. The same image runs on both ALPON X5 AI and ALPON X4 without modification.
Drive a GPIO output
Toggle a chosen GPIO pin HIGH and LOW from Python inside the container.
Read PB1 and PB2
Detect presses on the user-programmable push buttons mapped to GPIO 5 and GPIO 6.
Talk to a USB device
Open a shell into the container, find the USB endpoint with lsusb, and use pyserial or minicom to communicate.
Control a GPIO pin
The example below configures one GPIO pin as an output and alternates it between HIGH and LOW every 5 seconds, printing the state on each transition. It uses the RPi.GPIO library with BCM numbering (the same numbering you see in the ALPON pin maps).
On both ALPON X5 AI and ALPON X4, the RJ45-style GPIO Add-on port exposes GPIO 12, 13, 14, 15, 22, 23 plus 5 V OUT and GND. The port’s 5 V rail and signal path are gated by a power switch that must be enabled first by driving GPIO 21 HIGH. Buttons PB1 (GPIO 5) and PB2 (GPIO 6) are routed directly to CM4/CM5 and do not require this step. See the ALPON X5 AI Physical Layout & I/O or ALPON X4 Physical Layout & I/O reference for the full pin map.
example1.py
import RPi.GPIO as GPIO
import time

# 1. Use BCM pin numbering (same as ALPON pin maps).

GPIO.setmode(GPIO.BCM)
SELECTED_PIN = 12

# 2. Configure the pin as an output.

GPIO.setup(SELECTED_PIN, GPIO.OUT)

print("Default value:", GPIO.input(SELECTED_PIN))

try:
    while True:
        # 3. Drive HIGH and read back.
        GPIO.output(SELECTED_PIN, GPIO.HIGH)
        print("Set to HIGH:", GPIO.input(SELECTED_PIN))
        time.sleep(5)

        # 4. Drive LOW and read back.
        GPIO.output(SELECTED_PIN, GPIO.LOW)
        print("Set to LOW:", GPIO.input(SELECTED_PIN))
        time.sleep(5)
finally:
    # 5. Always release GPIO state on exit.
    GPIO.cleanup()
Save the file as example1.py next to the Dockerfile you’ll create in step 5.
Detect a button press
Both ALPON X5 AI and ALPON X4 expose two user-programmable push buttons on the enclosure. They are wired directly to CM4/CM5 GPIO and use the same BCM numbering on both devices.
GPIO 5 · Pulled HIGH · Reads LOW while pressed
GPIO 6 · Pulled HIGH · Reads LOW while pressed
The example below continuously reads PB1 and prints whether the button is pressed. Replace BUTTON_PIN with 6 to read PB2 instead.
example2.py
import RPi.GPIO as GPIO

# PB1 = GPIO 5 (front button), PB2 = GPIO 6 (rear button).

BUTTON_PIN = 5

GPIO.setmode(GPIO.BCM)

# Configure as input with the internal pull-up resistor active.

GPIO.setup(BUTTON_PIN, GPIO.IN, pull_up_down=GPIO.PUD_UP)

try:
    while True:
        if GPIO.input(BUTTON_PIN) == GPIO.LOW:
            print("Pressed")
        else:
            print("Not pressed")
finally:
    GPIO.cleanup()
For real applications, use GPIO.add_event_detect() with a bouncetime argument (for example 200 ms) instead of busy-polling. This avoids spurious double presses and lets your loop sleep.
Build the container
Place your script next to a Dockerfile and build an ARM64 image. The example below uses Alpine for a small base, installs Python and the build dependencies, and pulls in RPi.GPIO.
Dockerfile
FROM alpine:latest

WORKDIR /app
COPY . .

RUN apk update && apk add python3 py3-pip python3-dev build-base
RUN pip install RPi.GPIO --break-system-packages

# Run example1.py by default. Swap to example2.py to read PB1/PB2.
CMD ["python3", "example1.py"]
For a production image you should pin Alpine and pip versions, run as a non-root user, and copy only what the container needs. The minimal form above is intentionally short to keep the tutorial focused.
Build the image
From the directory containing your Dockerfile and example1.py, run:
# 1. Build an ARM64 image for ALPON (CM4 or CM5 are both arm64).
docker buildx build --platform=linux/arm64 -t gpio-example .

# 2. To run the button example instead, change the CMD line in the
#    Dockerfile to example2.py and rebuild with a different tag:
docker buildx build --platform=linux/arm64 -t button-example .
Tag and push the image to the Sixfab Container Registry so the device can pull it. The full push workflow lives in Sixfab Container Registry.
Deploy on ALPON Cloud
Once the image is in your registry, deploy it to the device from the Applications tab in ALPON Cloud. Privileged mode and a single device mount are all the container needs to reach GPIO.
Open the device’s Applications tab
In ALPON Cloud, open the ALPON asset and switch to Applications. Click + Deploy to open the deployment configuration panel.
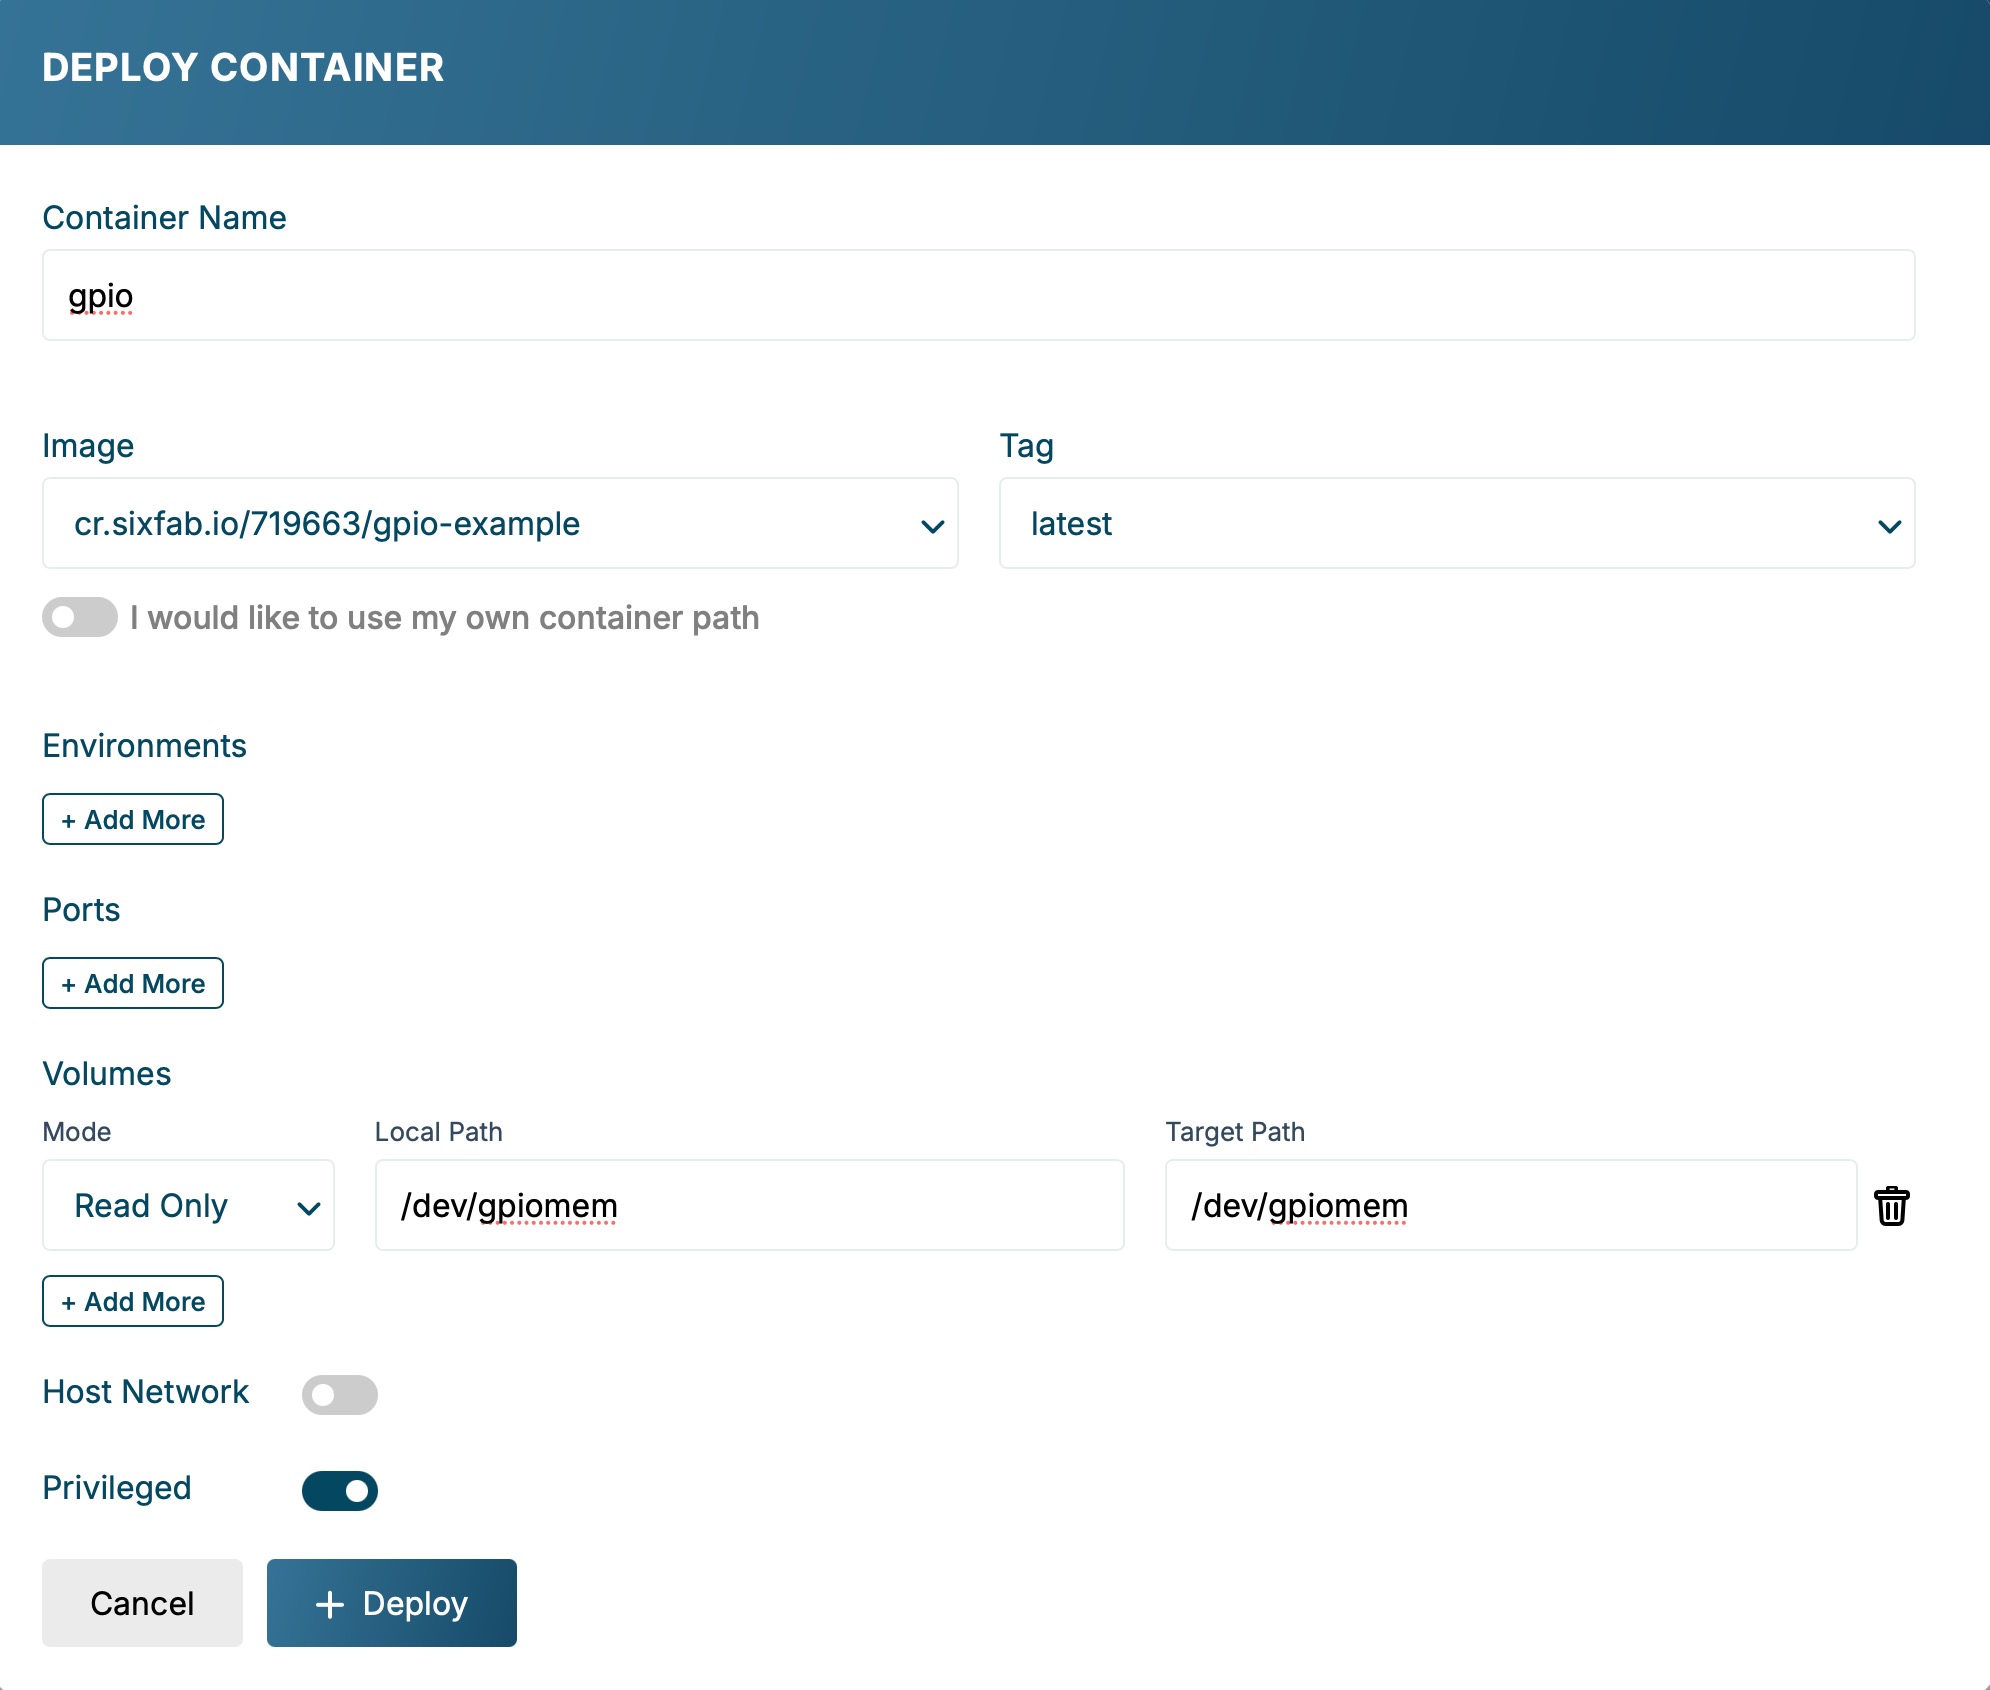
Select your image and name the container
Pick the image you pushed (for example gpio-example) from the registry list. Give the container a clear name (for example gpio) so it’s easy to find later in the logs and lifecycle view.
Enable Privileged Mode
Toggle Privileged Mode on. The container needs elevated capabilities to map the GPIO memory device and to see USB endpoints. Without this flag, RPi.GPIO initialization fails with a permission error.
Privileged Mode gives the container access to the host’s devices and kernel capabilities. Only enable it for workloads that actually need hardware access, and run trusted images you have built or audited yourself.
Mount the GPIO device
Add the following volume so the container sees the GPIO memory device on the same path the library expects. This is the only volume the GPIO and push-button examples need.
/dev/gpiomem/dev/gpiomemThe configuration panel should now look like the screenshot below: a named container, image selected from the Sixfab Registry, Privileged Mode toggled on, and a single /dev/gpiomem volume row.
/dev/gpiomem volume mount in place.Deploy and watch the logs
Click Deploy. The container pulls, starts within a few seconds, and the GPIO loop begins printing state transitions. Open the container’s log stream from the Applications tab to verify the output.
Default value: 0
Set to HIGH: 1
Set to LOW:  0
Set to HIGH: 1
Set to LOW:  0
If you see 0 and 1 values alternating in the log stream, the container is reading and writing the GPIO pin on the device. Probe the pin with a multimeter or a logic analyzer to confirm the level changes physically.
Access USB devices
The same Privileged Mode flag that unlocks GPIO also exposes the host’s USB tree to the container. There’s no extra volume to mount: any USB device plugged into the ALPON shows up under /dev/ inside the container, typically as /dev/ttyUSB0, /dev/ttyACM0, or a class-specific node.
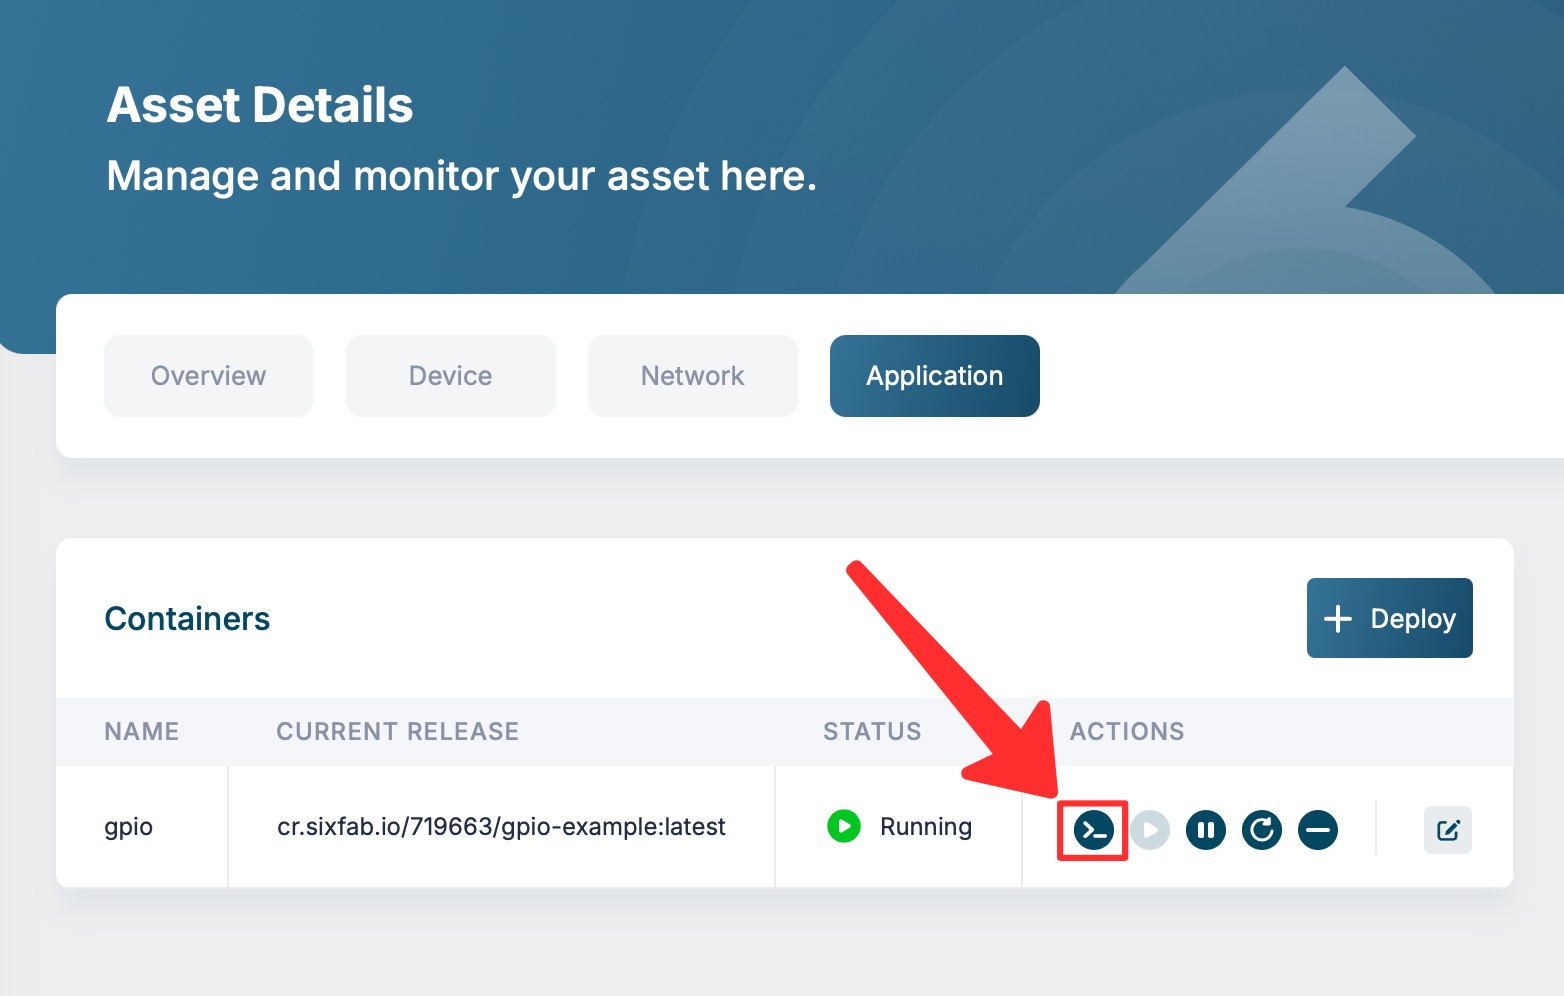
Open a shell into the running container
From the ALPON asset’s Applications tab in ALPON Cloud, open the container’s detail view and click the Shell button. A terminal opens directly inside the container, on the device, over your ALPON Cloud tunnel.
Identify the USB endpoint
Plug your USB device into one of the ALPON USB ports (USB 2.0 on ALPON X4, USB 3.0 on ALPON X5 AI). Then list connected devices and the associated TTY:
# 1. List USB devices on the host (visible because of Privileged Mode).
lsusb

# 2. Find the serial node your device exposes.
ls -l /dev/ttyUSB* /dev/ttyACM*
The first command prints the USB descriptor (vendor ID, product ID, name). The second shows whether your device registered as a CDC-ACM (/dev/ttyACM0) or USB-Serial bridge (/dev/ttyUSB0).
Communicate with the device
Choose the tool that fits your workflow. For interactive debugging, install and run minicom. For programmatic access, add Python pyserial to your Dockerfile and import it.
# Option A: interactive terminal session at 115200 baud.
minicom -b 115200 -D /dev/ttyUSB0

# Option B: programmatic read from Python.
python3 -c "import serial; s=serial.Serial('/dev/ttyUSB0', 115200); print(s.readline())"
ALPON X4 provides 5 V at 1 A total, shared across both USB 2.0 ports. High-draw peripherals (rotating drives, certain cellular dongles, multiple sensors on a hub) can exceed this budget. If a device enumerates intermittently or fails under load, give it its own externally-powered hub. ALPON X5 AI’s USB 3.0 ports follow the standard USB 3.0 power profile.
Updated 2 months ago