Accessing USB Devices, GPIO and Push Buttons in Docker Containers
This guide outlines the steps required to access GPIO pins, Push buttons and USB devices from within a container, enabling the creation of interactive applications that respond to hardware events. Detailed examples are provided for managing GPIO pins and detecting button presses using the RPi.GPIO library in Python script.
Controlling a GPIO Pin
To control GPIO pins, the following Python script demonstrates how to configure a GPIO pin, read its state and toggle its output:
# example1.py

import RPi.GPIO as GPIO
import time

# Set the GPIO mode to BCM
GPIO.setmode(GPIO.BCM)
SELECTED_PIN = 12

# Configure GPIO pin 12 as an output pin
GPIO.setup(SELECTED_PIN, GPIO.OUT)

# Print the default state of the pin
print("Default value:", GPIO.input(SELECTED_PIN))

try:
    while True:
        # Set the pin to HIGH and print its state
        GPIO.output(SELECTED_PIN, GPIO.HIGH)
        print("Set to HIGH:", GPIO.input(SELECTED_PIN))
        time.sleep(5)

        # Set the pin to LOW and print its state
        GPIO.output(SELECTED_PIN, GPIO.LOW)
        print("Set to LOW:", GPIO.input(SELECTED_PIN))
        time.sleep(5)
finally:
    # Clean up GPIO settings
    GPIO.cleanup()
Detecting a Button Press
On the ALPON X4, buttons PB1 and PB2 are connected to GPIO 5 and 6, respectively. This script continuously monitors the state of a button and prints “Pressed” if the button is pressed; otherwise, it prints “Not pressed”:
# example2.py

import RPi.GPIO as GPIO

# Define the GPIO pin for the button
BUTTON_PIN = 5

# Set the GPIO mode to BCM
GPIO.setmode(GPIO.BCM)

# Configure the button pin as input with a pull-up resistor
GPIO.setup(BUTTON_PIN, GPIO.IN, pull_up_down=GPIO.PUD_UP)

try:
    while True:
        if GPIO.input(BUTTON_PIN) == GPIO.LOW:
            print("Pressed")
        else:
            print("Not pressed")
finally:
    # Clean up GPIO settings on exit
    GPIO.cleanup()
Refer to the ALPON X4 Button Documentation for button details.
Building and Deploying Docker Containers
Example Dockerfile
The following example demonstrates how to containerize the scripts. This example is a reference and can be customized to suit specific needs.
For a comprehensive tutorial on creating and using Dockerfiles, refer to the App Containerization with Dockerfile Templates guide:
FROM alpine:latest

WORKDIR /app
COPY . .

RUN apk update && apk add python3 py3-pip python3-dev build-base
RUN pip install RPi.GPIO --break-system-packages

CMD ["python3", "example1.py"]
# or
# CMD ["python3", "example2.py"]
Build Command
Build the container with the following command:
docker buildx build --platform=linux/arm64 -t gpio-example .If you'd like to use the example2.py script instead, simply replace example1.py with example2.py in the CMD line of the Dockerfile.
Then, build the container using the following command:
docker buildx build --platform=linux/arm64 -t button-example .Deployment Instructions
- Push the container to the Sixfab registry.
- Deploy the app from the Applications tab of the asset.
For detailed guidance on deploying custom images and configuring applications, refer to the Manage & Deploy Applications guide.
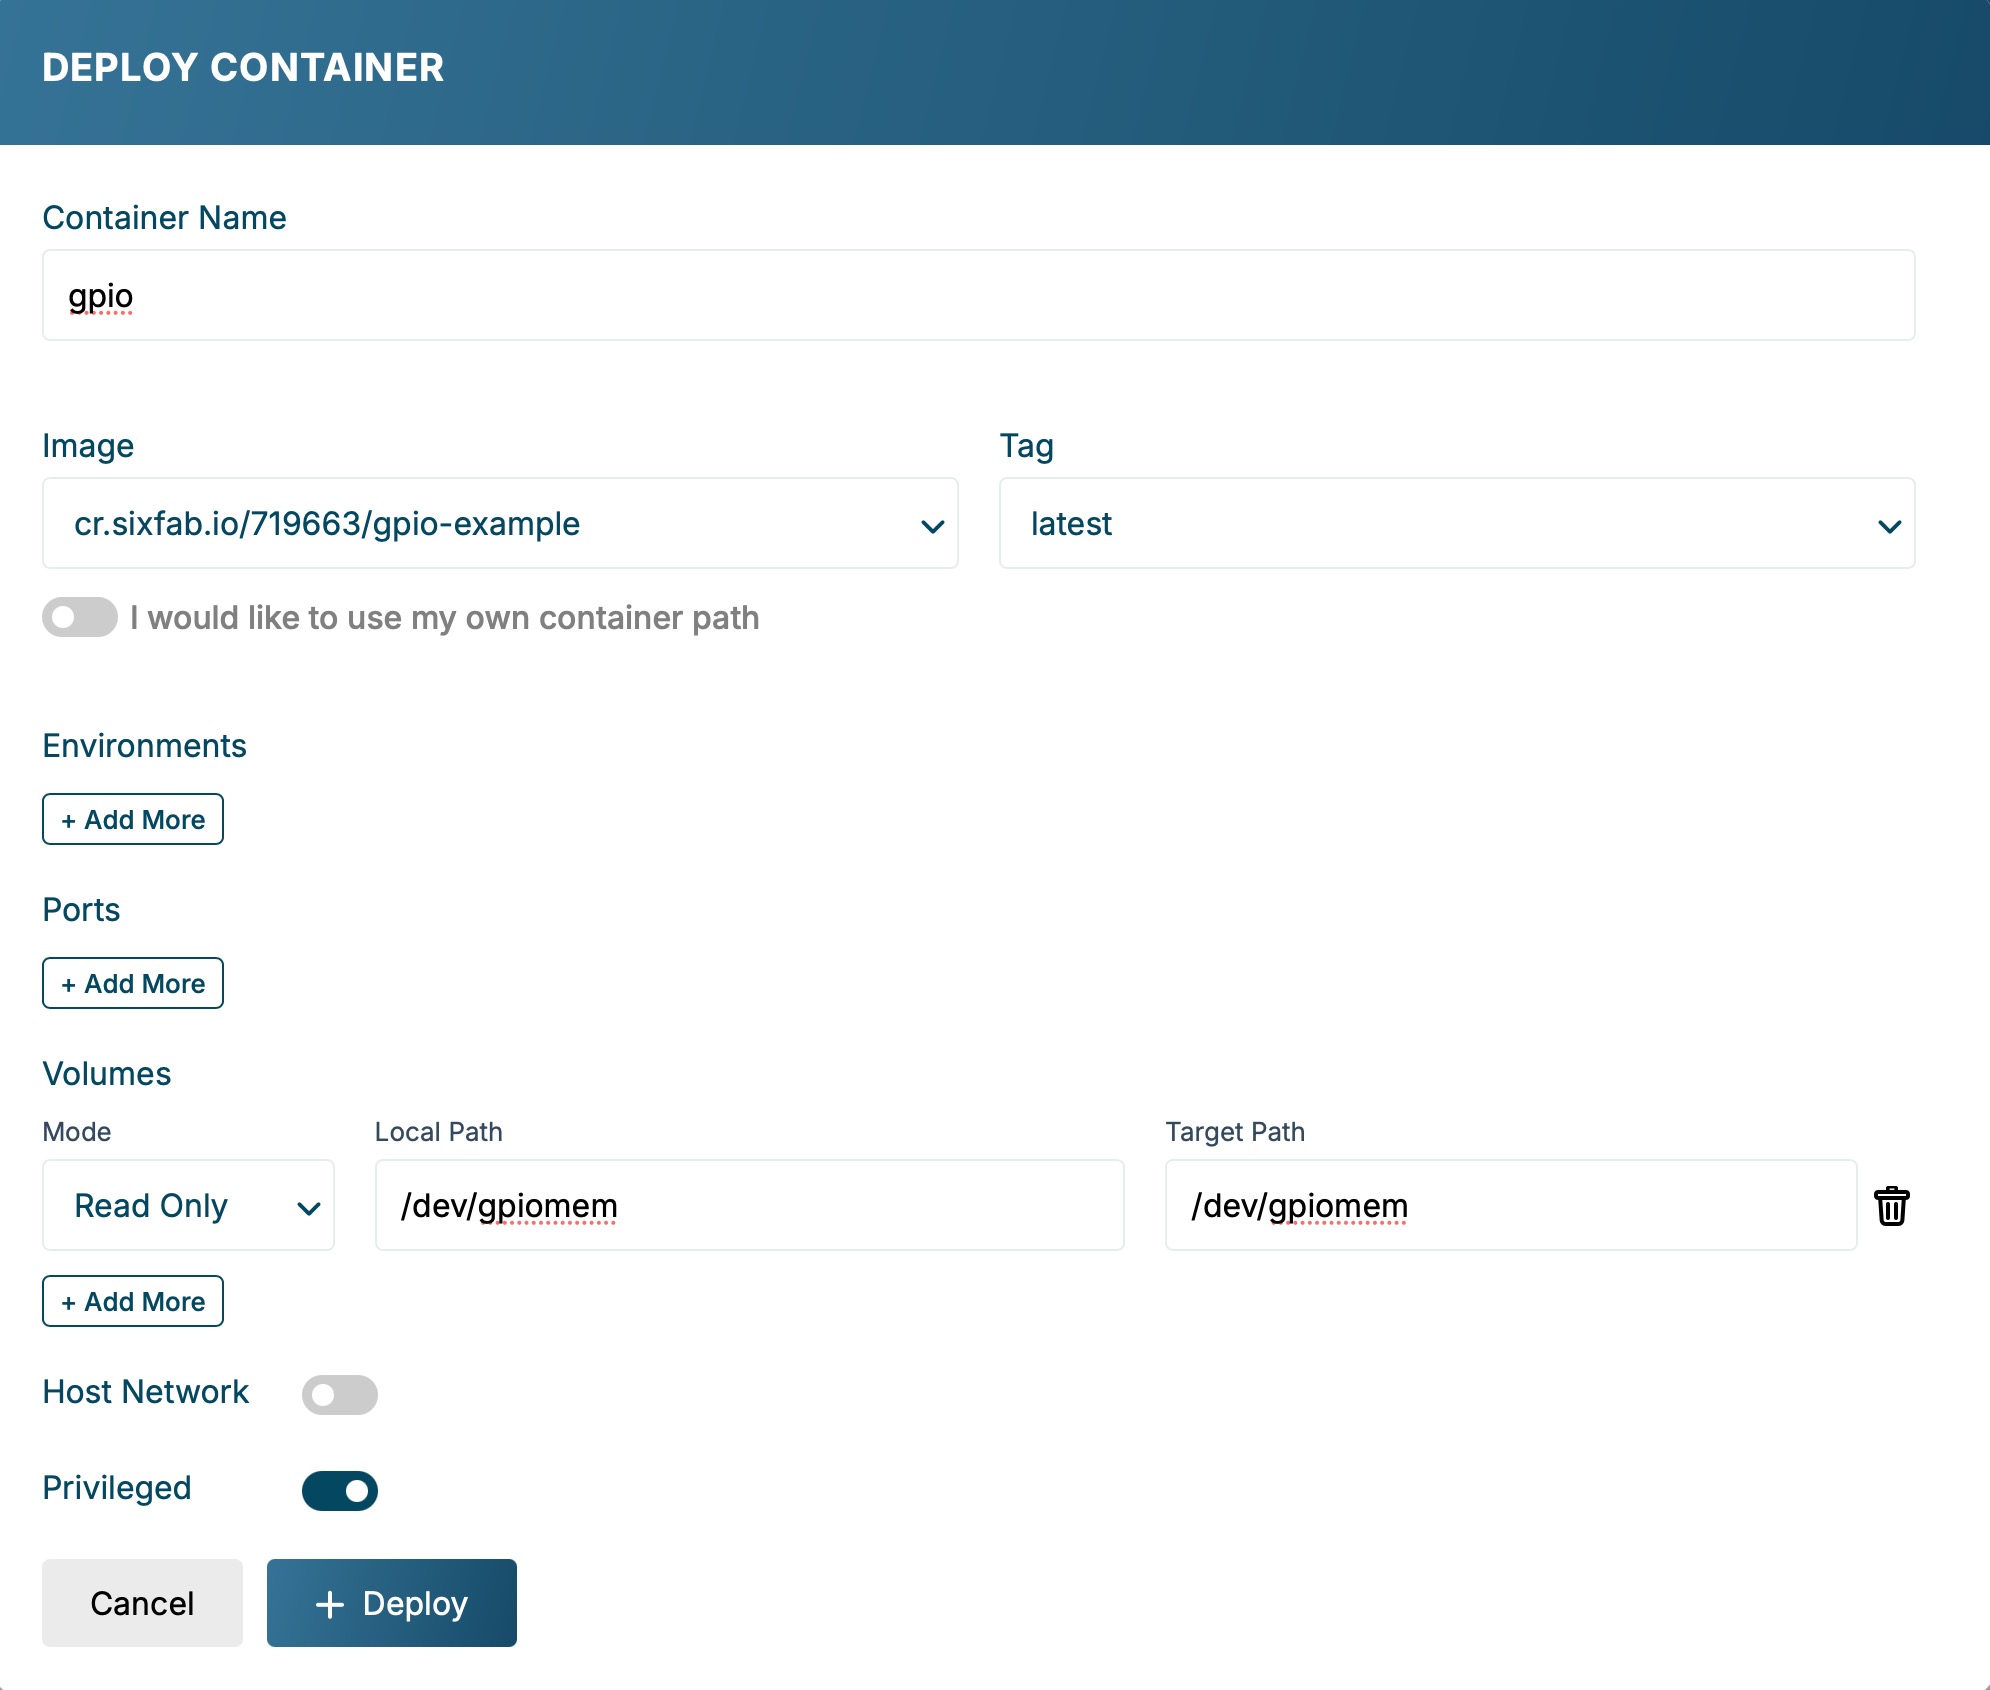
- Configure deployment:
- Container Name: gpio
- Image: Select the pushed image from the Sixfab Registry, in this case, gpio-example, to associate with this deployment.
- Enable Privileged Mode: The container must be run in privileged mode to access GPIO pins and USB devices.
- Volumes: Add the following volume mount to provide access to the GPIO device:
| Read/Write | Local Path | Target Path |
|---|---|---|
| Read/Write | /dev/gpiomem | /dev/gpiomem |

- Deploy and Run the Container: After deploying the container with the necessary configurations, your script has started successfully!
Accessing USB Devices in a Container
1. Enable Privileged Mode: Similar to GPIO access, privileged mode must be enabled for USB device access.
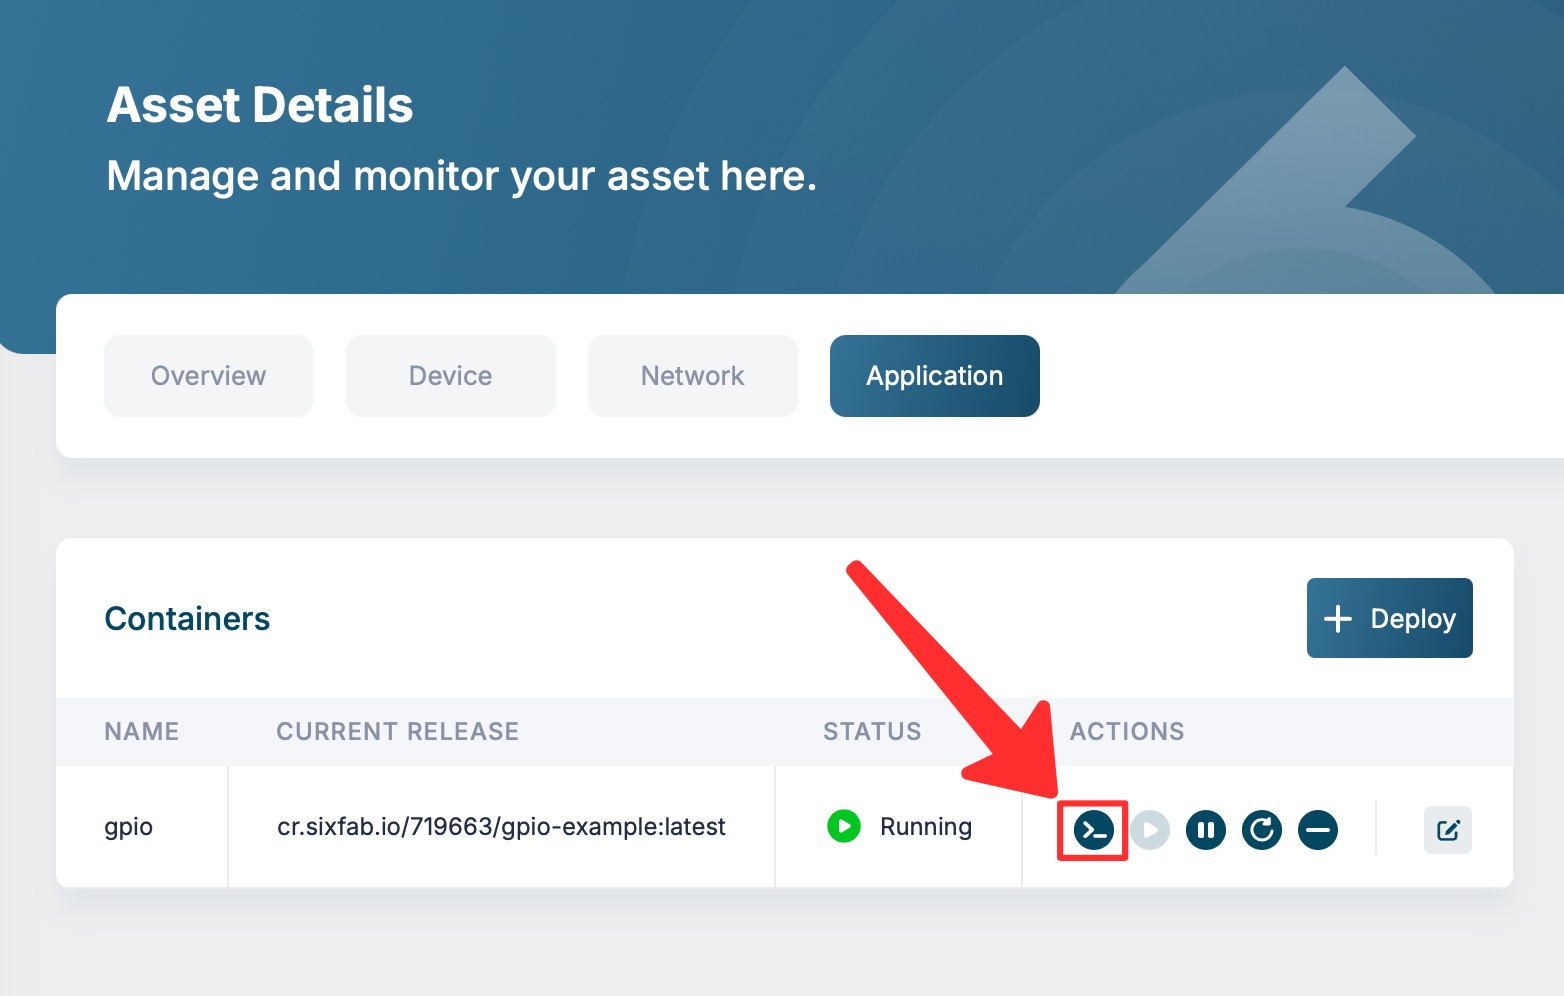
From Sixfab Connect, go to the application tab of the relevant asset. Click the shell button:

In the window that opens you have access to the shell inside the container. You can access USB by following these steps:
2. Identify the USB Device: Use the lsusb command on the host system to locate the USB device ID (e.g., /dev/ttyUSBX).
3. Interact with the Device: Tools such as minicom or Python libraries like pyserial can be used to communicate with USB devices.
Conclusion
Accessing GPIO pins and USB devices from within a container requires enabling privileged mode and mounting necessary device paths. By following the outlined steps, interactive and hardware-responsive applications can be developed effectively within containers.
Updated 3 months ago
