To get rid of the legacy cruft, newer ways to present USB-connected LTE modems like QMI and MBIM have been developed. Quectel modules offer QMI(Qualcomm MSM Interface) which is established as a real network interface, such as ethernet(typically shows as wwan0). There is an open source Linux in-kernel driver supporting this interface called qmi_wwan.
The QMI is also counted among the non-AT protocols which are communicated over dev/cdc-wdm0 port. In order to establish a connection, proper qmi/gobinet proxy should be installed, which again depending on the chipset of the module/modem and the kernel of Linux, can get a bit complicated.
🚨 Important notes
This tutorial is no longer compatible for Raspberry Pi OS Bookworm and newer ones. Those who have old versions can follow. Now you can follow the libqmi tutorial instead.
If you want to use the QConnectManager tool provided by Quectel. QConnectManager Linux User Guide can be followed and necessary drivers, documentation etc. It is found on the Cellular Modems Technical Documents and Compliance page.
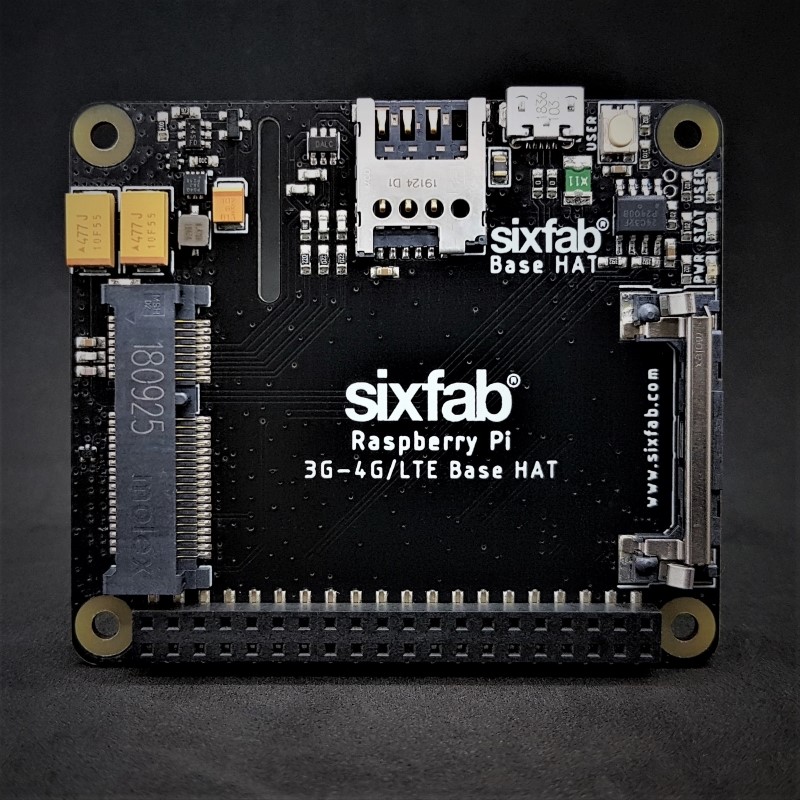
Hardware Setup
It is important to properly setup your hardware before you get started.
Software Setup
Before running the PPP/QMI make sure the module is configured to the right settings.
AT+QCFG="usbnet" should return 0, otherwise,send AT+QCFG="usbnet",0 then reboot the module after 10 seconds AT+CFUN=1,1
For sending AT commands, you may check the Sending AT Commands tutorial.
- Open a new terminal and run the update and upgrade command.
sudo apt update && sudo apt upgrade -y- Download the QMI installer file, and change the permission of the installation file. Then install it.
wget https://raw.githubusercontent.com/sixfab/Sixfab_QMI_Installer/main/qmi_install.sh
sudo chmod +x qmi_install.sh
sudo ./qmi_install.shReading package lists... Done
Building dependency tree... Done
Reading state information... Done
...
Installing udhcpc
...
Unpacking udhcpc (1:1.30.1-6) ...
Setting up udhcpc (1:1.30.1-6) ...
Processing triggers for man-db (2.9.4-2) ...
Create and Change directory to /opt/qmi_files
/opt/qmi_files /home/pi
Downloading QMI WWAN Driver for Quectel Module
...
...
Downloading Connection Manager
...
...
Copying udhcpc default script
Making /opt/qmi_files/quectel-CM
...
...
After reboot please follow commands mentioned below
go to /opt/qmi_files/quectel-CM and run sudo ./quectel-CM -s [YOUR APN] for manual operation
Press ENTER key to reboot
-
At the end of installation enter any key to reboot your Raspberry Pi. Attach the USB cable of the HAT.
-
Navigate to the Quectel files that were installed in the previous step.
cd /opt/qmi_files/quectel-CM- Now run the following command to connect to the Internet.
sudo ./quectel-CM -s [YOUR APN][04-26_14:44:29:481] QConnectManager_Linux_V1.6.1
[04-26_14:44:29:483] Find /sys/bus/usb/devices/1-1.1 idVendor=0x2c7c idProduct=0x125, bus=0x001, dev=0x004
[04-26_14:44:29:485] Auto find qmichannel = /dev/cdc-wdm0
[04-26_14:44:29:485] Auto find usbnet_adapter = wwan0
[04-26_14:44:29:485] netcard driver = qmi_wwan_q, driver version = V1.2.1
[04-26_14:44:29:486] Modem works in QMI mode
[04-26_14:44:29:509] cdc_wdm_fd = 7
[04-26_14:44:29:608] Get clientWDS = 20
[04-26_14:44:29:640] Get clientDMS = 1
[04-26_14:44:29:672] Get clientNAS = 4
[04-26_14:44:29:704] Get clientUIM = 1
[04-26_14:44:29:736] Get clientWDA = 1
[04-26_14:44:29:768] requestBaseBandVersion EC25EFAR06A04M4G
[04-26_14:44:29:896] requestGetSIMStatus SIMStatus: SIM_READY
[04-26_14:44:29:928] requestGetProfile[1] super///0/IPV4
[04-26_14:44:29:928] requestSetProfile[1] super///0/IPV4
[04-26_14:44:29:928] no need to set skip the rest
[04-26_14:44:29:960] requestRegistrationState2 MCC: 286, MNC: 2, PS: Attached, DataCap: LTE
[04-26_14:44:29:992] requestQueryDataCall IPv4ConnectionStatus: DISCONNECTED
[04-26_14:44:29:992] ifconfig wwan0 0.0.0.0
[04-26_14:44:30:008] ifconfig wwan0 down
[04-26_14:44:30:088] requestSetupDataCall WdsConnectionIPv4Handle: 0x871c2a60
[04-26_14:44:30:216] change mtu 1500 -> 1360
[04-26_14:44:30:216] ifconfig wwan0 up
[04-26_14:44:30:232] busybox udhcpc -f -n -q -t 5 -i wwan0
udhcpc: started, v1.30.1
No resolv.conf for interface wwan0.udhcpc
udhcpc: sending discover
udhcpc: sending select for 100.73.226.47
udhcpc: lease of 100.73.226.47 obtained, lease time 7200
[04-26_14:44:30:534] /etc/udhcpc/default.script: Resetting default routes
SIOCDELRT: No such process
[04-26_14:44:30:554] /etc/udhcpc/default.script: Adding DNS 8.8.8.8
[04-26_14:44:30:554] /etc/udhcpc/default.script: Adding DNS 8.8.4.4
[04-26_14:45:08:987] requestDeactivateDefaultPDP WdsConnectionIPv4Handle
./quectel-CM [-s [apn [user password auth]]] [-p pincode] [-f logfilename] -s [apn [user password auth]]
Set apn/user/password/auth get -p pincode from your network provider, verify sim card pin if sim card is locked -f log filename, save log message of this program to the file.
quectel-CM will send QMI message to the module via QMI channel to setup data connection. Please refer to the following message to use quectel-CM:
Example 1: ./quectel-CM
Example 2: ./quectel-CM -s 3gnet
Example 3: ./quectel-CM -s 3gnet carl 1234 0 -p 1234 -f gobinet_log.txt
- Now check the assigned IP address and test the connection
wwan0: flags=4305<UP,POINTOPOINT,RUNNING,NOARP,MULTICAST> mtu 1360
inet 100.68.68.134 netmask 255.255.255.252 destination 100.68.68.134
inet6 fe80::8d13:6f5:cbb6:cb4 prefixlen 64 scopeid 0x20<link>
unspec 00-00-00-00-00-00-00-00-00-00-00-00-00-00-00-00 txqueuelen 1000 (UNSPEC)
RX packets 16 bytes 2216 (2.1 KiB)
RX errors 0 dropped 0 overruns 0 frame 0
TX packets 55 bytes 7136 (6.9 KiB)
TX errors 0 dropped 0 overruns 0 carrier 0 collisions 0
PING 8.8.8.8 (8.8.8.8) from 100.65.213.248 wwan0: 56(84) bytes of data.
64 bytes from 8.8.8.8: icmp_seq=1 ttl=110 time=222 ms
64 bytes from 8.8.8.8: icmp_seq=2 ttl=110 time=194 ms
64 bytes from 8.8.8.8: icmp_seq=3 ttl=110 time=193 ms
64 bytes from 8.8.8.8: icmp_seq=4 ttl=110 time=194 ms
64 bytes from 8.8.8.8: icmp_seq=5 ttl=110 time=195 ms
--- 8.8.8.8 ping statistics ---
5 packets transmitted, 5 received, 0% packet loss, time 8ms
rtt min/avg/max/mdev = 192.947/199.606/221.875/11.168 ms
Auto Connect on reboot
If you want your Raspberry Pi to automatically connect to the Internet via QMI interface then there is one more step you will need to follow.
- Download the QMI auto connect installer file, and change the permission of the installation file. Then install it.
wget https://raw.githubusercontent.com/sixfab/Sixfab_QMI_Installer/main/install_auto_connect.sh
sudo chmod +x install_auto_connect.sh
sudo ./install_auto_connect.sh- It will then ask for APN. Type in your APN and then press ENTER.
<YOUR_APN>
--2020-12-03 12:07:39-- https://raw.githubusercontent.com/sixfab/Sixfab_RPi_3G-4G-LTE_Base_Shield/master/tutorials/QMI_tutorial/reconnect_service
Resolving raw.githubusercontent.com
...
Saving to: 'qmi_reconnect.service'
qmi_reconnect.service 100%[=========================================================>]
264 --.-KB/s in 0s
2020-12-03 12:07:39 (2.63 MB/s) - 'qmi_reconnect.service' saved [264/264]
...
Saving to: 'qmi_reconnect.sh'
qmi_reconnect.sh 100%[=========================================================>]
224 --.-KB/s in 0s
2020-12-03 12:07:40 (1.32 MB/s) - 'qmi_reconnect.sh' saved [224/224]
Created symlink /etc/systemd/system/multi-user.target.wants/qmi_reconnect.service → /etc/systemd/system/qmi_reconnect.service.
DONE
- The name of the service is qmi_reconnect. To check if the service is active you can type the following. If it is working fine then you will be able to see active(running) in green.
Managing the Auto-connect/Reconnect service
To check if the service is active you can type.
sudo systemctl status qmi_reconnect.serviceTo stop your reconnect service, type:
sudo systemctl stop qmi_reconnect.serviceTo start the reconnect service when it is stopped, type:
sudo systemctl start qmi_reconnect.serviceTo stop and then start the service again, type:
sudo systemctl restart qmi_reconnect.serviceBy default, reconnect service is configured to start automatically when the server boots. If this is not what you want, you can disable this behavior by typing:
sudo systemctl disable qmi_reconnect.serviceUninstall
If you are using auto-connect/reconnect service, stop the service and disable it.
sudo systemctl stop qmi_reconnect.service
sudo systemctl disable qmi_reconnect.service
Troubleshooting
We recommend going through the section on troubleshooting as it covers the more common issues with establishing and maintaining a network connection. Please check the troubleshooting of your shield/HAT.
Alternative
Alternatively, the QMI interface can be established using the libqmi library. Please see this tutorial: